

Spring Bean拡張インターフェースのメソッドの紹介

この記事では主に、一般的に使用されるいくつかの Spring Bean 拡張インターフェイスとその簡単な使用法を紹介しており、参考になります。以下のエディターで見てみましょう
前書き
Spring は非常に強力なフレームワークです。ほとんどすべてのエンタープライズレベルの Java プロジェクトが Spring を使用しており、Bean は Spring フレームワークの中核であると言えます。
Spring フレームワークは多くの デザイン パターン を使用します。全体として、そのデザインは OCP の開閉原則に厳密に従っています。つまり、
1. 変更のために閉じられていることを確認します。操作プロセス全体を外部から変更できます
2. 拡張機能にオープン性を提供します。つまり、継承を通じてクラスロードの動作を変更し、Springによって提供される多くの抽象クラスとインターフェイスを実装できます
Spring のソースコードを読むのに役立ちます(すべて読む必要はありません。各カテゴリが詳細に表示され、大まかなプロセスが整理できます)。また、個人のレベルを向上させるのに非常に役立ちます。職場での珍しい Spring の問題を解決します。
ただし、この記事の目的は Spring プロセスを整理することではなく、Spring が開発者に提供するさまざまな機能をより効果的に使用できるように、一般的に使用される Spring Bean ツール クラスをいくつか紹介することです。
InitialingBeanとDisposableBean
InitialingBeanは、独自のメソッドafterPropertiesSet()を提供するインターフェースです。
DisposableBean もインターフェイスであり、独自のメソッド destroy() を提供します。
これら 2 つのインターフェースは同様の機能を持つセットであるため、まとめられています。前者は、名前が示すように、Beanプロパティが設定された後に初期化作業を行うために afterPropertiesSet() メソッドを呼び出し、後者は終了しますBeanライフサイクルの終わり、最終作業を行うために destroy() メソッドを呼び出す前。例を見てみましょう。 afterPropertiesSet() メソッドを呼び出すタイミングを明確にするには、属性を追加し、その属性に set メソッドを指定し、set メソッドのコンテンツを出力します。
/**
 * @author 五月的仓颉 http://www.cnblogs.com/xrq730/p/5721366.html
 */
public class LifecycleBean implements InitializingBean, DisposableBean
{
  @SuppressWarnings("unused")
  private String  lifeCycleBeanName;

  public void setLifeCycleBeanName(String lifeCycleBeanName)
  {
    System.out.println("Enter LifecycleBean.setLifeCycleBeanName(), lifeCycleBeanName = " + lifeCycleBeanName);
    this.lifeCycleBeanName = lifeCycleBeanName;
  }

  public void destroy() throws Exception
  {
    System.out.println("Enter LifecycleBean.destroy()");
  }

  public void afterPropertiesSet() throws Exception
  {
    System.out.println("Enter LifecycleBean.afterPropertiesSet()");
  }

  public void beanStart()
  {
    System.out.println("Enter LifecycleBean.beanStart()");
  }
  public void beanEnd()
  {
    System.out.println("Enter LifecycleBean.beanEnd()");
  }
}spring.xml を設定します。
<?xml version="1.0" encoding="UTF-8"?>
<beans xmlns="http://www.springframework.org/schema/beans"
  xmlns:xsi="http://www.w3.org/2001/XMLSchema-instance"
  xsi:schemaLocation="http://www.springframework.org/schema/beans
  http://www.springframework.org/schema/beans/spring-beans-4.1.xsd">

  <bean id="lifeCycleBean" class="org.xrq.bean.lifecycle.LifecycleBean">
    <property name="lifeCycleBeanName" value="lifeCycleBean" />
  </bean>
</beans>Spring Container を起動すると、LifecycleBean の実行結果は次のようになります。
Enter LifecycleBean.setLifeCycleBeanName(), lifeCycleBeanName = lifeCycleBean
Enter LifecycleBean.afterPropertiesSet()
Enter LifecycleBean.beanStart()
Enter LifecycleBean.destroy()
Enter LifecycleBean.beanEnd()
実行結果は、その名前が示すように、Bean のプロパティの後にあります。すべての設定が完了したら、初めて が呼び出されます。 これら 2 つのインターフェイスについて、いくつかのポイントをまとめます。 1. InitializingBean インターフェイスと Disposable インターフェイスは、init-method および destroy-method と組み合わせて使用できます。
2. インターフェイスの実行順序は、InitializingBean インターフェイスよりも優先されます。使い捨てインターフェイスの最下層
型強制を使用してメソッド名 ()
を直接呼び出します。 init-method と destroy-method の最下層はリフレクションを使用します。後者は Spring から分離されていますが、どちらを使用するかは非効率です3. afterPropertiesSet() メソッドは、Bean のプロパティが設定されるまで呼び出されません。あるBeanの()メソッドは次のBeanが実行されるまで実行されないため、afterPropertiesSet()メソッド内に処理に時間がかかりすぎるメソッドを記述することは推奨されませんBeanNameAware、ApplicationContextAwareおよび BeanFactoryAware
これら 3 つのインターフェイスは、一連の類似した関数であるため、一緒に記述されています。 「Aware」は「認識される」という意味なので、これら 3 つのインターフェースの意味を理解するのは難しくありません:1. BeanNameAware インターフェースを実装する Bean の場合、Bean の ID は Bean のロード プロセス中に取得できます
2 ApplicationContextAware インターフェースを実装する Bean は、Bean のロード処理中に Spring の ApplicationContext を取得できます。これは特に重要です。ApplicationContext は、あらゆる Bean を含む大量の Spring コンテナーのコンテンツと情報を ApplicationContext から取得できます。 3. BeanFactoryAware インターフェースを実装する Bean の場合、Bean をロードする BeanFactory は Bean ロード プロセス中に取得できます。 例を見てください:/**
* @author 五月的仓颉 http://www.cnblogs.com/xrq730/p/5721366.html
*/
public class AwareBean implements BeanNameAware, BeanFactoryAware, ApplicationContextAware
{
private String beanName;
private ApplicationContext applicationContext;
private BeanFactory beanFactory;
public void setBeanName(String beanName)
{
System.out.println("Enter AwareBean.setBeanName(), beanName = " + beanName + "\n");
this.beanName = beanName;
}
public void setApplicationContext(ApplicationContext applicationContext) throws BeansException
{
System.out.println("Enter AwareBean.setApplicationContext(), applicationContext = " + applicationContext + "\n");
this.applicationContext = applicationContext;
}
public void setBeanFactory(BeanFactory beanFactory) throws BeansException
{
System.out.println("Enter AwareBean.setBeanFactory(), beanfactory = " + beanFactory + "\n");
this.beanFactory = beanFactory;
}
}<?xml version="1.0" encoding="UTF-8"?> <beans xmlns="http://www.springframework.org/schema/beans" xmlns:xsi="http://www.w3.org/2001/XMLSchema-instance" xsi:schemaLocation="http://www.springframework.org/schema/beans http://www.springframework.org/schema/beans/spring-beans-4.1.xsd"> <bean id="AwareBean" class="org.xrq.bean.aware.AwareBean" /> </beans>
Enter AwareBean.setBeanName(), beanName = AwareBean

Enter AwareBean.setBeanFactory(), beanfactory = org.springframework.beans.factory.support.DefaultListableBeanFactory@2747fda0: defining beans [AwareBean,org.springframework.context.annotation.internalConfigurationAnnotationProcessor,org.springframework.context.annotation.internalAutowiredAnnotationProcessor,org.springframework.context.annotation.internalRequiredAnnotationProcessor,org.springframework.context.annotation.internalCommonAnnotationProcessor,org.springframework.context.annotation.ConfigurationClassPostProcessor.importAwareProcessor,org.springframework.context.annotation.ConfigurationClassPostProcessor.enhancedConfigurationProcessor]; root of factory hierarchy

Enter AwareBean.setApplicationContext(), applicationContext = org.springframework.context.support.GenericApplicationContext@5514cd80: startup date [Mon Aug 08 19:23:30 CST 2016]; root of context hierarchy
変数
を定義します。それらが役に立たない場合は、setXXX() メソッドを実装し、Spring によって挿入されたパラメーターを使用するだけです2. Bean が InitializingBean も実装している場合、 BeanName、ApplicationContext、および BeanFactory が確実に挿入されます。 afterPropertiesSet() メソッドを呼び出した後FactoryBean在Spring中是非常有用的,使用Eclipse/MyEclipse的朋友可以对FactoryBean使用ctrl+t查看一下,FactoryBean这个接口在Spring容器中有大量的子实现。
传统的Spring容器加载一个Bean的整个过程,都是由Spring控制的,换句话说,开发者除了设置Bean相关属性之外,是没有太多的自主权的。FactoryBean改变了这一点,开发者可以个性化地定制自己想要实例化出来的Bean,方法就是实现FactoryBean接口。
看一下代码例子,为了讲清楚FactoryBean,内容相对多一些,首先定义一个接口Animal:
public interface Animal
{
  public void move();
}定义两个实现类Monkey和Tiger:
public class Monkey implements Animal
{
  public void move()
  {
    System.out.println("Monkey move!");
  }
}public class Tiger implements Animal
{
public void move()
{
System.out.println("Tiger move!");
}
}写一个实现类,实现FactoryBean接口:
/**
 * @author 五月的仓颉 http://www.cnblogs.com/xrq730/p/5721366.html
 */
public class AnimalFactoryBean implements FactoryBean<Animal>
{
  private String  animal;

  public Animal getObject() throws Exception
  {
    if ("Monkey".equals(animal))
    {
      return new Monkey();
    }
    else if ("Tiger".equals(animal))
    {
      return new Tiger();
    }
    else
    {
      return null;
    }
  }

  public Class<?> getObjectType()
  {
    return Animal.class;
  }

  public boolean isSingleton()
  {
    return true;
  }
  public void setAnimal(String animal)
  {
    this.animal = animal;
  }
}配置一个spring.xml,注入属性Tiger:
<?xml version="1.0" encoding="UTF-8"?>
<beans xmlns="http://www.springframework.org/schema/beans"
  xmlns:xsi="http://www.w3.org/2001/XMLSchema-instance"
  xsi:schemaLocation="http://www.springframework.org/schema/beans
  http://www.springframework.org/schema/beans/spring-beans-4.1.xsd">

  <bean id="animal" class="org.xrq.bean.factory.AnimalFactoryBean">
    <property name="animal" value="Tiger"/>
  </bean>
</beans>写一个JUnit的测试类:
@RunWith(SpringJUnit4ClassRunner.class)
@ContextConfiguration(locations = {
    "classpath*:spring.xml",
})
public class BaseTest
{
  @Resource
  private Animal  animal;

  @Test
  public void aa()
  {
    animal.move();
  }
}查看一下运行结果:
Tiger move!
看到最后得到的并不是FactoryBean本身,而是FactoryBean的泛型对象,这就是FactoryBean的作用。FactoryBean的几个方法:
1、getObject()方法是最重要的,控制Bean的实例化过程
2、getObjectType()方法获取接口返回的实例的class
3、isSingleton()方法获取该Bean是否为一个单例的Bean
像我这段代码的功能就是传入一个String类型的参数,可以动态控制生成出来的是接口的哪种子类。有了FactoryBean,同样的我们也可以灵活地操控Bean的生成。
BeanPostProcessor
之前的InitializingBean、DisposableBean、FactoryBean包括init-method和destory-method,针对的都是某个Bean控制其初始化的操作,而似乎没有一种办法可以针对每个Bean的生成前后做一些逻辑操作,PostProcessor则帮助我们做到了这一点,先看一个简单的BeanPostProcessor。
网上有一张图画了Bean生命周期的过程,画得挺好,原图出处:
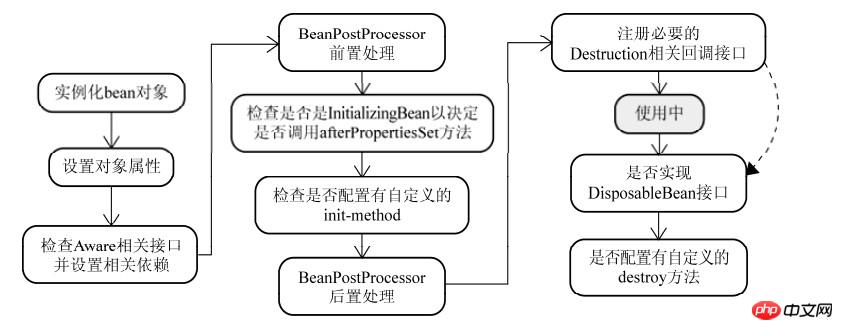
BeanPostProcess接口有两个方法,都可以见名知意:
1、postProcessBeforeInitialization:在初始化Bean之前
2、postProcessAfterInitialization:在初始化Bean之后
值得注意的是,这两个方法是有返回值的,不要返回null,否则getBean的时候拿不到对象。
写一段测试代码,首先定义一个普通的Bean,为了后面能区分,给Bean加一个属性:
public class CommonBean
{
  private String commonName;
  public void setCommonName(String commonName)
  {
    this.commonName = commonName;
  }
  public void initMethod()
  {
    System.out.println("Enter CommonBean.initMethod(), commonName = " + commonName);
  }
}定义一个PostProcess,实现BeanPostProcess接口:
/**
 * @author 五月的仓颉 http://www.cnblogs.com/xrq730/p/5721366.html
 */
public class PostProcessorBean implements BeanPostProcessor
{
  public Object postProcessAfterInitialization(Object bean, String beanName) throws BeansException
  {
    System.out.println("Enter ProcessorBean.postProcessAfterInitialization()\n");
    return bean;
  }
  public Object postProcessBeforeInitialization(Object bean, String beanName) throws BeansException
  {
    System.out.println("Enter ProcessorBean.postProcessBeforeInitialization()");
    return bean;
  }
}配置一个spring.xml,给CommonBean的commonName赋予不同的值以区分:
<?xml version="1.0" encoding="UTF-8"?>
<beans xmlns="http://www.springframework.org/schema/beans"
  xmlns:xsi="http://www.w3.org/2001/XMLSchema-instance"
  xsi:schemaLocation="http://www.springframework.org/schema/beans
  http://www.springframework.org/schema/beans/spring-beans-4.1.xsd">

  <bean id="common0" class="org.xrq.bean.common.CommonBean" init-method="initMethod">
    <property name="commonName" value="common0"/>
  </bean>

  <bean id="common1" class="org.xrq.bean.common.CommonBean" init-method="initMethod">
    <property name="commonName" value="common1"/>
  </bean>
  <bean id="postProcessorBean" class="org.xrq.bean.processor.PostProcessorBean" />
</beans>运行一个Spring容器, 初始化结果为:
Enter ProcessorBean.postProcessBeforeInitialization()
Enter CommonBean.initMethod(), commonName = common0
Enter ProcessorBean.postProcessAfterInitialization()

Enter ProcessorBean.postProcessBeforeInitialization()
Enter CommonBean.initMethod(), commonName = common1
Enter ProcessorBean.postProcessAfterInitialization()
Enter ProcessorBean.postProcessBeforeInitialization()
Enter ProcessorBean.postProcessAfterInitialization()
看到每个Bean初始化前后都会分别执行postProcessorBeforeInitiallization()方法与postProcessorAfterInitialization()方法,最后两行出现原因是,PostProcessorBean本身也是一个Bean。
BeanFactoryPostProcessor
接下来看另外一个PostProcessor----BeanFactoryPostProcessor。
Spring允许在Bean创建之前,读取Bean的元属性,并根据自己的需求对元属性进行改变,比如将Bean的scope从singleton改变为prototype,最典型的应用应当是PropertyPlaceholderConfigurer,替换xml文件中的占位符,替换为properties文件中相应的key对应的value,这将会在下篇文章中专门讲解PropertyPlaceholderConfigurer的作用及其原理。
BeanFactoryPostProcessor就可以帮助我们实现上述的功能,下面来看一下BeanFactoryPostProcessor的使用,定义一个BeanFactoryPostProcessor的实现类:
/**
 * @author 五月的仓颉 http://www.cnblogs.com/xrq730/p/5721366.html
 */
public class FactoryPostProcessorBean implements BeanFactoryPostProcessor
{
  public void postProcessBeanFactory(ConfigurableListableBeanFactory configurablelistablebeanfactory)
      throws BeansException
  {
    System.out.println("Enter FactoryPostProcessorBean.postProcessBeanFactory()\n");
  }
}spring.xml里面配置一下这个Bean,就不写了,运行一下Spring容器,结果为:
Enter FactoryPostProcessorBean.postProcessBeanFactory()

Enter ProcessorBean.postProcessBeforeInitialization()
Enter CommonBean.initMethod(), commonName = common0
Enter ProcessorBean.postProcessAfterInitialization()

Enter ProcessorBean.postProcessBeforeInitialization()
Enter CommonBean.initMethod(), commonName = common1
Enter ProcessorBean.postProcessAfterInitialization()
Enter ProcessorBean.postProcessBeforeInitialization()
Enter ProcessorBean.postProcessAfterInitialization()
从执行结果中可以看出两点:
1、BeanFactoryPostProcessor的执行优先级高于BeanPostProcessor
2、BeanFactoryPostProcessor的postProcessBeanFactory()方法只会执行一次
注意到postProcessBeanFactory方法是带了参数ConfigurableListableBeanFactory的,这就和我之前说的可以使用BeanFactoryPostProcessor来改变Bean的属性相对应起来了。ConfigurableListableBeanFactory功能非常丰富,最基本的,它携带了每个Bean的基本信息,比如我简单写一段代码:
/**
 * @author 五月的仓颉 http://www.cnblogs.com/xrq730/p/5721366.html
 */
public void postProcessBeanFactory(ConfigurableListableBeanFactory configurablelistablebeanfactory)
      throws BeansException
{
  BeanDefinition beanDefinition = configurablelistablebeanfactory.getBeanDefinition("common0");
  MutablePropertyValues beanProperty = beanDefinition.getPropertyValues();
  System.out.println("scope before change:" + beanDefinition.getScope());
  beanDefinition.setScope("singleton");
  System.out.println("scope after change:" + beanDefinition.getScope());
  System.out.println("beanProperty:" + beanProperty);
}看一下执行结果:
scope before change:
scope after change:singleton
beanProperty:PropertyValues: length=1; bean property 'commonName'
这样就获取了Bean的生命周期以及重新设置了Bean的生命周期。ConfigurableListableBeanFactory还有很多的功能,比如添加BeanPostProcessor,可以自己去查看。
InstantiationAwareBeanPostProcessor
最后写一个叫做InstantiationAwareBeanPostProcessor的PostProcessor。
InstantiationAwareBeanPostProcessor又代表了Spring的另外一段生命周期:实例化。先区别一下Spring Bean的实例化和初始化两个阶段的主要作用:
1、实例化----实例化的过程是一个创建Bean的过程,即调用Bean的构造函数,单例的Bean放入单例池中
2、初始化----初始化的过程是一个赋值的过程,即调用Bean的setter,设置Bean的属性
之前的BeanPostProcessor作用于过程(2)前后,现在的InstantiationAwareBeanPostProcessor则作用于过程(1)前后,看一下代码,给前面的CommonBean加上构造函数:
public class CommonBean
{
  public CommonBean()
  {
    System.out.println("Enter CommonBean's constructor");
  }

  private String commonName;

  public void setCommonName(String commonName)
  {
    System.out.println("Enter CommonBean.setCommonName(), commonName = " + commonName);
    this.commonName = commonName;
  }
  public void initMethod()
  {
    System.out.println("Enter CommonBean.initMethod(), commonName = " + commonName);
  }
}实现InstantiationAwareBeanPostProcessor接口:
/**
 * @author 五月的仓颉 http://www.cnblogs.com/xrq730/p/5721366.html
 */
public class InstantiationAwareBeanPostProcessorBean implements InstantiationAwareBeanPostProcessor
{
  public Object postProcessAfterInitialization(Object bean, String beanName) throws BeansException
  {
    System.out.println("Enter InstantiationAwareBeanPostProcessorBean.postProcessAfterInitialization()");
    return bean;
  }

  public Object postProcessBeforeInitialization(Object bean, String beanName) throws BeansException
  {
    System.out.println("Enter InstantiationAwareBeanPostProcessorBean.postProcessBeforeInitialization()");
    return bean;
  }

  public boolean postProcessAfterInstantiation(Object bean, String beanName) throws BeansException
  {
    System.out.println("Enter InstantiationAwareBeanPostProcessorBean.postProcessAfterInstantiation()");
    return true;
  }

  public Object postProcessBeforeInstantiation(Class<?> bean, String beanName) throws BeansException
  {
    System.out.println("Enter InstantiationAwareBeanPostProcessorBean.postProcessBeforeInstantiation()");
    return null;
  }
  public PropertyValues postProcessPropertyValues(PropertyValues pvs, PropertyDescriptor[] pd, Object bean,
      String beanName) throws BeansException
  {
    return pvs;
  }
}配置一下spring.xml:
<?xml version="1.0" encoding="UTF-8"?>
<beans xmlns="http://www.springframework.org/schema/beans"
  xmlns:xsi="http://www.w3.org/2001/XMLSchema-instance"
  xsi:schemaLocation="http://www.springframework.org/schema/beans
  http://www.springframework.org/schema/beans/spring-beans-4.1.xsd">

  <bean id="common" class="org.xrq.bean.common.CommonBean">
    <property name="commonName" value="common"/>
  </bean>

  <bean class="org.xrq.bean.processor.InstantiationAwareBeanPostProcessorBean" />
</beans>启动容器,观察一下运行结果为:
Enter InstantiationAwareBeanPostProcessorBean.postProcessBeforeInstantiation()
Enter CommonBean's constructor
Enter InstantiationAwareBeanPostProcessorBean.postProcessAfterInstantiation()
Enter CommonBean.setCommonName(), commonName = common
Enter InstantiationAwareBeanPostProcessorBean.postProcessBeforeInitialization()
Enter InstantiationAwareBeanPostProcessorBean.postProcessAfterInitialization()
Enter InstantiationAwareBeanPostProcessorBean.postProcessAfterInstantiation()
Enter InstantiationAwareBeanPostProcessorBean.postProcessBeforeInitialization()
Enter InstantiationAwareBeanPostProcessorBean.postProcessAfterInitialization()
最后三行的运行结果不去关注,看到很明显的,InstantiationAwareBeanPostProcessor作用的是Bean实例化前后,即:
1、Bean构造出来之前调用postProcessBeforeInstantiation()方法
2、Bean构造出来之后调用postProcessAfterInstantiation()方法
不过通常来讲,我们不会直接实现InstantiationAwareBeanPostProcessor接口,而是会采用继承InstantiationAwareBeanPostProcessorAdapter这个抽象类的方式来使用。
后记
如果只会写个Bean,配置在xml文件里面,注入一下,那是最最基础的Spring开发者。一个中级、高级的Spring开发者,必然会对Spring中的多个扩展点有所了解,并利用这些扩展点更好地为项目服务,使得整个代码结构更加地优雅,并且可读性、可维护性更好。
【相关推荐】
1. Java免费视频教程
2. JAVA教程手册
3. 全面解析Java注解
以上がSpring Bean拡張インターフェースのメソッドの紹介の詳細内容です。詳細については、PHP 中国語 Web サイトの他の関連記事を参照してください。

ホットAIツール

Undresser.AI Undress
リアルなヌード写真を作成する AI 搭載アプリ

AI Clothes Remover
写真から衣服を削除するオンライン AI ツール。

Undress AI Tool
脱衣画像を無料で

Clothoff.io
AI衣類リムーバー

Video Face Swap
完全無料の AI 顔交換ツールを使用して、あらゆるビデオの顔を簡単に交換できます。

人気の記事
ホットツール

メモ帳++7.3.1
使いやすく無料のコードエディター

SublimeText3 中国語版
中国語版、とても使いやすい

ゼンドスタジオ 13.0.1
強力な PHP 統合開発環境

ドリームウィーバー CS6
ビジュアル Web 開発ツール

SublimeText3 Mac版
神レベルのコード編集ソフト(SublimeText3)
ホットトピック
 1662
1662
 14
1418
52
1311
25
1261
29
1234
24
14
1418
52
1311
25
1261
29
1234
24

 Java 8 Stream Foreachから休憩または戻ってきますか?
Feb 07, 2025 pm 12:09 PM
Java 8 Stream Foreachから休憩または戻ってきますか?
Feb 07, 2025 pm 12:09 PM
Java 8は、Stream APIを導入し、データ収集を処理する強力で表現力のある方法を提供します。ただし、ストリームを使用する際の一般的な質問は次のとおりです。 従来のループにより、早期の中断やリターンが可能になりますが、StreamのForeachメソッドはこの方法を直接サポートしていません。この記事では、理由を説明し、ストリーム処理システムに早期終了を実装するための代替方法を調査します。 さらに読み取り:JavaストリームAPIの改善 ストリームを理解してください Foreachメソッドは、ストリーム内の各要素で1つの操作を実行する端末操作です。その設計意図はです
 PHP:Web開発の重要な言語
Apr 13, 2025 am 12:08 AM
PHP:Web開発の重要な言語
Apr 13, 2025 am 12:08 AM
PHPは、サーバー側で広く使用されているスクリプト言語で、特にWeb開発に適しています。 1.PHPは、HTMLを埋め込み、HTTP要求と応答を処理し、さまざまなデータベースをサポートできます。 2.PHPは、ダイナミックWebコンテンツ、プロセスフォームデータ、アクセスデータベースなどを生成するために使用され、強力なコミュニティサポートとオープンソースリソースを備えています。 3。PHPは解釈された言語であり、実行プロセスには語彙分析、文法分析、編集、実行が含まれます。 4.PHPは、ユーザー登録システムなどの高度なアプリケーションについてMySQLと組み合わせることができます。 5。PHPをデバッグするときは、error_reporting()やvar_dump()などの関数を使用できます。 6. PHPコードを最適化して、キャッシュメカニズムを使用し、データベースクエリを最適化し、組み込み関数を使用します。 7
 PHP対Python:違いを理解します
Apr 11, 2025 am 12:15 AM
PHP対Python:違いを理解します
Apr 11, 2025 am 12:15 AM
PHP and Python each have their own advantages, and the choice should be based on project requirements. 1.PHPは、シンプルな構文と高い実行効率を備えたWeb開発に適しています。 2。Pythonは、簡潔な構文とリッチライブラリを備えたデータサイエンスと機械学習に適しています。
 PHP対その他の言語:比較
Apr 13, 2025 am 12:19 AM
PHP対その他の言語:比較
Apr 13, 2025 am 12:19 AM
PHPは、特に迅速な開発や動的なコンテンツの処理に適していますが、データサイエンスとエンタープライズレベルのアプリケーションには良くありません。 Pythonと比較して、PHPはWeb開発においてより多くの利点がありますが、データサイエンスの分野ではPythonほど良くありません。 Javaと比較して、PHPはエンタープライズレベルのアプリケーションでより悪化しますが、Web開発により柔軟性があります。 JavaScriptと比較して、PHPはバックエンド開発により簡潔ですが、フロントエンド開発のJavaScriptほど良くありません。
 PHP対Python:コア機能と機能
Apr 13, 2025 am 12:16 AM
PHP対Python:コア機能と機能
Apr 13, 2025 am 12:16 AM
PHPとPythonにはそれぞれ独自の利点があり、さまざまなシナリオに適しています。 1.PHPはWeb開発に適しており、組み込みのWebサーバーとRich Functionライブラリを提供します。 2。Pythonは、簡潔な構文と強力な標準ライブラリを備えたデータサイエンスと機械学習に適しています。選択するときは、プロジェクトの要件に基づいて決定する必要があります。
 カプセルの量を見つけるためのJavaプログラム
Feb 07, 2025 am 11:37 AM
カプセルの量を見つけるためのJavaプログラム
Feb 07, 2025 am 11:37 AM
カプセルは3次元の幾何学的図形で、両端にシリンダーと半球で構成されています。カプセルの体積は、シリンダーの体積と両端に半球の体積を追加することで計算できます。このチュートリアルでは、さまざまな方法を使用して、Javaの特定のカプセルの体積を計算する方法について説明します。 カプセルボリュームフォーミュラ カプセルボリュームの式は次のとおりです。 カプセル体積=円筒形の体積2つの半球体積 で、 R:半球の半径。 H:シリンダーの高さ(半球を除く)。 例1 入力 RADIUS = 5ユニット 高さ= 10単位 出力 ボリューム= 1570.8立方ユニット 説明する 式を使用してボリュームを計算します。 ボリューム=π×R2×H(4
 PHPの影響:Web開発など
Apr 18, 2025 am 12:10 AM
PHPの影響:Web開発など
Apr 18, 2025 am 12:10 AM
phphassiblasifly-impactedwebdevevermentandsbeyondit.1)itpowersmajorplatformslikewordpratsandexcelsindatabase interactions.2)php'sadaptableability allowsitale forlargeapplicationsusingframeworkslikelavel.3)
 PHP:多くのウェブサイトの基礎
Apr 13, 2025 am 12:07 AM
PHP:多くのウェブサイトの基礎
Apr 13, 2025 am 12:07 AM
PHPが多くのWebサイトよりも優先テクノロジースタックである理由には、その使いやすさ、強力なコミュニティサポート、広範な使用が含まれます。 1)初心者に適した学習と使用が簡単です。 2)巨大な開発者コミュニティと豊富なリソースを持っています。 3)WordPress、Drupal、その他のプラットフォームで広く使用されています。 4)Webサーバーとしっかりと統合して、開発の展開を簡素化します。
