

この記事では、Spring Boot (web+freemarker) の使用開始に関する関連情報を主に紹介します。必要な方は参照してください。1. maven ファイルを設定します
1 2 3 4 5 6 7 8 9 10 11 12 13 14 15 16 17 18 19 20 21 22 23 24 25 26 27 28 29 30 31 32 33 34 35 36 37 38 39 40 41 42 43 44 45 46 47 |
|
static
/templates/application.properties/logback.xml の名前はすべて合意されており、特定の名前のみを使用できます。詳細については、Spring Boot の公式ドキュメントを参照してください。次の名前は構成の 1 つです。メソッド)
1 2 3 4 5 6 7 8 9 10 |
|
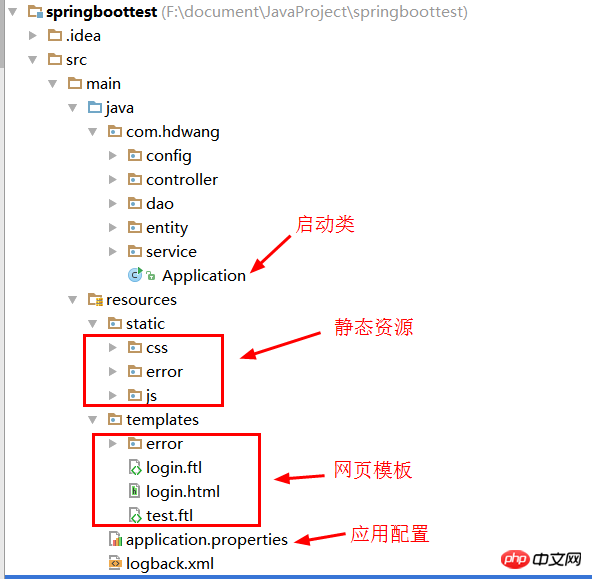 4. コントローラーを作成します ( Application クラスの下位ディレクトリ)
1 2 3 4 5 6 7 8 9 10 11 12 13 14 15 |
|
5. Web ページ テンプレートのログイン .ftl を作成します (freemark は ftl サフィックスを使用する必要がありますが、私は長い間これに騙されてきました!js/css などは/static はアクセス パスに含まれていないことに注意してください。私は長い間これに騙されてきました!)
1 2 3 4 5 6 7 8 9 10 11 12 13 14 15 16 17 18 19 20 21 22 23 24 25 26 |
|
6. アプリケーション
設定ファイルを書き込みます
新しい application.properties を作成します。ファイルを作成し、次の内容を追加します7. 起動して実行します
ブラウザでアクセスします: http://localhost:8080/common/login
8. デプロイ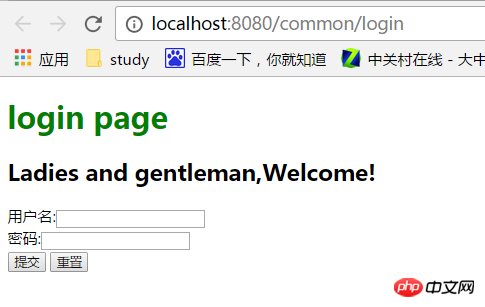 mvn パッケージを作成します
-jar xxx.jar を実行し、このパッケージを実行します
以上がSpring Boot から JAVA への詳しい説明 (web+freemarker)の詳細内容です。詳細については、PHP 中国語 Web サイトの他の関連記事を参照してください。


![[Web フロントエンド] Node.js クイック スタート](https://img.php.cn/upload/course/000/000/067/662b5d34ba7c0227.png)


