Vue要素のアニメーショントランジションエフェクト例を詳しく解説
この記事では主にアニメーショントランジション効果を実現するためのVue要素を紹介します。エディターに従って見てみましょう
1 vue で、v-show または を使用するときに、<code> <transition> タグを使用して単一のサブ要素を含めます。 v-if が表示と非表示を切り替える前に、まず子要素に一致する対応する class スタイルがあるかどうかを判断します: <transition> 标签包含着的单个子元素在使用 v-show 或 v-if 切换显示隐藏前,会先判断是否有对应的 class 样式能匹配到该子元素上:
<script src="/public/javascripts/vuejs"></script>
<style>
red {background-color: red; width: 100px; height: 100px;}
redv-leave { margin-top: 50px; }
redv-leave-active { transition: all 3s;}
redv-leave-to { margin-top: 100px; opacity: 0;}
redv-enter { margin-top: 50px; }
redv-enter-active { transition: all 3s;}
redv-enter-to { margin-top: 10px; opacity: 0;}
</style>
<body>
<p id="app">
<transition>
<p class="red" v-show="show"></p>
</transition>
<button v-on:click="change">button</button>
</p>
<script>
new Vue({
el: '#app',
data: {
show: true
},
methods: {
change: function(){
thisshow = !thisshow;
}
}
});
</script>
</script>
</body>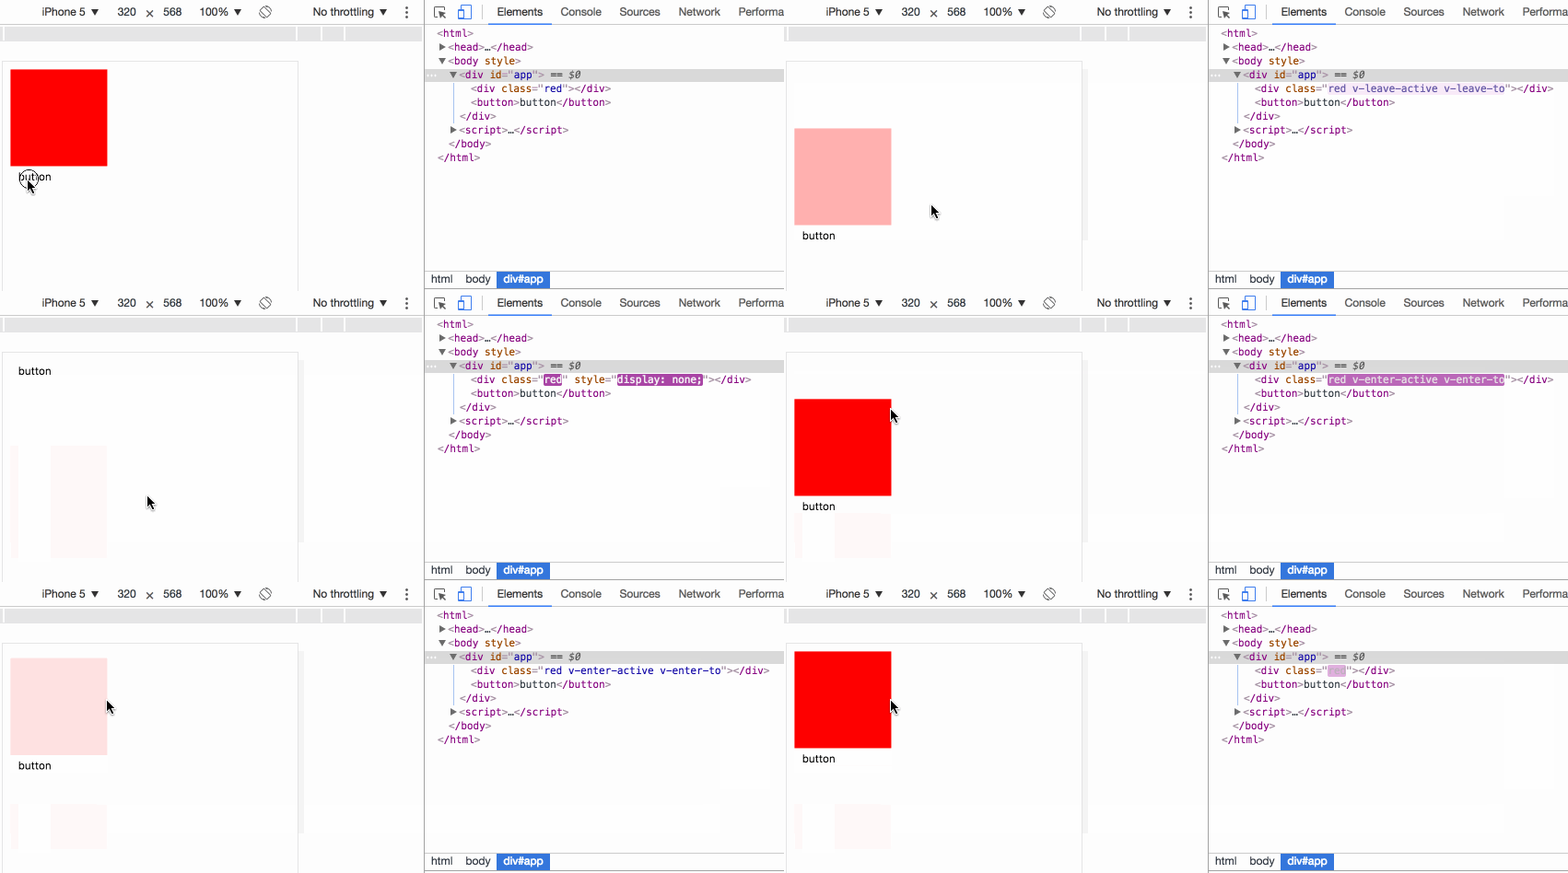
v-leave 当前元素准备从显示转变成隐藏,在动画开始前添加到元素上,动画一旦开始会立即删除;
v-leave-active 在动画过渡过程中,元素一直拥有该样式,直到动画结束则自动删除,用于设置过渡的效果;
v-leave-to 在动画过渡过程中,元素一直拥有该样式,直到动画结束则自动删除,用于设置动画最终的效果;
事例中,当点击 button,p 并不会马上 display: none, 而是首先设置 v-leave ,下一刻即删除 v-leave ,同时添加 v-leave-active v-leave-to,当 v-leave-active 中的过渡时间执行完成,则删除 v-leave-active v-leave-to,同时添加 display: none。
v-enter 当前元素准备从隐藏转变成显示,在动画开始前添加到元素上,动画一旦开始会立即删除;
v-enter-active 在动画过渡过程中,元素一直拥有该样式,直到动画结束则自动删除,用于设置过渡的效果;
v-enter-to 在动画过渡过程中,元素一直拥有该样式,直到动画结束则自动删除,用于设置动画最终的效果;
事例中,当点击 button,p 马上清除 display: none, 然后设置 v-enter ,下一刻即删除 v-enter ,同时添加 v-enter-active v-enter-to,当 v-enter-active 中的过渡时间执行完成,则删除 v-enter-active v-enter-to。
2 自定义动画类名:
<script src="/public/javascripts/vuejs"></script>
<style>
red {background-color: red; width: 100px; height: 100px;}
redslide-leave { margin-top: 50px; }
redslide-leave-active { transition: all 3s;}
redslide-leave-to { margin-top: 100px; opacity: 0;}
redslide-enter { margin-top: 50px; }
redslide-enter-active { transition: all 3s;}
redslide-enter-to { margin-top: 10px; opacity: 0;}
</style>
<body>
<p id="app">
<transition name="slide">
<p class="red" v-show="show"></p>
</transition>
<button v-on:click="change">button</button>
</p>
<script>
new Vue({
el: '#app',
data: {
show: true
},
methods: {
change: function(){
thisshow = !thisshow;
}
}
});
</script>该效果与上一例效果完全一致的,transition 元素可以使用 name 属性来指定使用的类名前缀,从而代替 v-字段,例如事例中的 name="slide" 使本来的 v-enter 变成了 slide-enter
<script src="/public/javascripts/vuejs"></script>
<style>
@keyframes aslide {
0% {
margin-left: 10px;
}
100% {
margin-left: 100px;
}
}
red {background-color: red; width: 100px; height: 100px;}
blue {background-color: blue; width: 100px; height: 100px;}
v-leave { margin-top: 50px; }
v-leave-active { transition: all 3s; animation: aslide 5s;}
v-leave-to { margin-top: 100px;}
</style>
<body>
<p id="app">
<transition type="transition" >
<p class="red" v-show="show"></p>
</transition>
<br>
<transition type="animation" >
<p class="blue" v-show="show"></p>
</transition>
<button v-on:click="change">button</button>
</p>
<script>
new Vue({
el: '#app',
data: {
show: true
},
methods: {
change: function(){
thisshow = !thisshow;
}
}
});
</script>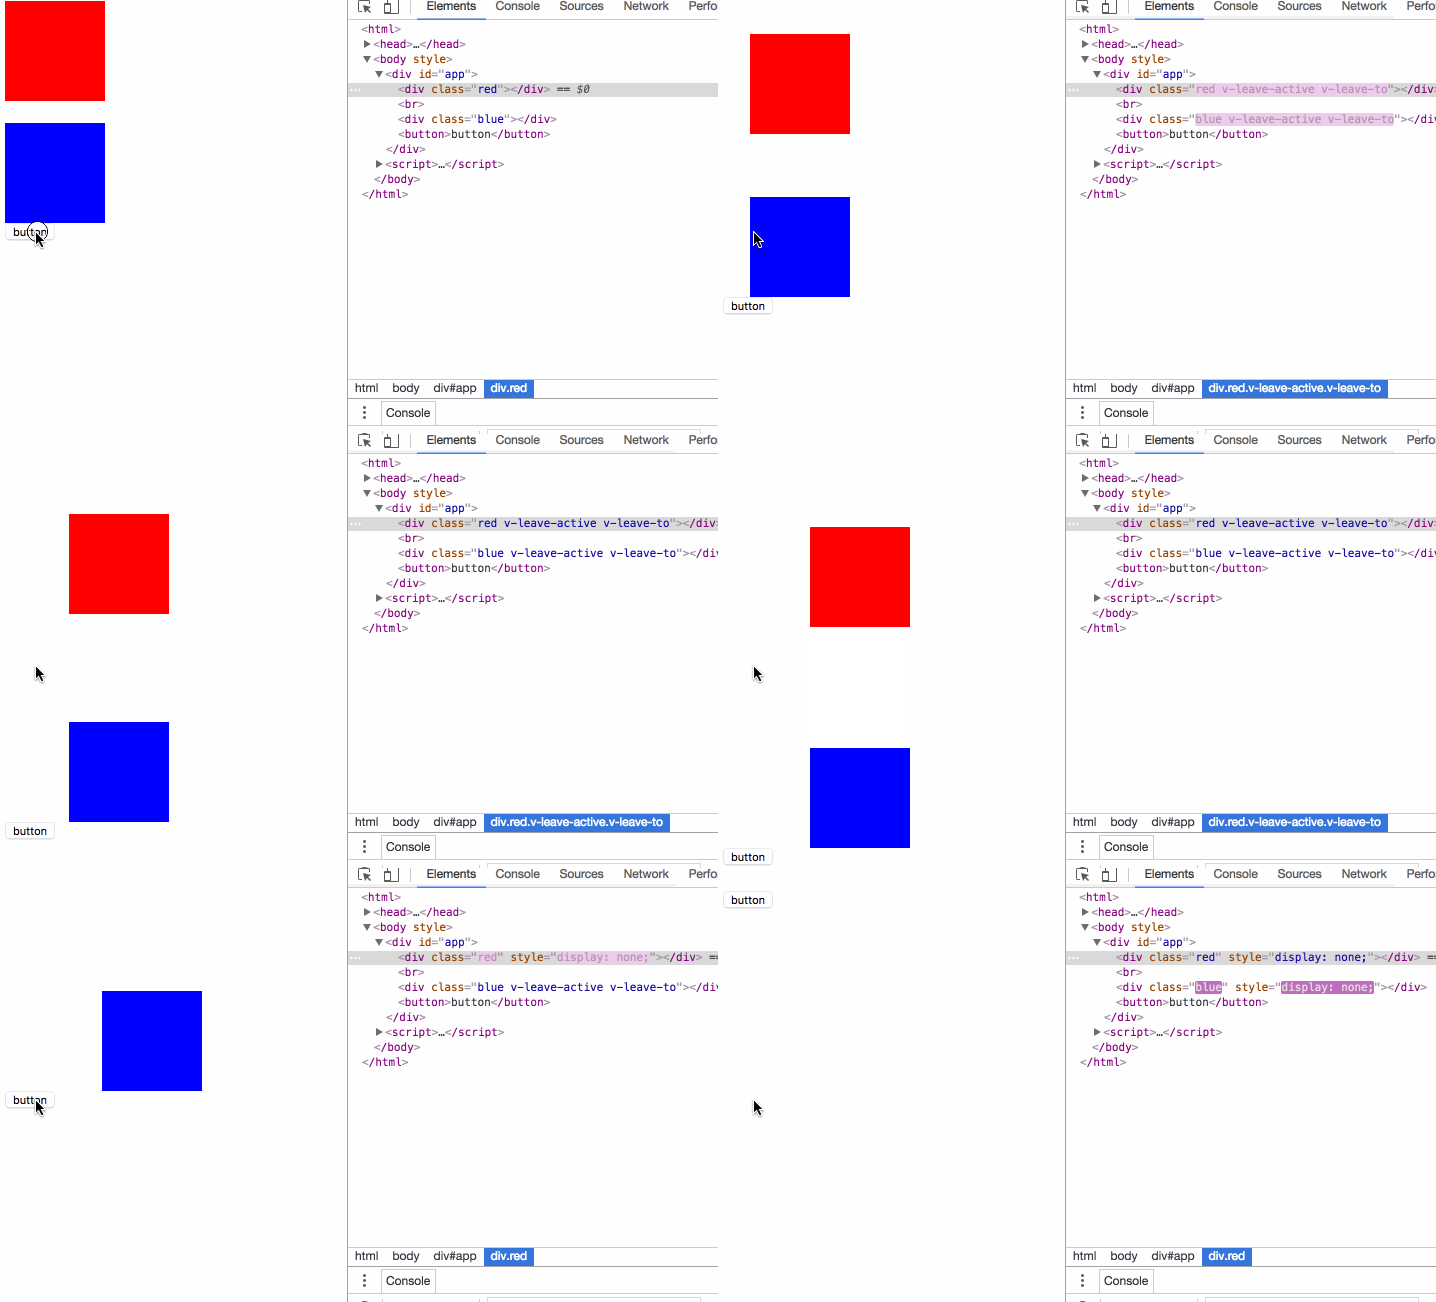
v-leave 現在の要素は表示から非表示に変更する準備ができています。アニメーションの開始前に要素に追加されますが、アニメーションが開始されるとすぐに削除されます。

v-leave-active アニメーションの移行プロセス中、要素は常にこのスタイルを持ち、アニメーションが開始されるまで自動的に削除されます。トランジションの効果を設定するために使用されます;
v-leave -to アニメーションのトランジションプロセス中、要素は常にこのスタイルを持ち、アニメーションが終了するまで自動的に削除されます。アニメーションの最終効果を設定します。
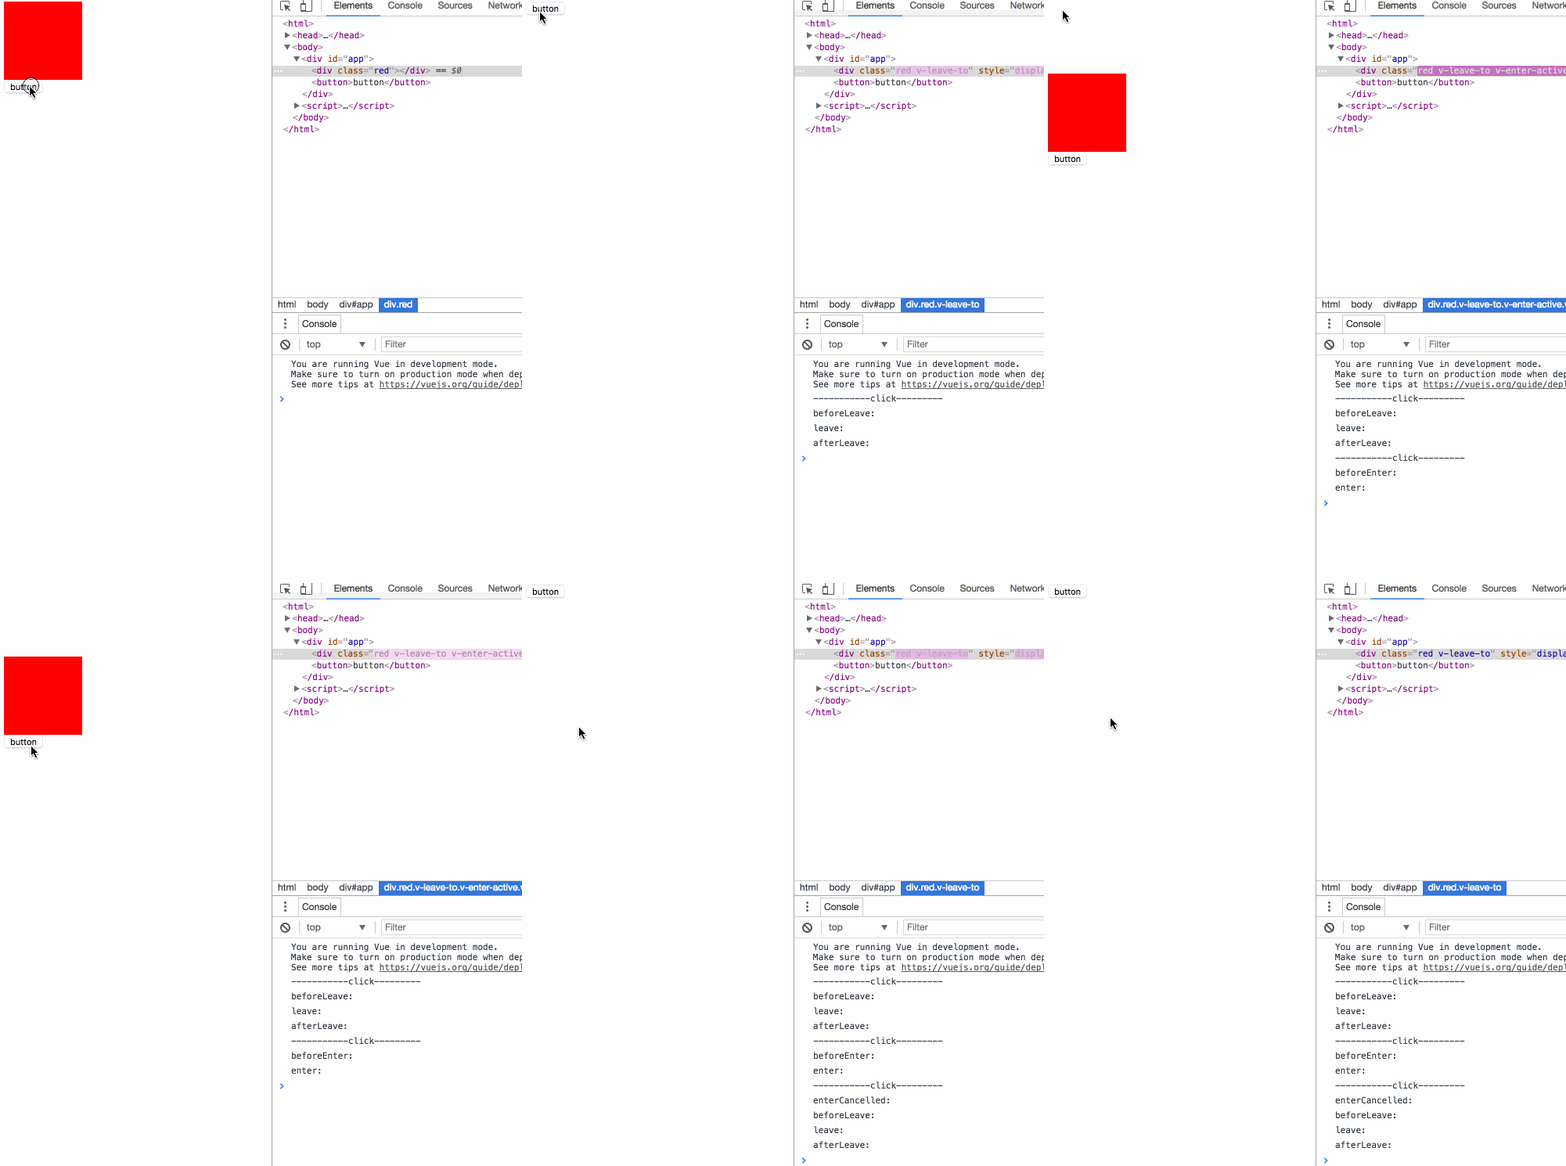
v-enter 現在の要素は、アニメーションの開始前に要素に追加され、アニメーションが開始されるとすぐに削除されます。アニメーション遷移プロセス中、要素は常にこのスタイルを持っています。このスタイルはアニメーションが終了するまで自動的に削除され、遷移の効果を設定するために使用されます。
v-enter-to アニメーション遷移プロセス中、要素は常にこのスタイルは、アニメーションの最終効果を設定するために使用されます
2 カスタム アニメーション クラス名:
<script src="/public/javascripts/vuejs"></script>
<style>
red {background-color: red; width: 100px; height: 100px;}
v-leave { margin-top: 50px; }
v-leave-active { transition: all 3s;}
v-leave-to { margin-top: 100px;}
</style>
<body>
<p id="app">
<transition
v-on:before-enter="beforeEnter"
v-on:enter="enter"
v-on:after-enter="afterEnter"
v-on:enter-cancelled="enterCancelled"
v-on:before-leave="beforeLeave"
v-on:leave="leave"
v-on:after-leave="afterLeave"
v-on:leave-cancelled="leaveCancelled"
>
<p class="red" v-show="show"></p>
</transition>
<button v-on:click="change">button</button>
</p>
<script>
new Vue({
el: '#app',
data: {
show: true
},
methods: {
change: function() {
thisshow = !thisshow;
consolelog('-----------click---------');
},
beforeEnter: function (el) {
consolelog('beforeEnter:');
},
enter: function (el, done) {
consolelog('enter:');
// done()
},
afterEnter: function (el) {
consolelog('afterEnter:');
},
enterCancelled: function (el) {
consolelog('enterCancelled:');
},
beforeLeave: function (el) {
consolelog('beforeLeave:');
},
leave: function (el, done) {
consolelog('leave:');
done()
},
afterLeave: function (el) {
consolelog('afterLeave:');
},
leaveCancelled: function (el) {
consolelog('leaveCancelled:');
}
}
});
</script> この効果は前の例とまったく同じです。
 transition 要素は、 name 属性を使用してクラスを指定できます。たとえば、この例の name="slide" は、元の v-enter < になります。 /code> は <code> スライド入力 になります。 - 3 トランジションとアニメーションを同時に使用する場合
<script src="/public/javascripts/vuejs"></script> <style> @keyframes aslide { 0% { margin-left: 10px; } 100% { margin-left: 100px; } } red {background-color: red; width: 100px; height: 100px;} apper { margin-top: 50px; } apper-active { margin-top: 100px; animation: aslide 4s; transition: all 3s;} </style> <body> <p id="app"> <transition appear appear-class="apper" appear-active-class="apper-active" v-on:before-appear="customBeforeAppearHook" v-on:appear="customAppearHook" v-on:after-appear="customAfterAppearHook" > <p class="red" ></p> </transition> <button v-on:click="change">button</button> </p> <script> new Vue({ el: '#app', data: { show: true }, methods: { change: function() { thisshow = !thisshow; consolelog('-----------click---------'); }, customBeforeAppearHook: function (el) { consolelog('customBeforeAppearHook:'); }, customAppearHook: function (el) { consolelog('customAppearHook:'); // done() }, customAfterAppearHook: function (el) { consolelog('customAfterAppearHook:'); } } }); </script>ログイン後にコピー - この場合、アニメーションはトランジションとアニメーションの両方のアニメーションを指定することができ、どちらのアニメーション時間を使用するかを指定できます。要素の終了時刻を指定しない場合は、アニメーション監視方法を指定した場合、最も長い時間が使用されます。
4 JavaScript監視アニメーション
<script src="/public/javascripts/vuejs"></script>
<style>
v-enter-active { transition: all 15s;}
v-enter-to { margin-top: 100px;}
v-leave-active { transition: all 15s;}
v-leave-to { margin-top: 10px;}
</style>
<body>
<p id="app">
<p class="show1">
<transition>
<button v-if="show1" @click="show1 = false">on</button>
<button v-else @click="show1 = true">off</button>
</transition>
</p>
<p class="show2">
<transition>
<button v-if="show2" key="on" @click="show2 = false">on</button>
<button v-else key="off" @click="show2 = true">off</button>
</transition>
</p>
</p>
<script>
var app = new Vue({
el: '#app',
data: {
show1: true,
show2: true
}
});
</script>jsイベントを使用すると、元のcssアニメーション遷移効果は無効になります
で v-bind:css="false" を設定すると、CSS アニメーション イベント コールバックを監視するための Vue の内部メカニズムが不要になり、パフォーマンスが向上します。
Enter イベントと Leave イベントは、done メソッドを手動で呼び出す必要があります。そうしないと、イベントは後続の after イベントを呼び出すことはありません。after イベントが呼び出されずに他のイベントが開始された場合、アニメーションはキャンセルされたとみなされます。
5 ページ初期化中のアニメーション:
<script src="/public/javascripts/vuejs"></script>
<style>
v-enter { margin-left: 100px;}
v-enter-active { transition: all 5s;}
v-enter-to { margin-left: 10px;}
v-leave { margin-left: 10px;}
v-leave-active { transition: all 5s;}
v-leave-to { margin-left: 100px;}
</style>
<body>
<p id="app">
<p class="default">
<transition>
<button v-if="show" key="on" @click="show = false">on</button>
<button v-else key="off" @click="show = true">off</button>
</transition>
</p>
<p class="inout">
<transition mode="in-out">
<button v-if="show" key="on" @click="show = false">on</button>
<button v-else key="off" @click="show = true">off</button>
</transition>
</p>
<p class="outin">
<transition mode="out-in">
<button v-if="show" key="on" @click="show = false">on</button>
<button v-else key="off" @click="show = true">off</button>
</transition>
</p>
</p>
<script>
var app = new Vue({
el: '#app',
data: {
show: true
}
});
</script><script src="/public/javascripts/vuejs"></script>
<style>
v-enter { margin-left: 100px;}
v-enter-active { transition: all 2s;}
v-enter-to { margin-left: 10px;}
</style>
<body>
<p id="app">
<transition-group>
<li v-for="item in items" :key="item">{{item}}</li>
</transition-group>
<transition-group tag="ul">
<li v-for="item in items" :key="item">{{item}}</li>
</transition-group>
<button @click="itemspush(itemslength)">add</button>
</p>
<script>
var app = new Vue({
el: '#app',
data: {
items: [0,1]
}
});
</script><script src="/public/javascripts/vuejs"></script>
<style>
v-enter { margin-left: 100px;}
v-enter-active { transition: all 5s;}
v-enter-to { margin-left: 10px;}
v-leave { margin-left: 10px;}
v-leave-active { transition: all 5s;}
v-leave-to { margin-left: 100px;}
</style>
<body>
<p id="app">
<p class="default">
<transition>
<button v-if="show" key="on" @click="show = false">on</button>
<button v-else key="off" @click="show = true">off</button>
</transition>
</p>
<p class="inout">
<transition mode="in-out">
<button v-if="show" key="on" @click="show = false">on</button>
<button v-else key="off" @click="show = true">off</button>
</transition>
</p>
<p class="outin">
<transition mode="out-in">
<button v-if="show" key="on" @click="show = false">on</button>
<button v-else key="off" @click="show = true">off</button>
</transition>
</p>
</p>
<script>
var app = new Vue({
el: '#app',
data: {
show: true
}
});
</script>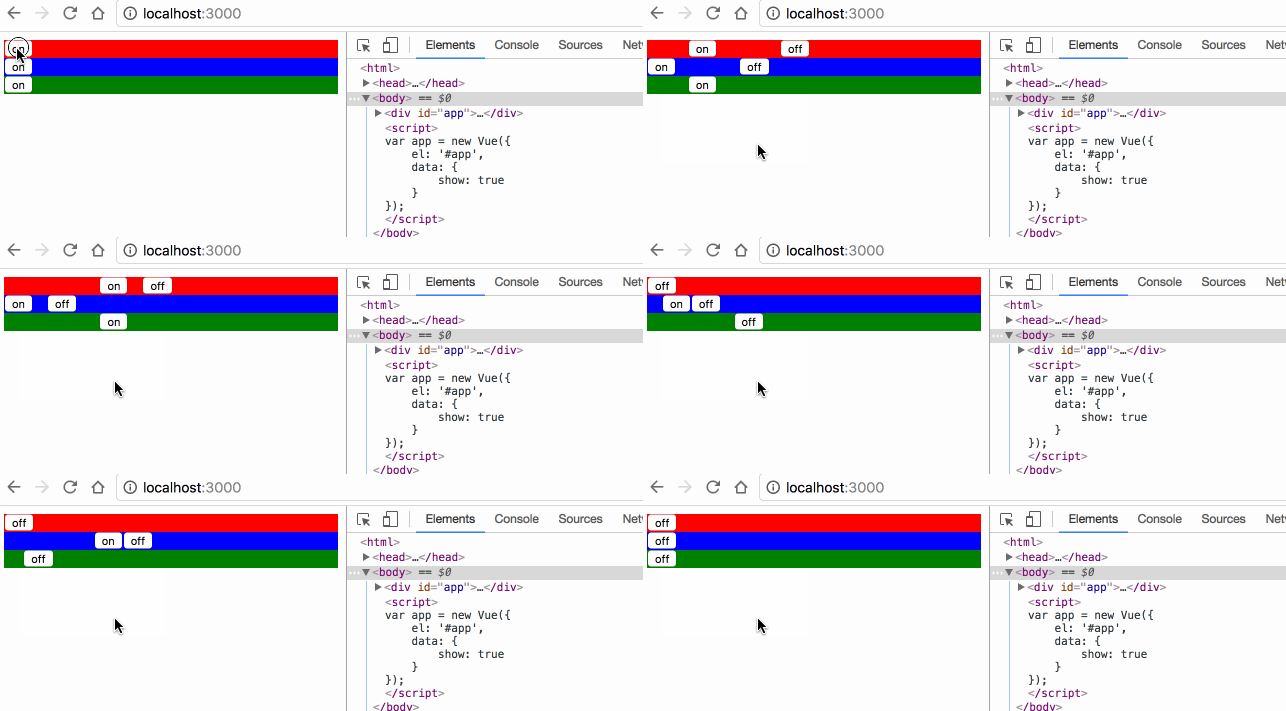
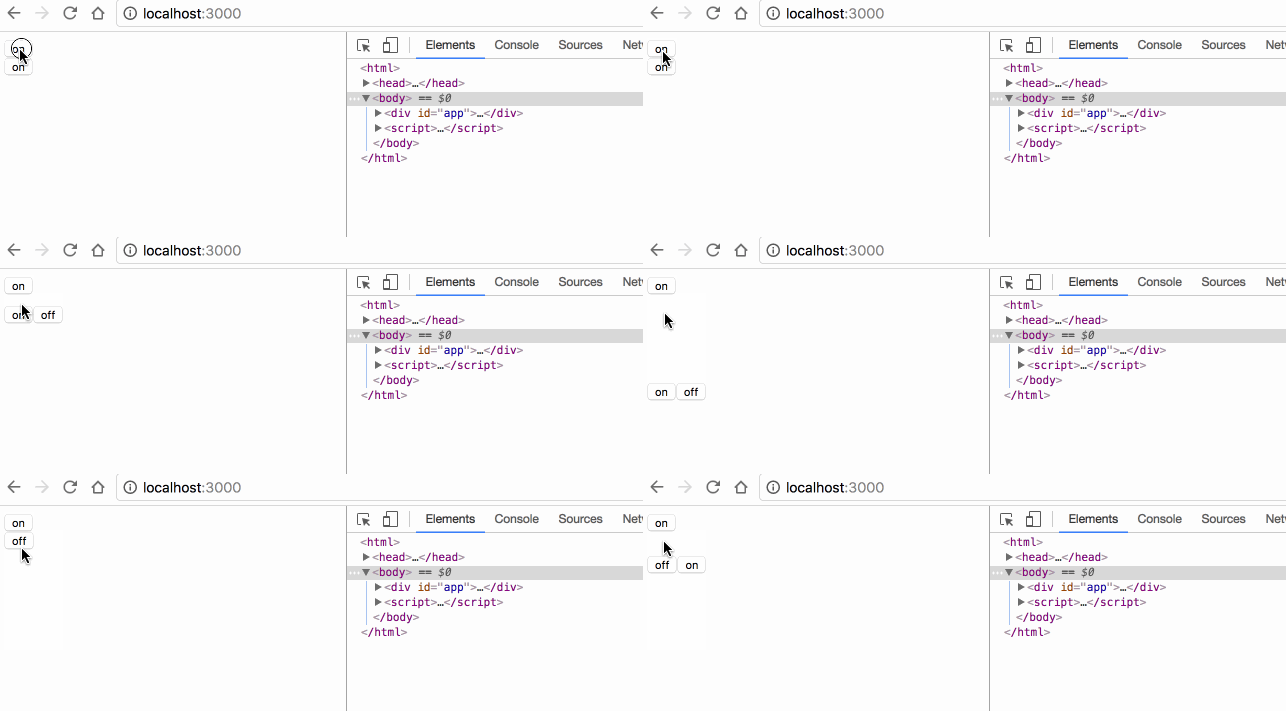
transition 默认是同时执行2个元素的切换动画的,案例中红色的 off 按钮其实是会同时向左移动的,只是因为布局上没有脱离布局流,被 on 按钮顶住,无法移动;
mode="in-out" 可以使切换元素先执行将要显示元素的动画,再执行将要隐藏元素的动画;
mode="out-in" 可以使切换元素先执行将要隐藏元素的动画,再执行将要显示元素的动画;
8 多元素动画:
<script src="/public/javascripts/vuejs"></script>
<style>
v-enter { margin-left: 100px;}
v-enter-active { transition: all 2s;}
v-enter-to { margin-left: 10px;}
</style>
<body>
<p id="app">
<transition-group>
<li v-for="item in items" :key="item">{{item}}</li>
</transition-group>
<transition-group tag="ul">
<li v-for="item in items" :key="item">{{item}}</li>
</transition-group>
<button @click="itemspush(itemslength)">add</button>
</p>
<script>
var app = new Vue({
el: '#app',
data: {
items: [0,1]
}
});
</script>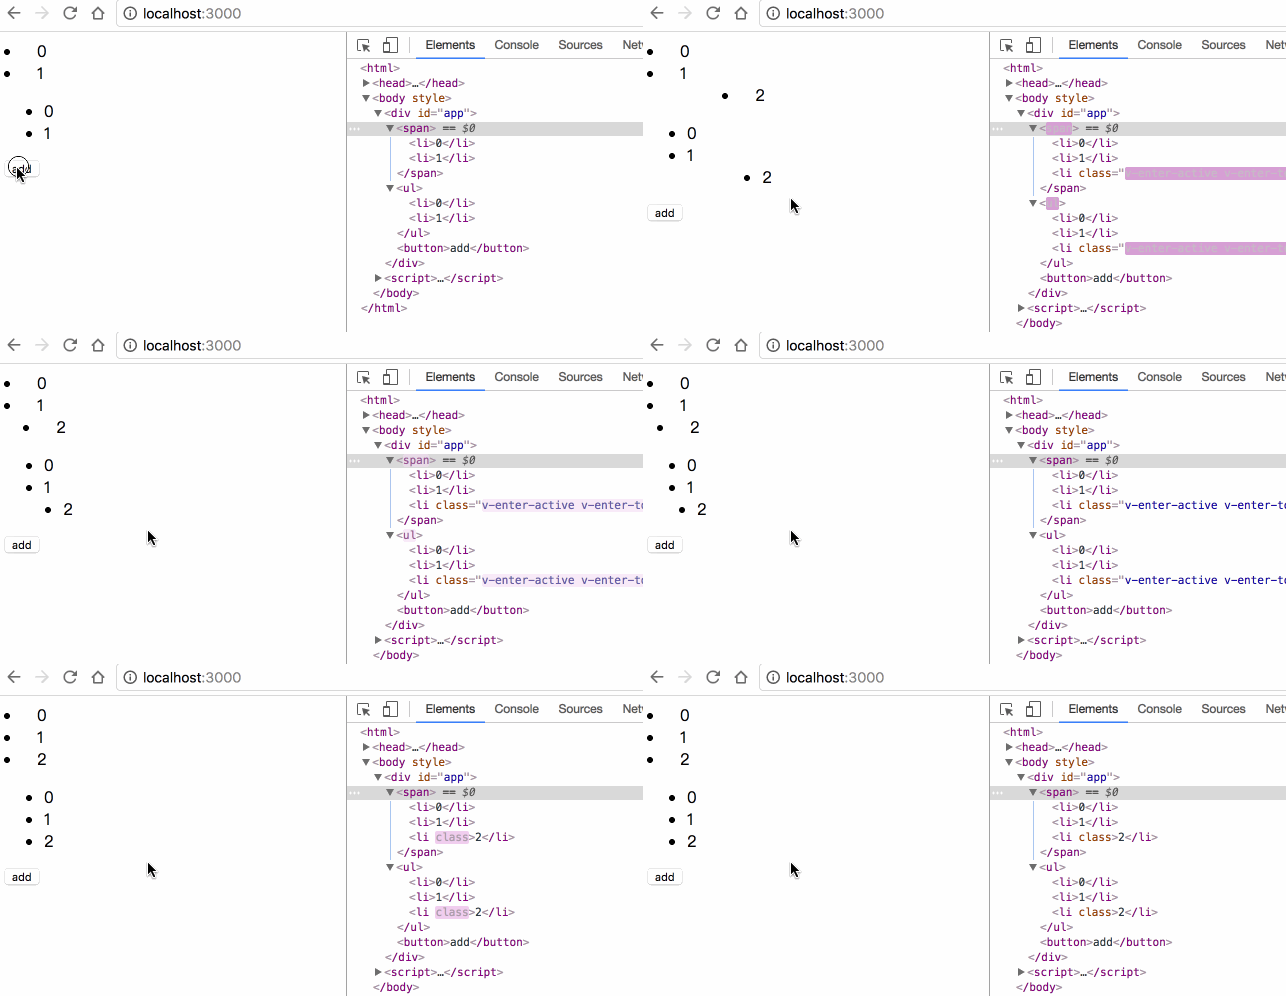
transition 里面只能放置单个元素或使用 v-if v-show 切换的单个元素,要想使用多个元素的动画,必须使用 transition-group;
transition-group 默认会在 DOM 里渲染成 span 标签,可使用 tag="ul" 指定渲染成其他标签;
transition-group 必须为每一个子元素指定 key;
8 多元素的位移动画:
<script src="/public/javascripts/vuejs"></script>
<style>
v-move { transition: all 1s; }
</style>
<body>
<p id="app">
<transition-group tag="ul" >
<li v-for="item in items" :key="item">{{item}}</li>
</transition-group>
<button @click="itemsreverse()">reverse</button>
</p>
<script>
var app = new Vue({
el: '#app',
data: {
items: [0,1,2,3]
}
});
</script>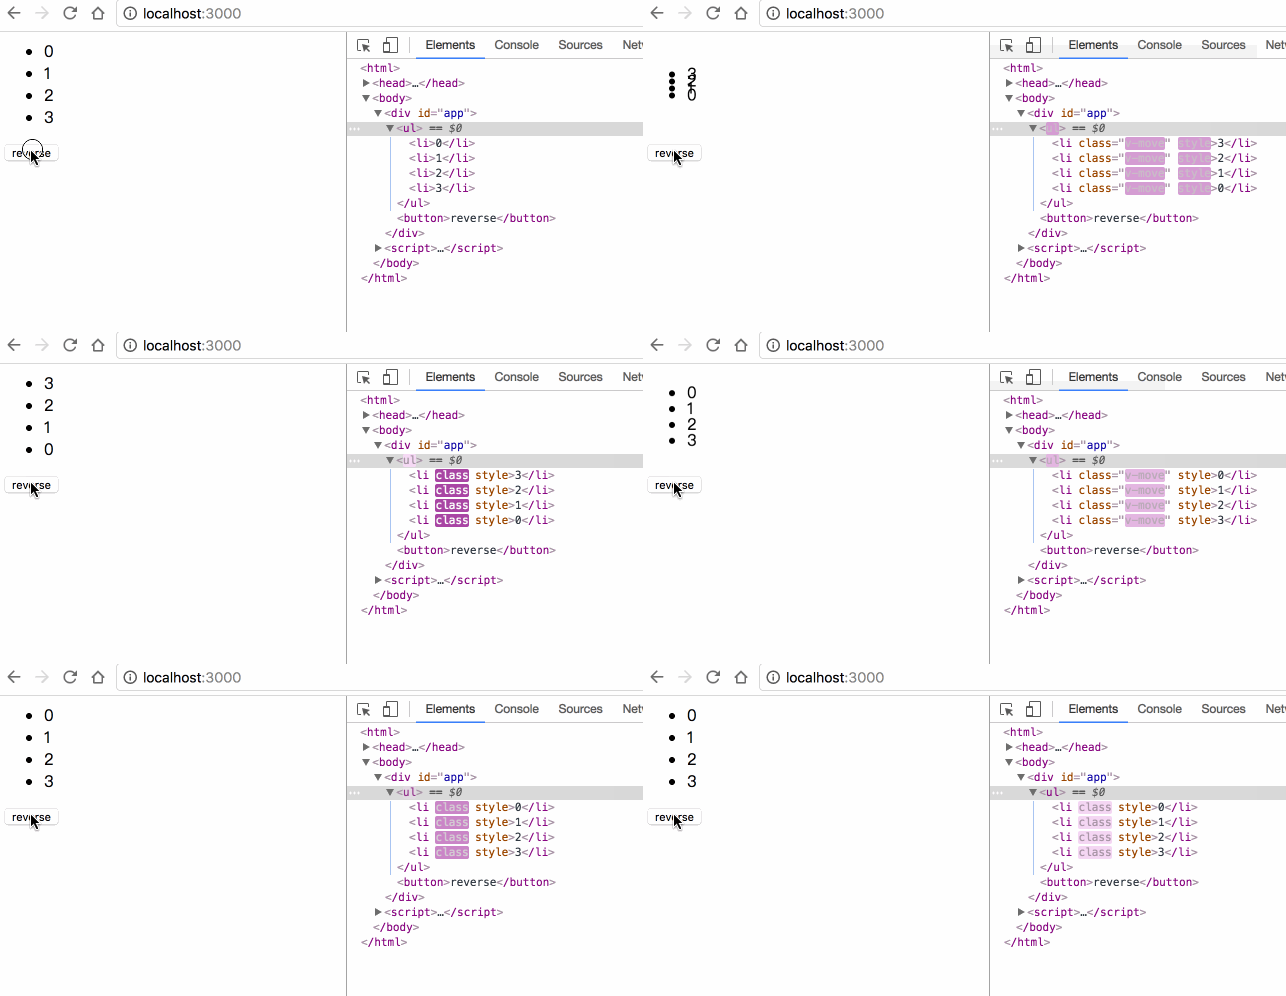
transition-group 允许在每个元素移动时,添加 v-move 的样式,移动完成后自动清除该样式;
transition 的属性, transition-group 都有,包括 name enter leave;
以上がVue要素のアニメーショントランジションエフェクト例を詳しく解説の詳細内容です。詳細については、PHP 中国語 Web サイトの他の関連記事を参照してください。

ホットAIツール

Undresser.AI Undress
リアルなヌード写真を作成する AI 搭載アプリ

AI Clothes Remover
写真から衣服を削除するオンライン AI ツール。

Undress AI Tool
脱衣画像を無料で

Clothoff.io
AI衣類リムーバー

Video Face Swap
完全無料の AI 顔交換ツールを使用して、あらゆるビデオの顔を簡単に交換できます。

人気の記事

ホットツール

メモ帳++7.3.1
使いやすく無料のコードエディター

SublimeText3 中国語版
中国語版、とても使いやすい

ゼンドスタジオ 13.0.1
強力な PHP 統合開発環境

ドリームウィーバー CS6
ビジュアル Web 開発ツール

SublimeText3 Mac版
神レベルのコード編集ソフト(SublimeText3)

ホットトピック
 7717
7717
 15
15
 1641
1641
 14
14
 1396
1396
 52
52
 1289
1289
 25
25
 1233
1233
 29
29
 ユーザーがまれに発生する不具合: Samsung Watch スマートウォッチで突然白い画面の問題が発生する
Apr 03, 2024 am 08:13 AM
スマートフォンの画面に緑色の線が表示されるというトラブルに遭遇したことがある方もいると思いますし、見たことはなくても、関連する写真をインターネット上で見たことがあるはずです。では、スマートウォッチの画面が白くなってしまう状況に遭遇したことはありますか? CNMOは4月2日、海外メディアから、Redditユーザーがサムスンウォッチシリーズのスマートウォッチの画面が白くなっている写真をソーシャルプラットフォームで共有したことを知った。ユーザーは、「出発時に充電していましたが、戻ってきたらこのようになっていました。再起動しようとしましたが、再起動プロセス中も画面はまだこのままでした。」Samsung Watch スマートウォッチの画面が白くなりました。 Reddit ユーザーはスマート ウォッチを指定していません。特定のモデルです。しかし、写真から判断すると、Samsung Watch5のはずです。以前、別のRedditユーザーも報告しました
![PowerPoint でアニメーションが機能しない [修正]](https://img.php.cn/upload/article/000/887/227/170831232982910.jpg?x-oss-process=image/resize,m_fill,h_207,w_330) PowerPoint でアニメーションが機能しない [修正]
Feb 19, 2024 am 11:12 AM
PowerPoint でアニメーションが機能しない [修正]
Feb 19, 2024 am 11:12 AM
プレゼンテーションを作成しようとしていますが、アニメーションを追加できませんか? Windows PC 上の PowerPoint でアニメーションが機能しない場合は、この記事が役に立ちます。これは多くの人が不満を抱く一般的な問題です。たとえば、Microsoft Teams でのプレゼンテーション中または画面録画中にアニメーションが停止する場合があります。このガイドでは、Windows 上の PowerPoint で動作しないアニメーションを修正するのに役立つさまざまなトラブルシューティング テクニックを説明します。 PowerPoint アニメーションが機能しないのはなぜですか? Windows 上で PowerPoint のアニメーションが機能しない問題を引き起こす可能性のある考えられる理由として、次のようなことが考えられます。
 CSS アニメーション: 要素のフラッシュ効果を実現する方法
Nov 21, 2023 am 10:56 AM
CSS アニメーション: 要素のフラッシュ効果を実現する方法、具体的なコード例が必要です。Web デザインでは、アニメーション効果がページに優れたユーザー エクスペリエンスをもたらすことがあります。グリッター効果は、要素をより目を引くようにできる一般的なアニメーション効果です。 CSSを使って要素のフラッシュ効果を実現する方法を紹介します。 1. フラッシュの基本的な実装 まず、フラッシュ効果を実現するには、CSS のアニメーション プロパティを使用する必要があります。アニメーション属性の値には、アニメーション名、アニメーション実行時間、アニメーション遅延時間を指定する必要があります。
 CSS トランジション効果: 要素のフェードインおよびフェードアウト効果を実現する方法
Nov 21, 2023 am 08:03 AM
CSS トランジション効果: 要素のフェードインおよびフェードアウト効果を実現する方法 はじめに: Web デザインにおいて、要素にトランジション効果を持たせることは、ユーザー エクスペリエンスを向上させる重要な手段の 1 つです。フェードイン フェードアウト エフェクトは、要素を最初から浅いところから深いところまで表示できる、一般的で簡潔なトランジション エフェクトです。この記事では、CSS を使用して要素のフェードインおよびフェードアウト効果を実現する方法と、具体的なコード例を紹介します。 1. 要素のフェードインおよびフェードアウト効果を実現するには、transition 属性を使用します CSS のtransition 属性を使用して、要素に要素を追加できます。
 九州風神アサシン4Sラジエターレビュー 空冷「アサシンマスター」スタイル
Mar 28, 2024 am 11:11 AM
ASSASSINといえば、プレイヤーの皆さんは必ず『アサシン クリード』に登場するマスターアサシンを思い浮かべると思いますが、彼らは熟練しただけではなく、「闇に身を捧げ、光に仕える」という信条を持っています。 - アプライアンス ブランド DeepCool の冷却ラジエーターが互いに一致します。このたび、シリーズ最新作「ASSASSIN4S」が登場し、上級者に新たな空冷体験をもたらす『スーツの暗殺者 アドバンスト』。外観はディテールに富んでいます. Assassin 4S ラジエーターはダブルタワー構造 + シングルファン内蔵設計を採用しています. 外側は立方体状のフェアリングで覆われており, 全体的な印象が強いです. ホワイトとブラックの2色が用意されています.さまざまな色に合う色。
 最初に入力してから終了するように ppt アニメーションを設定する方法
Mar 20, 2024 am 09:30 AM
私たちは日々の仕事で ppt をよく使用しますが、ppt のすべての操作機能に精通していますか?例: ppt でアニメーション効果を設定する方法、切り替え効果を設定する方法、各アニメーションの効果時間はどれくらいですか?各スライドは自動的に再生されますか、ppt アニメーションの開始と終了などはできますか? 今回は、まず ppt アニメーションの開始と終了の具体的な手順を共有します。以下にあります。友達、見に来てください。見て! 1. まず、コンピューターで ppt を開き、テキスト ボックスの外側をクリックしてテキスト ボックスを選択します (下図の赤い丸で示されているように)。 2. 次に、メニューバーの[アニメーション]をクリックし、[消去]効果を選択します(図の赤丸部分)。 3. 次に、[
 2年の遅れを経て、国産3Dアニメ映画『エル・ランシェン:深海竜』が7月13日に公開予定
Jan 26, 2024 am 09:42 AM
当サイトは1月26日、国産3Dアニメ映画『エル・ランシェン:深海竜』が最新スチールを公開し、7月13日に公開されると正式に発表したと報じた。 「Er Lang Shen: The Deep Sea Dragon」は、Mihuxing (Beijing) Movie Co., Ltd.、Horgos Zhonghe Qiancheng Film Co., Ltd.、Zhejiang Hengdian Film Co., Ltd.、Zhejiang Gongying Film によって制作されていることがわかります。 Tianhuo Technology Co., Ltd.とHuawen Image (Beijing) Film Co., Ltd.が制作し、Wang Junが監督したこのアニメーション映画は、当初、2022年7月22日に中国本土で公開される予定でした。 。このサイトのあらすじ:授与神の戦いの後、蒋子耶が神々を分割するために「授与神リスト」を持ち出し、授与神リストは天宮によって九州の深海に封印された秘密の領域。実は、授与神リストには神職以外にも強力な悪霊が数多く封印されている。
 春の絶妙な光と影のアート、Haqu H2 は費用対効果の高い選択肢です
Apr 17, 2024 pm 05:07 PM
春の到来とともにあらゆるものが生き返り、あらゆるものが生命力と活力に満ち溢れます。この美しい季節、家庭生活に彩りを加えるにはどうすればよいでしょうか? Haqu H2 プロジェクターは、絶妙なデザインと超コストパフォーマンスで、この春に欠かせない美しさになりました。コンパクトでありながらスタイリッシュなH2プロジェクター。リビングルームのテレビキャビネットの上に置いても、寝室のベッドサイドテーブルの隣に置いても、美しい風景になります。乳白色のマットな質感のボディは、プロジェクターの高級感を演出するだけでなく、触り心地も向上させたデザインです。ベージュのレザー風の素材が全体の外観に温かみとエレガントさを加えます。この色と素材の組み合わせは、現代の住宅の美的傾向に準拠しているだけでなく、住宅に統合することもできます。


