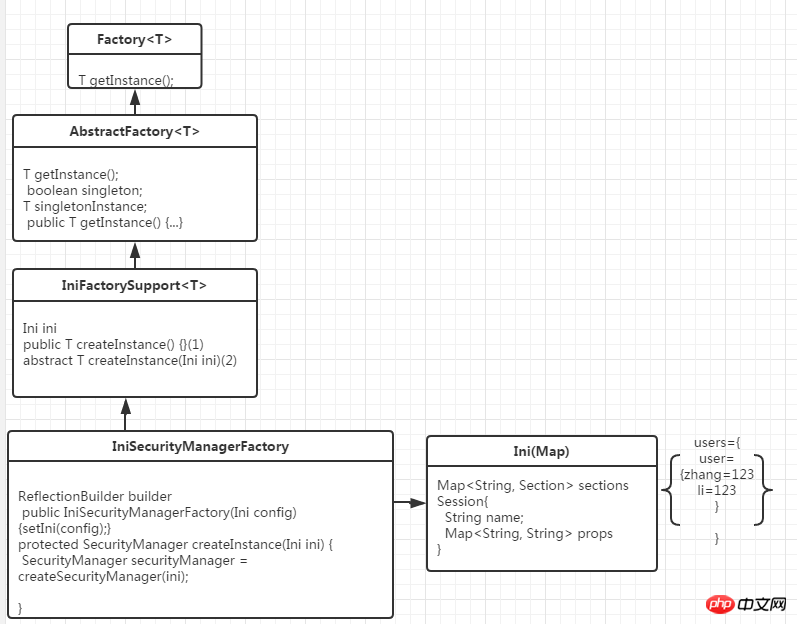

(3) abstractFactory クラスは主にシングルトンかどうかを設定します
(4) iniFactorySupport は ini 設定をサポートすることによって作成されたオブジェクトです
(5) iniSecurityman agerFactory は、securityManager の実装クラスを作成するためのメソッドです
(2)//2. SecurityManager インスタンスを取得し、SecurityUtils1 IniSecurityManagerFactory类:2 creatSecuritymanager(ini){3 SecurityManager securityManager = createSecurityManager(ini);4 return securityManager;5 }
1 private SecurityManager createSecurityManager(Ini ini) { 2 //null 3 Ini.Section mainSection = ini.getSection(MAIN_SECTION_NAME); 4 if (CollectionUtils.isEmpty(mainSection)) { 5 6 //try the default: null 7 mainSection = ini.getSection(Ini.DEFAULT_SECTION_NAME); 8 } 9 return createSecurityManager(ini, mainSection);10 }( 3) ini オブジェクトとメインモジュール mainSession を通して Securitymanager を作成
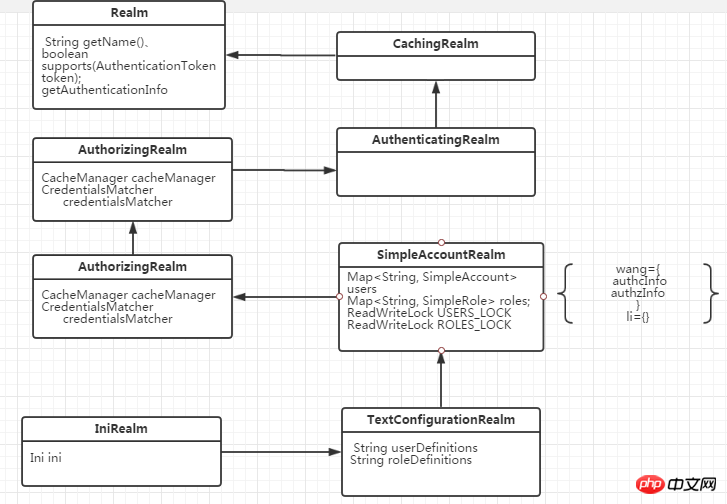
1 private SecurityManager createSecurityManager(Ini ini, Ini.Section mainSection) { 2 //{securityManager=DefaultSecurityManager,iniRealm=IniRealm} 3 Map defaults = createDefaults(ini, mainSection); 4 Map objects = buildInstances(mainSection, defaults); 5 6 SecurityManager securityManager = getSecurityManagerBean(); 7 boolean autoApplyRealms = isAutoApplyRealms(securityManager); 8 if (autoApplyRealms) { 9 //realms and realm factory might have been created - pull them out first so we can initialize the securityManager:10 Collection realms = getRealms(objects);11 //set them on the SecurityManager12 if (!CollectionUtils.isEmpty(realms)) {13 applyRealmsToSecurityManager(realms, securityManager);14 }15 }16 return securityManager;17 } 1 private Map buildInstances(Ini.Section section, Map defaults) { 2 this.builder = new ReflectionBuilder(defaults); 3 return this.builder.buildObjects(section); 4 } 5 //类ReflectionBuilder 6 //通过mainSection创建对象并关联 7 public Map buildObjects(Map kvPairs) { 8 ..... 9 LifecycleUtils.init(objects.values());10 } 1 //类IniRealm 2 private void processDefinitions(Ini ini) { 3 Ini.Section usersSection = ini.getSection(USERS_SECTION_NAME); 4 processUserDefinitions(usersSection); 5 } 6 //通过userSection解析user模块 7 protected void processUserDefinitions(Map userDefs) { 8 for (String username : userDefs.keySet()) { 9 ........10 account = new SimpleAccount(username, password, getName());11 add(account);12 ........13 }14 }15 protected void add(SimpleAccount account) {16 String username = getUsername(account);17 USERS_LOCK.writeLock().lock();18 try {19 this.users.put(username, account);20 }finally {21 USERS_LOCK.writeLock().unlock();22 }


1 applyRealmsToSecurityManager(realms, securityManager){2 ((RealmSecurityManager) securityManager).setRealms(realms);3 }4 //在类RealmSecurityManager中5 public void setRealms(Collection realms) {6 this.realms = realms;7 afterRealmsSet();8 }注: afterRealmsSet() は、主にレルム属性を設定するために使用されます。オーセンティケーターとオーソライザーの:
1 //获取主题对象 2 public static Subject getSubject() {3 Subject subject = ThreadContext.getSubject();//第一次null4 if (subject == null) {5 subject = (new Subject.Builder()).buildSubject();6 ThreadContext.bind(subject);7 }8 return subject;9 }(1) コード分析: ビルダー パターンを使用してオブジェクトを作成します:
(2) テーマコンテキストを使用してテーマを作成します
1 public static class Builder{ 2 SubjectContext subjectContext; 3 SecurityManager securityManager; 4 public Builder(SecurityManager securityManager) { 5 if (securityManager == null) { 6 throw new NullPointerException("SecurityManager method argument cannot be null."); 7 } 8 this.securityManager = securityManager; 9 this.subjectContext = newSubjectContextInstance();//DefaultSubjectContext(初始化一个backMap集合)10 if (this.subjectContext == null) {11 throw new IllegalStateException("Subject instance returned from 'newSubjectContextInstance' " +12 "cannot be null.");13 }14 this.subjectContext.setSecurityManager(securityManager);15 }16 public Subject buildSubject() {17 return this.securityManager.createSubject(this.subjectContext);18 }19 }(3) テーマを通じてサブジェクトオブジェクトを作成します
1 public Subject createSubject(SubjectContext subjectContext) { 2 //create a copy so we don't modify the argument's backing map: 3 SubjectContext context = copy(subjectContext); 4 5 //ensure that the context has a SecurityManager instance, and if not, add one: 6 context = ensureSecurityManager(context);//DefaultSubjectContext.backMap.put(SecurityManage) 7 8 //Resolve an associated Session (usually based on a referenced session ID), and place it in the context before 9 //sending to the SubjectFactory. The SubjectFactory should not need to know how to acquire sessions as the10 //process is often environment specific - better to shield the SF from these details:11 context = resolveSession(context);12 13 //Similarly, the SubjectFactory should not require any concept of RememberMe - translate that here first14 //if possible before handing off to the SubjectFactory:15 context = resolvePrincipals(context);16 17 Subject subject = doCreateSubject(context);18 19 //save this subject for future reference if necessary:20 //(this is needed here in case rememberMe principals were resolved and they need to be stored in the21 //session, so we don't constantly rehydrate the rememberMe PrincipalCollection on every operation).22 //Added in 1.2:23 save(subject);24 25 return subject;26 }
1 public Subject createSubject(SubjectContext context) { 2 SecurityManager securityManager = context.resolveSecurityManager(); 3 Session session = context.resolveSession(); 4 boolean sessionCreationEnabled = context.isSessionCreationEnabled(); 5 PrincipalCollection principals = context.resolvePrincipals(); 6 boolean authenticated = context.resolveAuthenticated(); 7 String host = context.resolveHost(); 8 9 return new DelegatingSubject(principals, authenticated, host, session, sessionCreationEnabled, securityManager);10 }以上がhiroのソースコードを詳しく紹介の詳細内容です。詳細については、PHP 中国語 Web サイトの他の関連記事を参照してください。