C# で Windows サービスを作成する方法 (図)?
这篇文章主要介绍了使用C#创建Windows服务的实例代码,小编觉得挺不错的,现在分享给大家,也给大家做个参考。一起跟随小编过来看看吧
本文介绍了使用C#创建Windows服务的实例代码,分享给大家
一、开发环境
操作系统:Windows 10 X64
开发环境:VS2015
编程语言:C#
.NET版本:.NET Framework 4.0
目标平台:X86
二、创建Windows Service
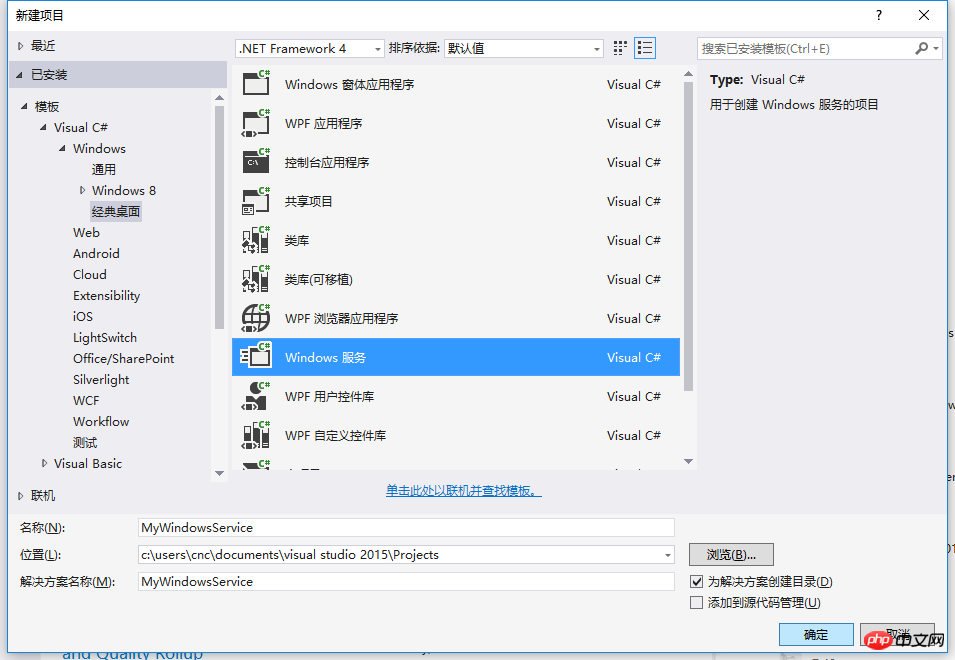
1、新建一个Windows Service,并将项目名称改为“MyWindowsService”,如下图所示:
2、在解决方案资源管理器内将Service1.cs改为MyService1.cs后并点击“查看代码”图标按钮进入代码编辑器界面,如下图所示:

3、在代码编辑器内如入以下代码,如下所示:
using System;
using System.ServiceProcess;
using System.IO;

namespace MyWindowsService
{
  public partial class MyService : ServiceBase
  {
    public MyService()
    {
      InitializeComponent();
    }

    string filePath = @"D:\MyServiceLog.txt";

    protected override void OnStart(string[] args)
    {
      using (FileStream stream = new FileStream(filePath,FileMode.Append))
      using (StreamWriter writer = new StreamWriter(stream))
      {
        writer.WriteLine($"{DateTime.Now},服务启动!");
      }
    }

    protected override void OnStop()
    {
      using (FileStream stream = new FileStream(filePath, FileMode.Append))
      using (StreamWriter writer = new StreamWriter(stream))
      {
        writer.WriteLine($"{DateTime.Now},服务停止!");
      }
    }
  }
}4、双击项目“MyWindowsService”进入“MyService”设计界面,在空白位置右击鼠标弹出上下文菜单,选中“添加安装程序”,如下图所示:

5、此时软件会生成两个组件,分别为“serviceInstaller1”及“serviceProcessInstaller1”,如下图所示:

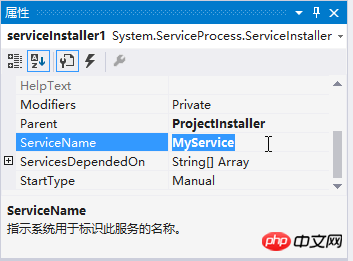
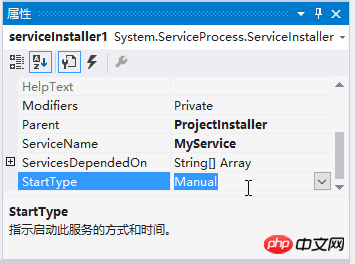
6、点击“serviceInstaller1”,在“属性”窗体将ServiceName改为MyService,Description改为我的服务,StartType保持为Manual,如下图所示:

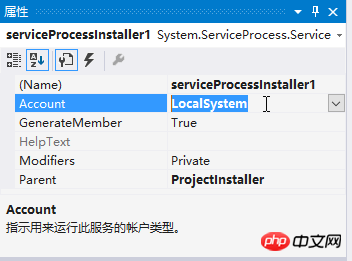
7、点击“serviceProcessInstaller1”,在“属性”窗体将Account改为LocalSystem(服务属性系统级别),如下图所示:
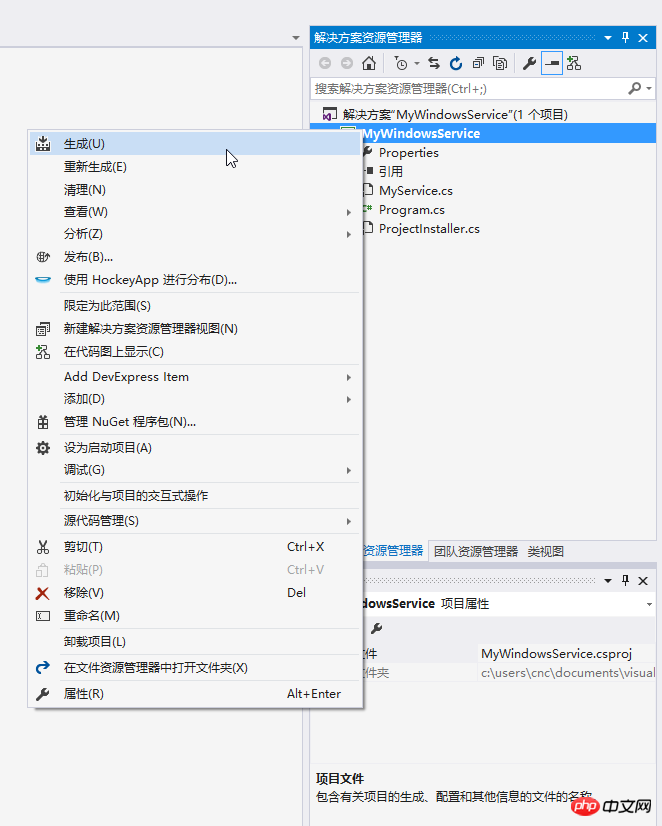
8、鼠标右键点击项目“MyWindowsService”,在弹出的上下文菜单中选择“生成”按钮,如下图所示:
9、至此,Windows服务已经创建完毕。
三、创建安装、启动、停止、卸载服务的Windows窗体
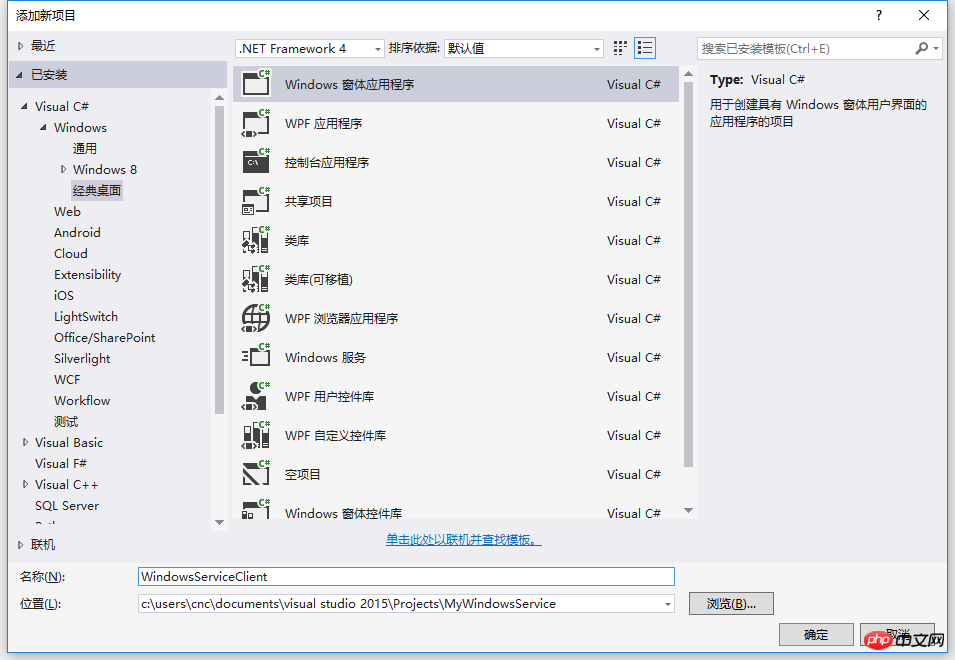
1、在同一个解决方案里新建一个Windows Form项目,并命名为WindowsServiceClient,如下图所示:
2、将该项目设置为启动项目,并在窗体内添加四个按钮,分别为安装服务、启动服务、停止服务及卸载服务,如下图所示:

3、按下F7进入代码编辑界面,引用“System.ServiceProcess”及“System.Configuration.Install”,并输入如下代码:
using System;
using System.Collections;
using System.Windows.Forms;
using System.ServiceProcess;
using System.Configuration.Install;

namespace WindowsServiceClient
{
  public partial class Form1 : Form
  {
    public Form1()
    {
      InitializeComponent();
    }
    string serviceFilePath = $"{Application.StartupPath}\\MyWindowsService.exe";
    string serviceName = "MyService";

    //事件:安装服务
    private void button1_Click(object sender, EventArgs e)
    {
      if (this.IsServiceExisted(serviceName)) this.UninstallService(serviceName);
      this.InstallService(serviceFilePath);
    }

    //事件:启动服务
    private void button2_Click(object sender, EventArgs e)
    {
      if (this.IsServiceExisted(serviceName)) this.ServiceStart(serviceName);
    }

    //事件:停止服务
    private void button4_Click(object sender, EventArgs e)
    {
      if (this.IsServiceExisted(serviceName)) this.ServiceStop(serviceName);
    }

    //事件:卸载服务
    private void button3_Click(object sender, EventArgs e)
    {
      if (this.IsServiceExisted(serviceName))
      {
        this.ServiceStop(serviceName);
        this.UninstallService(serviceFilePath);
      }
    }

    //判断服务是否存在
    private bool IsServiceExisted(string serviceName)
    {
      ServiceController[] services = ServiceController.GetServices();
      foreach (ServiceController sc in services)
      {
        if (sc.ServiceName.ToLower() == serviceName.ToLower())
        {
          return true;
        }
      }
      return false;
    }

    //安装服务
    private void InstallService(string serviceFilePath)
    {
      using (AssemblyInstaller installer = new AssemblyInstaller())
      {
        installer.UseNewContext = true;
        installer.Path = serviceFilePath;
        IDictionary savedState = new Hashtable();
        installer.Install(savedState);
        installer.Commit(savedState);
      }
    }

    //卸载服务
    private void UninstallService(string serviceFilePath)
    {
      using (AssemblyInstaller installer = new AssemblyInstaller())
      {
        installer.UseNewContext = true;
        installer.Path = serviceFilePath;
        installer.Uninstall(null);
      }
    }
    //启动服务
    private void ServiceStart(string serviceName)
    {
      using (ServiceController control = new ServiceController(serviceName))
      {
        if (control.Status == ServiceControllerStatus.Stopped)
        {
          control.Start();
        }
      }
    }

    //停止服务
    private void ServiceStop(string serviceName)
    {
      using (ServiceController control = new ServiceController(serviceName))
      {
        if (control.Status == ServiceControllerStatus.Running)
        {
          control.Stop();
        }
      }
    }
  }
}4、为了后续调试服务及安装卸载服务的需要,将已生成的MyWindowsService.exe引用到本Windows窗体,如下图所示:

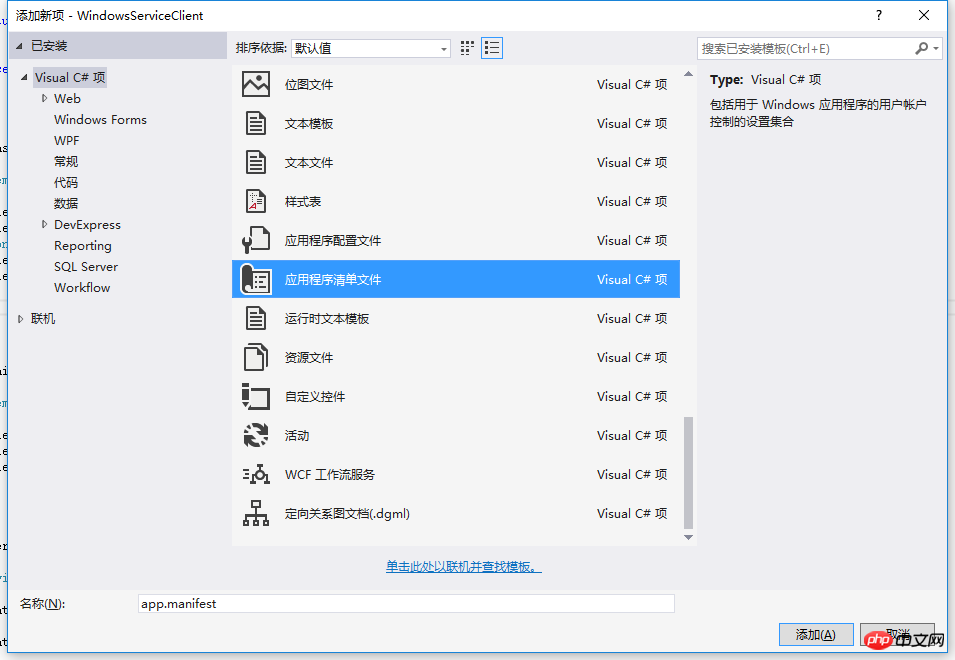
5、由于需要安装服务,故需要使用UAC中Administrator的权限,鼠标右击项目“WindowsServiceClient”,在弹出的上下文菜单中选择“添加”->“新建项”,在弹出的选择窗体中选择“应用程序清单文件”并单击确定,如下图所示:
6、打开该文件,并将

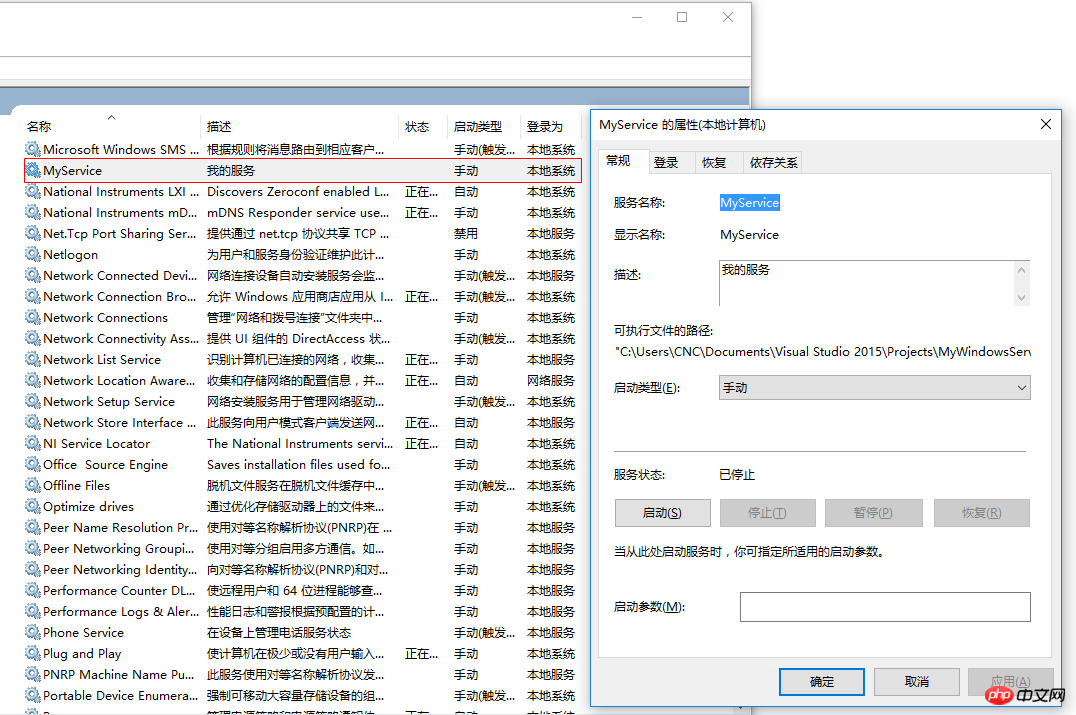
7. IDE が起動すると、以下に示すフォームが表示されます (一部のシステムは UAC 設定により表示されない場合があります)。これは管理者権限で開く必要があります:


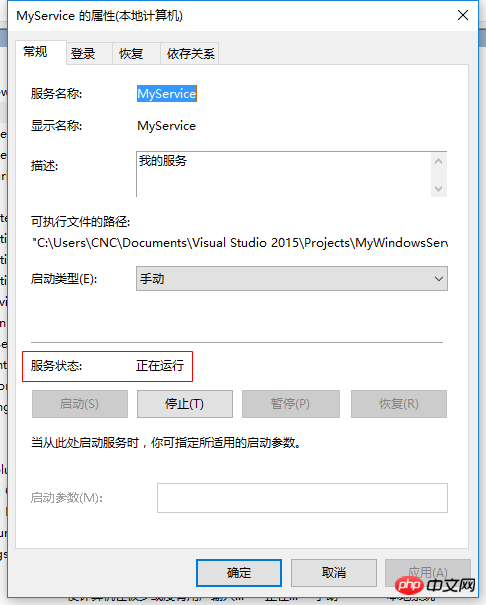
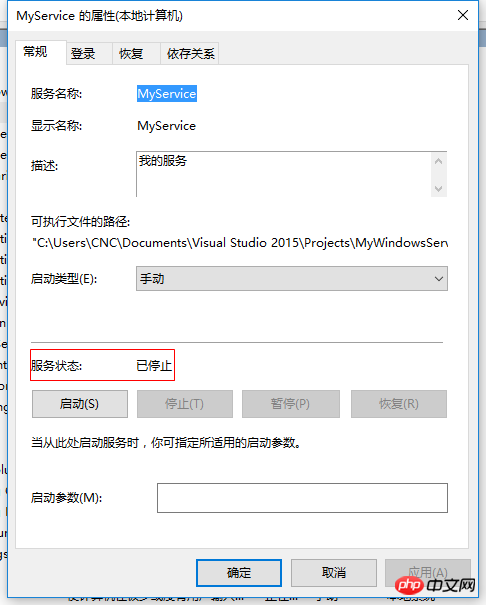
補足: サービスのデバッグ方法
1. サービスのデバッグは、実際には非常に簡単です。デバッグが必要なプロジェクトにサービス プロセスをアタッチする必要がある場合、構築したばかりのサービスをデバッグしたい場合は、次のように OnStop イベントにブレークポイントを設定します。
2. 以下に示すように、「WindowsServiceClient」プロジェクトを開始し、「デバッグ」メニューで「プロセスにアタッチ」を選択します(サービスは事前にインストールする必要があります)。
 3. 「MyWindowsService.exe」を見つけます。
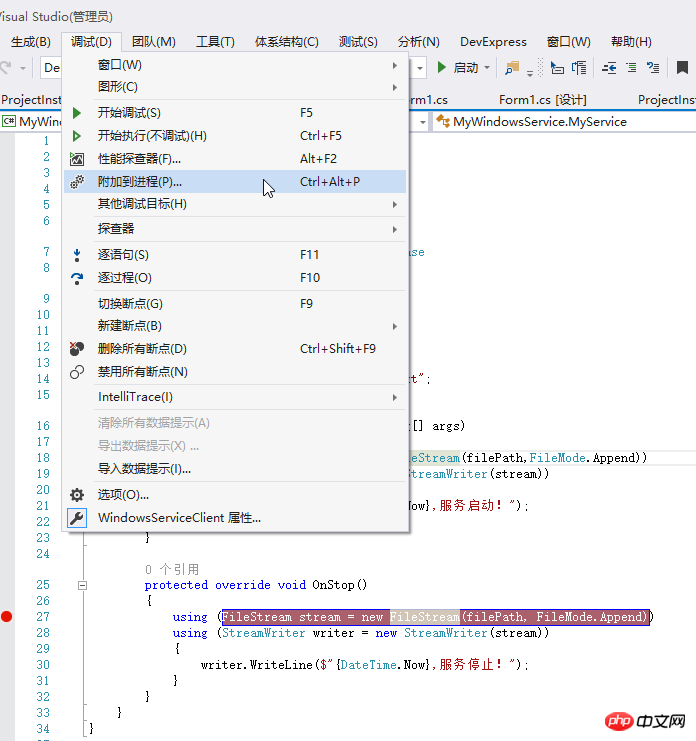 4. 「サービスの停止」ボタンをクリックすると、以下の図に示すように、ブレークポイントが設定された場所でプログラムが中断されます。 :
以上がC# で Windows サービスを作成する方法 (図)?の詳細内容です。詳細については、PHP 中国語 Web サイトの他の関連記事を参照してください。

ホットAIツール

Undresser.AI Undress
リアルなヌード写真を作成する AI 搭載アプリ

AI Clothes Remover
写真から衣服を削除するオンライン AI ツール。

Undress AI Tool
脱衣画像を無料で

Clothoff.io
AI衣類リムーバー

Video Face Swap
完全無料の AI 顔交換ツールを使用して、あらゆるビデオの顔を簡単に交換できます。

人気の記事

ホットツール

メモ帳++7.3.1
使いやすく無料のコードエディター

SublimeText3 中国語版
中国語版、とても使いやすい

ゼンドスタジオ 13.0.1
強力な PHP 統合開発環境

ドリームウィーバー CS6
ビジュアル Web 開発ツール

SublimeText3 Mac版
神レベルのコード編集ソフト(SublimeText3)

ホットトピック
 7756
7756
 15
15
 1643
1643
 14
14
 1399
1399
 52
52
 1293
1293
 25
25
 1234
1234
 29
29
 Windows 7にMySQLをインストールできますか?
Apr 08, 2025 pm 03:21 PM
はい、MySQLはWindows 7にインストールできます。MicrosoftはWindows 7のサポートを停止しましたが、MySQLは引き続き互換性があります。ただし、インストールプロセス中に次のポイントに注意する必要があります。WindowsのMySQLインストーラーをダウンロードしてください。 MySQL(コミュニティまたはエンタープライズ)の適切なバージョンを選択します。インストールプロセス中に適切なインストールディレクトリと文字セットを選択します。ルートユーザーパスワードを設定し、適切に保ちます。テストのためにデータベースに接続します。 Windows 7の互換性とセキュリティの問題に注意してください。サポートされているオペレーティングシステムにアップグレードすることをお勧めします。
 MySQLを解く方法は、ローカルホストに接続できません
Apr 08, 2025 pm 02:24 PM
MySQL接続は、次の理由が原因である可能性があります。MySQLサービスは開始されず、ファイアウォールは接続をインターセプトし、ポート番号が間違っています。ユーザー名またはパスワードが間違っています。My.cnfのリスニングアドレスは不適切に構成されています。トラブルシューティング手順には以下が含まれます。 2.ファイアウォール設定を調整して、MySQLがポート3306をリッスンできるようにします。 3.ポート番号が実際のポート番号と一致していることを確認します。 4.ユーザー名とパスワードが正しいかどうかを確認します。 5. my.cnfのバインドアドレス設定が正しいことを確認してください。
 特定のシステムバージョンでMySQLが報告したエラーのソリューション
Apr 08, 2025 am 11:54 AM
MySQLのインストールエラーのソリューションは次のとおりです。1。システム環境を慎重に確認して、MySQL依存関係ライブラリの要件が満たされていることを確認します。異なるオペレーティングシステムとバージョンの要件は異なります。 2.エラーメッセージを慎重に読み取り、依存関係のインストールやSUDOコマンドの使用など、プロンプト(ライブラリファイルの欠落やアクセス許可など)に従って対応する測定値を取得します。 3.必要に応じて、ソースコードをインストールし、コンパイルログを慎重に確認してみてください。これには、一定量のLinuxの知識と経験が必要です。最終的に問題を解決する鍵は、システム環境とエラー情報を慎重に確認し、公式の文書を参照することです。
 ターミナルからMySQLにアクセスできません
Apr 08, 2025 pm 04:57 PM
端末からmysqlにアクセスできない場合は、次の理由があります。MySQLサービスが実行されていません。接続コマンドエラー;許可が不十分です。ファイアウォールは接続をブロックします。 mysql構成ファイルエラー。
 MySQLはダウンロード後にインストールできません
Apr 08, 2025 am 11:24 AM
MySQLのインストール障害の主な理由は次のとおりです。1。許可の問題、管理者として実行するか、SUDOコマンドを使用する必要があります。 2。依存関係が欠落しており、関連する開発パッケージをインストールする必要があります。 3.ポート競合では、ポート3306を占めるプログラムを閉じるか、構成ファイルを変更する必要があります。 4.インストールパッケージが破損しているため、整合性をダウンロードして検証する必要があります。 5.環境変数は誤って構成されており、環境変数はオペレーティングシステムに従って正しく構成する必要があります。これらの問題を解決し、各ステップを慎重に確認して、MySQLを正常にインストールします。
 mysqlをコピーして貼り付ける方法
Apr 08, 2025 pm 07:18 PM
MySQLのコピーと貼り付けには、次の手順が含まれています。データを選択し、Ctrl C(Windows)またはCMD C(MAC)でコピーします。ターゲットの場所を右クリックして、貼り付けまたはCTRL V(Windows)またはCMD V(MAC)を使用します。コピーされたデータは、ターゲットの場所に挿入されるか、既存のデータを置き換えます(データが既にターゲットの場所に存在するかどうかに応じて)。
 Windows 8でコードを実行できます
Apr 15, 2025 pm 07:24 PM
VSコードはWindows 8で実行できますが、エクスペリエンスは大きくない場合があります。まず、システムが最新のパッチに更新されていることを確認してから、システムアーキテクチャに一致するVSコードインストールパッケージをダウンロードして、プロンプトとしてインストールします。インストール後、一部の拡張機能はWindows 8と互換性があり、代替拡張機能を探すか、仮想マシンで新しいWindowsシステムを使用する必要があることに注意してください。必要な拡張機能をインストールして、適切に動作するかどうかを確認します。 Windows 8ではVSコードは実行可能ですが、開発エクスペリエンスとセキュリティを向上させるために、新しいWindowsシステムにアップグレードすることをお勧めします。
 mysqlダウンロードプロンプトディスク書き込みエラーへの対処方法
Apr 08, 2025 am 11:51 AM
MySQLダウンロードは、ディスク書き込みエラーをプロンプトします。ソリューションは次のとおりです。1。ディスクスペースが不十分かどうかを確認するか、スペースをクリーンアップするか、大きなディスクを交換します。 2.ディスク検出ツール(CHKDSKやFSCKなど)を使用して、ディスクエラーを確認および修正し、必要に応じてハードディスクを交換します。 3.ターゲットディレクトリの権限を確認して、ユーザーアカウントに書き込み権限があることを確認します。 4.ダウンロードツールまたはネットワーク環境を変更し、ダウンロードマネージャーを使用して中断されたダウンロードを復元します。 5.ウイルス対策ソフトウェアまたはファイアウォールを一時的に閉じ、ダウンロードが完了した後に再度に再び可能になります。これらの側面を体系的にトラブルシューティングすることにより、問題を解決できます。


