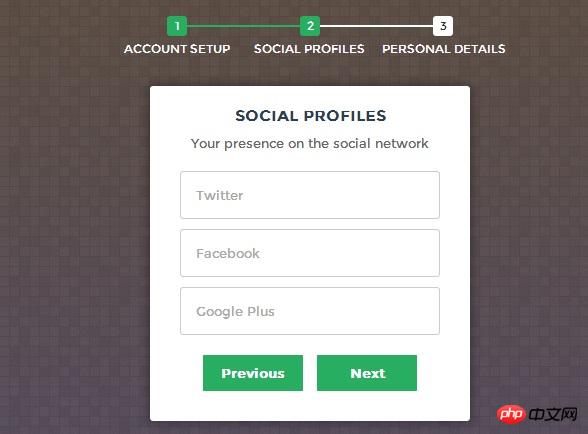
css3+html5でステップバイステップの登録ログインフォームを実装する例
現在、ユーザーエクスペリエンスを向上させるために、多くの段階的なログインおよび登録フォームがあり、ユーザーは多数のフォームを見て躊躇することがないよう、対応するフォーム情報を選択して入力できます。今日皆さんに共有するのは、HTML5 と CSS3 に基づいたステップバイステップの登録およびログイン フォームです。言うまでもなく、非常に美しく見えます。 DEMOを見ればすぐにわかります。

ここではオンラインデモンストレーションを行っており、最初に効果を確認できます。
次に、実装プロセスを見てみましょう。コードは少し複雑で、主に HTML コード、CSS3 コード、JavaScript コードで構成されています。
HTML コード:
<form id="msform">
    <!-- progressbar -->
    <ul id="progressbar">
        <li>Account Setup</li>
        <li>Social Profiles</li>
        <li>Personal Details</li>
    </ul>
    <!-- fieldsets -->
    <fieldset>
        <h2 id="Create-nbsp-your-nbsp-account">Create your account</h2>
        <h3 id="This-nbsp-is-nbsp-step-nbsp">This is step 1</h3>
        <input type="text" name="email" placeholder="Email" />
        <input type="password" name="pass" placeholder="Password" />
        <input type="password" name="cpass" placeholder="Confirm Password" />
        <input type="button" name="next" value="Next" />
    </fieldset>
    <fieldset>
        <h2 id="Social-nbsp-Profiles">Social Profiles</h2>
        <h3 id="Your-nbsp-presence-nbsp-on-nbsp-the-nbsp-social-nbsp-network">Your presence on the social network</h3>
        <input type="text" name="twitter" placeholder="Twitter" />
        <input type="text" name="facebook" placeholder="Facebook" />
        <input type="text" name="gplus" placeholder="Google Plus" />
        <input type="button" name="previous" value="Previous" />
        <input type="button" name="next" value="Next" />
    </fieldset>
    <fieldset>
        <h2 id="Personal-nbsp-Details">Personal Details</h2>
        <h3 id="We-nbsp-will-nbsp-never-nbsp-sell-nbsp-it">We will never sell it</h3>
        <input type="text" name="fname" placeholder="First Name" />
        <input type="text" name="lname" placeholder="Last Name" />
        <input type="text" name="phone" placeholder="Phone" />
        <textarea name="address" placeholder="Address"></textarea>
        <input type="button" name="previous" value="Previous" />
        <input type="submit" name="submit" value="Submit" />
</fieldset></form>HTML コードはたくさんあるように見えますが、非常に単純で、主にフォームを記述しています。
CSS コード:
/*form styles*/#msform {
    width: 400px;
    margin: 50px auto;
    text-align: center;
    position: relative;
}#msform fieldset {
    background: white;
    border: 0 none;
    border-radius: 3px;
    box-shadow: 0 0 15px 1px rgba(0, 0, 0, 0.4);
    padding: 20px 30px;

    box-sizing: border-box;
    width: 80%;
    margin: 0 10%;    /*stacking fieldsets above each other*/
    position: absolute;
}/*Hide all except first fieldset*/#msform fieldset:not(:first-of-type) {
    display: none;
}/*inputs*/#msform input, #msform textarea {
    padding: 15px;
    border: 1px solid #ccc;
    border-radius: 3px;
    margin-bottom: 10px;
    width: 100%;
    box-sizing: border-box;
    font-family: montserrat;
    color: #2C3E50;
    font-size: 13px;
}/*buttons*/#msform .action-button {
    width: 100px;
    background: #27AE60;
    font-weight: bold;
    color: white;
    border: 0 none;
    border-radius: 1px;
    cursor: pointer;
    padding: 10px 5px;
    margin: 10px 5px;
}#msform .action-button:hover, #msform .action-button:focus {
    box-shadow: 0 0 0 2px white, 0 0 0 3px #27AE60;
}/*headings*/.fs-title {
    font-size: 15px;
    text-transform: uppercase;
    color: #2C3E50;
    margin-bottom: 10px;
}.fs-subtitle {
    font-weight: normal;
    font-size: 13px;
    color: #666;
    margin-bottom: 20px;
}/*progressbar*/#progressbar {
    margin-bottom: 30px;
    overflow: hidden;    /*CSS counters to number the steps*/
    counter-reset: step;
}#progressbar li {
    list-style-type: none;
    color: white;
    text-transform: uppercase;
    font-size: 9px;
    width: 33.33%;
    float: left;
    position: relative;
}#progressbar li:before {
    content: counter(step);
    counter-increment: step;
    width: 20px;
    line-height: 20px;
    display: block;
    font-size: 10px;
    color: #333;
    background: white;
    border-radius: 3px;
    margin: 0 auto 5px auto;
}/*progressbar connectors*/#progressbar li:after {
    content: '';
    width: 100%;
    height: 2px;
    background: white;
    position: absolute;
    left: -50%;
    top: 9px;
    z-index: -1; /*put it behind the numbers*/}#progressbar li:first-child:after {    /*connector not needed before the first step*/
    content: none;
}/*marking active/completed steps green*//*The number of the step and the connector before it = green*/#progressbar li.active:before,  #progressbar li.active:after{
    background: #27AE60;
    color: white;
}ここでは、フォームをレンダリングするための CSS コードを投稿しました。これにより、フォームが非常に新鮮で自然に見えます。もう 1 つの注意点は、ここでは CSS3 の :before 属性を使用していることです。
最後は、登録フォームのステップジャンプを実現できるJavaScriptコードです。
Javascript コード:
var current_fs, next_fs, previous_fs; //fieldsets
var left, opacity, scale; //fieldset properties which we will animate
var animating; //flag to prevent quick multi-click glitches
$(".next").click(function(){    if(animating) return false;
    animating = true;
    current_fs = $(this).parent();
    next_fs = $(this).parent().next();    //activate next step on progressbar using the index of next_fs
    $("#progressbar li").eq($("fieldset").index(next_fs)).addClass("active");    //show the next fieldset    next_fs.show();
    //hide the current fieldset with style
    current_fs.animate({opacity: 0}, {
        step: function(now, mx) {            //as the opacity of current_fs reduces to 0 - stored in "now"
            //1. scale current_fs down to 80%
            scale = 1 - (1 - now) * 0.2;            //2. bring next_fs from the right(50%)
            left = (now * 50)+"%";            //3. increase opacity of next_fs to 1 as it moves in
            opacity = 1 - now;
            current_fs.css({'transform': 'scale('+scale+')'});
            next_fs.css({'left': left, 'opacity': opacity});
        },
        duration: 800,
        complete: function(){
            current_fs.hide();
            animating = false;
        },
        //this comes from the custom easing plugin
        easing: 'easeInOutBack'
    });
});

$(".previous").click(function(){    if(animating) return false;
    animating = true;

    current_fs = $(this).parent();
    previous_fs = $(this).parent().prev();    //de-activate current step on progressbar
    $("#progressbar li").eq($("fieldset").index(current_fs)).removeClass("active");    //show the previous fieldset    previous_fs.show();
    //hide the current fieldset with style
    current_fs.animate({opacity: 0}, {
        step: function(now, mx) {            //as the opacity of current_fs reduces to 0 - stored in "now"
            //1. scale previous_fs from 80% to 100%
            scale = 0.8 + (1 - now) * 0.2;            //2. take current_fs to the right(50%) - from 0%
            left = ((1-now) * 50)+"%";            //3. increase opacity of previous_fs to 1 as it moves in
            opacity = 1 - now;
            current_fs.css({'left': left});
            previous_fs.css({'transform': 'scale('+scale+')', 'opacity': opacity});
        },
        duration: 800,
        complete: function(){
            current_fs.hide();
            animating = false;
        },
        //this comes from the custom easing plugin
        easing: 'easeInOutBack'
    });
});

$(".submit").click(function(){    return false;
})ここでは、jQuery コードの使用が非常に簡単になっていることがわかります。主に次、前、送信の 3 つのイベントがあります。同時に、次のイベントと前のイベントでフェードインとフェードアウトのアニメーション効果を実現するために jQuery が使用されます。
以上がcss3+html5でステップバイステップの登録ログインフォームを実装する例の詳細内容です。詳細については、PHP 中国語 Web サイトの他の関連記事を参照してください。

ホットAIツール

Undresser.AI Undress
リアルなヌード写真を作成する AI 搭載アプリ

AI Clothes Remover
写真から衣服を削除するオンライン AI ツール。

Undress AI Tool
脱衣画像を無料で

Clothoff.io
AI衣類リムーバー

AI Hentai Generator
AIヘンタイを無料で生成します。

人気の記事

ホットツール

メモ帳++7.3.1
使いやすく無料のコードエディター

SublimeText3 中国語版
中国語版、とても使いやすい

ゼンドスタジオ 13.0.1
強力な PHP 統合開発環境

ドリームウィーバー CS6
ビジュアル Web 開発ツール

SublimeText3 Mac版
神レベルのコード編集ソフト(SublimeText3)

ホットトピック
 7569
7569
 15
15
 1386
1386
 52
52
 87
87
 11
11
 28
28
 107
107
 VueでBootstrapの使用方法
Apr 07, 2025 pm 11:33 PM
vue.jsでBootstrapを使用すると、5つのステップに分かれています。ブートストラップをインストールします。 main.jsにブートストラップをインポートしますブートストラップコンポーネントをテンプレートで直接使用します。オプション:カスタムスタイル。オプション:プラグインを使用します。
 HTML、CSS、およびJavaScriptの役割:コアの責任
Apr 08, 2025 pm 07:05 PM
HTMLはWeb構造を定義し、CSSはスタイルとレイアウトを担当し、JavaScriptは動的な相互作用を提供します。 3人はWeb開発で職務を遂行し、共同でカラフルなWebサイトを構築します。
 ブートストラップにスプリットラインを書く方法
Apr 07, 2025 pm 03:12 PM
ブートストラップスプリットラインを作成するには2つの方法があります。タグを使用して、水平方向のスプリットラインを作成します。 CSS Borderプロパティを使用して、カスタムスタイルのスプリットラインを作成します。
 HTML、CSS、およびJavaScriptの理解:初心者向けガイド
Apr 12, 2025 am 12:02 AM
webdevelopmentReliesOnhtml、css、andjavascript:1)htmlStructuresContent、2)cssStylesit、および3)Javascriptaddsinteractivity、形成、
 ブートストラップのフレームワークをセットアップする方法
Apr 07, 2025 pm 03:27 PM
Bootstrapフレームワークをセットアップするには、次の手順に従う必要があります。1。CDNを介してブートストラップファイルを参照してください。 2。独自のサーバーでファイルをダウンロードしてホストします。 3。HTMLにブートストラップファイルを含めます。 4.必要に応じてSASS/LESSをコンパイルします。 5。カスタムファイルをインポートします(オプション)。セットアップが完了したら、Bootstrapのグリッドシステム、コンポーネント、スタイルを使用して、レスポンシブWebサイトとアプリケーションを作成できます。
 ブートストラップに写真を挿入する方法
Apr 07, 2025 pm 03:30 PM
ブートストラップに画像を挿入する方法はいくつかあります。HTMLIMGタグを使用して、画像を直接挿入します。ブートストラップ画像コンポーネントを使用すると、レスポンシブ画像とより多くのスタイルを提供できます。画像サイズを設定し、IMG-Fluidクラスを使用して画像を適応可能にします。 IMGボーダークラスを使用して、境界線を設定します。丸い角を設定し、IMGラウンドクラスを使用します。影を設定し、影のクラスを使用します。 CSSスタイルを使用して、画像をサイズ変更して配置します。背景画像を使用して、背景イメージCSSプロパティを使用します。
 ブートストラップボタンの使用方法
Apr 07, 2025 pm 03:09 PM
ブートストラップボタンの使用方法は?ブートストラップCSSを導入してボタン要素を作成し、ブートストラップボタンクラスを追加してボタンテキストを追加します


