

vue-cli vscode 構成 eslint の詳細な例

Vue-cli は Vue のスキャフォールディング ツールです。この記事では主に vue-cli vscode 設定 eslint を共有し、皆様のお役に立てれば幸いです。
効果
vscode に非準拠のプロンプト情報をリアルタイムで表示できます
<code><span style="font-size: 14px;">npm run lint</span>格式化所有不符合规范的代码,并列出所有需手动修改的代码错误及定位可以定制规范【默认用的是eslint推荐的规范JavaScript Standard Style】
可以通过<span style="font-size: 14px;">/*eslint-disable */</span>让下面的代码不接受代码规范检查、通过<span style="font-size: 14px;">/*eslint-enable */</span>让下面的代码重新接受代码规范检查、通过<span style="font-size: 14px;">// eslint-disable-line no-undef</span>让某行代码不接受规范检查以及可以有未定义的变量
如何配置
主要包括vscode的插件安装及配置和命令行插件的安装及配置
step1 vscode的插件安装及配置
在vscode中搜索ESlint并安装
在vscode的用户设置中加入如下代码:
<span style="font-size: 14px;">// 自动识别文件类型<br> "emmet.syntaxProfiles": {<br> "vue-html": "html",<br> "vue": "html"<br> },<br> "eslint.autoFixOnSave": false,<br> // 要lint的语言<br> "eslint.validate": [<br> "javascript",<br> "javascriptreact",<br> "html",<br> "vue",<br> {<br> "language": "vue",<br> "autoFix": true<br> }<br> ],<br> "eslint.options": {<br> "plugins": [<br> "html"<br> ]<br> }<br></span>在项目根目录下新建
<span style="font-size: 14px;">eslintrc.json</span>文件并加入如下代码:
<span style="font-size: 14px;">{<br> "root": true,<br> "parserOptions": {<br> "sourceType": "module"<br> },<br> "env": {<br> "browser": true,<br> "es6": true<br> },<br> "extends": "eslint:recommended",<br> "plugins": [<br> "html"<br> ],<br> "rules": {<br> "accessor-pairs": 2,<br> "arrow-spacing": [2, {<br> "before": true,<br> "after": true<br> }],<br> "block-spacing": [2, "always"],<br> "brace-style": [2, "1tbs", {<br> "allowSingleLine": true<br> }],<br> "camelcase": [0, {<br> "properties": "always"<br> }],<br> "comma-dangle": [2, "never"],<br> "comma-spacing": [2, {<br> "before": false,<br> "after": true<br> }],<br> "comma-style": [2, "last"],<br> "constructor-super": 2,<br> "curly": [2, "multi-line"],<br> "dot-location": [2, "property"],<br> "eol-last": 2,<br> // "eqeqeq": [2, "allow-null"],<br> "eqeqeq": 0,<br> "generator-star-spacing": [2, {<br> "before": true,<br> "after": true<br> }],<br> "handle-callback-err": [2, "^(err|error)$"],<br> "indent": [2, 2, {<br> "SwitchCase": 1<br> }],<br> "jsx-quotes": [2, "prefer-single"],<br> "key-spacing": [2, {<br> "beforeColon": false,<br> "afterColon": true<br> }],<br> "keyword-spacing": [2, {<br> "before": true,<br> "after": true<br> }],<br> "new-cap": [2, {<br> "newIsCap": true,<br> "capIsNew": false<br> }],<br> "new-parens": 2,<br> "no-array-constructor": 2,<br> "no-caller": 2,<br> "no-console": "off",<br> "no-class-assign": 2,<br> "no-cond-assign": 2,<br> "no-const-assign": 2,<br> "no-control-regex": 0,<br> "no-delete-var": 2,<br> "no-dupe-args": 2,<br> "no-dupe-class-members": 2,<br> "no-dupe-keys": 2,<br> "no-duplicate-case": 2,<br> "no-empty-character-class": 2,<br> "no-empty-pattern": 2,<br> "no-eval": 2,<br> "no-ex-assign": 2,<br> "no-extend-native": 2,<br> "no-extra-bind": 2,<br> "no-extra-boolean-cast": 2,<br> "no-extra-parens": [2, "functions"],<br> "no-fallthrough": 2,<br> "no-floating-decimal": 2,<br> "no-func-assign": 2,<br> "no-implied-eval": 2,<br> "no-inner-declarations": [2, "functions"],<br> "no-invalid-regexp": 2,<br> "no-irregular-whitespace": 2,<br> "no-iterator": 2,<br> "no-label-var": 2,<br> "no-labels": [2, {<br> "allowLoop": false,<br> "allowSwitch": false<br> }],<br> "no-lone-blocks": 2,<br> "no-mixed-spaces-and-tabs": 2,<br> "no-multi-spaces": 2,<br> "no-multi-str": 2,<br> "no-multiple-empty-lines": [2, {<br> "max": 1<br> }],<br> "no-native-reassign": 2,<br> "no-negated-in-lhs": 2,<br> "no-new-object": 2,<br> "no-new-require": 2,<br> "no-new-symbol": 2,<br> "no-new-wrappers": 2,<br> "no-obj-calls": 2,<br> "no-octal": 2,<br> "no-octal-escape": 2,<br> "no-path-concat": 2,<br> "no-proto": 2,<br> "no-redeclare": 2,<br> "no-regex-spaces": 2,<br> "no-return-assign": [2, "except-parens"],<br> "no-self-assign": 2,<br> "no-self-compare": 2,<br> "no-sequences": 2,<br> "no-shadow-restricted-names": 2,<br> "no-spaced-func": 2,<br> "no-sparse-arrays": 2,<br> "no-this-before-super": 2,<br> "no-throw-literal": 2,<br> "no-trailing-spaces": 2,<br> "no-undef": 2,<br> "no-undef-init": 2,<br> "no-unexpected-multiline": 2,<br> "no-unmodified-loop-condition": 2,<br> "no-unneeded-ternary": [2, {<br> "defaultAssignment": false<br> }],<br> "no-unreachable": 2,<br> "no-unsafe-finally": 2,<br> "no-unused-vars": [2, {<br> "vars": "all",<br> "args": "none"<br> }],<br> "no-useless-call": 2,<br> "no-useless-computed-key": 2,<br> "no-useless-constructor": 2,<br> "no-useless-escape": 0,<br> "no-whitespace-before-property": 2,<br> "no-with": 2,<br> "one-var": [2, {<br> "initialized": "never"<br> }],<br> "operator-linebreak": [2, "after", {<br> "overrides": {<br> "?": "before",<br> ":": "before"<br> }<br> }],<br> "padded-blocks": [2, "never"],<br> "quotes": [2, "single", {<br> "avoidEscape": true,<br> "allowTemplateLiterals": true<br> }],<br> "semi": [2, "never"],<br> "semi-spacing": [2, {<br> "before": false,<br> "after": true<br> }],<br> "space-before-blocks": [2, "always"],<br> "space-before-function-paren": [2, "never"],<br> "space-in-parens": [2, "never"],<br> "space-infix-ops": 2,<br> "space-unary-ops": [2, {<br> "words": true,<br> "nonwords": false<br> }],<br> "spaced-comment": [2, "always", {<br> "markers": ["global", "globals", "eslint", "eslint-disable", "*package", "!", ","]<br> }],<br> "template-curly-spacing": [2, "never"],<br> "use-isnan": 2,<br> "valid-typeof": 2,<br> "wrap-iife": [2, "any"],<br> "yield-star-spacing": [2, "both"],<br> "yoda": [2, "never"],<br> "prefer-const": 2,<br> "object-curly-spacing": [2, "always", {<br> "objectsInObjects": false<br> }],<br> "array-bracket-spacing": [2, "never"]<br> }<br>}<br></span>step2 命令行插件的安装及配置
1 . 在项目根目录下的<span style="font-size: 14px;">package.json</span>文件中的加入如下代码:<span style="font-size: 14px;">scripts</span>下:
<span style="font-size: 14px;">"lint": "eslint --fix --ext .js,.vue src"<br></span>
和<span style="font-size: 14px;">devDependencies</span>下:
<span style="font-size: 14px;">"eslint": "^3.19.0",<br>"eslint-plugin-vue": "^2.1.0",<br></span>
-
在项目根目录终端下运行
を実行することで、非準拠のプロンプトをすべてフォーマットできますcode><span style="font-size: 14px;">cnpm i</span>npm run lint 仕様に準拠し、すべてのコードエラーと手動で変更する必要がある箇所をリストしたコード
<p>/*eslint-disable */<a href="http://www.php.cn/js-tutorial-382635.html" target="_self"></a></p> を渡すと、次のコードがコード仕様チェックを受け入れないようにして、<p>/*eslint- を渡すことができます。これを行うには */<a href="http://www.php.cn/html5-tutorial-369892.html" target="_self"></a></p> を有効にします。 次のコードはコード仕様のチェックを再度受け入れ、<p>// eslint-disable-line no-undef<a href="http://www.php.cn/js-tutorial-364405.html" target="_self"></a></p> を渡してコード行を作成します。仕様チェックの対象ではなく、未定義の変数を持つことができます🎜🎜設定方法🎜🎜🎜主に vscode プラグインのインストールと設定、コマンドライン プラグインのインストールと設定が含まれます🎜🎜ステップ 1 vscode プラグインのインストールと設定🎜
- 🎜🎜🎜 vscode で ESlint を検索し、インストールします🎜🎜🎜🎜🎜🎜 vscode のユーザー設定: 🎜🎜🎜🎜rrreee
- 🎜🎜🎜 プロジェクトのルート ディレクトリに新しい 🎜
🎜eslintrc.json🎜🎜 ファイルを作成し、追加します次のコード: 🎜🎜🎜🎜rrreee🎜step2 コマンドラインプラグインのインストールと設定🎜
🎜🎜1. 次のコードを 🎜🎜package.json🎜に追加します。 > プロジェクト ルート ディレクトリの🎜 ファイル: 🎜
🎜scripts🎜 🎜Down: 🎜🎜rrreee🎜🎜 および🎜
🎜devDependency🎜🎜Down : プロジェクトのルート ディレクトリ ターミナル内の 🎜🎜rrreee- 🎜🎜🎜 c
🎜cnpm i🎜 🎜🎜🎜🎜🎜Done.🎜🎜🎜🎜 🎜🎜 関連する推奨事項: 🎜🎜🎜🎜 Vue-CLI を使用してマルチページ アプリケーション メソッドを開発する方法 🎜🎜🎜🎜 vue-cli を使用して vue プロジェクトと Webpack を構築する方法🎜🎜🎜🎜Vue-cliに関する関連事例のまとめ🎜🎜以上がvue-cli vscode 構成 eslint の詳細な例の詳細内容です。詳細については、PHP 中国語 Web サイトの他の関連記事を参照してください。

ホットAIツール

Undresser.AI Undress
リアルなヌード写真を作成する AI 搭載アプリ

AI Clothes Remover
写真から衣服を削除するオンライン AI ツール。

Undress AI Tool
脱衣画像を無料で

Clothoff.io
AI衣類リムーバー

AI Hentai Generator
AIヘンタイを無料で生成します。

人気の記事
ホットツール

メモ帳++7.3.1
使いやすく無料のコードエディター

SublimeText3 中国語版
中国語版、とても使いやすい

ゼンドスタジオ 13.0.1
強力な PHP 統合開発環境

ドリームウィーバー CS6
ビジュアル Web 開発ツール

SublimeText3 Mac版
神レベルのコード編集ソフト(SublimeText3)
ホットトピック


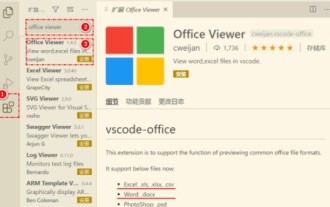 vscode で Word ドキュメントを表示する方法 vscode で Word ドキュメントを表示する方法
May 09, 2024 am 09:37 AM
vscode で Word ドキュメントを表示する方法 vscode で Word ドキュメントを表示する方法
May 09, 2024 am 09:37 AM
まず、コンピュータ上で vscode ソフトウェアを開き、図の①に示すように、左側の [拡張機能] アイコンをクリックし、図の②に示すように、拡張機能インターフェイスの検索ボックスに「officeviewer」と入力します。次に、図の③のように検索結果からインストールする「officeviewer」を選択し、最後に以下のようにdocxやpdfなどのファイルを開きます。
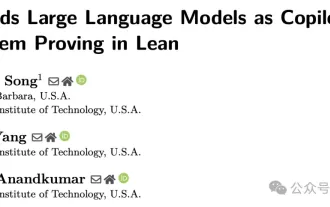 カリフォルニア工科大学の中国人がAIを使って数学的証明を覆す!タオ・ゼシュアンの衝撃を5倍にスピードアップ、数学的ステップの80%が完全に自動化
Apr 23, 2024 pm 03:01 PM
カリフォルニア工科大学の中国人がAIを使って数学的証明を覆す!タオ・ゼシュアンの衝撃を5倍にスピードアップ、数学的ステップの80%が完全に自動化
Apr 23, 2024 pm 03:01 PM
テレンス・タオなど多くの数学者に賞賛されたこの正式な数学ツール、LeanCopilot が再び進化しました。ちょうど今、カリフォルニア工科大学のアニマ・アナンドクマール教授が、チームが LeanCopilot 論文の拡張版をリリースし、コードベースを更新したと発表しました。イメージペーパーのアドレス: https://arxiv.org/pdf/2404.12534.pdf 最新の実験では、この Copilot ツールが数学的証明ステップの 80% 以上を自動化できることが示されています。この記録は、以前のベースラインのイソップよりも 2.3 倍優れています。そして、以前と同様に、MIT ライセンスの下でオープンソースです。写真の彼は中国人の少年、ソン・ペイヤンです。
 vscode でバックグラウンド更新を有効にする方法 vscode でバックグラウンド更新を有効にする方法
May 09, 2024 am 09:52 AM
vscode でバックグラウンド更新を有効にする方法 vscode でバックグラウンド更新を有効にする方法
May 09, 2024 am 09:52 AM
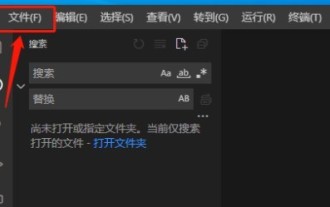
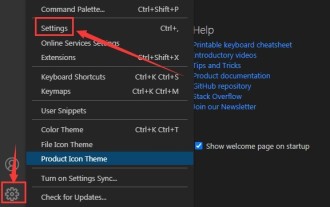
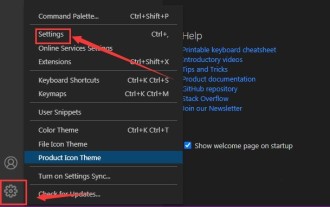
1. まず、インターフェースを開いた後、左上隅のファイルメニューをクリックします。 2. 次に、設定列の設定ボタンをクリックします。 3. ジャンプした設定ページで、アップデートセクションを見つけます。最後に、マウスをクリックしてチェックして有効にし、Windows のバックグラウンドで新しい VSCode バージョンのボタンをダウンロードしてインストールし、プログラムを再起動します。
 vscode ワークスペースにファイルを追加する方法 vscode ワークスペースにファイルを追加する方法
May 09, 2024 am 09:43 AM
vscode ワークスペースにファイルを追加する方法 vscode ワークスペースにファイルを追加する方法
May 09, 2024 am 09:43 AM
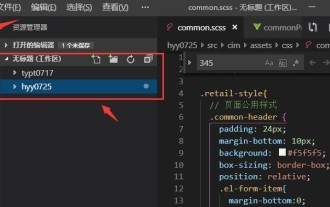
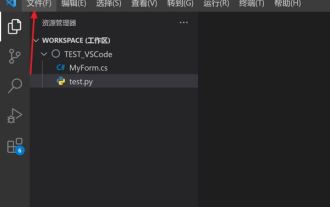
1. まず、vscode ソフトウェアを開き、エクスプローラー アイコンをクリックして、ワークスペース ウィンドウを見つけます。 2. 次に、左上隅にあるファイル メニューをクリックし、フォルダーをワークスペースに追加オプションを見つけます。 3. 最後に、フォルダーの場所を見つけます。ローカルディスク、追加ボタンをクリックします
 vscode で wsl 設定ファイルを無効にする方法 vscode で wsl 設定ファイルを無効にする方法
May 09, 2024 am 10:30 AM
vscode で wsl 設定ファイルを無効にする方法 vscode で wsl 設定ファイルを無効にする方法
May 09, 2024 am 10:30 AM
1. まず、設定メニューで設定オプションを開きます。 2. 次に、よく使用されるページでターミナル列を見つけます。 3. 最後に、列の右側にある usewslprofiles ボタンのチェックを外します。
 VScode でアニメーションのスムーズな挿入を設定する方法 アニメーションのスムーズな挿入を設定する VScode チュートリアル
May 09, 2024 am 09:49 AM
VScode でアニメーションのスムーズな挿入を設定する方法 アニメーションのスムーズな挿入を設定する VScode チュートリアル
May 09, 2024 am 09:49 AM
1. まず、インターフェースを開いた後、ワークスペースインターフェースをクリックします。 2. 次に、開いている編集パネルで、「ファイル」メニューをクリックします。 3. 次に、「環境設定」列の下にある「設定」ボタンをクリックします。 4. 最後に、マウスをクリックして CursorSmoothCaretAnimation を確認します。ボタンを押して保存するだけです
 Vscode でワークスペースの信頼権限を開く方法 Vscode でワークスペースの信頼権限を開く方法
May 09, 2024 am 10:34 AM
Vscode でワークスペースの信頼権限を開く方法 Vscode でワークスペースの信頼権限を開く方法
May 09, 2024 am 10:34 AM
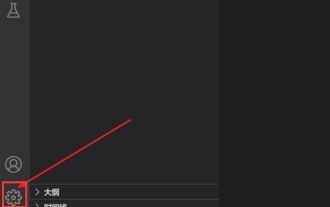
1. まず、編集ウィンドウを開いた後、左下隅にある設定アイコンをクリックします。 2. 次に、表示されるサブメニューで [ワークスペース信頼の管理] ボタンをクリックします。 3. 次に、編集ウィンドウでページを見つけます。最後に、あなたのオフィスによると、必要に応じて関連する指示を確認してください
 vscode でスマート コミットを有効にする方法 vscode でスマート コミットを有効にする手順
May 09, 2024 am 10:40 AM
vscode でスマート コミットを有効にする方法 vscode でスマート コミットを有効にする手順
May 09, 2024 am 10:40 AM
ステップ 1: vscode ソフトウェア インターフェイスを開いた後、下の設定メニューで [設定] ボタンをクリックします。 ステップ 2: [拡張機能] 列で [Git] オプションを見つけます。 ステップ 3: [enablesmartcommit] ボタンをクリックしてチェックします。
