Webpack を使用してリソースのメソッドとテクニックを最適化する方法
フロントエンド アプリケーションの最適化では、ロードされるリソースのサイズを制御することが非常に重要です。ほとんどの場合、できることは、パッケージ化とコンパイルのプロセス中にサイズを制御し、リソースを分割して再利用することです。この記事では、主に webpack を使用してリソースを最適化する方法を紹介します。編集者がそれを共有し、参考にします。編集者をフォローして見てみましょう。皆さんのお役に立てれば幸いです。
前書き この記事は主に Webpack パッケージ化に基づいており、Webpack パッケージ化レベルからリソースとキャッシュを処理する方法を例として使用しています。やるべきことは、Webpack を行うことです。ビジネス コードを少量変更しながら、構成の最適化を実行します。 同時に、(webpack-contrib/webpack-bundle-analyzer) プラグインを使用して、パッケージ化されたリソースを分析することもできます。この記事では、このプラグインを使用します。主に例として使用されます。 ヒント: webpack バージョン @3.6.01. パッケージ化環境とコード圧縮まず、基本的な webpack 構成があります:// webpack.config.js
const path = require('path');
const BundleAnalyzerPlugin = require('webpack-bundle-analyzer').BundleAnalyzerPlugin;
const PROJECT_ROOT = path.resolve(__dirname, './');
module.exports = {
entry: {
index: './src/index.js'
},
output: {
path: path.resolve(__dirname, 'dist'),
filename: '[name].[chunkhash:4].js'
},
module: {
rules: [
{
test: /\.js[x]?$/,
use: 'babel-loader',
include: PROJECT_ROOT,
exclude: /node_modules/
}
]
},
plugins: [
new BundleAnalyzerPlugin()
],
resolve: {
extensions: ['.js', '.jsx']
},
};
Hash: e51afc2635f08322670b
Version: webpack 3.6.0
Time: 2769ms
    Asset  Size Chunks          Chunk Names
index.caa7.js 1.3 MB    0 [emitted] [big] index
// webpack.config.js
...
{
 ...
 plugins: [
  new BundleAnalyzerPlugin(),
  new webpack.DefinePlugin({
   'process.env.NODE_ENV': JSON.stringify(process.env.NODE_ENV || 'production')
  }),
  new UglifyJSPlugin({
   uglifyOptions: {
    ie8: false,
    output: {
     comments: false,
     beautify: false,
    },
    mangle: {
     keep_fnames: true
    },
    compress: {
     warnings: false,
     drop_console: true
    },
   }
  })
 ]
 ...
}Hash: 84338998472a6d3c5c25 Version: webpack 3.6.0 Time: 9940ms Asset Size Chunks Chunk Names index.89c2.js 346 kB 0 [emitted] [big] index
// webpack.config.js
const path = require('path');
const webpack = require('webpack');
const UglifyJSPlugin = require('uglifyjs-webpack-plugin');
const BundleAnalyzerPlugin = require('webpack-bundle-analyzer').BundleAnalyzerPlugin;

const PROJECT_ROOT = path.resolve(__dirname, './');

module.exports = {
 entry: {
  index: './src/index.js'
 },
 output: {
  path: path.resolve(__dirname, 'dist'),
  filename: '[name].[chunkhash:4].js',
  chunkFilename: '[name].[chunkhash:4].child.js',
 },
 module: {
  rules: [
   {
    test: /\.js[x]?$/,
    use: 'babel-loader',
    include: PROJECT_ROOT,
    exclude: /node_modules/
   }
  ]
 },
 plugins: [
  new BundleAnalyzerPlugin(),
  new webpack.DefinePlugin({
   'process.env.NODE_ENV': JSON.stringify(process.env.NODE_ENV || 'production')
  }),
  new UglifyJSPlugin({
   uglifyOptions: {
    ie8: false,
    output: {
     comments: false,
     beautify: false,
    },
    mangle: {
     keep_fnames: true
    },
    compress: {
     warnings: false,
     drop_console: true
    },
   }
  }),
 ],
 resolve: {
  extensions: ['.js', '.jsx']
 },
};- `import('path/to/module') -> Promise`、 `require.ensure(dependency: String [] 、callback: function(require)、errorCallback: function(error)、chunkName: String)`
- 最新バージョンの webpack では、主に `import()` を使用することをお勧めします (注: import は Promise を使用するため、 Promise ポリフィルがコードでサポートされていることを確認する必要があります)。
// src/index.js
function getComponent() {
 return import(
  /* webpackChunkName: "lodash" */
  'lodash'
 ).then(_ => {
  var element = document.createElement('p');

  element.innerHTML = _.join(['Hello', 'webpack'], ' ');

  return element;

 }).catch(error => 'An error occurred while loading the component');
}

getComponent().then(component => {
 document.body.appendChild(component);
})パッケージ化情報を確認できます:
Hash: d6ba79fe5995bcf9fa4d
Version: webpack 3.6.0
Time: 7022ms
        Asset   Size Chunks       Chunk Names
lodash.89f0.child.js 85.4 kB    0 [emitted] lodash
    index.316e.js 1.96 kB    1 [emitted] index
  [0] ./src/index.js 441 bytes {1} [built]
  [2] (webpack)/buildin/global.js 509 bytes {0} [built]
  [3] (webpack)/buildin/module.js 517 bytes {0} [built]
+ 1 hidden moduleパッケージ化されたコードが 2 つのファイル、`index.316e.js` と `lodash.89f0.child.js` を生成することがわかります。後者は `import ` を介して渡されます。分割を実現します。
`import` 它接收一个 `path` 参数,指的是该子模块对于的路径,同时还注意到其中可以添加一行注释 `/* webpackChunkName: "lodash" */`,该注释并非是无用的,它定义了该子模块的 name,其对应与 `output.chunkFilename` 中的 `[name]`。
`import` 函数返回一个 Promise,当异步加载到子模块代码是会执行后续操作,比如更新视图等。
(1)React 中的按需加载
在 React 配合 React-Router 开发中,往往就需要代码根据路由按需加载的能力,下面是一个基于 webpack 代码动态导入技术实现的 React 动态载入的组件:
import React, { Component } from 'react';

export default function lazyLoader (importComponent) {
 class AsyncComponent extends Component {
  state = { Component: null }

  async componentDidMount () {
   const { default: Component } = await importComponent();

   this.setState({
    Component: Component
   });
  }

  render () {
   const Component = this.state.Component;

   return Component
    ? <Component {...this.props} />
    : null;
  }
 }

 return AsyncComponent;
};在 `Route` 中:
<Switch>
 <Route exact path="/"
  component={lazyLoader(() => import('./Home'))}
 />
 <Route path="/about"
  component={lazyLoader(() => import('./About'))}
 />
 <Route
  component={lazyLoader(() => import('./NotFound'))}
 />
</Switch>在 `Route` 中渲染的是 `lazyLoader` 函数返回的组件,该组件在 mount 之后会去执行 `importComponent` 函数(既:`() => import('./About')`)动态加载其对于的组件模块(被拆分出来的代码),待加载成功之后渲染该组件。
使用该方式打包出来的代码:
Hash: 02a053d135a5653de985
Version: webpack 3.6.0
Time: 9399ms
     Asset   Size Chunks          Chunk Names
0.db22.child.js 5.82 kB    0 [emitted]
1.fcf5.child.js  4.4 kB    1 [emitted]
2.442d.child.js   3 kB    2 [emitted]
 index.1bbc.js  339 kB    3 [emitted] [big] index
三、抽离 Common 资源
(1)第三方库的长缓存
首先对于一些比较大的第三方库,比如在 React 中用到的 react、react-dom、react-router 等等,我们不希望它们被重复打包,并且在每次版本更新的时候也不希望去改变这部分的资源导致在用户端重新加载。
在这里可以使用 webpack 的 CommonsChunkPlugin 来抽离这些公共资源;
CommonsChunkPlugin 插件,是一个可选的用于建立一个独立文件(又称作 chunk)的功能,这个文件包括多个入口 chunk 的公共模块。通过将公共模块拆出来,最终合成的文件能够在最开始的时候加载一次,便存起来到缓存中供后续使用。这个带来速度上的提升,因为浏览器会迅速将公共的代码从缓存中取出来,而不是每次访问一个新页面时,再去加载一个更大的文件。
首先需要在 entry 中新增一个入口用来打包需要抽离出来的库,这里将 `'react', 'react-dom', 'react-router-dom', 'immutable'` 都给单独打包进 `vendor` 中;
之后在 plugins 中定义一个 `CommonsChunkPlugin` 插件,同时将其 `name` 设置为 `vendor` 是它们相关联,再将 `minChunks` 设置为 `Infinity` 防止其他代码被打包进来。
// webpack.config.js
const path = require('path');
const webpack = require('webpack');
const UglifyJSPlugin = require('uglifyjs-webpack-plugin');
const BundleAnalyzerPlugin = require('webpack-bundle-analyzer').BundleAnalyzerPlugin;

const PROJECT_ROOT = path.resolve(__dirname, './');

module.exports = {
 entry: {
  index: './src0/index.js',
  vendor: ['react', 'react-dom', 'react-router-dom', 'immutable']
 },
 output: {
  path: path.resolve(__dirname, 'dist'),
  filename: '[name].[chunkhash:4].js',
  chunkFilename: '[name].[chunkhash:4].child.js',
 },
 module: {
  rules: [
   {
    test: /\.js[x]?$/,
    use: 'babel-loader',
    include: PROJECT_ROOT,
    exclude: /node_modules/
   }
  ]
 },
 plugins: [
  new BundleAnalyzerPlugin(),
  new webpack.DefinePlugin({
   'process.env.NODE_ENV': JSON.stringify(process.env.NODE_ENV || 'production')
  }),
  new UglifyJSPlugin({
   uglifyOptions: {
    ie8: false,
    output: {
     comments: false,
     beautify: false,
    },
    mangle: {
     keep_fnames: true
    },
    compress: {
     warnings: false,
     drop_console: true
    },
   }
  }),
  new webpack.optimize.CommonsChunkPlugin({
   name: 'vendor',
   minChunks: Infinity,
  }),
 ],
 resolve: {
  extensions: ['.js', '.jsx']
 },
};运行打包可以看到:
Hash: 34a71fcfd9a24e810c21
Version: webpack 3.6.0
Time: 9618ms
     Asset   Size Chunks          Chunk Names
0.2c65.child.js 5.82 kB    0 [emitted]
1.6e26.child.js  4.4 kB    1 [emitted]
2.e4bc.child.js   3 kB    2 [emitted]
 index.4e2f.js 64.2 kB    3 [emitted]     index
 vendor.5fd1.js  276 kB    4 [emitted] [big] vendor
可以看到 `vendor` 被单独打包出来了。
当我们改变业务代码时再次打包:
Hash: cd3f1bc16b28ac97e20a
Version: webpack 3.6.0
Time: 9750ms
     Asset   Size Chunks          Chunk Names
0.2c65.child.js 5.82 kB    0 [emitted]
1.6e26.child.js  4.4 kB    1 [emitted]
2.e4bc.child.js   3 kB    2 [emitted]
 index.4d45.js 64.2 kB    3 [emitted]     index
 vendor.bc85.js  276 kB    4 [emitted] [big] vendor
vendor 包同样被打包出来的,然而它的文件 hash 却发生了变化,这显然不符合我们长缓存的需求。
这是因为 webpack 在使用 CommoChunkPlugin 的时候会生成一段 runtime 代码(它主要用来处理代码模块的映射关系),而哪怕没有改变 vendor 里的代码,这个 runtime 仍然是会跟随着打包变化的并且打入 verdor 中,所以 hash 就会开始变化了。解决方案则是把这部分的 runtime 代码也单独抽离出来,修改之前的 `CommonsChunkPlugin` 为:
// webpack.config.js
...
new webpack.optimize.CommonsChunkPlugin({
 name: ['vendor', 'runtime'],
 minChunks: Infinity,
}),
...执行打包可以看到生成的代码中多了 `runtime` 文件,同时即使改变业务代码,vendor 的 hash 值也保持不变了。
当然这段 `runtime` 实际上非常短,我们可以直接 inline 在 html 中,如果使用的是 `html-webpack-plugin` 插件处理 html,则可以结合 [`html-webpack-inline-source-plugin`](DustinJackson/html-webpack-inline-source-plugin) 插件自动处理其 inline。
(2)公共资源抽离
在我们打包出来的 js 资源包括不同入口以及子模块的 js 资源包,然而它们之间也会重复载入相同的依赖模块或者代码,因此可以通过 CommonsChunkPlugin 插件将它们共同依赖的一些资源打包成一个公共的 js 资源。
// webpack.config.js
plugins: [
 new BundleAnalyzerPlugin(),
 new webpack.DefinePlugin({
  'process.env.NODE_ENV': JSON.stringify(process.env.NODE_ENV || 'production')
 }),
 new UglifyJSPlugin({
  uglifyOptions: {
   ie8: false,
   output: {
    comments: false,
    beautify: false,
   },
   mangle: {
    keep_fnames: true
   },
   compress: {
    warnings: false,
    drop_console: true
   },
  }
 }),
 new webpack.optimize.CommonsChunkPlugin({
  name: ['vendor', 'runtime'],
  minChunks: Infinity,
 }),
 new webpack.optimize.CommonsChunkPlugin({
  // ( 公共chunk(commnons chunk) 的名称)
  name: "commons",
  // ( 公共chunk 的文件名)
  filename: "commons.[chunkhash:4].js",
  // (模块必须被 3个 入口chunk 共享)
  minChunks: 3
 })
],可以看到这里增加了 `commons` 的一个打包,当一个资源被三个以及以上 chunk 依赖时,这些资源会被单独抽离打包到 `commons.[chunkhash:4].js` 文件。
执行打包,看到结果如下:
Hash: 2577e42dc5d8b94114c8
Version: webpack 3.6.0
Time: 24009ms
     Asset   Size Chunks          Chunk Names
0.2eee.child.js 90.8 kB    0 [emitted]
1.cfbc.child.js 89.4 kB    1 [emitted]
2.557a.child.js  88 kB    2 [emitted]
 vendor.66fd.js  275 kB    3 [emitted] [big] vendor
 index.688b.js 64.2 kB    4 [emitted]     index
commons.a61e.js 1.78 kB    5 [emitted]     commons
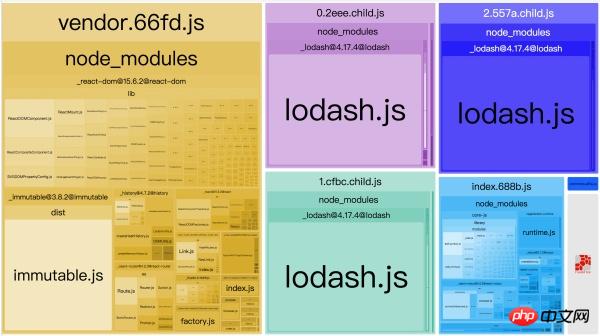
却发现这里的 `commons.[chunkhash].js` 基本没有实际内容,然而明明在每个子模块中也都依赖了一些相同的依赖。
借助 webpack-bundle-analyzer 来分析一波:

可以看到三个模块都依赖了 `lodash`,然而它并没有被抽离出来。
这是因为 CommonsChunkPlugin 中的 chunk 指的是 entry 中的每个入口,因此对于一个入口拆分出来的子模块(children chunk)是不生效的。
可以通过在 CommonsChunkPlugin 插件中配置 `children` 参数将拆分出来的子模块的公共依赖也打包进 `commons` 中:
// webpack.config.js
plugins: [
 new BundleAnalyzerPlugin(),
 new webpack.DefinePlugin({
  'process.env.NODE_ENV': JSON.stringify(process.env.NODE_ENV || 'production')
 }),
 new UglifyJSPlugin({
  uglifyOptions: {
   ie8: false,
   output: {
    comments: false,
    beautify: false,
   },
   mangle: {
    keep_fnames: true
   },
   compress: {
    warnings: false,
    drop_console: true
   },
  }
 }),
 new webpack.optimize.CommonsChunkPlugin({
  name: ['vendor', 'runtime'],
  minChunks: Infinity,
 }),
 new webpack.optimize.CommonsChunkPlugin({
  // ( 公共chunk(commnons chunk) 的名称)
  name: "commons",
  // ( 公共chunk 的文件名)
  filename: "commons.[chunkhash:4].js",
  // (模块必须被 3个 入口chunk 共享)
  minChunks: 3
 }),
 new webpack.optimize.CommonsChunkPlugin({
  // (选择所有被选 chunks 的子 chunks)
  children: true,
  // (在提取之前需要至少三个子 chunk 共享这个模块)
  minChunks: 3,
 })
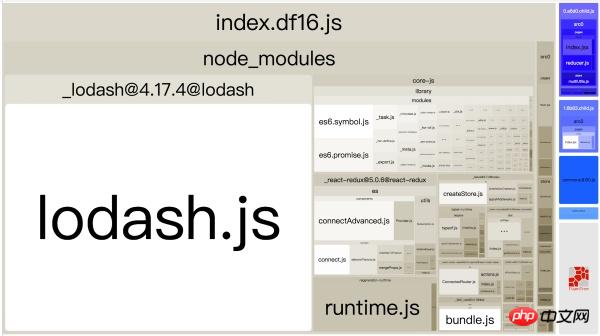
],查看打包效果:

其子模块的公共资源都被打包到 `index` 之中了,并没有理想地打包进 `commons` 之中,还是因为 `commons` 对于的是 entry 中的入口模块,而这里并未有 3 个 entry 模块共用资源;
在单入口的应用中可以选择去除 `commons`,而在子模块的 `CommonsChunkPlugin` 的配置中配置 `async` 为 `true`:
// webpack.config.js
plugins: [
 new BundleAnalyzerPlugin(),
 new webpack.DefinePlugin({
  'process.env.NODE_ENV': JSON.stringify(process.env.NODE_ENV || 'production')
 }),
 new UglifyJSPlugin({
  uglifyOptions: {
   ie8: false,
   output: {
    comments: false,
    beautify: false,
   },
   mangle: {
    keep_fnames: true
   },
   compress: {
    warnings: false,
    drop_console: true
   },
  }
 }),
 new webpack.optimize.CommonsChunkPlugin({
  name: ['vendor', 'runtime'],
  minChunks: Infinity,
 }),
 new webpack.optimize.CommonsChunkPlugin({
  // (选择所有被选 chunks 的子 chunks)
  children: true,
  // (异步加载)
  async: true,
  // (在提取之前需要至少三个子 chunk 共享这个模块)
  minChunks: 3,
 })
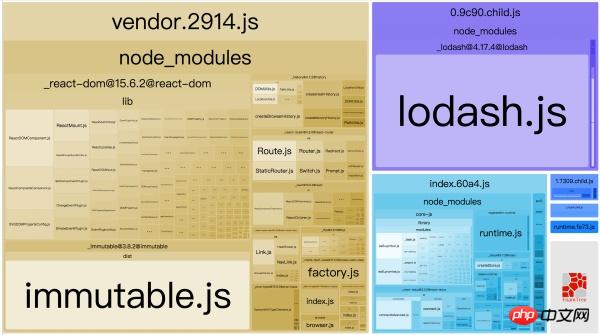
],查看效果:

子模块的公共资源都被打包到 `0.9c90.child.js` 中了,该模块则是子模块的 commons。
四、tree shaking
tree shaking 是一个术语,通常用于描述移除 JavaScript 上下文中的未引用代码(dead-code)。它依赖于 ES2015 模块系统中的静态结构特性,例如 import 和 export。这个术语和概念实际上是兴起于 ES2015 模块打包工具 rollup。
在我们引入一个依赖的某个输出的时候,我们可能需要的仅仅是该依赖的某一部分代码,而另一部分代码则是 `unused` 的,如果能够去除这部分代码,那么最终打包出来的资源体积也是可以有可观的减小。
首先,webpack 中实现 tree shaking 是基于 webpack 内部支持的 es2015 的模块机制,在大部分时候我们使用 babel 来编译 js 代码,而 babel 会通过自己的模块加载机制处理一遍,这导致 webpack 中的 tree shaking 处理将会失效。因此在 babel 的配置中需要关闭对模块加载的处理:
// .babelrc
{
 "presets": [
  [
   "env", {
    "modules": false,
   }
  ],
  "stage-0"
 ],
 ...
}然后我们来看下 webpack 是如何处理打包的代码,举例有一个入口文件 `index.js` 和一个 `utils.js` 文件:
// utils.js
export function square(x) {
 return x * x;
}

export function cube(x) {
 return x * x * x;
}
"

"js
// index.js
import { cube } from './utils.js';

console.log(cube(10));
"

打包出来的代码:

"
// index.bundle.js
/* 1 */
/***/ (function(module, __webpack_exports__, __webpack_require__) {

"use strict";
/* unused harmony export square */
/* harmony export (immutable) */ __webpack_exports__["a"] = cube;
function square(x) {
 return x * x;
}

function cube(x) {
 return x * x * x;
}可以看到仅有 `cube` 函数被 `__webpack_exports__` 导出来,而 `square` 函数被标记为 `unused harmony export square`,然而在打包代码中既是 `square` 没有被导出但是它仍然存在与代码中,而如何去除其代码则可以通过添加 `UglifyjsWebpackPlugin` 插件来处理。
相关推荐:
以上がWebpack を使用してリソースのメソッドとテクニックを最適化する方法の詳細内容です。詳細については、PHP 中国語 Web サイトの他の関連記事を参照してください。

ホットAIツール

Undresser.AI Undress
リアルなヌード写真を作成する AI 搭載アプリ

AI Clothes Remover
写真から衣服を削除するオンライン AI ツール。

Undress AI Tool
脱衣画像を無料で

Clothoff.io
AI衣類リムーバー

AI Hentai Generator
AIヘンタイを無料で生成します。

人気の記事

ホットツール

メモ帳++7.3.1
使いやすく無料のコードエディター

SublimeText3 中国語版
中国語版、とても使いやすい

ゼンドスタジオ 13.0.1
強力な PHP 統合開発環境

ドリームウィーバー CS6
ビジュアル Web 開発ツール

SublimeText3 Mac版
神レベルのコード編集ソフト(SublimeText3)

ホットトピック
 7476
7476
 15
15
 1377
1377
 52
52
 77
77
 11
11
 19
19
 32
32
 VUE3 入門チュートリアル: Webpack を使用したパッケージ化とビルド
Jun 15, 2023 pm 06:17 PM
Vue は、インタラクティブで効率的な Web アプリケーションを迅速に構築するのに役立つ優れた JavaScript フレームワークです。 Vue3 は、多くの新機能が導入された Vue の最新バージョンです。 Webpack は現在最も人気のある JavaScript モジュール パッケージャーおよびビルド ツールの 1 つで、プロジェクト内のさまざまなリソースの管理に役立ちます。この記事では、Webpack を使用して Vue3 アプリケーションをパッケージ化してビルドする方法を紹介します。 1.Webpackをインストールする
 115 ネットワーク ディスク上のリソースを見つける方法
Feb 23, 2024 pm 05:10 PM
115 ネットワーク ディスクには大量のリソースが存在しますが、リソースを見つけるにはどうすればよいでしょうか?ユーザーはソフトウェア内で必要なリソースを検索し、ダウンロード インターフェイスに入り、ネットワーク ディスクに保存することを選択できます。 115 ネットワーク ディスク上のリソースを検索する方法のこの紹介では、具体的な内容を説明します。 115 ネットワーク ディスク上のリソースを見つけるにはどうすればよいですか? 回答: ソフトウェアでコンテンツを検索し、クリックしてネットワーク ディスクに保存します。詳細な紹介: 1. まず、アプリに必要なリソースを入力します。 2. 次に、表示されるキーワードのリンクをクリックします。 3. 次に、ダウンロード インターフェイスに入ります。 4. 内部のネットワーク ディスクに保存をクリックします。
 Java API開発におけるWebサーバー処理にJetty7を使用する
Jun 18, 2023 am 10:42 AM
JavaAPI 開発における Web サーバー処理に Jetty7 を使用する インターネットの発展に伴い、Web サーバーはアプリケーション開発の中核部分となり、多くの企業でも注目を集めています。増大するビジネス ニーズを満たすために、多くの開発者が Web サーバー開発に Jetty の使用を選択しており、その柔軟性と拡張性は広く認識されています。この記事では、JavaAPI 開発における Jetty7 の使用方法を紹介します。
 なぜHan Xiaoquanには突然リソースがなくなったのでしょうか?
Feb 24, 2024 pm 03:22 PM
Han Xiaoquan は多くの韓国ドラマを視聴できるソフトウェアですが、なぜ突然リソースがなくなったのですか?このソフトウェアには、ネットワークの問題、バージョンの問題、または著作権の問題により、リソースがない可能性があります。 Han Xiaoquan が突然リソースを失った理由についてのこの記事では、その具体的な内容を説明します。 Han Xiaoquan に突然リソースがなくなったのはなぜですか? 回答: ネットワークの問題、バージョンの問題、および著作権の問題のため、詳細な紹介: 1. ネットワーク問題の解決策: 別のネットワークを選択し、ソフトウェアに再度ログインして試すことができます。 。 2. バージョンの問題の解決策: ユーザーは、このソフトウェアの最新バージョンを公式 Web サイトからダウンロードできます。 3. 著作権問題への対応: 一部の韓国ドラマは著作権問題により棚から削除されていますが、他の韓国ドラマを選択して視聴することができます。
 ウェブ上の顔面ブロック攻撃に対するリアルタイム保護 (機械学習に基づく)
Jun 10, 2023 pm 01:03 PM
顔面遮蔽弾幕とは、映像内の人物を遮ることなく大量の弾幕が浮遊し、人物の背後から浮遊しているように見せることです。機械学習は数年前から普及していますが、これらの機能がブラウザでも実行できることは多くの人に知られていません。この記事では、ビデオ連発における実際的な最適化プロセスを紹介します。記事の最後に、適用可能なシナリオをいくつか示します。このソリューションを開くことを望んでいます。いくつかのアイデアがあります。 mediapipeDemo (https://google.github.io/mediapipe/) は、顔ブロック弾幕のオンデマンドアップアップロードの主流の実装原理を示していますサーバーのバックグラウンド計算により、ビデオ画面内のポートレート領域を抽出し、SVG ストレージに変換しますクライアントがビデオを再生している間、サーバーから SVG をダウンロードし、弾幕、ポートレートと組み合わせる
 Golang を使用して Web アプリケーションのフォーム検証を実装する方法
Jun 24, 2023 am 09:08 AM
フォーム検証は Web アプリケーション開発において非常に重要なリンクであり、フォーム データを送信する前にデータの有効性をチェックして、アプリケーションのセキュリティ脆弱性やデータ エラーを回避できます。 Web アプリケーションのフォーム検証は、Golang を使用すると簡単に実装できます。この記事では、Golang を使用して Web アプリケーションのフォーム検証を実装する方法を紹介します。 1. フォーム検証の基本要素 フォーム検証の実装方法を紹介する前に、フォーム検証の基本要素が何であるかを知る必要があります。フォーム要素: フォーム要素は
 Windows 11 セーフ モードでの Explorer.exe のクラッシュは発生しなくなりました
Aug 30, 2023 pm 11:09 PM
Windows 11 のセーフ モードで Explorer.exe がクラッシュしますか?もうない。 Microsoft は新しいパッチを Dev Channel にリリースしたところです。このリリースには新機能はありませんが、セーフ モードで Explorer.exe がクラッシュする迷惑なバグを含め、多くの修正と改善が Windows Insider プログラムに組み込まれています。まあ、少なくとも Windows Insider Program では、もうこれに別れを告げることができます。ただし、これらすべてのアップデートと同様に、ライブ Windows サーバーにも適用される予定です。 Explorer.exe がセーフ モードで動作しなくなる問題を修正しました。ただし、ファイルエクスプローラーには他にもいくつかの修正が予定されているため、Microsoftはそれを機能させることに熱心です。
 コックピット Web UI から管理アクセスを有効にする方法
Mar 20, 2024 pm 06:56 PM
Cockpit は、Linux サーバー用の Web ベースのグラフィカル インターフェイスです。これは主に、初心者/熟練ユーザーにとって Linux サーバーの管理を容易にすることを目的としています。この記事では、Cockpit アクセス モードと、CockpitWebUI から Cockpit への管理アクセスを切り替える方法について説明します。コンテンツ トピック: コックピット エントリ モード 現在のコックピット アクセス モードの確認 CockpitWebUI からコックピットへの管理アクセスを有効にする CockpitWebUI からコックピットへの管理アクセスを無効にする まとめ コックピット エントリ モード コックピットには 2 つのアクセス モードがあります。 制限付きアクセス: これは、コックピット アクセス モードのデフォルトです。このアクセス モードでは、コックピットから Web ユーザーにアクセスできません。


