Ajax の高度な機能: Ajax はサーバーにデータを送信します
この記事では主にAjaxサーバーへのデータ送信に関するajax関連情報を紹介します。ajaxに興味のある方は、
1. Ajax の最も一般的な用途の 1 つは、サーバーにデータを送信することです。最も一般的な状況は、クライアントからフォーム データ、つまりフォーム要素に含まれる各入力要素にユーザーが入力した値を送信することです。次のコードは、単純なフォームを示しています。
<!DOCTYPE html>
<html lang="en">
<head>
<meta charset="UTF-8">
<title>基本表单</title>
<style>
.table{display: table;}
.row{display: table-row;}
.cell{display: table-cell;padding: 5px;}
.lable{text-align: right;}
</style>
</head>
<body>
<form id="fruitform" method="post" action="http://127.0.0.1:8080/form">
<p class="lable">
<p class="row">
<p class="cell lable">Apples:</p>
<p class="cell"><input name="apples" value="5" /></p>
</p>
<p class="row">
<p class="cell lable">Bananas:</p>
<p class="cell"><input name="bananas" value="2" /></p>
</p>
<p class="row">
<p class="cell lable">Cherries:</p>
<p class="cell"><input name="cherries" value="20" /></p>
</p>
<p class="row">
<p class="cell lable">Total:</p>
<p id="results" class="cell">0 items</p>
</p>
</p>
<button id="submit" type="submit">Submit Form</button>
</form>
</body>
</html>1.1 サーバーの定義
もちろん、これらの例のリクエストを処理するサーバーを作成する必要があります。ここでも Node.js が使用されていますが、これは主にシンプルで Javascript
を使用しているためです。次のように、新しい Fruitcalc.js スクリプト ファイルを作成します:
var http = require('http');
var querystring = require('querystring');
function writeResponse(res,data){
var total = 0;
for(fruit in data){
total += Number(data[fruit]);
}
res.writeHead(200,"OK",{
"Content-Type":"text/html",
"Access-Control-Allow-Origin":"http://localhost:63342"
});
res.write('<html><head><title>Fruit Total</title></head><body>');
res.write('<p>'+total+' item ordered</p></body></html>');
res.end();
}
http.createServer(function(req,res){
console.log("[200] "+req.method+" to "+req.url);
if(req.method == "OPTIONS"){
res.writeHead(200,"OK",{
"Access-Control-Allow-Header":"Content-Type",
"Access-Control-Allow-Methods":"*",
"Access-Control-Allow-Origin":"*"
});
res.end();
}else if(req.url == '/form'&& req.method == 'POST'){
var dataObj = new Object();
var contentType = req.headers["content-type"];
var fullBody = '';
if(contentType){
if(contentType.indexOf("application/x-www-form-urlencode") > -1){
req.on('data',function(chunk){
fullBody += chunk.toString();
});
req.on('end',function(){
var dBody = querystring.parse(fullBody);
dataObj.apples = dBody["apples"];
dataObj.bananas = dBody["bananas"];
dataObj.cherries = dBody["cherries"];
writeResponse(res,dataObj);
});
}else if(contentType.indexOf("application/json") > -1){
req.on('data',function(chunk){
fullBody += chunk.toString();
});
req.on('end',function(){
dataObj = JSON.parse(fullBody);
writeResponse(res,dataObj);
});
}
}
}
}).listen(8080);HTML ドキュメント
を作成します:
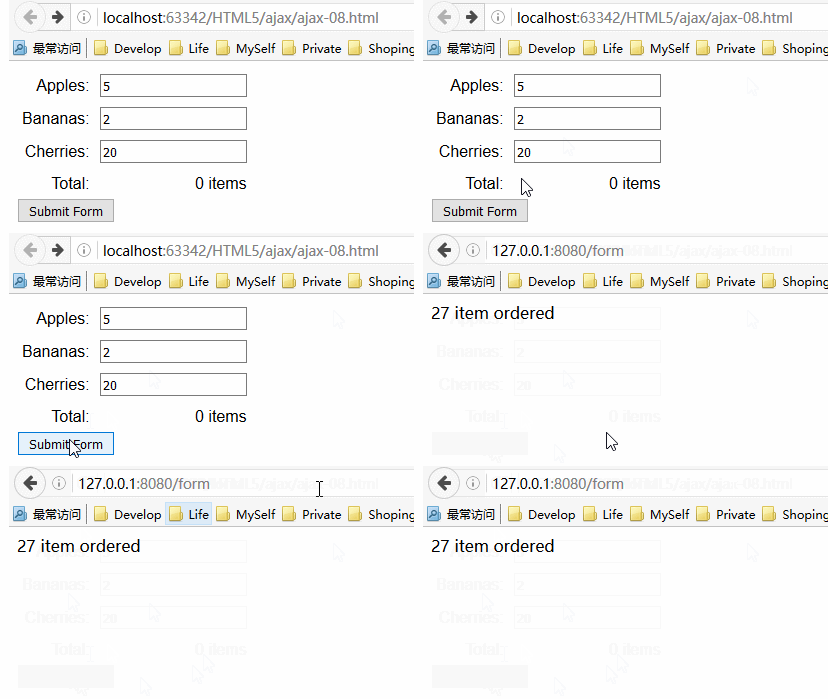
1.2 問題を理解する
上の図は、Ajax で解決したい問題を明確に示しています。
2. フォームの送信
データをサーバーに送信する最も基本的な方法は、データを自分で収集してフォーマットすることです。次のコードは、前の HTML ドキュメント example.html に追加されたスクリプトを示しています。これは使用されるメソッドです:
<!DOCTYPE html>
<html lang="en">
<head>
<meta charset="UTF-8">
<title>手动收集和发送数据</title>
<style>
.table{display: table;}
.row{display: table-row;}
.cell{display: table-cell;padding: 5px;}
.lable{text-align: right;}
</style>
</head>
<body>
<form id="fruitform" method="post" action="http://127.0.0.1:8080/form">
<p class="lable">
<p class="row">
<p class="cell lable">Apples:</p>
<p class="cell"><input name="apples" value="5" /></p>
</p>
<p class="row">
<p class="cell lable">Bananas:</p>
<p class="cell"><input name="bananas" value="2" /></p>
</p>
<p class="row">
<p class="cell lable">Cherries:</p>
<p class="cell"><input name="cherries" value="20" /></p>
</p>
<p class="row">
<p class="cell lable">Total:</p>
<p id="results" class="cell">0 items</p>
</p>
</p>
<button id="submit" type="submit">Submit Form</button>
</form>
<script>
document.getElementById("submit").onclick = handleButtonPress;
var httpRequest;
function handleButtonPress(e){
//对表单里的button元素而言,其默认行为是用常规的非Ajax方式提交表单。这里不想让他发生,所以调用了preventDefault方法
e.preventDefault();
var form = document.getElementById("fruitform");
//收集并格式化各个input的值
var formData ="";
var inputElements = document.getElementsByTagName("input");
for (var i = 0; i < inputElements.length; i++){
formData += inputElements[i].name + "=" + inputElements[i].value +"&";
}
httpRequest = new XMLHttpRequest();
httpRequest.onreadystatechange = handleResponse;
//数据必须通过POST方法发送给服务器,并读取了HTMLFormElement的action属性获得了请求需要发送的URL
httpRequest.open("POST",form.action);
//添加标头来告诉服务器准备接受的数据格式
httpRequest.setRequestHeader('Content-Type','application/x-www-form-urlencoded');
//把想要发送给服务器的字符串作为参数传递给send方法
httpRequest.send(formData);
}
function handleResponse(){
if(httpRequest.readyState == 4 && httpRequest.status == 200){
document.getElementById("results").innerHTML = httpRequest.responseText;
}
}
</script>
</body>
</html>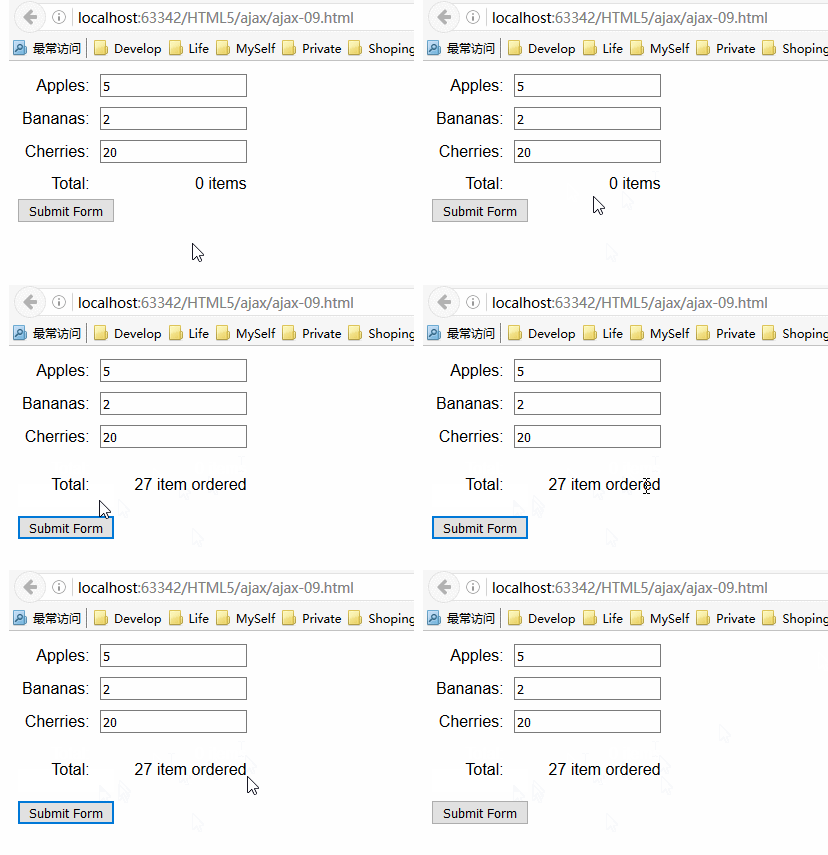
3. JSON データの送信
Ajax はフォーム データの送信に使用されるだけでなく、JavaScript Object Notation (JSON) データを含むほぼすべてのデータを送信することができ、ほぼ一般的なデータとなっています。フォーマット。 Ajax のルーツは XML ですが、この形式は扱いにくいです。大量の XML ドキュメントを送信する必要がある Web アプリケーションを実行する場合、その複雑さは帯域幅とシステム容量の点で実際のコストを意味します。
JSON は、XML の「スキム」代替手段と呼ばれることがよくあります。 JSON は読み書きが簡単で、XML よりもコンパクトで、すでに広くサポートされています。 JSON は JavaScript に由来しますが、その開発は JavaScript を超え、無数のパッケージやシステムで理解され、使用されています。
以下は、JSON で表現された単純な JavaScript オブジェクトの例です。
{"bananas":"2","apples":"5","cherries":"20"}
このオブジェクトには、バナナ、リンゴ、チェリーの 3 つのプロパティがあります。これらのプロパティの値はそれぞれ 2、5、20 です。
JSON は XML ほど機能が豊富ではありませんが、多くのアプリケーションではこれらの機能は必要ありません。 JSON はシンプル、軽量、表現力豊かです。次の例は、前の例の JavaScript 部分を次のように変更して、JSON データをサーバーに送信する方法を示しています。 form 各入力要素の name 属性値。任意のデータを使用できますが、input 要素が便利で、前の例と一貫性があります。
JSON データが送信されていることをサーバーに伝えるには、次のようにリクエストの Content-Type ヘッダーを application/json に設定します。
httpRequest.setRequestHeader("Content-Type","application/json");
用JSON对象和JSON格式进行相互的转换。(大多数浏览器能直接支持这个对象,但也可以用下面的网址里的脚本来给旧版的浏览器添加同样的功能:https://github.com/douglascrockford/JSON-js/blob/master/json2.js )JSON对象提供了两个方法:

在上面的例子中,使用了stringify方法,然后把结果传递给XMLHttpRequest 对象的send方法。此例中只有数据的编码方式发生了变化。提交表单的效果还是一样。
4. 使用FormData对象发送表单数据
另一种更简洁的表单收集方式是使用一个FormData对象,它是在XMLHttpRequest的第二级规范中定义的。
由于原来的Node.js代码有点问题,此处用C#新建文件 fruitcalc.aspx作为处理请求的服务器。其cs代码如下:
using System;
namespace Web4Luka.Web.ajax.html5
{
public partial class fruitcalc : System.Web.UI.Page
{
protected void Page_Load(object sender, EventArgs e)
{
int total = 0;
if (Request.HttpMethod == "POST")
{
if (Request.ContentType.IndexOf("multipart/form-data") > -1)
{
for (int i = 0; i < Request.Form.Count; i++)
{
total += Int32.Parse(Request.Form[i]);
}
}
writeResponse(Response, total);
}
}
private void writeResponse(System.Web.HttpResponse Response, int total)
{
string strHtml;
Response.AddHeader("Access-Control-Allow-Origin", "http://localhost:63342");
strHtml = total + " item ordered";
Response.Write(strHtml);
}
}
}4.1 创建 FormData 对象
创建FormData对象时可以传递一个HTMLFormElement对象,这样表单里所有的元素的值都会被自动收集起来。示例如下:
<!DOCTYPE html>
<html lang="en">
<head>
<meta charset="UTF-8">
<title>使用FormData对象</title>
<style>
.row{display: table-row;}
.cell{display: table-cell;padding: 5px;}
.lable{text-align: right;}
</style>
</head>
<body>
<form id="fruitform" method="post" action="http://localhost:53396/ajax/html5/fruitcalc.aspx">
<p class="lable">
<p class="row">
<p class="cell lable">Apples:</p>
<p class="cell"><input name="apples" value="5" /></p>
</p>
<p class="row">
<p class="cell lable">Bananas:</p>
<p class="cell"><input name="bananas" value="2" /></p>
</p>
<p class="row">
<p class="cell lable">Cherries:</p>
<p class="cell"><input name="cherries" value="20" /></p>
</p>
<p class="row">
<p class="cell lable">Total:</p>
<p id="results" class="cell">0 items</p>
</p>
</p>
<button id="submit" type="submit">Submit Form</button>
</form>
<script>
document.getElementById("submit").onclick = handleButtonPress;
var httpRequest;
function handleButtonPress(e){
e.preventDefault();
var form = document.getElementById("fruitform");
var formData = new FormData(form);
httpRequest = new XMLHttpRequest();
httpRequest.onreadystatechange = handleResponse;
httpRequest.open("POST",form.action);
httpRequest.send(formData);
}
function handleResponse(){
if(httpRequest.readyState == 4 && httpRequest.status == 200){
document.getElementById("results").innerHTML = httpRequest.responseText;
}
}
</script>
</body>
</html>当然,关键的变化是使用了FormData对象:
var formData = new FormData(form);
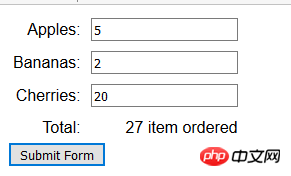
其他需要注意的地方是不再设置Content-Type标头的值了。如果使用FormData对象,数据总是会被编码为multipart/form-data 。本例提交表单后,显示效果如下:
4.2 修改FormData对象
FormData对象定义了一个方法,它允许给要发送到服务器的数据添加名称/值对。

可以用append方法增补从表单中收集的数据,也可以在不使用HTMLFormElement的情况下创建FormData对象。这就意味着可以使用append方法来选择向客户端发送哪些数据值。修改上一示例的JavaScript代码如下:
<script>
document.getElementById("submit").onclick = handleButtonPress;
var httpRequest;
function handleButtonPress(e){
e.preventDefault();
var form = document.getElementById("fruitform");
var formData = new FormData();
var inputElements = document.getElementsByTagName("input");
for(var i=0;i<inputElements.length;i++){
if(inputElements[i].name != "cherries"){
formData.append(inputElements[i].name,inputElements[i].value);
}
}
httpRequest = new XMLHttpRequest();
httpRequest.onreadystatechange = handleResponse;
httpRequest.open("POST",form.action);
httpRequest.send(formData);
}
function handleResponse(){
if(httpRequest.readyState == 4 && httpRequest.status == 200){
document.getElementById("results").innerHTML = httpRequest.responseText;
}
}
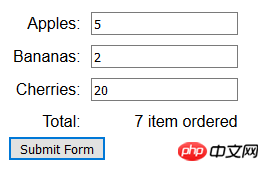
</script>此段脚本里,创建FormData对象时并没有提供HTMLFormElement对象。随后用DOM找到文档里所有的input元素,并为那些name属性的值不是cherries的元素添加名称/值对。此例提交表单后,显示效果如下:
5. 发送文件
可以使用FormData 对象和type 属性为 file 的input 元素向服务器发送文件。当表单提交时,FormData对象会自动确保用户选择的文件内容与其他的表单值一同上传。下面的例子展示了如何以这种方式使用FormData对象。
<!DOCTYPE html>
<html lang="en">
<head>
<meta charset="UTF-8">
<title>使用FormData对象发送文件到服务器</title>
<style>
.row{display: table-row;}
.cell{display: table-cell;padding: 5px;}
.lable{text-align: right;}
</style>
</head>
<body>
<form id="fruitform" method="post" action="http://localhost:53396/ajax/html5/fruitcalc.aspx">
<p class="lable">
<p class="row">
<p class="cell lable">Apples:</p>
<p class="cell"><input name="apples" value="5" /></p>
</p>
<p class="row">
<p class="cell lable">Bananas:</p>
<p class="cell"><input name="bananas" value="2" /></p>
</p>
<p class="row">
<p class="cell lable">Cherries:</p>
<p class="cell"><input name="cherries" value="20" /></p>
</p>
<p class="row">
<p class="cell lable">File:</p>
<p class="cell"><input type="file" name="file" /></p>
</p>
<p class="row">
<p class="cell lable">Total:</p>
<p id="results" class="cell">0 items</p>
</p>
</p>
<button id="submit" type="submit">Submit Form</button>
</form>
<script>
document.getElementById("submit").onclick = handleButtonPress;
var httpRequest;
function handleButtonPress(e){
e.preventDefault();
var form = document.getElementById("fruitform");
var formData = new FormData(form);
httpRequest = new XMLHttpRequest();
httpRequest.onreadystatechange = handleResponse;
httpRequest.open("POST",form.action);
httpRequest.send(formData);
}
function handleResponse(){
if(httpRequest.readyState == 4 && httpRequest.status == 200){
document.getElementById("results").innerHTML = httpRequest.responseText;
}
}
</script>
</body>
</html>此例里,最明显的变化发生在 form元素上。添加了input元素后,FormData对象就会上传用户所选的任意文件。
修改 fruitcalc.aspx 的cs文件如下:
using System;
using System.Web;
namespace Web4Luka.Web.ajax.html5
{
public partial class fruitcalc : System.Web.UI.Page
{
protected void Page_Load(object sender, EventArgs e)
{
int total = 0;
if (Request.HttpMethod == "POST")
{
if (Request.ContentType.IndexOf("multipart/form-data") > -1)
{
for (int i = 0; i < Request.Form.Count; i++)
{
total += Int32.Parse(Request.Form[i]);
}
if (Request.Files["file"] != null)
{
HttpPostedFile file = Request.Files["file"];
file.SaveAs(Server.MapPath("/upload/pictures/" + file.FileName));
}
}
writeResponse(Response, total);
}
}
private void writeResponse(System.Web.HttpResponse Response, int total)
{
string strHtml;
Response.AddHeader("Access-Control-Allow-Origin", "http://localhost:63342");
strHtml = total + " item ordered";
Response.Write(strHtml);
}
}
}此例的显示效果如下:
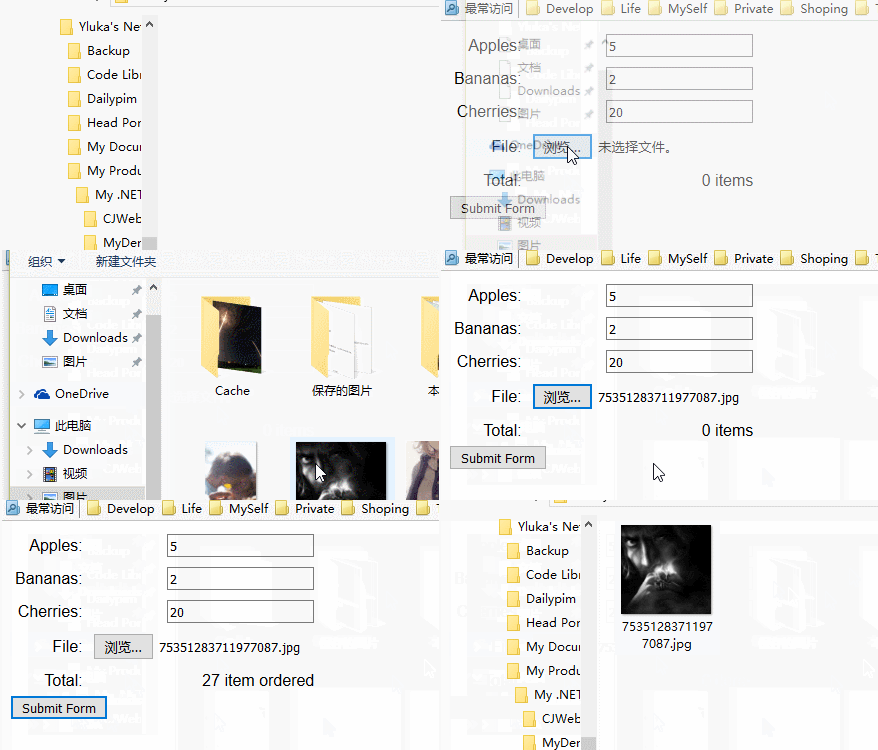
以上所述是小编给大家介绍的Ajax 高级功能之ajax向服务器发送数据,希望对大家有所帮助 !
相关推荐:
巧用ajax请求服务器加载数据列表时提示loading的方法
以上がAjax の高度な機能: Ajax はサーバーにデータを送信しますの詳細内容です。詳細については、PHP 中国語 Web サイトの他の関連記事を参照してください。

ホットAIツール

Undresser.AI Undress
リアルなヌード写真を作成する AI 搭載アプリ

AI Clothes Remover
写真から衣服を削除するオンライン AI ツール。

Undress AI Tool
脱衣画像を無料で

Clothoff.io
AI衣類リムーバー

Video Face Swap
完全無料の AI 顔交換ツールを使用して、あらゆるビデオの顔を簡単に交換できます。

人気の記事

ホットツール

メモ帳++7.3.1
使いやすく無料のコードエディター

SublimeText3 中国語版
中国語版、とても使いやすい

ゼンドスタジオ 13.0.1
強力な PHP 統合開発環境

ドリームウィーバー CS6
ビジュアル Web 開発ツール

SublimeText3 Mac版
神レベルのコード編集ソフト(SublimeText3)

ホットトピック
 7706
7706
 15
15
 1640
1640
 14
14
 1394
1394
 52
52
 1288
1288
 25
25
 1231
1231
 29
29
 RPC サーバーに接続できない、およびデスクトップに入れない場合の解決策
Feb 18, 2024 am 10:34 AM
RPC サーバーが利用できず、デスクトップからアクセスできない場合はどうすればよいですか? 近年、コンピューターとインターネットが私たちの生活の隅々に浸透しています。集中コンピューティングとリソース共有のテクノロジーとして、リモート プロシージャ コール (RPC) はネットワーク通信において重要な役割を果たします。ただし、場合によっては、RPC サーバーが利用できなくなり、デスクトップにアクセスできなくなる状況が発生することがあります。この記事では、この問題の考えられる原因のいくつかについて説明し、解決策を提供します。まず、RPC サーバーが使用できない理由を理解する必要があります。 RPCサーバーは、
 CentOSインストールヒューズとCentOSインストールサーバーの詳細説明
Feb 13, 2024 pm 08:40 PM
LINUX ユーザーとして、CentOS にさまざまなソフトウェアやサーバーをインストールする必要があることがよくありますが、この記事では、CentOS に Fuse をインストールしてサーバーをセットアップする方法を詳しく紹介し、関連する作業をスムーズに完了できるようにします。 CentOS のインストールfusionFuse は、権限のないユーザーがカスタマイズされたファイル システムを通じてファイル システムにアクセスして操作できるようにするユーザー スペース ファイル システム フレームワークです。CentOS への Fuse のインストールは非常に簡単で、次の手順に従うだけです: 1. ターミナルを開き、次のようにログインします。ルートユーザー。 2. 次のコマンドを使用して、fuse パッケージをインストールします: ```yuminstallfuse3。インストール プロセス中のプロンプトを確認し、「y」を入力して続行します。 4. インストール完了
 Dnsmasq を DHCP リレー サーバーとして構成する方法
Mar 21, 2024 am 08:50 AM
DHCP リレーの役割は、2 つのサーバーが異なるサブネット上にある場合でも、受信した DHCP パケットをネットワーク上の別の DHCP サーバーに転送することです。 DHCP リレーを使用すると、ネットワーク センターに集中 DHCP サーバーを展開し、それを使用してすべてのネットワーク サブネット/VLAN に IP アドレスを動的に割り当てることができます。 Dnsmasq は、一般的に使用される DNS および DHCP プロトコル サーバーであり、ネットワーク内の動的ホスト構成の管理を支援する DHCP リレー サーバーとして構成できます。この記事では、dnsmasq を DHCP リレー サーバーとして構成する方法を説明します。コンテンツ トピック: ネットワーク トポロジ DHCP リレー上の静的 IP アドレスの構成 集中型 DHCP サーバー上の DHCP リレー D
 PHP を使用して IP プロキシ サーバーを構築するためのベスト プラクティス ガイド
Mar 11, 2024 am 08:36 AM
ネットワーク データ転送において、IP プロキシ サーバーは重要な役割を果たし、ユーザーが実際の IP アドレスを隠し、プライバシーを保護し、アクセス速度を向上させるのに役立ちます。この記事では、PHP を使用して IP プロキシ サーバーを構築する方法に関するベスト プラクティス ガイドを紹介し、具体的なコード例を示します。 IPプロキシサーバーとは何ですか? IP プロキシ サーバーは、ユーザーとターゲット サーバーの間にある中間サーバーであり、ユーザーとターゲット サーバー間の転送ステーションとして機能し、ユーザーのリクエストと応答を転送します。 IPプロキシサーバーを使用する場合
 jQuery AJAX リクエストで発生した 403 エラーを解決する方法
Feb 20, 2024 am 10:07 AM
タイトル: jQuery AJAX リクエストの 403 エラーを解決する方法とコード例。403 エラーは、サーバーがリソースへのアクセスを禁止するリクエストを指します。このエラーは通常、リクエストにアクセス許可がないか、サーバーによって拒否されたために発生します。 jQueryAJAX リクエストを行うときにこのような状況に遭遇することがありますが、この記事ではこの問題の解決方法とコード例を紹介します。解決策: 権限を確認します。まず、要求された URL アドレスが正しいことを確認し、リソースにアクセスするための十分な権限があることを確認します。
 jQuery AJAXリクエスト403エラーを解決する方法
Feb 19, 2024 pm 05:55 PM
jQuery は、クライアント側の開発を簡素化するために使用される人気のある JavaScript ライブラリです。 AJAX は、Web ページ全体をリロードせずに、非同期リクエストを送信し、サーバーと対話するテクノロジーです。ただし、jQuery を使用して AJAX リクエストを行うと、403 エラーが発生することがあります。 403 エラーは通常、セキュリティ ポリシーまたは権限の問題が原因で、サーバーによってアクセスが拒否されたエラーです。この記事では、jQueryAJAX リクエストで 403 エラーが発生した場合の解決方法について説明します。
 Epic サーバーがオフラインのときにゲームに参加できない場合はどうすればよいですか? Epic がオフラインでゲームに参加できない理由の解決策
Mar 13, 2024 pm 04:40 PM
Epic サーバーがオフラインのときにゲームに参加できない場合はどうすればよいですか?この問題は多くの友人が経験しているはずです。このプロンプトが表示されると、正規のゲームが起動できなくなります。この問題は通常、ネットワークやセキュリティ ソフトウェアからの干渉によって引き起こされます。では、どのように解決すればよいでしょうか?今回の編集者が説明します。解決策を皆さんと共有したいと思います。今日のソフトウェア チュートリアルが問題の解決に役立つことを願っています。オフライン時に epic サーバーがゲームに参加できない場合の対処方法: 1. セキュリティ ソフトウェアによって妨害されている可能性があります。ゲーム プラットフォームとセキュリティ ソフトウェアを閉じて、再起動します。 2. 2 つ目は、ネットワークの変動が大きすぎることです。ルーターを再起動して機能するかどうかを確認してください。状態に問題がない場合は、5G モバイル ネットワークを使用して動作を試みることができます。 3. それならもっとあるかもしれない
 PHP と Ajax: オートコンプリート提案エンジンの構築
Jun 02, 2024 pm 08:39 PM
PHP と Ajax を使用してオートコンプリート候補エンジンを構築します。 サーバー側スクリプト: Ajax リクエストを処理し、候補を返します (autocomplete.php)。クライアント スクリプト: Ajax リクエストを送信し、提案を表示します (autocomplete.js)。実際のケース: HTML ページにスクリプトを組み込み、検索入力要素の識別子を指定します。


