カプセル化モーションフレームワークの実践におけるスライディングフォーカスカルーセル図の説明
この記事では主に、動きのフレームをカプセル化して左右上下にスライドするフォーカスカルーセル図(例)を紹介します。編集者はこれがとても良いものだと思ったので、皆さんの参考として今から共有します。編集者をフォローして見てみましょう。皆さんのお役に立てれば幸いです。
この記事では、ユニバーサル均一モーション フレームワークの構築 (例付きで説明)、このフレームワークに基づいて、バッファ モーション エフェクトを追加し、モーション フレームを使用してスライドを作成します (上から下へ)。左右)。

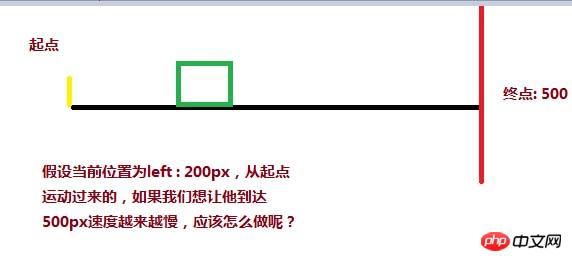
バッファの動きには通常 2 つの共通の症状があります。たとえば、p を 0 から 500 まで動かすと、1 つはイベントがトリガーされると非常に速くなり、もう 1 つはイベントがトリガーされると遅くなり、その後ゆっくりと速度が上がります。最初に速度を落とすことを意識しましょう。たとえば、高速道路を降りたばかりの車が時速 40 キロメートルに進入することです。 40km/hで最後に40km/hに変わります。120km/h→40km/h、または40km/h→0km/hになります。このような動きをプログラムで表現できるのでしょうか?

目標距離 (500) - 現在の距離 (200) / 係数 (12 など) を使用して、速度の減速変化を実現できます。 現在の距離が開始点であり、分子が分子です。 (500 - 0) が最も大きいので、現在の距離が 500 に近い場合、分子は最も小さく、分割後の速度も最も小さくなります。
<style>
p{
width: 200px;
height: 200px;
background:red;
position: absolute;
left: 0px;
}
</style>
<script>
window.onload = function(){
var oBtn = document.querySelector( "input" ),
oBox = document.querySelector( '#box' ),
speed = 0, timer = null;
oBtn.onclick = function(){
timer = setInterval( function(){
speed = ( 500 - oBox.offsetLeft ) / 8;
oBox.style.left = oBox.offsetLeft + speed + 'px';
}, 30 );
}
}
</script>
</head>
<body>
<input type="button" value="动起来">
<p id="box"></p>
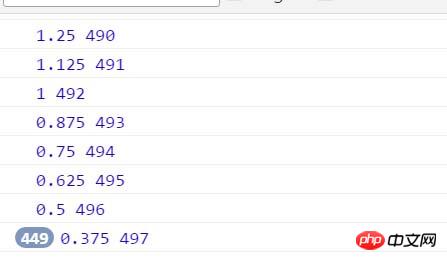
</body>しかし、pは素直に500pxの目標位置で停止せず、最終的には497.375pxで停止します。理由は現在の速度と現在値を確認してください


。速度は常に 0.375 で停止し、取得された現在の距離は 497px で停止することがわかりますか? ここで問題が発生します。p は 497.375px で止まりませんか?コンピュータは浮動小数点数を処理する際に精度が低下します。小さなテストを個別に行うことができます:
<p id="box"></p> <script> var oBox = document.querySelector( '#box' ); alert( oBox.offsetLeft ); </script>
このコードによって取得される左オフセットは、インライン スタイルで記述された 30.2px ではなく、30px であることがわかります。現在位置を取得する際に小数点以下は四捨五入されるため、速度は常に0.375pxで止まり、位置は常に497で止まります。そのため、目標に到達するには速度を1にして速度を四捨五入する必要があります。 up ( Math .ceil )、速度を 1 に変更すると、p は 500 に達することもできます
oBtn.onclick = function(){
 timer = setInterval( function(){
 speed = ( 500 - oBox.offsetLeft ) / 8;
 if( speed > 0 ) {
  speed = Math.ceil( speed );
 }
 console.log( speed, oBox.offsetLeft );
 oBox.style.left = oBox.offsetLeft + speed + 'px';
 }, 30 );
}2 番目の質問、p の位置が 900 にある場合、つまり、900 から 500 に移動します。 、そのような方法はありますか 需要はどうですか? 必ず 1 つあるはずです。カルーセルの画像は右から左に次のようになります。
<style>
#box{
width: 200px;
height: 200px;
background:red;
position: absolute;
left: 900px;
}
</style>
<script>// <![CDATA[
window.onload = function(){
var oBtn = document.querySelector( "input" ),
oBox = document.querySelector( '#box' ),
speed = 0, timer = null;
oBtn.onclick = function(){
timer = setInterval( function(){
speed = ( 500 - oBox.offsetLeft ) / 8;
if( speed > 0 ) {
speed = Math.ceil( speed );
}
oBox.style.left = oBox.offsetLeft + speed + 'px';
}, 30 );
}
}
// ]]></script>
</head>
<body>
<input type="button" value="动起来">
<p id="box"></p>
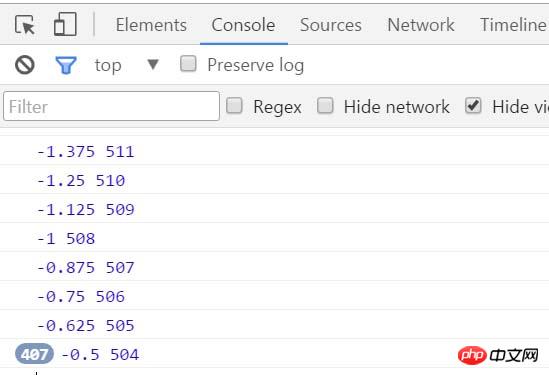
</body>この時点では、最終的な速度は 503.5px で停止します。反対方向の速度については、-1 に変更する必要があります。なので、方向を切り捨てる (Math.floor) を使用します

oBtn.onclick = function(){
 timer = setInterval( function(){
 speed = ( 500 - oBox.offsetLeft ) / 8;
 if( speed > 0 ) {
  speed = Math.ceil( speed );
 }else {
  speed = Math.floor( speed );
 }
 console.log( speed, oBox.offsetLeft );
 oBox.style.left = oBox.offsetLeft + speed + 'px';
 }, 30 );
}次に、このバッファモーションを均一モーションフレームに統合すると、次のようになります:
function css(obj, attr, value) {
 if (arguments.length == 3) {
 obj.style[attr] = value;
 } else {
 if (obj.currentStyle) {
  return obj.currentStyle[attr];
 } else {
  return getComputedStyle(obj, false)[attr];
 }
 }
}

function animate(obj, attr, fn) {
 clearInterval(obj.timer);
 var cur = 0;
 var target = 0;
 var speed = 0;
 obj.timer = setInterval(function () {
 var bFlag = true;
 for (var key in attr) {
  if (key == 'opacity ') {
  cur = css(obj, 'opacity') * 100;
  } else {
  cur = parseInt(css(obj, key));
  }
  target = attr[key];
  speed = ( target - cur ) / 8;
  speed = speed > 0 ? Math.ceil(speed) : Math.floor(speed);
  if (cur != target) {
  bFlag = false;
  if (key == 'opacity') {
   obj.style.opacity = ( cur + speed ) / 100;
   obj.style.filter = "alpha(opacity:" + ( cur + speed ) + ")";
  } else {
   obj.style[key] = cur + speed + "px";
  }
  }
 }
 if (bFlag) {
  clearInterval(obj.timer);
  fn && fn.call(obj);
 }
 }, 30 );
}この均一モーションフレームを使用すると、スライドショーを実行します:
上下のスライドの HTML スタイル ファイル:
<!DOCTYPE html>
<html lang="en">
<head>
 <meta charset="UTF-8">
 <title>slide - by ghostwu</title>
 <link rel="stylesheet" href="css/slide3.css" rel="external nofollow" >
 <script src="js/animate.js"></script>
 <script src="js/slide.js"></script>
</head>
<body>
<p id="slide">
 <p id="slide-img">
 <p id="img-container">
  <img src="./img/1.jpg" alt="">
  <img src="./img/2.jpg" alt="">
  <img src="./img/3.jpg" alt="">
  <img src="./img/4.jpg" alt="">
  <img src="./img/5.jpg" alt="">
 </p>
 </p>
 <p id="slide-nums">
 <ul>
  <li class="active"></li>
  <li></li>
  <li></li>
  <li></li>
  <li></li>
 </ul>
 </p>
</p>
</body>
</html>
slide3.css ファイル:
* {
 margin: 0;
 padding: 0;
}
li {
 list-style-type: none;
}
#slide {
 width: 800px;
 height: 450px;
 position: relative;
 margin:20px auto;
}
#slide-img {
 position: relative;
 width: 800px;
 height: 450px;
 overflow: hidden;
}
#img-container {
 position: absolute;
 left: 0px;
 top: 0px;
 height: 2250px;
 /*font-size:0px;*/
}
#img-container img {
 display: block;
 float: left;
}
#slide-nums {
 position: absolute;
 right:10px;
 bottom:10px;
}
#slide-nums li {
 float: left;
 margin:0px 10px;
 background: white;
 width: 20px;
 height: 20px;
 text-align: center;
 line-height: 20px;
 border-radius:10px;
 text-indent:-999px;
 opacity:0.6;
 filter:alpha(opacity:60);
 cursor:pointer;
}
#slide-nums li.active {
 background: red;
}animate.js ファイル:
function css(obj, attr, value) {
 if (arguments.length == 3) {
 obj.style[attr] = value;
 } else {
 if (obj.currentStyle) {
  return obj.currentStyle[attr];
 } else {
  return getComputedStyle(obj, false)[attr];
 }
 }
}

function animate(obj, attr, fn) {
 clearInterval(obj.timer);
 var cur = 0;
 var target = 0;
 var speed = 0;
 obj.timer = setInterval(function () {
 var bFlag = true;
 for (var key in attr) {
  if (key == 'opacity ') {
  cur = css(obj, 'opacity') * 100;
  } else {
  cur = parseInt(css(obj, key));
  }
  target = attr[key];
  speed = ( target - cur ) / 8;
  speed = speed > 0 ? Math.ceil(speed) : Math.floor(speed);
  if (cur != target) {
  bFlag = false;
  if (key == 'opacity') {
   obj.style.opacity = ( cur + speed ) / 100;
   obj.style.filter = "alpha(opacity:" + ( cur + speed ) + ")";
  } else {
   obj.style[key] = cur + speed + "px";
  }
  }
 }
 if (bFlag) {
  clearInterval(obj.timer);
  fn && fn.call(obj);
 }
 }, 30 );
}slide.js ファイル:
window.onload = function () {
function Slide() {
this.oImgContainer = document.getElementById("img-container");
this.aLi = document.getElementsByTagName("li");
this.index = 0;
}
Slide.prototype.bind = function () {
var that = this;
for (var i = 0; i < this.aLi.length; i++) {
this.aLi[i].index = i;
this.aLi[i].onmouseover = function () {
that.moveTop( this.index );
}
}
}
Slide.prototype.moveTop = function (i) {
this.index = i;
for( var j = 0; j < this.aLi.length; j++ ){
this.aLi[j].className = '';
}
this.aLi[this.index].className = 'active';
animate( this.oImgContainer, {
"top" : -this.index * 450,
"left" : 0
});
}
var oSlide = new Slide();
oSlide.bind();
}左右のスライドのスタイルを変更するだけです
スタイルファイル:
* {
 margin: 0;
 padding: 0;
}
li {
 list-style-type: none;
}
#slide {
 width: 800px;
 height: 450px;
 position: relative;
 margin:20px auto;
}
#slide-img {
 position: relative;
 width: 800px;
 height: 450px;
 overflow: hidden;
}
#img-container {
 position: absolute;
 left: 0px;
 top: 0px;
 width: 4000px;
}
#img-container img {
 display: block;
 float: left;
}
#slide-nums {
 position: absolute;
 right:10px;
 bottom:10px;
}
#slide-nums li {
 float: left;
 margin:0px 10px;
 background: white;
 width: 20px;
 height: 20px;
 text-align: center;
 line-height: 20px;
 border-radius:10px;
 text-indent:-999px;
 opacity:0.6;
 filter:alpha(opacity:60);
 cursor:pointer;
}
#slide-nums li.active {
 background: red;
}js呼び出しファイル:
window.onload = function () {
function Slide() {
this.oImgContainer = document.getElementById("img-container");
this.aLi = document.getElementsByTagName("li");
this.index = 0;
}
Slide.prototype.bind = function () {
var that = this;
for (var i = 0; i < this.aLi.length; i++) {
this.aLi[i].index = i;
this.aLi[i].onmouseover = function () {
that.moveLeft( this.index );
}
}
}
Slide.prototype.moveLeft = function (i) {
this.index = i;
for( var j = 0; j < this.aLi.length; j++ ){
this.aLi[j].className = '';
}
this.aLi[this.index].className = 'active';
animate( this.oImgContainer, {
"left" : -this.index * 800
});
}
var oSlide = new Slide();
oSlide.bind();
}関連する推奨事項:
バッファリングモーションフレームを実装するJavaScriptの例
以上がカプセル化モーションフレームワークの実践におけるスライディングフォーカスカルーセル図の説明の詳細内容です。詳細については、PHP 中国語 Web サイトの他の関連記事を参照してください。

ホットAIツール

Undresser.AI Undress
リアルなヌード写真を作成する AI 搭載アプリ

AI Clothes Remover
写真から衣服を削除するオンライン AI ツール。

Undress AI Tool
脱衣画像を無料で

Clothoff.io
AI衣類リムーバー

AI Hentai Generator
AIヘンタイを無料で生成します。

人気の記事

ホットツール

メモ帳++7.3.1
使いやすく無料のコードエディター

SublimeText3 中国語版
中国語版、とても使いやすい

ゼンドスタジオ 13.0.1
強力な PHP 統合開発環境

ドリームウィーバー CS6
ビジュアル Web 開発ツール

SublimeText3 Mac版
神レベルのコード編集ソフト(SublimeText3)

ホットトピック
 7563
7563
 15
15
 1385
1385
 52
52
 84
84
 11
11
 28
28
 99
99
 Java フレームワークの商用サポートの費用対効果を評価する方法
Jun 05, 2024 pm 05:25 PM
Java フレームワークの商用サポートのコスト/パフォーマンスを評価するには、次の手順が必要です。 必要な保証レベルとサービス レベル アグリーメント (SLA) 保証を決定します。研究サポートチームの経験と専門知識。アップグレード、トラブルシューティング、パフォーマンスの最適化などの追加サービスを検討してください。ビジネス サポートのコストと、リスクの軽減と効率の向上を比較検討します。
 PHP フレームワークの学習曲線は他の言語フレームワークと比較してどうですか?
Jun 06, 2024 pm 12:41 PM
PHP フレームワークの学習曲線は、言語熟練度、フレームワークの複雑さ、ドキュメントの品質、コミュニティのサポートによって異なります。 PHP フレームワークの学習曲線は、Python フレームワークと比較すると高く、Ruby フレームワークと比較すると低くなります。 Java フレームワークと比較すると、PHP フレームワークの学習曲線は中程度ですが、開始までの時間は短くなります。
 PHP フレームワークの軽量オプションはアプリケーションのパフォーマンスにどのような影響を与えますか?
Jun 06, 2024 am 10:53 AM
軽量の PHP フレームワークは、サイズが小さくリソース消費が少ないため、アプリケーションのパフォーマンスが向上します。その特徴には、小型、高速起動、低メモリ使用量、改善された応答速度とスループット、および削減されたリソース消費が含まれます。 実際のケース: SlimFramework は、わずか 500 KB、高い応答性と高スループットの REST API を作成します。
 Java フレームワークのパフォーマンス比較
Jun 04, 2024 pm 03:56 PM
ベンチマークによると、小規模で高性能なアプリケーションの場合、Quarkus (高速起動、低メモリ) または Micronaut (TechEmpower に優れた) が理想的な選択肢です。 SpringBoot は大規模なフルスタック アプリケーションに適していますが、起動時間とメモリ使用量が若干遅くなります。
 Golang フレームワークのドキュメントのベスト プラクティス
Jun 04, 2024 pm 05:00 PM
明確で包括的なドキュメントを作成することは、Golang フレームワークにとって非常に重要です。ベスト プラクティスには、Google の Go コーディング スタイル ガイドなど、確立されたドキュメント スタイルに従うことが含まれます。見出し、小見出し、リストなどの明確な組織構造を使用し、ナビゲーションを提供します。スタート ガイド、API リファレンス、概念など、包括的で正確な情報を提供します。コード例を使用して、概念と使用法を説明します。ドキュメントを常に最新の状態に保ち、変更を追跡し、新機能を文書化します。 GitHub の問題やフォーラムなどのサポートとコミュニティ リソースを提供します。 API ドキュメントなどの実践的なサンプルを作成します。
 さまざまなアプリケーションシナリオに最適な Golang フレームワークを選択する方法
Jun 05, 2024 pm 04:05 PM
アプリケーションのシナリオに基づいて最適な Go フレームワークを選択します。アプリケーションの種類、言語機能、パフォーマンス要件、エコシステムを考慮します。一般的な Go フレームワーク: Jin (Web アプリケーション)、Echo (Web サービス)、Fiber (高スループット)、gorm (ORM)、fasthttp (速度)。実際のケース: REST API (Fiber) の構築とデータベース (gorm) との対話。フレームワークを選択します。主要なパフォーマンスには fasthttp、柔軟な Web アプリケーションには Jin/Echo、データベース インタラクションには gorm を選択してください。
 golang フレームワーク開発の実践的な詳細な説明: 質疑応答
Jun 06, 2024 am 10:57 AM
Go フレームワーク開発における一般的な課題とその解決策は次のとおりです。 エラー処理: 管理にはエラー パッケージを使用し、エラーを一元的に処理するにはミドルウェアを使用します。認証と認可: サードパーティのライブラリを統合し、資格情報を確認するためのカスタム ミドルウェアを作成します。同時処理: ゴルーチン、ミューテックス、チャネルを使用してリソース アクセスを制御します。単体テスト: 分離のために getest パッケージ、モック、スタブを使用し、十分性を確保するためにコード カバレッジ ツールを使用します。デプロイメントとモニタリング: Docker コンテナを使用してデプロイメントをパッケージ化し、データのバックアップをセットアップし、ログ記録およびモニタリング ツールでパフォーマンスとエラーを追跡します。
 Golang フレームワークの学習プロセスでよくある誤解は何ですか?
Jun 05, 2024 pm 09:59 PM
Go フレームワークの学習には、フレームワークへの過度の依存と柔軟性の制限という 5 つの誤解があります。フレームワークの規則に従わない場合、コードの保守が困難になります。古いライブラリを使用すると、セキュリティと互換性の問題が発生する可能性があります。パッケージを過度に使用すると、コード構造が難読化されます。エラー処理を無視すると、予期しない動作やクラッシュが発生します。


