jQueryはスクロール効果を実装します
この記事では、主にスクロール効果を実現するための jQuery を詳しく紹介します。jquery を学習する際の参考と価値があります。jquery に興味のある友人は、この記事を参照してください。この記事の例は、スクロールの jQuery 実装を皆さんと共有します。エフェクト表示の具体的なコードは次のとおりです
1. 画像カルーセル:原理は次のとおりです:
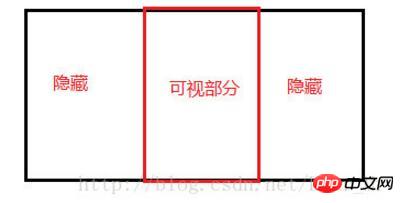
 3 つの画像があり、3 つの画像すべてがあるとします。実際にはページ上に存在しますが、設定された表示部分のサイズ(ここでは幅を主に考慮します)は 1 つの画像のサイズ以下であるため、他の画像を見たい場合、最も直接的な考え方は、
に表示する必要がある画像、つまり変更が必要なのは画像領域全体のオフセット値(左/右)です具体的な実装:
<!DOCTYPE html>
<html>
<head>
 <meta charset="utf-8">
 <title></title>
 <script type="text/javascript" src="jquery.min.js"></script>
 <link rel="stylesheet" type="text/css" href="./style.css" rel="external nofollow" >
</head>
<body>
 <p class="carousel">
 <p class="Con">
 <!-- 轮播(carousel)项目 -->
  <p class="scroll">
  <img src="./pic/1.jpg">
  <img src="./pic/2.jpg">
  <img src="./pic/3.jpg">
  <img src="./pic/4.jpg">
  <img src="./pic/5.jpg">
  <img src="./pic/6.jpg">
  <img src="./pic/7.jpg">
  </p>

  <!-- 轮播(carousel)指标 -->
  <p class="But">
  <span class="active"></span> <!-- 0 * img.width -->
  <span></span>
  <span></span>
  <span></span>
  <span></span>
  <span></span>
  <span></span>
  </p>
 </p>

 <!-- 轮播(carousel)导航 -->
 <a href="javascript:void(0)" class="prev" data-slide="prev"> << </a>
 <a href="javascript:void(0)" class="next" data-slide="next"> >> </a>
 </p>
</body>
</html>
js部分:
$(function() {
var _index = 0;
var time = 0;
$(".But span").click(function() {
_index = $(this).index();
play(_index);
});
function play(index) {
$(".But span").eq(index).addClass('active').siblings('span').removeClass('active');
$('.scroll').animate({left: -(_index*1024)}, 500);
}
function autoPlay() {
time = setInterval(function() {
_index++;
if(_index > 6) {
$('.scroll').css("left", 0);
_index = 0;
}
play(_index);
}, 3000);
}
autoPlay();
$('.prev').click(function() {
if(_index <= 0) {
return;
}
clearInterval(time);
play(--_index);
autoPlay();
});
$('.next').click(function() {
if(_index >= 6) {
return;
}
clearInterval(time);
play(++_index);
autoPlay();
});
});2. 上下にスクロールします
テキストのスクロールは次のとおりです 例:
タイマー
ホットAIツール

Undresser.AI Undress
リアルなヌード写真を作成する AI 搭載アプリ

AI Clothes Remover
写真から衣服を削除するオンライン AI ツール。

Undress AI Tool
脱衣画像を無料で

Clothoff.io
AI衣類リムーバー

AI Hentai Generator
AIヘンタイを無料で生成します。

人気の記事

ホットツール

メモ帳++7.3.1
使いやすく無料のコードエディター

SublimeText3 中国語版
中国語版、とても使いやすい

ゼンドスタジオ 13.0.1
強力な PHP 統合開発環境

ドリームウィーバー CS6
ビジュアル Web 開発ツール

SublimeText3 Mac版
神レベルのコード編集ソフト(SublimeText3)

ホットトピック
 7493
7493
 15
15
 1377
1377
 52
52
 77
77
 11
11
 19
19
 41
41
 ユーザーがまれに発生する不具合: Samsung Watch スマートウォッチで突然白い画面の問題が発生する
Apr 03, 2024 am 08:13 AM
スマートフォンの画面に緑色の線が表示されるというトラブルに遭遇したことがある方もいると思いますし、見たことはなくても、関連する写真をインターネット上で見たことがあるはずです。では、スマートウォッチの画面が白くなってしまう状況に遭遇したことはありますか? CNMOは4月2日、海外メディアから、Redditユーザーがサムスンウォッチシリーズのスマートウォッチの画面が白くなっている写真をソーシャルプラットフォームで共有したことを知った。ユーザーは、「出発時に充電していましたが、戻ってきたらこのようになっていました。再起動しようとしましたが、再起動プロセス中も画面はまだこのままでした。」Samsung Watch スマートウォッチの画面が白くなりました。 Reddit ユーザーはスマート ウォッチを指定していません。特定のモデルです。しかし、写真から判断すると、Samsung Watch5のはずです。以前、別のRedditユーザーも報告しました
 Huawei 携帯電話にデュアル WeChat ログインを実装するにはどうすればよいですか?
Mar 24, 2024 am 11:27 AM
Huawei 携帯電話にデュアル WeChat ログインを実装するにはどうすればよいですか?ソーシャルメディアの台頭により、WeChatは人々の日常生活に欠かせないコミュニケーションツールの1つになりました。ただし、多くの人は、同じ携帯電話で同時に複数の WeChat アカウントにログインするという問題に遭遇する可能性があります。 Huawei 社の携帯電話ユーザーにとって、WeChat の二重ログインを実現することは難しくありませんが、この記事では Huawei 社の携帯電話で WeChat の二重ログインを実現する方法を紹介します。まず第一に、ファーウェイの携帯電話に付属するEMUIシステムは、デュアルアプリケーションを開くという非常に便利な機能を提供します。アプリケーションのデュアルオープン機能により、ユーザーは同時に
 九州風神アサシン4Sラジエターレビュー 空冷「アサシンマスター」スタイル
Mar 28, 2024 am 11:11 AM
ASSASSINといえば、プレイヤーの皆さんは必ず『アサシン クリード』に登場するマスターアサシンを思い浮かべると思いますが、彼らは熟練しただけではなく、「闇に身を捧げ、光に仕える」という信条を持っています。 - アプライアンス ブランド DeepCool の冷却ラジエーターが互いに一致します。このたび、シリーズ最新作「ASSASSIN4S」が登場し、上級者に新たな空冷体験をもたらす『スーツの暗殺者 アドバンスト』。外観はディテールに富んでいます. Assassin 4S ラジエーターはダブルタワー構造 + シングルファン内蔵設計を採用しています. 外側は立方体状のフェアリングで覆われており, 全体的な印象が強いです. ホワイトとブラックの2色が用意されています.さまざまな色に合う色。
 春の絶妙な光と影のアート、Haqu H2 は費用対効果の高い選択肢です
Apr 17, 2024 pm 05:07 PM
春の到来とともにあらゆるものが生き返り、あらゆるものが生命力と活力に満ち溢れます。この美しい季節、家庭生活に彩りを加えるにはどうすればよいでしょうか? Haqu H2 プロジェクターは、絶妙なデザインと超コストパフォーマンスで、この春に欠かせない美しさになりました。コンパクトでありながらスタイリッシュなH2プロジェクター。リビングルームのテレビキャビネットの上に置いても、寝室のベッドサイドテーブルの隣に置いても、美しい風景になります。乳白色のマットな質感のボディは、プロジェクターの高級感を演出するだけでなく、触り心地も向上させたデザインです。ベージュのレザー風の素材が全体の外観に温かみとエレガントさを加えます。この色と素材の組み合わせは、現代の住宅の美的傾向に準拠しているだけでなく、住宅に統合することもできます。
 PHP プログラミング ガイド: フィボナッチ数列を実装する方法
Mar 20, 2024 pm 04:54 PM
プログラミング言語 PHP は、さまざまなプログラミング ロジックやアルゴリズムをサポートできる、Web 開発用の強力なツールです。その中でも、フィボナッチ数列の実装は、一般的で古典的なプログラミングの問題です。この記事では、PHP プログラミング言語を使用してフィボナッチ数列を実装する方法を、具体的なコード例を添付して紹介します。フィボナッチ数列は、次のように定義される数学的数列です。数列の最初と 2 番目の要素は 1 で、3 番目の要素以降、各要素の値は前の 2 つの要素の合計に等しくなります。シーケンスの最初のいくつかの要素
 Huntkey MX750P フルモジュール電源レビュー: 750W の集中プラチナ強度
Mar 28, 2024 pm 03:20 PM
コンパクトなサイズで究極の独自の美しさを追求する多くのプレイヤーを魅了するITXプラットフォームは、製造プロセスの改善と技術の進歩により、インテルの第14世代CoreおよびRTX40シリーズのグラフィックスカードの両方がITXプラットフォーム上で強みを発揮することができ、ゲーマーも SFX 電源にはより高い要件があります。ゲーム愛好家である Huntkey は、高性能要件を満たす ITX プラットフォームにおいて、最大 750W の定格電力を備え、80PLUS プラチナ レベルの認証を取得した、新しい MX シリーズ電源を発売しました。以下にこの電源の評価を示します。 Huntkey MX750P フルモジュール電源は、シンプルでファッショナブルなデザインコンセプトを採用しており、プレイヤーに合わせて選択できるブラックとホワイトの 2 つのモデルがあり、どちらもマットな表面処理が施されており、シルバーグレーとレッドのフォントで質感が優れています。
 Huawei携帯電話にWeChatクローン機能を実装する方法
Mar 24, 2024 pm 06:03 PM
Huawei 携帯電話に WeChat クローン機能を実装する方法 ソーシャル ソフトウェアの人気と人々のプライバシーとセキュリティの重視に伴い、WeChat クローン機能は徐々に人々の注目を集めるようになりました。 WeChat クローン機能を使用すると、ユーザーは同じ携帯電話で複数の WeChat アカウントに同時にログインできるため、管理と使用が容易になります。 Huawei携帯電話にWeChatクローン機能を実装するのは難しくなく、次の手順に従うだけです。ステップ 1: 携帯電話システムのバージョンと WeChat のバージョンが要件を満たしていることを確認する まず、Huawei 携帯電話システムのバージョンと WeChat アプリが最新バージョンに更新されていることを確認します。
 4K HD映像がわかりやすい!この大規模なマルチモーダル モデルは、Web ポスターのコンテンツを自動的に分析するため、作業者にとって非常に便利です。
Apr 23, 2024 am 08:04 AM
PDF、Web ページ、ポスター、Excel グラフの内容を自動的に分析できる大型モデルは、アルバイトにとってはあまり便利ではありません。上海 AILab、香港中文大学、その他の研究機関が提案した InternLM-XComposer2-4KHD (略称 IXC2-4KHD) モデルは、これを実現します。解像度制限が 1500x1500 以下である他のマルチモーダル大型モデルと比較して、この作業ではマルチモーダル大型モデルの最大入力画像が 4K (3840x1600) 解像度を超え、任意のアスペクト比と 336 ピクセルをサポートし、 4K 動的解像度の変更。発売から3日後、このモデルはHuggingFaceのビジュアル質疑応答モデルの人気ランキングで1位となった。扱いやすい


