最初に説明すると、プロジェクトで使用するテーブルは大きく 2 つのカテゴリに分けられます。1 つは固定ヘッダーを持たない通常のテーブルで、もう 1 つは現在の列の幅を制御できる固定ヘッダーです。 tbody部分是可以滚动的。需要说明的是,表头固定的那种是需要用两个table去实现,做过的人应该也都明白。前者看起来比较简单,因为宽度是受thead里的th影响的,后者看起来就不好处理,因为你用两个table就会出现下面的情况:
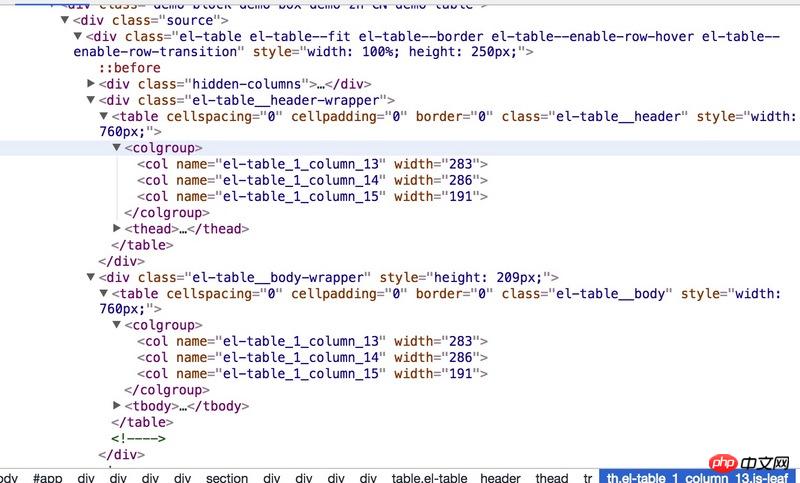
emmm,这和我们想象的应该不一样,这可咋整,感觉处理起来很麻烦啊。想起看过element-ui中的表格,似乎有拖动表头的实现,先打开控制台看下结构吧:
呃,话说长这么大我都没用过<colgroup>和<col>这两个标签,但仔细观察上面有个width,看到这大概也知道是怎么回事了,打开MDN看下相关属性的描述,和想的一样,width幅の制御は解決しましたが、次のように、ドラッグ後に他の列の幅を変更する方法という別の問題があります。
列 a をドラッグした場合、変更された幅は b、c、d にどのように配分されますか? B、c、d には、列がドラッグされたかどうかを示す属性があります。 、c、d がドラッグされていない場合、変更された a の幅は、b、c、d の 3 つの列の幅に均等に分割されます。b、c、および d がすべて変更された場合、その幅のみが変更されます。最後の列 d が変更されます。アイデアはあるので、実装してみましょう。
上記のデザインに従うのはあまりにも愚かであることが判明しました。ドラッグされた列の後ろの列のみを変更するように変更され、これらの列の幅は変更されません。
まず、HTMLの構造はおおよそ次のようになります:
<table>
  <thead>
    <tr>
      <th>a<th>
      <th>b<th>
    </tr>
  </thead>
  <tbody>
    <tr>
      <th>1<th>
      <th>2<th>
    </tr>
  </tbody>
</table>
jsアスペクト
  constructor (id, options) {
    this._el = document.querySelector(`#${id}`);
    // 实际使用中需要对dom结构进行判断,这里就不做了
    this._tables = Array.from(this._el.querySelectorAll('table'));
    setTimeout(() => this._resolveDom());

    this.store = {
      dragging: false,                 //是否拖动
      draggingColumn: null,            //拖动的对象
      miniWidth: 30,                   //拖动的最小宽度
      startMouseLeft: undefined,       //鼠标点击时的clientX
      startLeft: undefined,            //th右离table的距离
      startColumnLeft: undefined,      //th左离table的距离
      tableLeft: undefined,            //table离页面左边的距离,
      HColumns: [],
      BColumns: [],
    };
};domを追加:
const [ THeader ] = this._tables;
let TBody;
const Tr = THeader.tHead.rows[0];
const columns = Array.from(Tr.cells);
const Bcolgroup = document.createElement('colgroup');
const cols = columns.map((item, index) => {
  const col = document.createElement('col');
  item.dataset.index = index;
  col.width = +item.offsetWidth;
  return col;
});
cols.reduce((newDom, item) => {
  newDom.appendChild(item);
  return newDom;
}, Bcolgroup);
const HColgroup = Bcolgroup.cloneNode(true);
THeader.appendChild(HColgroup);

//不管是一个table还是两个,都把header和body提出来
if (this._tables.length === 1) {
  const [ , tbody ] = Array.from(THeader.children);
  tbody.remove();
  TBody = THeader.cloneNode();
  TBody.appendChild(Bcolgroup);
  TBody.appendChild(tbody);
  this._el.appendChild(TBody);
} else {
  [ , TBody ] = this._tables;
  TBody.appendChild(Bcolgroup);
}

//拖动时的占位线
const hold = document.createElement('p');
hold.classList.add('resizable-hold');
this._el.appendChild(hold);上記のブロックはノードを追加し、再利用するためにdomを処理します。ここでは、テーブル ヘッダーが固定されているかどうかは関係ありません。テーブル ヘッダーを 2 つの table に分割することで、扱いやすくなります。 dom进行处理,为了复用,这里我们不管你是表头固定还是表头不固定,我们都拆分为两个table,这样处理起来也方便的多。
然后就是处理手指移到列右侧cursor的值设为col-resize:
handleMouseMove(evt) {
//...
if (!this.store.dragging) {
const rect = target.getBoundingClientRect();
const bodyStyle = document.body.style;
if (rect.width > 12 && rect.right - event.pageX < 8) {
bodyStyle.cursor = 'col-resize';
target.style.cursor = 'col-resize';
this.store.draggingColumn = target;
} else {
bodyStyle.cursor = '';
target.style.cursor = 'pointer';
this.store.draggingColumn = null;
}
}
};需要注意的是,getBoundingClientRect()获取的rigth是元素右侧距离页面左边缘的距离,不是离页面右边缘的距离。这里就是给thead的tr添加mousemove事件,当鼠标指针距离右边缘小于8的时候,改变指针形状,然后改变store里的状态,表示此时点击是可以拖动的了。
然后就是mousedown+mousemove+mouseupその後、指を列の右側に移動し、cursor の値を col-resize に設定します:
 <code>getBoundingClientRect()</code >取得される <code>rigth</code> は、ページの右端からの距離ではなく、要素の右側とページの左端の間の距離です。ここでは、<code>mousemove</code> イベントを <code>thead</code> の <code>tr</code> に追加します。マウス ポインターが右端から 8 未満のときにポインターを変更します。 >store</code> のステータスは、現時点ではクリックしてドラッグできることを示しています。 🎜次に、<code>mousedown</code>+<code>mousemove</code>+<code>mouseup</code> を使用してドラッグを処理します。 🎜🎜const handleMouseDown = (evt) =>
if (this.store.draggingColumn) {
This.store.dragging = true;

{ ターゲット } = evt; とします。
if (!target) return;

const tableEle = THeader;
const tableLeft = tableEle.getBoundingClientRect().left;
const columnRect = target.getBoundingClientRect();
const minLeft = columnRect.left - tableLeft + 30;
Target.classList.add('noclick');

This.store.startMouseLeft = evt.clientX;
This.store.startLeft = columnRect.right - tableLeft;
This.store.startColumnLeft = columnRect.left - tableLeft;
This.store.tableLeft = tableLeft;

Document.onselectstart = () =>
Document.ondragstart = () =>

Hold.style.display = 'ブロック';
Hold.style.left = this.store.startLeft + 'px';

const handleOnMouseMove = (イベント) =>
Const deltaLeft =event.clientX - this.store.startMouseLeft;
Const proxyLeft = this.store.startLeft + deltaLeft;

Hold.style.left = Math.max(minLeft, proxyLeft) + 'px';
};

// 幅は例えばこのように割り当てられます以上がドラッグ可能なテーブルヘッダーを実装する方法の詳細内容です。詳細については、PHP 中国語 Web サイトの他の関連記事を参照してください。