

WordPress で個人ブログを構築する

この記事では、主に WordPress で個人ブログを構築する方法を、主に写真、テキスト、コードの形式で説明します。お役に立てれば幸いです。
1 そして 3 種類の仮想ホストLNMP バイナリのインストール mysql-5.5.54
LNMP ソースコードのコンパイルとインストール php-5.5.32# 修改/application/nginx/conf/extra/blog.conf[root@web01 extra]# cat blog.conf
server { listen 80;
server_name blog.rsq.com;
location / {
root html/blog; index index.html index.htm;
}
location ~ .*\.(php|php5)?$ {
root html/blog;
fastcgi_pass 127.0.0.1:9000;
fastcgi_index index.php;
include fastcgi.conf;
}
}# 重启nginx服务[root@web01 extra]# ../../sbin/nginx -tnginx: the configuration file /application/nginx-1.6.3//conf/nginx.conf syntax is ok
nginx: configuration file /application/nginx-1.6.3//conf/nginx.conf test is successful
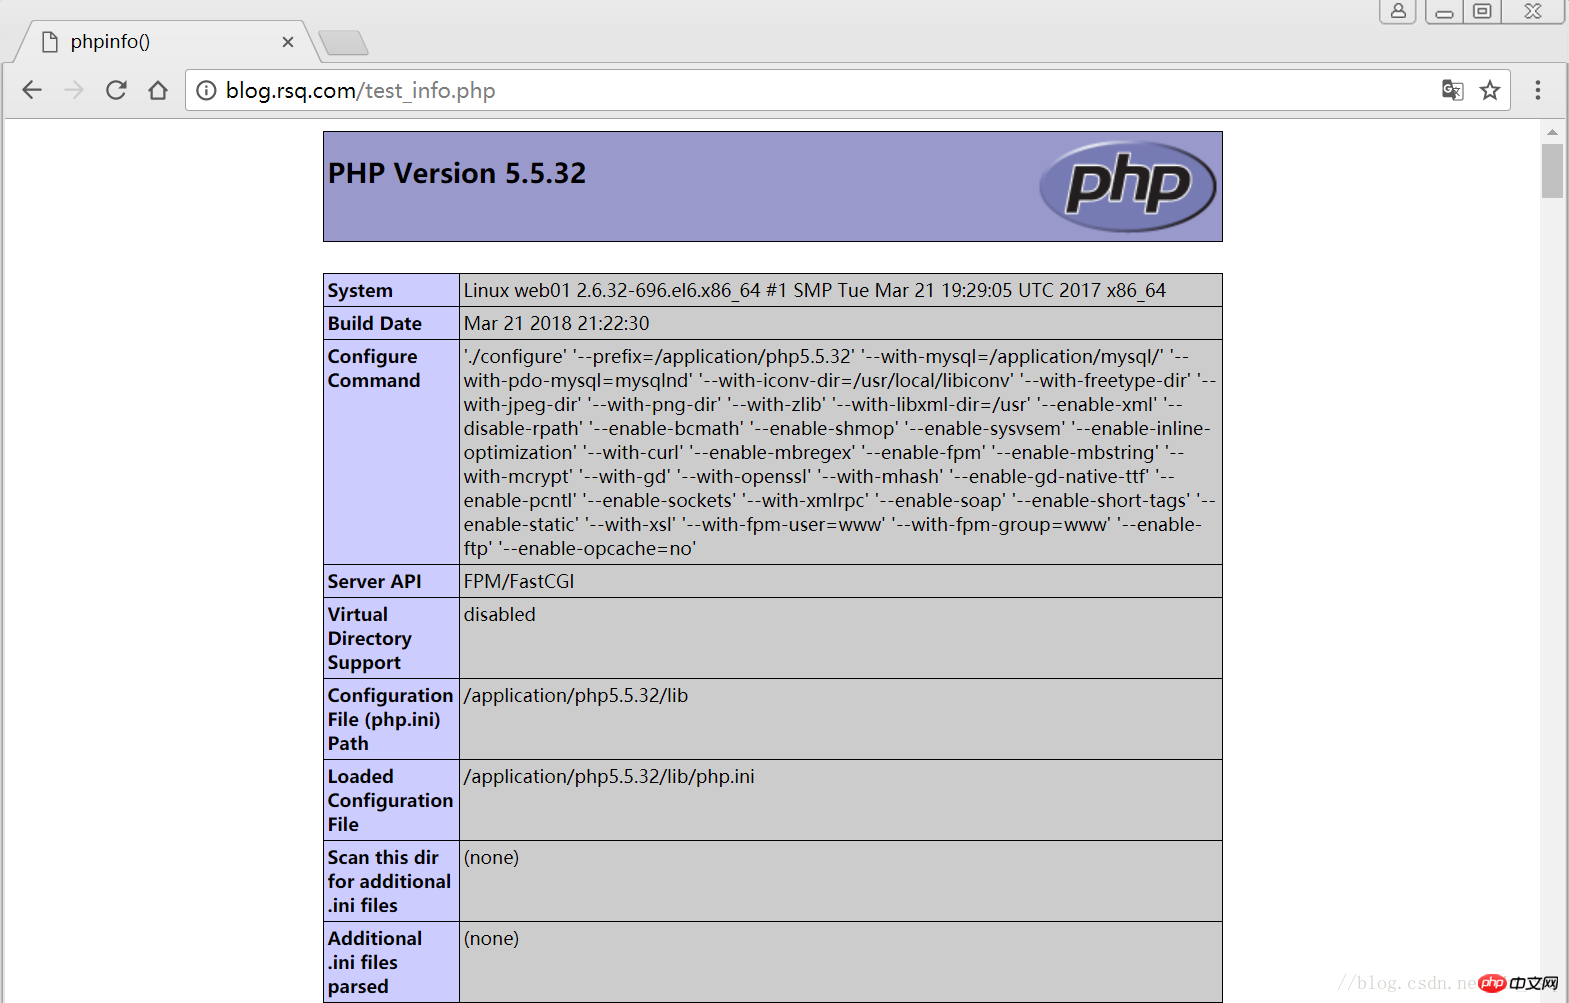
[root@web01 extra]# ../../sbin/nginx -s reload# 在/application/nginx/html/blog/目录中写一个WordPress で個人ブログを構築する文件,测试连通性[root@web01 extra]# cd /application/nginx/html/blog/[root@web01 blog]# echo "<?php WordPress で個人ブログを構築する(); ?>" >test_info.php[root@web01 blog]# cat test_info.php<?php WordPress で個人ブログを構築する(); ?># Windows ブラウザでアクセステストを行う 以下のページが表示されたら、テストは成功しました
# ブラウザ側のテスト
1.2 php から mysql への接続を確認します# 写一个简单的数据库连接脚本[root@web01 blog]# cat test_mysql.php<?php $link_id=mysql_connect('localhost','root','oldboy123') or mysql_error(); if($link_id){ echo "Mysql successful by RSQ !"; }else{ echo mysql_error(); }?>ログイン後にコピーログイン後にコピー
 2 LNMP WordPress 個人ブログのセットアップ
2.1 wordpress データベースを作成します
# 先登录mysql,创建WordPress所需要的数据库 [root@web01 ~]# mysql -uroot -poldboy123mysql> show databases; +--------------------+| Database | +--------------------+| information_schema | | mysql | | performance_schema || test | +--------------------+4 rows in set (0.01 sec) mysql> drop database test; # 删除多余的test数据库 Query OK, 0 rows affected (0.02 sec)mysql> show databases; #显示数据库 +--------------------+| Database | +--------------------+| information_schema | | mysql | | performance_schema |+--------------------+3 rows in set (0.00 sec) mysql> create database wordpress; # 创建wordpress用户 Query OK, 1 row affected (0.00 sec)mysql> show databases; +--------------------+| Database | +--------------------+| information_schema | | mysql | | performance_schema || wordpress | +--------------------+4 rows in set (0.00 sec)mysql> select user(); +----------------+| user() | +----------------+| root@localhost | +----------------+1 row in set (0.00 sec)mysql> select user,host from mysql.user; #查看当前数据库用户 +------+-----------+| user | host | +------+-----------+| root | 127.0.0.1 | | root | ::1 | | | localhost || root | localhost | +------+-----------+4 rows in set (0.00 sec) # 为wordpress数据库创建专门管理的wordpress用户并授予所有权限 mysql> grant all on wordpress.* to wordpress@'localhost' identified by '123456'; Query OK, 0 rows affected (0.00 sec)mysql> select user,host from mysql.user; # 查看wordpress数据库用户是否创建 +-----------+-----------+| user | host | +-----------+-----------+| root | 127.0.0.1 | | root | ::1 | | | localhost | | root | localhost || wordpress | localhost | +-----------+-----------+5 rows in set (0.00 sec) mysql> show grants for wordpress@'localhost'; # 查看指定用户所具有的权限 mysql> flush privileges; # 刷新一下,使用户权限生效 Query OK, 0 rows affected (0.00 sec)
2.2 blog.confを修正する設定ファイル# blog.conf配置文件中index新增index.html[root@web01 extra]# cat blog.conf
server {
listen 80;
server_name blog.rsq.com;
location / {
root html/blog;
index index.php index.html index.htm;
}
location ~ .*\.(php|php5)?$ {
root html/blog;
fastcgi_pass 127.0.0.1:9000;
fastcgi_index index.php;
include fastcgi.conf;
}
}
[root@web01 tools]# /application/nginx/sbin/nginx -t nginx: the configuration file /application/nginx-1.6.3//conf/nginx.conf syntax is oknginx: configuration file /application/nginx-1.6.3//conf/nginx.conf test is successful
[root@web01 tools]# /application/nginx/sbin/nginx -s reload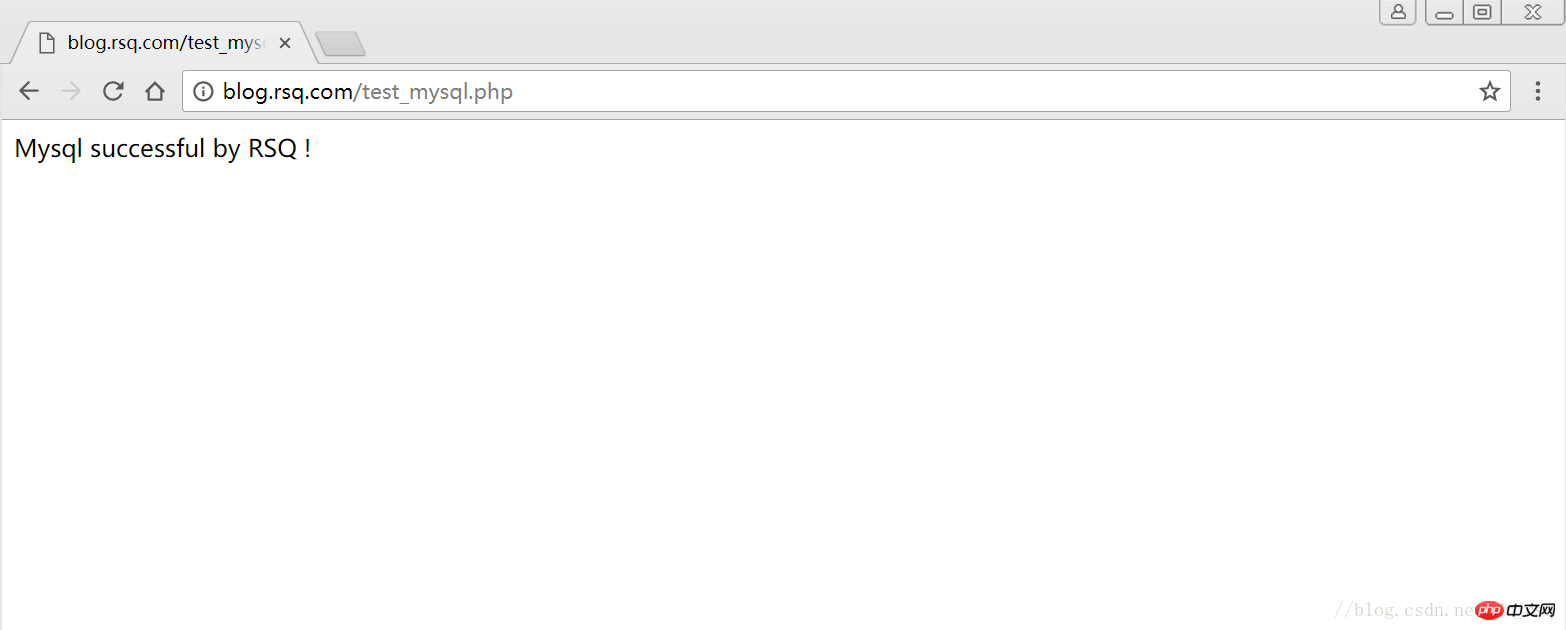
# 去官网下载最新的wordpress软件包[root@web01 extra]# cd /home/oldboy/tools/[root@web01 tools]# wget https://cn.wordpress.org/wordpress-4.9.4-zh_CN.tar.gz# 解压缩[root@web01 tools]# tar -xf wordpress-4.9.4-zh_CN.tar.gz# 拷贝wordpress目录下的所有内容到/application/nginx/html/blog/目录下[root@web01 tools]# cp -a wordpress/* /application/nginx/html/blog/[root@web01 tools]# ls /application/nginx/html/blog/index.php wp-blog-header.php wp-includes wp-settings.phplicense.txt wp-comments-post.php wp-links-opml.php wp-signup.phpreadme.html wp-config-sample.php wp-load.php wp-trackback.phpwp-activate.php wp-content wp-login.php xmlrpc.phpwp-admin wp-cron.php wp-mail.php# 授予权限,先暂时授予所有文件,以后再调整权限[root@web01 tools]# chown -R www.www /application/nginx/html/blog/
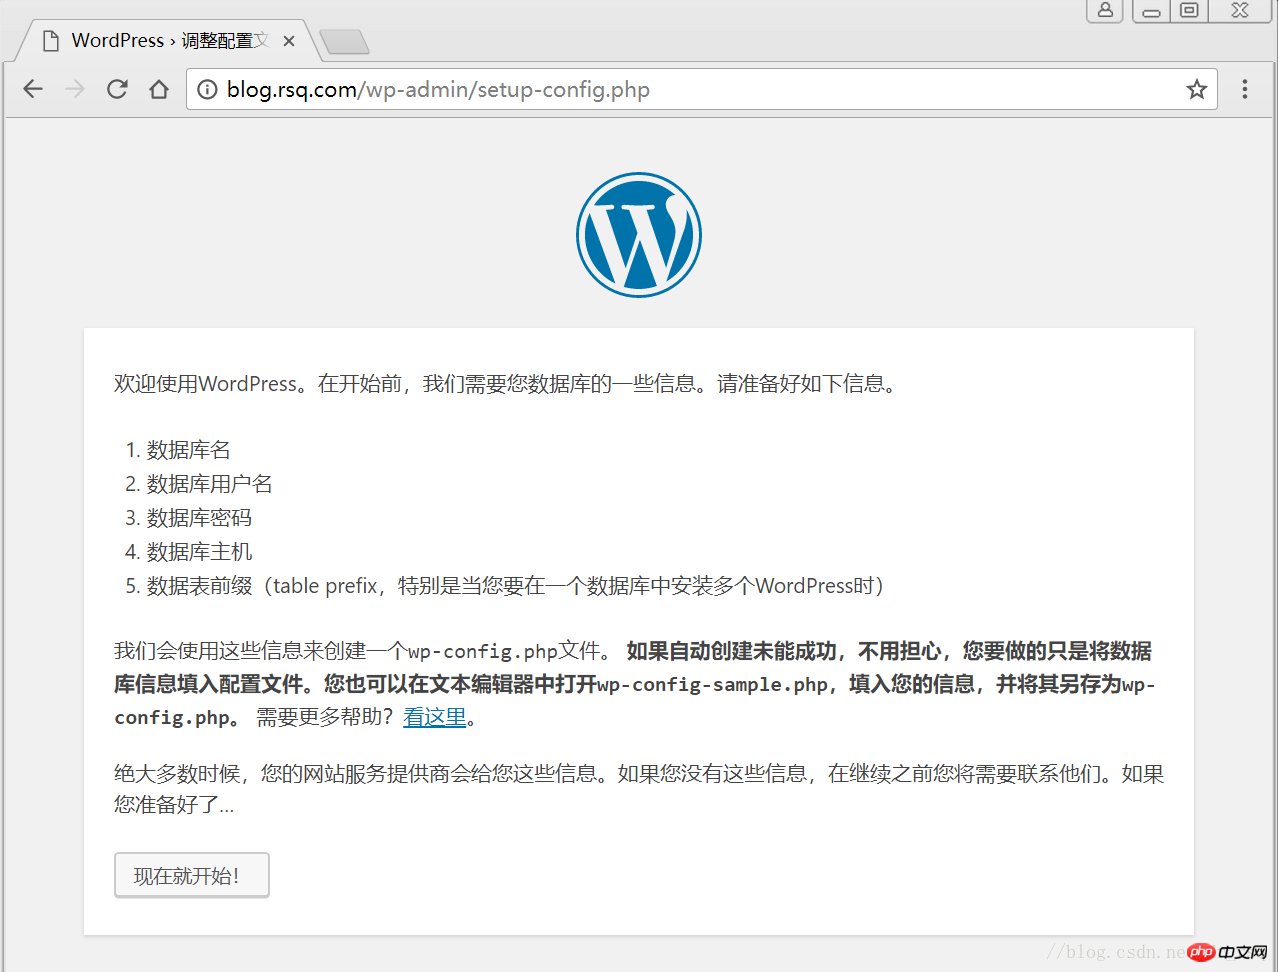
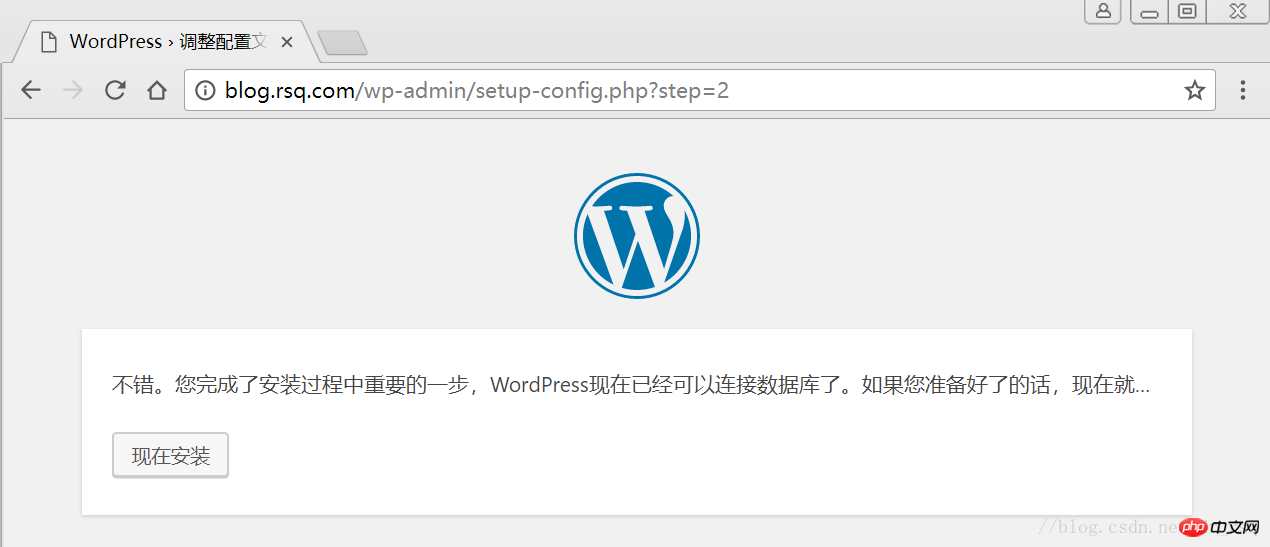
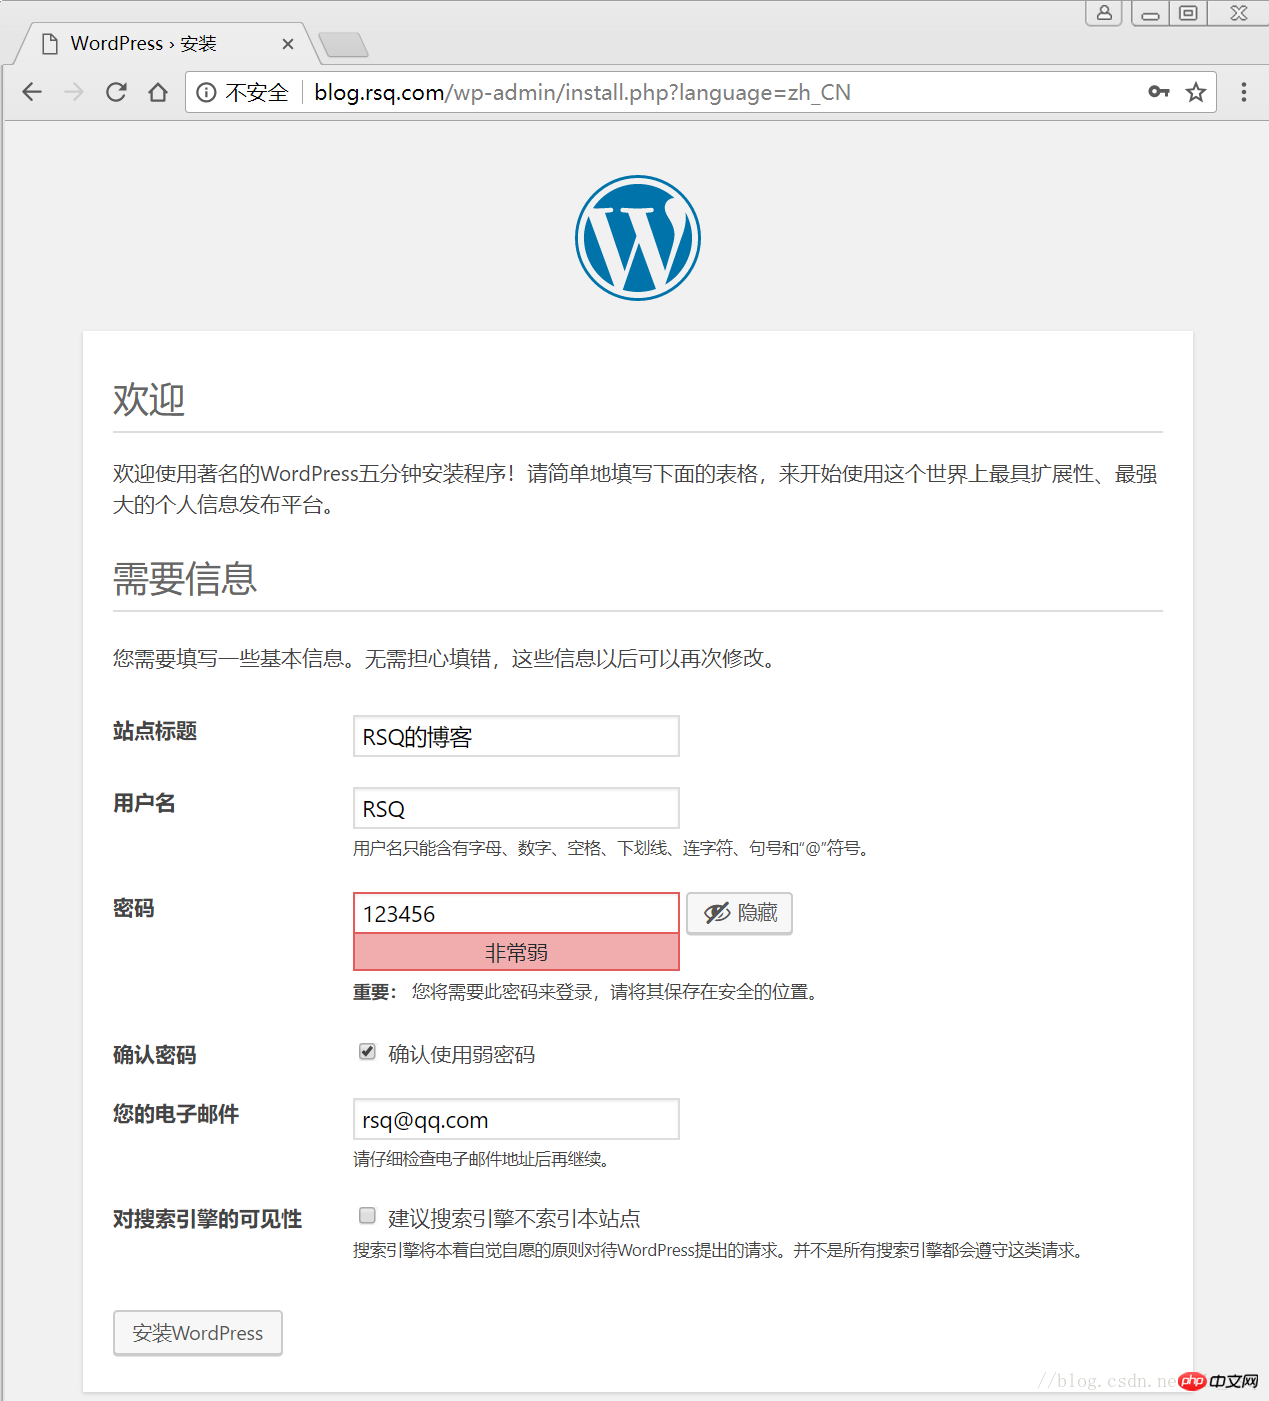
2.4 Webページにwordpressをインストールします
#クライアントホストファイルを解析する必要があります


1.1 Nginxからphpへの接続を確認する
1 .2 php から mysql への接続を確認します
- 2 LNMP WordPress 個人ブログの設定
- 2.1 wordpress データベースを作成する
- 2.2 blog.conf 設定ファイルを変更する
2.3 wordpress パッケージをダウンロードする
- 2.4 wordpress をインストールするウェブページで
1 LNMP の組み合わせ
1.1 Nginx から php への接続を確認する
最初の数回では、このブログ投稿のすべての環境が構成されています- LNMP Nginx 間の接続をテストします。サービスの確立と 3 種類の仮想ホスト LNMP バイナリのインストール mysql-5.5.54
# 修改/application/nginx/conf/extra/blog.conf[root@web01 extra]# cat blog.conf
    server {        listen       80;
        server_name  blog.rsq.com;
        location / {
            root   html/blog;            index  index.html index.htm;
        }
        location ~ .*\.(php|php5)?$ {
            root html/blog;
        fastcgi_pass 127.0.0.1:9000;
        fastcgi_index index.php;
        include fastcgi.conf;
        }
    }# 重启nginx服务[root@web01 extra]# ../../sbin/nginx -tnginx: the configuration file /application/nginx-1.6.3//conf/nginx.conf syntax is ok
nginx: configuration file /application/nginx-1.6.3//conf/nginx.conf test is successful
[root@web01 extra]# ../../sbin/nginx -s reload# 在/application/nginx/html/blog/目录中写一个WordPress で個人ブログを構築する文件,测试连通性[root@web01 extra]# cd /application/nginx/html/blog/[root@web01 blog]# echo "<?php WordPress で個人ブログを構築する(); ?>" >test_info.php[root@web01 blog]# cat test_info.php<?php WordPress で個人ブログを構築する(); ?>ログイン後にコピーログイン後にコピー
# 修改/application/nginx/conf/extra/blog.conf[root@web01 extra]# cat blog.conf
server { listen 80;
server_name blog.rsq.com;
location / {
root html/blog; index index.html index.htm;
}
location ~ .*\.(php|php5)?$ {
root html/blog;
fastcgi_pass 127.0.0.1:9000;
fastcgi_index index.php;
include fastcgi.conf;
}
}# 重启nginx服务[root@web01 extra]# ../../sbin/nginx -tnginx: the configuration file /application/nginx-1.6.3//conf/nginx.conf syntax is ok
nginx: configuration file /application/nginx-1.6.3//conf/nginx.conf test is successful
[root@web01 extra]# ../../sbin/nginx -s reload# 在/application/nginx/html/blog/目录中写一个WordPress で個人ブログを構築する文件,测试连通性[root@web01 extra]# cd /application/nginx/html/blog/[root@web01 blog]# echo "<?php WordPress で個人ブログを構築する(); ?>" >test_info.php[root@web01 blog]# cat test_info.php<?php WordPress で個人ブログを構築する(); ?># Windows ブラウザでアクセステストを行う 以下のページが表示されたら、テストを実行します。成功しました
1.2 phpからmysqlへの接続を確認します
# 写一个简单的数据库连接脚本[root@web01 blog]# cat test_mysql.php<?php $link_id=mysql_connect('localhost','root','oldboy123') or mysql_error(); if($link_id){ echo "Mysql successful by RSQ !"; }else{ echo mysql_error(); }?>ログイン後にコピーログイン後にコピー
# ブラウザ側テスト
2 LNMP wordpress個人ブログ構築
2.1 wordpressデータベースを作成します
# 先登录mysql,创建WordPress所需要的数据库
[root@web01 ~]# mysql -uroot -poldboy123mysql> show databases;
+--------------------+| Database           |
+--------------------+| information_schema |
| mysql              |
| performance_schema || test               |
+--------------------+4 rows in set (0.01 sec)

mysql> drop database test;          # 删除多余的test数据库
Query OK, 0 rows affected (0.02 sec)mysql> show databases;          #显示数据库
+--------------------+| Database           |
+--------------------+| information_schema |
| mysql              |
| performance_schema |+--------------------+3 rows in set (0.00 sec)

mysql> create database wordpress;           # 创建wordpress用户
Query OK, 1 row affected (0.00 sec)mysql> show databases;
+--------------------+| Database           |
+--------------------+| information_schema |
| mysql              |
| performance_schema || wordpress          |
+--------------------+4 rows in set (0.00 sec)mysql> select user();
+----------------+| user()         |
+----------------+| root@localhost |
+----------------+1 row in set (0.00 sec)mysql> select user,host from mysql.user;        #查看当前数据库用户
+------+-----------+| user | host      |
+------+-----------+| root | 127.0.0.1 |
| root | ::1       |
|      | localhost || root | localhost |
+------+-----------+4 rows in set (0.00 sec)

# 为wordpress数据库创建专门管理的wordpress用户并授予所有权限
mysql> grant all on wordpress.* to wordpress@'localhost' identified by '123456';
Query OK, 0 rows affected (0.00 sec)mysql> select user,host from mysql.user;    # 查看wordpress数据库用户是否创建
+-----------+-----------+| user      | host      |
+-----------+-----------+| root      | 127.0.0.1 |
| root      | ::1       |
|           | localhost |
| root      | localhost || wordpress | localhost |
+-----------+-----------+5 rows in set (0.00 sec)
mysql> show grants for wordpress@'localhost';   # 查看指定用户所具有的权限
mysql> flush privileges;        # 刷新一下,使用户权限生效
Query OK, 0 rows affected (0.00 sec)
# blog.conf配置文件中index新增index.html[root@web01 extra]# cat blog.conf
    server {
        listen       80;
        server_name  blog.rsq.com;
        location / {
            root   html/blog;
            index  index.php index.html index.htm;
        }
        location ~ .*\.(php|php5)?$ {
            root html/blog;
        fastcgi_pass 127.0.0.1:9000;
        fastcgi_index index.php;
        include fastcgi.conf;
        }
    }
[root@web01 tools]# /application/nginx/sbin/nginx -t nginx: the configuration file /application/nginx-1.6.3//conf/nginx.conf syntax is oknginx: configuration file /application/nginx-1.6.3//conf/nginx.conf test is successful
[root@web01 tools]# /application/nginx/sbin/nginx -s reloadログイン後にコピーログイン後にコピー
2.3 wordpress ソフトウェア パッケージをダウンロードします # blog.conf配置文件中index新增index.html[root@web01 extra]# cat blog.conf
server {
listen 80;
server_name blog.rsq.com;
location / {
root html/blog;
index index.php index.html index.htm;
}
location ~ .*\.(php|php5)?$ {
root html/blog;
fastcgi_pass 127.0.0.1:9000;
fastcgi_index index.php;
include fastcgi.conf;
}
}
[root@web01 tools]# /application/nginx/sbin/nginx -t nginx: the configuration file /application/nginx-1.6.3//conf/nginx.conf syntax is oknginx: configuration file /application/nginx-1.6.3//conf/nginx.conf test is successful
[root@web01 tools]# /application/nginx/sbin/nginx -s reload# まず、公式 Web サイトにアクセスして、サポートされているプラグインのバージョンを確認します
# 去官网下载最新的wordpress软件包[root@web01 extra]# cd /home/oldboy/tools/[root@web01 tools]# wget https://cn.wordpress.org/wordpress-4.9.4-zh_CN.tar.gz# 解压缩[root@web01 tools]# tar -xf wordpress-4.9.4-zh_CN.tar.gz# 拷贝wordpress目录下的所有内容到/application/nginx/html/blog/目录下[root@web01 tools]# cp -a wordpress/* /application/nginx/html/blog/[root@web01 tools]# ls /application/nginx/html/blog/index.php wp-blog-header.php wp-includes wp-settings.phplicense.txt wp-comments-post.php wp-links-opml.php wp-signup.phpreadme.html wp-config-sample.php wp-load.php wp-trackback.phpwp-activate.php wp-content wp-login.php xmlrpc.phpwp-admin wp-cron.php wp-mail.php# 授予权限,先暂时授予所有文件,以后再调整权限[root@web01 tools]# chown -R www.www /application/nginx/html/blog/
ログイン後にコピーログイン後にコピー2.4 Web ページのインストール wordpress
# クライアントのホスト ファイルは次のことを行う必要があります解析される
# 去官网下载最新的wordpress软件包[root@web01 extra]# cd /home/oldboy/tools/[root@web01 tools]# wget https://cn.wordpress.org/wordpress-4.9.4-zh_CN.tar.gz# 解压缩[root@web01 tools]# tar -xf wordpress-4.9.4-zh_CN.tar.gz# 拷贝wordpress目录下的所有内容到/application/nginx/html/blog/目录下[root@web01 tools]# cp -a wordpress/* /application/nginx/html/blog/[root@web01 tools]# ls /application/nginx/html/blog/index.php wp-blog-header.php wp-includes wp-settings.phplicense.txt wp-comments-post.php wp-links-opml.php wp-signup.phpreadme.html wp-config-sample.php wp-load.php wp-trackback.phpwp-activate.php wp-content wp-login.php xmlrpc.phpwp-admin wp-cron.php wp-mail.php# 授予权限,先暂时授予所有文件,以后再调整权限[root@web01 tools]# chown -R www.www /application/nginx/html/blog/
関連する推奨事項:
LAMP php モジュールに基づいて個人ブログを構築するための詳細なグラフィックとテキストの説明
HTTPS WordPress の手順個人的なブログを構築する
php 個人ブログ PHP の継承についての個人的な意見です
以上がWordPress で個人ブログを構築するの詳細内容です。詳細については、PHP 中国語 Web サイトの他の関連記事を参照してください。

ホットAIツール

Undresser.AI Undress
リアルなヌード写真を作成する AI 搭載アプリ

AI Clothes Remover
写真から衣服を削除するオンライン AI ツール。

Undress AI Tool
脱衣画像を無料で

Clothoff.io
AI衣類リムーバー

AI Hentai Generator
AIヘンタイを無料で生成します。

人気の記事
ホットツール

メモ帳++7.3.1
使いやすく無料のコードエディター

SublimeText3 中国語版
中国語版、とても使いやすい

ゼンドスタジオ 13.0.1
強力な PHP 統合開発環境

ドリームウィーバー CS6
ビジュアル Web 開発ツール

SublimeText3 Mac版
神レベルのコード編集ソフト(SublimeText3)
ホットトピック
 7549
7549
 15
1382
52
83
11
22
90
15
1382
52
83
11
22
90

 PHP vs. Flutter: モバイル開発に最適な選択
May 06, 2024 pm 10:45 PM
PHP vs. Flutter: モバイル開発に最適な選択
May 06, 2024 pm 10:45 PM
PHP と Flutter は、モバイル開発でよく使われるテクノロジです。 Flutter は、クロスプラットフォーム機能、パフォーマンス、ユーザー インターフェイスに優れており、高パフォーマンス、クロスプラットフォーム、カスタマイズされた UI を必要とするアプリケーションに適しています。 PHP は、クロスプラットフォームではなく、パフォーマンスが低いサーバー側アプリケーションに適しています。
 ワードプレスでページ幅を変更する方法
Apr 16, 2024 am 01:03 AM
ワードプレスでページ幅を変更する方法
Apr 16, 2024 am 01:03 AM
style.css ファイルを編集することで、WordPress ページの幅を簡単に変更できます。 style.css ファイルを編集し、 .site-content { max-width: [好みの幅] }; を追加します。 [好みの幅]を編集してページ幅を設定します。変更を保存し、キャッシュをクリアします (オプション)。
 wordpressの記事はどのフォルダにありますか?
Apr 16, 2024 am 10:29 AM
wordpressの記事はどのフォルダにありますか?
Apr 16, 2024 am 10:29 AM
WordPress の投稿は /wp-content/uploads フォルダーに保存されます。このフォルダーはサブフォルダーを使用して、年、月、記事 ID ごとに整理された記事など、さまざまな種類のアップロードを分類します。記事ファイルはプレーン テキスト形式 (.txt) で保存され、通常、ファイル名には ID とタイトルが含まれます。
 ワードプレスで商品ページを作成する方法
Apr 16, 2024 am 12:39 AM
ワードプレスで商品ページを作成する方法
Apr 16, 2024 am 12:39 AM
WordPress で製品ページを作成します。 1. 製品 (名前、説明、写真) を作成します。 2. ページ テンプレートをカスタマイズします (タイトル、説明、写真、ボタンを追加します)。 3. 製品情報 (在庫、サイズ、重量) を入力します。 4. バリエーションを作成します (さまざまな色、サイズ)。 5. 公開または非表示を設定します。 7. ページをプレビューして公開します。
 ワードプレスのテンプレートファイルはどこにありますか?
Apr 16, 2024 am 11:00 AM
ワードプレスのテンプレートファイルはどこにありますか?
Apr 16, 2024 am 11:00 AM
WordPress テンプレート ファイルは、/wp-content/themes/[テーマ名]/ ディレクトリにあります。これらは、ヘッダー (header.php)、フッター (footer.php)、メイン テンプレート (index.php)、単一記事 (single.php)、ページ (page.php) など、Web サイトの外観と機能を決定するために使用されます。 、アーカイブ (archive.php)、カテゴリ (category.php)、タグ (tag.php)、検索 (search.php)、および 404 エラー ページ (404.php)。これらのファイルを編集および変更することで、WordPress Web サイトの外観をカスタマイズできます。
 WordPress で著者を検索する方法
Apr 16, 2024 am 01:18 AM
WordPress で著者を検索する方法
Apr 16, 2024 am 01:18 AM
WordPress で作成者を検索します。 1. 管理パネルにログインしたら、[投稿] または [ページ] に移動し、検索バーを使用して作成者名を入力し、[フィルター] で [作成者] を選択します。 2. その他のヒント: ワイルドカードを使用して検索範囲を広げたり、演算子を使用して条件を組み合わせたり、著者 ID を入力して記事を検索したりできます。
 WordPress のどのバージョンが安定していますか?
Apr 16, 2024 am 10:54 AM
WordPress のどのバージョンが安定していますか?
Apr 16, 2024 am 10:54 AM
最も安定した WordPress バージョンは、最新のセキュリティ パッチ、パフォーマンスの強化、新機能と改善が導入された最新バージョンです。最新バージョンに更新するには、WordPress ダッシュボードにログインし、[更新] ページに移動して、[今すぐ更新] をクリックします。
 ワードプレスの登録は必要ですか?
Apr 16, 2024 pm 12:07 PM
ワードプレスの登録は必要ですか?
Apr 16, 2024 pm 12:07 PM
WordPressは登録が必要です。私の国の「インターネットセキュリティ管理措置」によれば、国内でインターネット情報サービスを提供するウェブサイトは、WordPress を含め、地方のインターネット情報局に登録する必要があります。登録プロセスには、サービスプロバイダーの選択、情報の準備、申請の送信、審査と公開、登録番号の取得などのステップが含まれます。申請の利点には、法令順守、信頼性の向上、アクセス要件の満たし、通常のアクセスの確保などが含まれます。申請情報は真実かつ有効である必要があり、申請後は定期的に更新する必要があります。
