

vue カスタム選択組み込みコンポーネント

この記事では、vue のカスタム組み込みコンポーネント select に関する関連知識を主に紹介します。具体的なコード例については、この記事を参照してください。
1.
<!DOCTYPE html>
<html>
<head>
<meta charset="UTF-8">
<title></title>
<link rel="stylesheet" href="js/select2/select2.min.css" />
<style>
html, body {
font: 13px/18px sans-serif;
}
select {
min-width: 300px;
}
</style>
</head>
<body>
<p id="el">
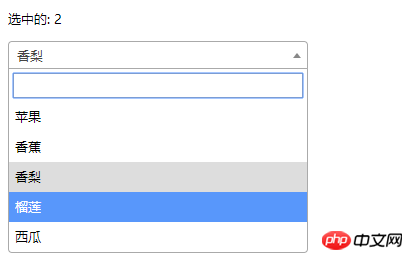
<p>选中的: {{ selected }}</p>
<select2 :options="options" v-model="selected"></select2>
</p>
<script src="js/jQuery-2.1.4.min.js"></script>
<script src="js/select2/select2.min.js"></script>
<script src="http://cdnjs.cloudflare.com/ajax/libs/vue/2.1.3/vue.js"></script>
<script>
Vue.component('select2', {
props: ['options', 'value'],
template: '<select><slot></slot></select>',
mounted: function () {
var vm = this;// init select2
$(this.$el).select2({ data: this.options }).val(this.value).trigger('change').on('change', function () {
// emit event on change.
vm.$emit('input', this.value)
})
},
watch: {
value: function (value) {
// update value
$(this.$el).val(value).trigger('change')
},
options: function (options) {
// update options
$(this.$el).empty().select2({ data: options })
}
},
destroyed: function () {
$(this.$el).off().select2('destroy')
}
})
var vm = new Vue({
el: '#el',
data: {
selected: 2,
options: [
{ id: 0, text: '苹果' },
{ id: 1, text: '香蕉' },
{ id: 2, text: '香梨' },
{ id: 3, text: '榴莲' },
{ id: 4, text: '西瓜' }
]
}
})
</script>
</body>
</html>2. 簡単な選択

<!DOCTYPE html>
<html lang="en">
<head>
<meta charset="utf-8">
<style>
*{
padding: 0;
margin: 0;
}
ul,li {
list-style: none;
}
li {
line-height: 2em;
}
li:hover {
background-color: #f9f9f9;
border-radius:5px;
cursor: pointer;
}
input{
cursor:pointer;
outline:none;
}
#app {
margin-top: 20px;
}
#app h2 {
text-align: center;
}
.wrap {
background-color: rgba(56, 170, 214, 0.45);
border-radius: 20px;
width: 300px;
margin: 40px;
padding: 20px;
}
input[type="button"] {
font-size:14px;
margin-left:2px;
padding:2px 5px;
background-color:rgb(228, 33, 33);
color:white;
border:1px solid rgb(228, 33, 33);
border-radius:5px;
}
.clearFix {
padding-left:
}
input.keyWord {
border: 1px solid #777777;
border-radius: 10px;
height: 30px;
width: 80%;
padding-left: 10px;
font-size: 16px;
}
ul.list {
margin: 20px 0;
}
ul.list li {
padding: 10px 0 0 10px;
}
</style>
</head>
<body>
<p id="app">
<p style="float: left;">
<h2>自定义下拉框</h2>
<custom-select btn-value="查询" v-bind:list="list1"></custom-select>
</p>
<p style="float: left;">
<h2>自定义下拉框2</h2>
<custom-select btn-value="搜索" v-bind:list="list2"></custom-select>
</p>
</p>
<p id="app1">
<custom-select></custom-select>
</p>
<script src="http://cdnjs.cloudflare.com/ajax/libs/vue/2.1.3/vue.js"></script>
<script>
Vue.component("custom-select",{
data(){
return {
selectShow:false,
val:""
}
},
props:["btnValue","list"],
template:`<section class="wrap">
<p class="searchIpt clearFix">
<p class="clearFix">
<input type="text" class="keyWord" :value="val" @click="selectShow = !selectShow" />
<input type="button" :value="btnValue" />
<span></span>
</p>
<custom-list
v-show="selectShow"
:list="list"
v-on:receive="changeValueHandle"
>
</custom-list>
</p>
</section>`,
methods:{
changeValueHandle(value){
this.val = value;
}
}
});
Vue.component("custom-list",{
props:["list"],
template:`<ul class="list">
<li v-for="item in list" @click="selectValueHandle(item)">{{item}}
</li>
</ul>`,
methods:{
selectValueHandle:function(item){
this.$emit("receive",item)
}
}
})
new Vue({
el:"#app",
data:{
list1:['北京','上海','广州','杭州'],
list2:['17-01-11','17-02-11','17-03-11','17-04-11'],
}
})
</script>
</body>
</html>参考:
1.
Vueの単一コンポーネントで無制限レベルの複数選択メニュー機能を実現
以上がvue カスタム選択組み込みコンポーネントの詳細内容です。詳細については、PHP 中国語 Web サイトの他の関連記事を参照してください。

ホットAIツール

Undresser.AI Undress
リアルなヌード写真を作成する AI 搭載アプリ

AI Clothes Remover
写真から衣服を削除するオンライン AI ツール。

Undress AI Tool
脱衣画像を無料で

Clothoff.io
AI衣類リムーバー

AI Hentai Generator
AIヘンタイを無料で生成します。

人気の記事
ホットツール

メモ帳++7.3.1
使いやすく無料のコードエディター

SublimeText3 中国語版
中国語版、とても使いやすい

ゼンドスタジオ 13.0.1
強力な PHP 統合開発環境

ドリームウィーバー CS6
ビジュアル Web 開発ツール

SublimeText3 Mac版
神レベルのコード編集ソフト(SublimeText3)
ホットトピック
 7478
7478
 15
1377
52
77
11
19
33
15
1377
52
77
11
19
33

 Netflix でカスタム アバターをすばやくセットアップする方法
Feb 19, 2024 pm 06:33 PM
Netflix でカスタム アバターをすばやくセットアップする方法
Feb 19, 2024 pm 06:33 PM
Netflix のアバターは、ストリーミング ID を視覚的に表現したものです。ユーザーはデフォルトのアバターを超えて自分の個性を表現できます。 Netflix アプリでカスタム プロフィール写真を設定する方法については、この記事を読み続けてください。 Netflix でカスタム アバターをすばやく設定する方法 Netflix には、プロフィール写真を設定する機能が組み込まれていません。ただし、ブラウザに Netflix 拡張機能をインストールすることでこれを行うことができます。まず、Netflix 拡張機能のカスタム プロフィール画像をブラウザにインストールします。 Chrome ストアで購入できます。拡張機能をインストールした後、ブラウザで Netflix を開き、アカウントにログインします。右上隅にあるプロフィールに移動し、をクリックします
 Windows 10 旧バージョンコンポーネント DirectPlay のインストール方法
Dec 28, 2023 pm 03:43 PM
Windows 10 旧バージョンコンポーネント DirectPlay のインストール方法
Dec 28, 2023 pm 03:43 PM
win10で一部のゲームをプレイすると、画面がフリーズしたり画面がぼやけるなどの不具合が多くのユーザーに発生しますが、現時点ではダイレクトプレイ機能をオンにすることで問題を解決でき、機能の操作方法も非常に簡単です。 win10 の古いコンポーネントである Directplay をインストールする方法 1. 検索ボックスに「コントロール パネル」と入力して開きます 2. 表示方法として大きなアイコンを選択します 3. 「プログラムと機能」を見つけます 4. 左側をクリックして有効にするか、 Win 機能をオフにする 5. ここで古いバージョンを選択します チェックボックスをオンにするだけです
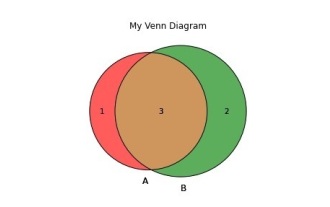 Python でベン図を作成およびカスタマイズするにはどうすればよいですか?
Sep 14, 2023 pm 02:37 PM
Python でベン図を作成およびカスタマイズするにはどうすればよいですか?
Sep 14, 2023 pm 02:37 PM
ベン図は、セット間の関係を表すために使用される図です。ベン図を作成するには、matplotlib を使用します。 Matplotlib は、対話型のチャートやグラフを作成するために Python で一般的に使用されるデータ視覚化ライブラリです。インタラクティブな画像やグラフの作成にも使用されます。 Matplotlib は、チャートやグラフをカスタマイズするための多くの関数を提供します。このチュートリアルでは、ベン図をカスタマイズするための 3 つの例を説明します。 Example の中国語訳は次のとおりです: Example これは 2 つのベン図の交差を作成する簡単な例です。最初に、必要なライブラリをインポートし、ベンをインポートしました。次に、データセットを Python セットとして作成し、その後「venn2()」関数を使用して
 Eclipseでショートカットキー設定をカスタマイズする方法
Jan 28, 2024 am 10:01 AM
Eclipseでショートカットキー設定をカスタマイズする方法
Jan 28, 2024 am 10:01 AM
Eclipse でショートカット キーの設定をカスタマイズするにはどうすればよいですか?開発者にとって、ショートカット キーをマスターすることは、Eclipse でコーディングする際の効率を向上させるための鍵の 1 つです。強力な統合開発環境として、Eclipse は多くのデフォルトのショートカット キーを提供するだけでなく、ユーザーが独自の好みに応じてショートカット キーをカスタマイズすることもできます。この記事では、Eclipseでショートカットキーの設定をカスタマイズする方法と具体的なコード例を紹介します。 Eclipseを開く まず、Eclipseを開いて次のように入力します。
 ediusカスタム画面レイアウトの操作手順
Mar 27, 2024 pm 06:50 PM
ediusカスタム画面レイアウトの操作手順
Mar 27, 2024 pm 06:50 PM
1. 下の図はediusのデフォルトの画面レイアウトです EDIUSのデフォルトのウィンドウレイアウトは横レイアウトのため、シングルモニタ環境では多くのウィンドウが重なってプレビューウィンドウがシングルウィンドウモードになります。 2. メニューバーの[表示]から[デュアルウィンドウモード]を有効にすると、プレビューウィンドウに再生ウィンドウと録音ウィンドウを同時に表示できます。 3. [表示メニューバー > ウィンドウレイアウト > 一般] でデフォルトの画面レイアウトに戻すことができます。また、ウィンドウをドラッグして好みのレイアウトにし、[表示 > ウィンドウ レイアウト > 現在のレイアウトを保存 > 新規作成] をクリックすると、自分に合ったレイアウトをカスタマイズして、よく使う画面レイアウトとして保存することもできます。ポップアップ [現在のレイアウトを保存] レイアウト] 小さなウィンドウにレイアウト名を入力し、OK をクリックします
 Angular コンポーネントとその表示プロパティ: 非ブロックのデフォルト値について
Mar 15, 2024 pm 04:51 PM
Angular コンポーネントとその表示プロパティ: 非ブロックのデフォルト値について
Mar 15, 2024 pm 04:51 PM
Angular フレームワークのコンポーネントのデフォルトの表示動作は、ブロックレベルの要素ではありません。この設計の選択により、コンポーネント スタイルのカプセル化が促進され、開発者が各コンポーネントの表示方法を意識的に定義することが促進されます。 CSS プロパティの表示を明示的に設定することで、Angular コンポーネントの表示を完全に制御して、目的のレイアウトと応答性を実現できます。
 古いバージョンのwin10コンポーネントの設定を開く方法
Dec 22, 2023 am 08:45 AM
古いバージョンのwin10コンポーネントの設定を開く方法
Dec 22, 2023 am 08:45 AM
Win10 の古いバージョンのコンポーネントは、デフォルトで閉じられていることが多いため、ユーザー自身が設定で有効にする必要があります。まず、設定を入力する必要があります。操作は非常に簡単です。以下の手順に従ってください。Win10 の古いバージョンはどこにありますか?バージョン コンポーネント? 開く 1. [スタート] をクリックし、[Win システム] をクリックします 2. クリックしてコントロール パネルに入ります 3. 次に、下のプログラムをクリックします 4. [Win 機能を有効または無効にする] をクリックします 5. ここで必要なものを選択できます開く
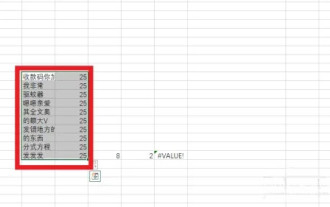 ExcelでX軸とY軸をカスタマイズするにはどうすればよいですか? (Excelの軸スケールをカスタマイズする方法)
Mar 14, 2024 pm 02:10 PM
ExcelでX軸とY軸をカスタマイズするにはどうすればよいですか? (Excelの軸スケールをカスタマイズする方法)
Mar 14, 2024 pm 02:10 PM
Excel の表では、データの変化傾向をより直観的に確認するために座標軸を挿入する必要がある場合があります。表に座標軸を挿入する方法がまだ分からない友達もいると思いますが、次に Excel で座標軸のスケールをカスタマイズする方法を紹介します。座標軸の挿入方法: 1. Excel インターフェイスでデータを選択します。 2. 挿入インターフェイスで、クリックして縦棒グラフまたは棒グラフを挿入します。 3. 展開されたインターフェースで、グラフィックのタイプを選択します。 4. テーブルを右クリックして表示されるインターフェイスで、[データの選択] をクリックします。 5. 拡張されたインターフェイスで、カスタマイズできます。
