

Popup ポップアップ ボックスはデータ イベントを追加するようにバインドされています (詳細なステップバイステップの説明)
今回は、データ イベントを追加するための Popup ポップアップ ボックス バインディングについて説明します (詳細なステップバイステップの説明)。 データ イベントを追加するための Popup ポップアップ ボックス バインディングの 注意事項 は次のとおりです。実際のケースを見てみましょう。
ロジック
一連のデータがウィンドウ P1 に表示され、ボタンをクリックすると新しいブラウザ ウィンドウ P2 が表示されます。データを追加して送信すると、ウィンドウ P2 が自動的に閉じられます。ウィンドウ P1 に移動し、必要な知識: JS BOM ウィンドウ オブジェクトを選択します
達成しました
以下は、Django での簡単な実装です。比較的単純なので、ルーティングとビューを一緒に記述します。
1. ルーティングとビューの部分from django.conf.urls import url
from django.shortcuts import render
def p1(request):
return render(request, 'p1.html')
def p2(request):
if request.method == 'GET':
return render(request, 'p2.html')
elif request.method == 'POST':
city = request.POST.get('city')
print('执行数据保存操作...')
return render(request, 'popup.html',{'city':city})
urlpatterns = [
url(r'^p1.html/', p1),
url(r'^p2.html/', p2),
]<head>
<meta charset="UTF-8">
<title>p1页面</title>
</head>
<body>
<h2>p1页面</h2>
<select id="cityChoose">
<option>上海</option>
<option>北京</option>
</select>
<input type="button" value="添加" onclick="popupFunc();"/>
<script>
popupFunc = function () {
window.open('/p2.html/', 'p2', "status=1, height:300, width:300, toolbar=0, resizeable=1")
//open(url, name, 窗口参数),注意name不能重名
};
callback = function (city) {
var opt = document.createElement('option');
opt.innerText = city;
opt.setAttribute('selected', 'selected');
var selEle = document.getElementById('cityChoose');
selEle.appendChild(opt);
}
</script>
</body>2.
コールバック関数を定義しますcallback: パラメータ city を受け取り、それを動的に追加しますドロップダウン オプションを選択し、選択された状態に設定します。
3. p2.html が次のようにポップアップ ウィンドウに表示されます:
<head>
 <meta charset="UTF-8">
 <title>p2页面</title>
</head>
<body>
<h2>p2页面</h2>
<form method="post">
 {% csrf_token %}
 <input type="text" name="city">
 <input type="submit" value="提交">
</form>
</body><head>
<meta charset="UTF-8">
<title>正在返回</title>
</head>
<body>
<script>
(function (city) {
window.opener.callback(city);
window.close();
})("{{ city }}")
</script>
</body>-
p2ビューが
エラーメッセージ を返した場合は、popup.htmlにも表示することができます(省略)。 -
自己実行関数は、
JavaScript 自己実行関数と jQuery 拡張メソッドを参照できます - この記事の事例を読んだ後は、この方法を習得したと思います。さらに興味深い情報については、注目してください。 PHP 中国語 Web サイトの他の関連記事へ!
JS 自己実行関数と jQuery 拡張機能の使用方法
vue-resource interceptor ヘッダー情報を設定する手順の詳細な説明
以上がPopup ポップアップ ボックスはデータ イベントを追加するようにバインドされています (詳細なステップバイステップの説明)の詳細内容です。詳細については、PHP 中国語 Web サイトの他の関連記事を参照してください。

ホットAIツール

Undresser.AI Undress
リアルなヌード写真を作成する AI 搭載アプリ

AI Clothes Remover
写真から衣服を削除するオンライン AI ツール。

Undress AI Tool
脱衣画像を無料で

Clothoff.io
AI衣類リムーバー

AI Hentai Generator
AIヘンタイを無料で生成します。

人気の記事
ホットツール

メモ帳++7.3.1
使いやすく無料のコードエディター

SublimeText3 中国語版
中国語版、とても使いやすい

ゼンドスタジオ 13.0.1
強力な PHP 統合開発環境

ドリームウィーバー CS6
ビジュアル Web 開発ツール

SublimeText3 Mac版
神レベルのコード編集ソフト(SublimeText3)
ホットトピック
 7518
7518
 15
1378
52
80
11
21
67
15
1378
52
80
11
21
67

 ddrescue を使用して Linux 上のデータを回復する
Mar 20, 2024 pm 01:37 PM
ddrescue を使用して Linux 上のデータを回復する
Mar 20, 2024 pm 01:37 PM
DDREASE は、ハード ドライブ、SSD、RAM ディスク、CD、DVD、USB ストレージ デバイスなどのファイル デバイスまたはブロック デバイスからデータを回復するためのツールです。あるブロック デバイスから別のブロック デバイスにデータをコピーし、破損したデータ ブロックを残して正常なデータ ブロックのみを移動します。 ddreasue は、回復操作中に干渉を必要としないため、完全に自動化された強力な回復ツールです。さらに、ddasue マップ ファイルのおかげでいつでも停止および再開できます。 DDREASE のその他の主要な機能は次のとおりです。 リカバリされたデータは上書きされませんが、反復リカバリの場合にギャップが埋められます。ただし、ツールに明示的に指示されている場合は切り詰めることができます。複数のファイルまたはブロックから単一のファイルにデータを復元します
 オープンソース!ゾーイデプスを超えて! DepthFM: 高速かつ正確な単眼深度推定!
Apr 03, 2024 pm 12:04 PM
オープンソース!ゾーイデプスを超えて! DepthFM: 高速かつ正確な単眼深度推定!
Apr 03, 2024 pm 12:04 PM
0.この記事は何をするのですか?私たちは、多用途かつ高速な最先端の生成単眼深度推定モデルである DepthFM を提案します。従来の深度推定タスクに加えて、DepthFM は深度修復などの下流タスクでも最先端の機能を実証します。 DepthFM は効率的で、いくつかの推論ステップ内で深度マップを合成できます。この作品について一緒に読みましょう〜 1. 論文情報タイトル: DepthFM: FastMonocularDepthEstimationwithFlowMatching 著者: MingGui、JohannesS.Fischer、UlrichPrestel、PingchuanMa、Dmytr
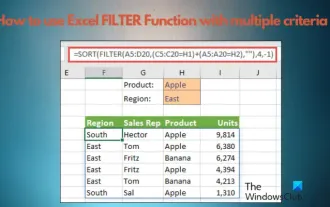 Excelのフィルター機能を複数条件で使う方法
Feb 26, 2024 am 10:19 AM
Excelのフィルター機能を複数条件で使う方法
Feb 26, 2024 am 10:19 AM
Excel で複数の条件によるフィルタリングを使用する方法を知る必要がある場合は、次のチュートリアルで、データを効果的にフィルタリングおよび並べ替えできるようにするための手順を説明します。 Excel のフィルタリング機能は非常に強力で、大量のデータから必要な情報を抽出するのに役立ちます。設定した条件でデータを絞り込み、条件に合致した部分のみを表示することができ、データ管理を効率化できます。フィルター機能を利用すると、目的のデータを素早く見つけることができ、データの検索や整理の時間を節約できます。この機能は、単純なデータ リストに適用できるだけでなく、複数の条件に基づいてフィルタリングすることもできるため、必要な情報をより正確に見つけることができます。全体として、Excel のフィルタリング機能は非常に実用的です。
 Mijia にテレビを追加する方法
Mar 25, 2024 pm 05:00 PM
Mijia にテレビを追加する方法
Mar 25, 2024 pm 05:00 PM
多くのユーザーは、現代生活において Xiaomi スマート ホーム相互接続の電子エコシステムをますます支持しています。Mijia APP に接続した後、携帯電話で接続されたデバイスを簡単に制御できます。しかし、多くのユーザーはまだ Mijia を追加する方法を知りません。このチュートリアル ガイドでは、困っているすべての人を助けるために、具体的な接続方法と手順を説明します。 1. Mijia APPをダウンロードした後、Xiaomi アカウントを作成またはログインします。 2. 追加方法: 新しいデバイスの電源を入れた後、携帯電話をデバイスに近づけて Xiaomi TV の電源を入れます。通常の状況では、接続プロンプトがポップアップ表示されます。「OK」を選択してデバイスの接続プロセスに入ります。プロンプトが表示されない場合は、スマート ホーム APP に入った後、左下の 1 番目のボタンをクリックしてデバイスを手動で追加することもできます。
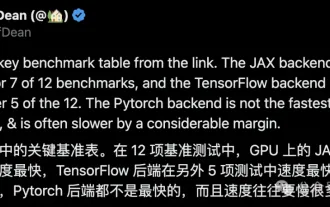 Google は大喜び: JAX のパフォーマンスが Pytorch や TensorFlow を上回りました! GPU 推論トレーニングの最速の選択肢となる可能性があります
Apr 01, 2024 pm 07:46 PM
Google は大喜び: JAX のパフォーマンスが Pytorch や TensorFlow を上回りました! GPU 推論トレーニングの最速の選択肢となる可能性があります
Apr 01, 2024 pm 07:46 PM
Google が推進する JAX のパフォーマンスは、最近のベンチマーク テストで Pytorch や TensorFlow のパフォーマンスを上回り、7 つの指標で 1 位にランクされました。また、テストは最高の JAX パフォーマンスを備えた TPU では行われませんでした。ただし、開発者の間では、依然として Tensorflow よりも Pytorch の方が人気があります。しかし、将来的には、おそらくより大規模なモデルが JAX プラットフォームに基づいてトレーニングされ、実行されるようになるでしょう。モデル 最近、Keras チームは、ネイティブ PyTorch 実装を使用して 3 つのバックエンド (TensorFlow、JAX、PyTorch) をベンチマークし、TensorFlow を使用して Keras2 をベンチマークしました。まず、主流のセットを選択します
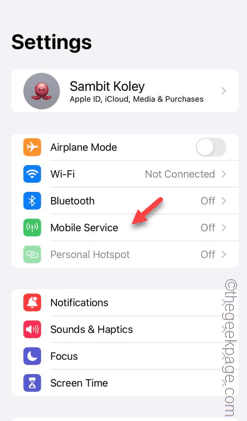 iPhoneのセルラーデータインターネット速度が遅い:修正
May 03, 2024 pm 09:01 PM
iPhoneのセルラーデータインターネット速度が遅い:修正
May 03, 2024 pm 09:01 PM
iPhone のモバイル データ接続に遅延や遅い問題が発生していませんか?通常、携帯電話の携帯インターネットの強度は、地域、携帯ネットワークの種類、ローミングの種類などのいくつかの要因によって異なります。より高速で信頼性の高いセルラー インターネット接続を実現するためにできることがいくつかあります。解決策 1 – iPhone を強制的に再起動する 場合によっては、デバイスを強制的に再起動すると、携帯電話接続を含む多くの機能がリセットされるだけです。ステップ 1 – 音量を上げるキーを 1 回押して放します。次に、音量小キーを押して、もう一度放します。ステップ 2 – プロセスの次の部分は、右側のボタンを押し続けることです。 iPhone の再起動が完了するまで待ちます。セルラーデータを有効にし、ネットワーク速度を確認します。もう一度確認してください 修正 2 – データ モードを変更する 5G はより優れたネットワーク速度を提供しますが、信号が弱い場合はより適切に機能します
 超知性の生命力が覚醒する!しかし、自己更新 AI の登場により、母親はデータのボトルネックを心配する必要がなくなりました。
Apr 29, 2024 pm 06:55 PM
超知性の生命力が覚醒する!しかし、自己更新 AI の登場により、母親はデータのボトルネックを心配する必要がなくなりました。
Apr 29, 2024 pm 06:55 PM
世界は狂ったように大きなモデルを構築していますが、インターネット上のデータだけではまったく不十分です。このトレーニング モデルは「ハンガー ゲーム」のようであり、世界中の AI 研究者は、データを貪欲に食べる人たちにどのように餌を与えるかを心配しています。この問題は、マルチモーダル タスクで特に顕著です。何もできなかった当時、中国人民大学学部のスタートアップチームは、独自の新しいモデルを使用して、中国で初めて「モデル生成データフィード自体」を実現しました。さらに、これは理解側と生成側の 2 つの側面からのアプローチであり、両方の側で高品質のマルチモーダルな新しいデータを生成し、モデル自体にデータのフィードバックを提供できます。モデルとは何ですか? Awaker 1.0 は、中関村フォーラムに登場したばかりの大型マルチモーダル モデルです。チームは誰ですか?ソフォンエンジン。人民大学ヒルハウス人工知能大学院の博士課程学生、ガオ・イージャオ氏によって設立されました。
 柔軟かつ高速な 5 本の指を備え、人間のタスクを自律的に完了する初のロボットが登場、大型モデルが仮想空間トレーニングをサポート
Mar 11, 2024 pm 12:10 PM
柔軟かつ高速な 5 本の指を備え、人間のタスクを自律的に完了する初のロボットが登場、大型モデルが仮想空間トレーニングをサポート
Mar 11, 2024 pm 12:10 PM
今週、OpenAI、Microsoft、Bezos、Nvidiaが投資するロボット企業FigureAIは、7億ドル近くの資金調達を受け、来年中に自立歩行できる人型ロボットを開発する計画であると発表した。そしてテスラのオプティマスプライムには繰り返し良い知らせが届いている。今年が人型ロボットが爆発的に普及する年になることを疑う人はいないだろう。カナダに拠点を置くロボット企業 SanctuaryAI は、最近新しい人型ロボット Phoenix をリリースしました。当局者らは、多くのタスクを人間と同じ速度で自律的に完了できると主張している。人間のスピードでタスクを自律的に完了できる世界初のロボットである Pheonix は、各オブジェクトを優しくつかみ、動かし、左右にエレガントに配置することができます。自律的に物体を識別できる
