

Vue は双方向データバインディング機能を実装します (コード付き)
今回は、Vue の双方向 データ バインディング 関数 (コード付き) について説明します。見て。
1. 原理 Vue の双方向データ バインディングの原理は、主に
Object オブジェクトの set 関数と get 関数を書き換えることによって実装されていると思います。ここでは原理についてはあまり説明しませんが、主に例を実装します。コードをわかりやすくするために、ここでは最も基本的な内容のみを実装します。主に v-model、v-bind、v-click の 3 つのコマンドを実装します。他のコマンドは自分で補足することもできます。 インターネットから画像を追加します

2. のページ構造の実装は、次のように非常に簡単です:
<p id="app">
 <form>
  <input type="text" v-model="number">
  <button type="button" v-click="increment">增加</button>
 </form>
 <h3 v-bind="number"></h3>
 </p>
1. v-modelコマンドを使用した入力
2. ボタン、v-click コマンドを使用します3. h3、v-bind コマンドを使用します。
最終的に、vue と同様の方法で双方向データ バインディングを使用し、データ構造と組み合わせたアノテーションを追加します
var app = new myVue({
  el:'#app',
  data: {
  number: 0
  },
  methods: {
  increment: function() {
   this.number ++;
  },
  }
})まず、myVueコンストラクター
を定義する必要があります:
function myVue(options) {
}このコンストラクターを初期化するには、 _init 属性を追加します function myVue(options) {
this._init(options);
}
myVue.prototype._init = function (options) {
this.$options = options; // options 为上面使用时传入的结构体,包括el,data,methods
this.$el = document.querySelector(options.el); // el是 #app, this.$el是id为app的Element元素
this.$data = options.data; // this.$data = {number: 0}
this.$methods = options.methods; // this.$methods = {increment: function(){}}
}
そして _init 関数を変換します
myVue.prototype._obverse = function (obj) { // obj = {number: 0}
 var value;
 for (key in obj) { //遍历obj对象
  if (obj.hasOwnProperty(key)) {
  value = obj[key];
  if (typeof value === 'object') { //如果值还是对象,则遍历处理
   this._obverse(value);
  }
  Object.defineProperty(this.$data, key, { //关键
   enumerable: true,
   configurable: true,
   get: function () {
   console.log(`获取${value}`);
   return value;
   },
   set: function (newVal) {
   console.log(`更新${newVal}`);
   if (value !== newVal) {
    value = newVal;
   }
   }
  })
  }
 }
 }
 myVue.prototype._init = function (options) {
 this.$options = options;
 this.$el = document.querySelector(options.el);
 this.$data = options.data;
 this.$methods = options.methods;
 this._obverse(this.$data);
}次に、命令クラス Watcher を作成します。 update 関数を使用して DOM 要素を更新します
function Watcher(name, el, vm, exp, attr) {
 this.name = name;   //指令名称,例如文本节点,该值设为"text"
 this.el = el;    //指令对应的DOM元素
 this.vm = vm;    //指令所属myVue实例
 this.exp = exp;   //指令对应的值,本例如"number"
 this.attr = attr;   //绑定的属性值,本例为"innerHTML"
 this.update();
 }
 Watcher.prototype.update = function () {
 this.el[this.attr] = this.vm.$data[this.exp]; //比如 H3.innerHTML = this.data.number; 当number改变时,会触发这个update函数,保证对应的DOM内容进行了更新。
}_init 関数と _obverse 関数を更新します
myVue.prototype._init = function (options) {
 //...
 this._binding = {}; //_binding保存着model与view的映射关系,也就是我们前面定义的Watcher的实例。当model改变时,我们会触发其中的指令类更新,保证view也能实时更新
 //...
 }
 myVue.prototype._obverse = function (obj) {
 //...
  if (obj.hasOwnProperty(key)) {
  this._binding[key] = { // 按照前面的数据,_binding = {number: _directives: []}
   _directives: []
  };
  //...
  var binding = this._binding[key];
  Object.defineProperty(this.$data, key, {
   //...
   set: function (newVal) {
   console.log(`更新${newVal}`);
   if (value !== newVal) {
    value = newVal;
    binding._directives.forEach(function (item) { // 当number改变时,触发_binding[number]._directives 中的绑定的Watcher类的更新
    item.update();
    })
   }
   }
  })
  }
 }
}それでは、ビューをモデルにバインドするにはどうすればよいでしょうか?次に、命令 (v-bind、v-model、v-clickde) などを解析する _compile 関数を定義し、プロセス内でビューとモデルをバインドします。
myVue.prototype._init = function (options) {
//...
this._complie(this.$el);
}
myVue.prototype._complie = function (root) { root 为 id为app的Element元素,也就是我们的根元素
var _this = this;
var nodes = root.children;
for (var i = 0; i < nodes.length; i++) {
var node = nodes[i];
if (node.children.length) { // 对所有元素进行遍历,并进行处理
this._complie(node);
}
if (node.hasAttribute('v-click')) { // 如果有v-click属性,我们监听它的onclick事件,触发increment事件,即number++
node.onclick = (function () {
var attrVal = nodes[i].getAttribute('v-click');
return _this.$methods[attrVal].bind(_this.$data); //bind是使data的作用域与method函数的作用域保持一致
})();
}
if (node.hasAttribute('v-model') && (node.tagName == 'INPUT' || node.tagName == 'TEXTAREA')) { // 如果有v-model属性,并且元素是INPUT或者TEXTAREA,我们监听它的input事件
node.addEventListener('input', (function(key) {
var attrVal = node.getAttribute('v-model');
//_this._binding['number']._directives = [一个Watcher实例]
// 其中Watcher.prototype.update = function () {
// node['vaule'] = _this.$data['number']; 这就将node的值保持与number一致
// }
_this._binding[attrVal]._directives.push(new Watcher(
'input',
node,
_this,
attrVal,
'value'
))
return function() {
_this.$data[attrVal] = nodes[key].value; // 使number 的值与 node的value保持一致,已经实现了双向绑定
}
})(i));
}
if (node.hasAttribute('v-bind')) { // 如果有v-bind属性,我们只要使node的值及时更新为data中number的值即可
var attrVal = node.getAttribute('v-bind');
_this._binding[attrVal]._directives.push(new Watcher(
'text',
node,
_this,
attrVal,
'innerHTML'
))
}
}
}これまで、v-bind、v-model、v-click の 3 つの命令を含む、vue の単純な双方向バインディング関数を実装しました。効果は以下の通りです
150 行未満の完全なコードを添付しますmyVue <p id="app"> <form> <input type="text" v-model="number"> <button type="button" v-click="increment">增加</button> </form> <h3 v-bind="number"></h3> </p> <script> function myVue(options) { this._init(options); } myVue.prototype._init = function (options) { this.$options = options; this.$el = document.querySelector(options.el); this.$data = options.data; this.$methods = options.methods; this._binding = {}; this._obverse(this.$data); this._complie(this.$el); } myVue.prototype._obverse = function (obj) { var value; for (key in obj) { if (obj.hasOwnProperty(key)) { this._binding[key] = { _directives: [] }; value = obj[key]; if (typeof value === 'object') { this._obverse(value); } var binding = this._binding[key]; Object.defineProperty(this.$data, key, { enumerable: true, configurable: true, get: function () { console.log(`获取${value}`); return value; }, set: function (newVal) { console.log(`更新${newVal}`); if (value !== newVal) { value = newVal; binding._directives.forEach(function (item) { item.update(); }) } } }) } } } myVue.prototype._complie = function (root) { var _this = this; var nodes = root.children; for (var i = 0; i < nodes.length; i++) { var node = nodes[i]; if (node.children.length) { this._complie(node); } if (node.hasAttribute('v-click')) { node.onclick = (function () { var attrVal = nodes[i].getAttribute('v-click'); return _this.$methods[attrVal].bind(_this.$data); })(); } if (node.hasAttribute('v-model') && (node.tagName == 'INPUT' || node.tagName == 'TEXTAREA')) { node.addEventListener('input', (function(key) { var attrVal = node.getAttribute('v-model'); _this._binding[attrVal]._directives.push(new Watcher( 'input', node, _this, attrVal, 'value' )) return function() { _this.$data[attrVal] = nodes[key].value; } })(i)); } if (node.hasAttribute('v-bind')) { var attrVal = node.getAttribute('v-bind'); _this._binding[attrVal]._directives.push(new Watcher( 'text', node, _this, attrVal, 'innerHTML' )) } } } function Watcher(name, el, vm, exp, attr) { this.name = name; //指令名称,例如文本节点,该值设为"text" this.el = el; //指令对应的DOM元素 this.vm = vm; //指令所属myVue实例 this.exp = exp; //指令对应的值,本例如"number" this.attr = attr; //绑定的属性值,本例为"innerHTML" this.update(); } Watcher.prototype.update = function () { this.el[this.attr] = this.vm.$data[this.exp]; } window.onload = function() { var app = new myVue({ el:'#app', data: { number: 0 }, methods: { increment: function() { this.number ++; }, } }) } </script>
 この記事の事例を読んだ後は、この方法を習得したと思います。さらに興味深い情報については、他の関連情報に注目してください。 PHP 中国語 Web サイトの記事をご覧ください。
 推奨読書:
jQuery$ と $() の使用方法の詳細な説明以上がVue は双方向データバインディング機能を実装します (コード付き)の詳細内容です。詳細については、PHP 中国語 Web サイトの他の関連記事を参照してください。

ホットAIツール

Undresser.AI Undress
リアルなヌード写真を作成する AI 搭載アプリ

AI Clothes Remover
写真から衣服を削除するオンライン AI ツール。

Undress AI Tool
脱衣画像を無料で

Clothoff.io
AI衣類リムーバー

AI Hentai Generator
AIヘンタイを無料で生成します。

人気の記事
ホットツール

メモ帳++7.3.1
使いやすく無料のコードエディター

SublimeText3 中国語版
中国語版、とても使いやすい

ゼンドスタジオ 13.0.1
強力な PHP 統合開発環境

ドリームウィーバー CS6
ビジュアル Web 開発ツール

SublimeText3 Mac版
神レベルのコード編集ソフト(SublimeText3)
ホットトピック
 7522
7522
 15
1378
52
81
11
21
71
15
1378
52
81
11
21
71

 ddrescue を使用して Linux 上のデータを回復する
Mar 20, 2024 pm 01:37 PM
ddrescue を使用して Linux 上のデータを回復する
Mar 20, 2024 pm 01:37 PM
DDREASE は、ハード ドライブ、SSD、RAM ディスク、CD、DVD、USB ストレージ デバイスなどのファイル デバイスまたはブロック デバイスからデータを回復するためのツールです。あるブロック デバイスから別のブロック デバイスにデータをコピーし、破損したデータ ブロックを残して正常なデータ ブロックのみを移動します。 ddreasue は、回復操作中に干渉を必要としないため、完全に自動化された強力な回復ツールです。さらに、ddasue マップ ファイルのおかげでいつでも停止および再開できます。 DDREASE のその他の主要な機能は次のとおりです。 リカバリされたデータは上書きされませんが、反復リカバリの場合にギャップが埋められます。ただし、ツールに明示的に指示されている場合は切り詰めることができます。複数のファイルまたはブロックから単一のファイルにデータを復元します
 オープンソース!ゾーイデプスを超えて! DepthFM: 高速かつ正確な単眼深度推定!
Apr 03, 2024 pm 12:04 PM
オープンソース!ゾーイデプスを超えて! DepthFM: 高速かつ正確な単眼深度推定!
Apr 03, 2024 pm 12:04 PM
0.この記事は何をするのですか?私たちは、多用途かつ高速な最先端の生成単眼深度推定モデルである DepthFM を提案します。従来の深度推定タスクに加えて、DepthFM は深度修復などの下流タスクでも最先端の機能を実証します。 DepthFM は効率的で、いくつかの推論ステップ内で深度マップを合成できます。この作品について一緒に読みましょう〜 1. 論文情報タイトル: DepthFM: FastMonocularDepthEstimationwithFlowMatching 著者: MingGui、JohannesS.Fischer、UlrichPrestel、PingchuanMa、Dmytr
 vivox100sとx100の違い:性能比較と機能分析
Mar 23, 2024 pm 10:27 PM
vivox100sとx100の違い:性能比較と機能分析
Mar 23, 2024 pm 10:27 PM
vivox100s と x100 携帯電話はどちらも vivo の携帯電話製品ラインの代表的なモデルであり、それぞれ異なる時代における vivo のハイエンド技術レベルを代表するものであるため、2 つの携帯電話にはデザイン、性能、機能に一定の違いがあります。この記事では、消費者が自分に合った携帯電話をより適切に選択できるように、これら 2 つの携帯電話を性能比較と機能分析の観点から詳しく比較します。まずはvivox100sとx100の性能比較を見てみましょう。 vivox100s には最新の機能が搭載されています。
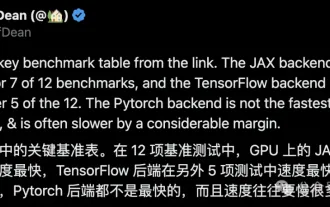 Google は大喜び: JAX のパフォーマンスが Pytorch や TensorFlow を上回りました! GPU 推論トレーニングの最速の選択肢となる可能性があります
Apr 01, 2024 pm 07:46 PM
Google は大喜び: JAX のパフォーマンスが Pytorch や TensorFlow を上回りました! GPU 推論トレーニングの最速の選択肢となる可能性があります
Apr 01, 2024 pm 07:46 PM
Google が推進する JAX のパフォーマンスは、最近のベンチマーク テストで Pytorch や TensorFlow のパフォーマンスを上回り、7 つの指標で 1 位にランクされました。また、テストは最高の JAX パフォーマンスを備えた TPU では行われませんでした。ただし、開発者の間では、依然として Tensorflow よりも Pytorch の方が人気があります。しかし、将来的には、おそらくより大規模なモデルが JAX プラットフォームに基づいてトレーニングされ、実行されるようになるでしょう。モデル 最近、Keras チームは、ネイティブ PyTorch 実装を使用して 3 つのバックエンド (TensorFlow、JAX、PyTorch) をベンチマークし、TensorFlow を使用して Keras2 をベンチマークしました。まず、主流のセットを選択します
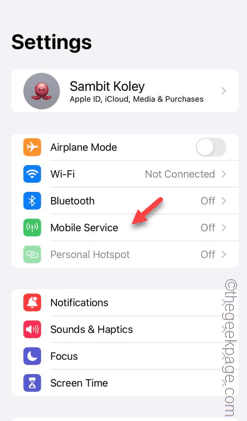 iPhoneのセルラーデータインターネット速度が遅い:修正
May 03, 2024 pm 09:01 PM
iPhoneのセルラーデータインターネット速度が遅い:修正
May 03, 2024 pm 09:01 PM
iPhone のモバイル データ接続に遅延や遅い問題が発生していませんか?通常、携帯電話の携帯インターネットの強度は、地域、携帯ネットワークの種類、ローミングの種類などのいくつかの要因によって異なります。より高速で信頼性の高いセルラー インターネット接続を実現するためにできることがいくつかあります。解決策 1 – iPhone を強制的に再起動する 場合によっては、デバイスを強制的に再起動すると、携帯電話接続を含む多くの機能がリセットされるだけです。ステップ 1 – 音量を上げるキーを 1 回押して放します。次に、音量小キーを押して、もう一度放します。ステップ 2 – プロセスの次の部分は、右側のボタンを押し続けることです。 iPhone の再起動が完了するまで待ちます。セルラーデータを有効にし、ネットワーク速度を確認します。もう一度確認してください 修正 2 – データ モードを変更する 5G はより優れたネットワーク速度を提供しますが、信号が弱い場合はより適切に機能します
 BTCC チュートリアル: BTCC 取引所で MetaMask ウォレットをバインドして使用する方法は?
Apr 26, 2024 am 09:40 AM
BTCC チュートリアル: BTCC 取引所で MetaMask ウォレットをバインドして使用する方法は?
Apr 26, 2024 am 09:40 AM
MetaMask (中国語ではリトル フォックス ウォレットとも呼ばれます) は、無料で評判の高い暗号化ウォレット ソフトウェアです。現在、BTCC は MetaMask ウォレットへのバインドをサポートしており、バインド後は MetaMask ウォレットを使用してすぐにログイン、値の保存、コインの購入などが可能になり、初回バインドで 20 USDT のトライアル ボーナスも獲得できます。 BTCCMetaMask ウォレットのチュートリアルでは、MetaMask の登録方法と使用方法、および BTCC で Little Fox ウォレットをバインドして使用する方法を詳しく紹介します。メタマスクウォレットとは何ですか? 3,000 万人を超えるユーザーを抱える MetaMask Little Fox ウォレットは、現在最も人気のある暗号通貨ウォレットの 1 つです。無料で使用でき、拡張機能としてネットワーク上にインストールできます。
 超知性の生命力が覚醒する!しかし、自己更新 AI の登場により、母親はデータのボトルネックを心配する必要がなくなりました。
Apr 29, 2024 pm 06:55 PM
超知性の生命力が覚醒する!しかし、自己更新 AI の登場により、母親はデータのボトルネックを心配する必要がなくなりました。
Apr 29, 2024 pm 06:55 PM
世界は狂ったように大きなモデルを構築していますが、インターネット上のデータだけではまったく不十分です。このトレーニング モデルは「ハンガー ゲーム」のようであり、世界中の AI 研究者は、データを貪欲に食べる人たちにどのように餌を与えるかを心配しています。この問題は、マルチモーダル タスクで特に顕著です。何もできなかった当時、中国人民大学学部のスタートアップチームは、独自の新しいモデルを使用して、中国で初めて「モデル生成データフィード自体」を実現しました。さらに、これは理解側と生成側の 2 つの側面からのアプローチであり、両方の側で高品質のマルチモーダルな新しいデータを生成し、モデル自体にデータのフィードバックを提供できます。モデルとは何ですか? Awaker 1.0 は、中関村フォーラムに登場したばかりの大型マルチモーダル モデルです。チームは誰ですか?ソフォンエンジン。人民大学ヒルハウス人工知能大学院の博士課程学生、ガオ・イージャオ氏によって設立されました。
 テスラのロボットは工場で働く、マスク氏:手の自由度は今年22に達する!
May 06, 2024 pm 04:13 PM
テスラのロボットは工場で働く、マスク氏:手の自由度は今年22に達する!
May 06, 2024 pm 04:13 PM
テスラのロボット「オプティマス」の最新映像が公開され、すでに工場内で稼働可能となっている。通常の速度では、バッテリー(テスラの4680バッテリー)を次のように分類します:公式は、20倍の速度でどのように見えるかも公開しました - 小さな「ワークステーション」上で、ピッキング、ピッキング、ピッキング:今回は、それがリリースされたハイライトの1つビデオの内容は、オプティマスが工場内でこの作業を完全に自律的に行い、プロセス全体を通じて人間の介入なしに完了するというものです。そして、オプティマスの観点から見ると、自動エラー修正に重点を置いて、曲がったバッテリーを拾い上げたり配置したりすることもできます。オプティマスのハンドについては、NVIDIA の科学者ジム ファン氏が高く評価しました。オプティマスのハンドは、世界の 5 本指ロボットの 1 つです。最も器用。その手は触覚だけではありません
