

VUE は ElTableColumn を拡張します
今回は、VUE の ElTableColumn 拡張について説明します。VUE が ElTableColumn を拡張する場合の 注意事項 について説明します。実際のケースを見てみましょう。
ElTableColumn は元々こんな感じでした: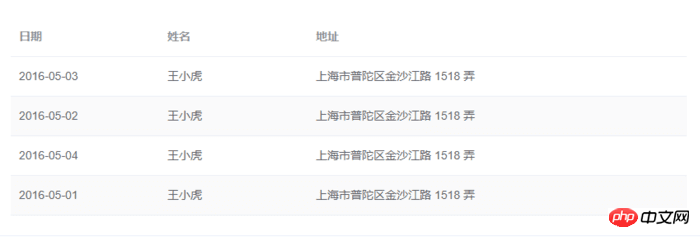
<!-- ElTableColumnPro.vue -->
<template>
<el-table-column v-if="visible" :formatter="formatter" :align='align' :prop="prop" :header-align="headerAlign" :label="label" :width="width" :render-header="renderHeader" >
<template slot-scope="scope">
<slot :row="scope.row" :$index="scope.$index" >
<span>{{fomatMethod(scope.row[prop])}}</span>
</slot>
</template>
</el-table-column>
</template>
<script>
import moment from "moment";
export default {
name: "el-table-column-pro",
props: {
prop: {
type: String
},
label: {
type: String
},
width: {
type: Number
},
renderType: {
type: String,
validator: value => ["date", "input", "select"].includes(value)
},
placeholder: {
type: String
},
rederWidth: {
type: String,
default: "230px"
},
param: {
type: String,
default: ""
},
startDate: {
type: String
},
endDate: {
type: String
},
selectList: {
type: Array
},
isClear: {
type: Boolean,
default:true
},
visible: {
type: Boolean,
default: true
},
filterIcon: {
type: String,
default: "el-icon-search"
},
callback: {
type: Function
},
formatter: {
type: Function,
default:(row, column, cellValue)=>cellValue
},
align:{
type:String
},
headerAlign:{
type:String
}
},
data() {
return {
formatD:this.filterIcon
};
},
methods: {
fomatMethod(value){
return this.formatter('','',value)
},
renderHeader(createElement, { column, $index }) {
switch (this.renderType) {
case "date":
return this.renderDate(createElement, { column, $index });
case "input":
return this.rederInput(createElement, { column, $index });
case "select":
return this.rederSelect(createElement, { column, $index });
default:
return column.label;
}
},
rederInput(createElement, { column, $index }) {
return createElement(
"p",
{
class: "filters",
style: {
color: column.color
}
},
[
createElement(
"el-popover",
{
props: {
placement: "bottom",
width: "200",
trigger: "click"
}
},
[
createElement("el-input", {
props: {
placeholder: this.placeholder,
value: this.param
},
nativeOn: {
keyup: event => {
if (event.keyCode === 13) {
this.$emit("update:param", event.target.value);
this.callback && this.callback();
}
}
},
on: {
blur: event => {
this.$emit("update:param", event.target.value);
this.callback && this.callback();
}
}
}),
createElement(
"span",
{
slot: "reference"
},
[
column.label,
createElement("i", {
class: this.filterIcon,
style: {
marginLeft: "4px"
}
})
]
)
]
)
]
);
},
rederSelect(createElement, { column, $index }) {
return createElement(
"p",
{
class: "filters",
style: {
color: column.color
}
},
[
createElement(
"el-popover",
{
props: {
placement: "bottom",
width: "200",
trigger: "click"
}
},
[
createElement(
"el-select",
{
props: {
placeholder: this.placeholder,
value: this.param,
clearable: this.isClear
},
on: {
input: value => {
this.$emit("update:param", value);
this.callback && this.callback();
}
}
},
[
this.selectList.map(item => {
return createElement("el-option", {
props: {
value: item.value,
label: item.label
}
});
})
]
),
createElement(
"span",
{
slot: "reference"
},
[
column.label,
createElement("i", {
class: this.filterIcon,
style: {
marginLeft: "4px"
}
})
]
)
]
)
]
);
},
renderDate(createElement, { column, $index }) {
return createElement(
"p",
{
class: "filters"
},
[
createElement(
"el-popover",
{
props: {
placement: "bottom",
width: this.rederWidth,
trigger: "click"
}
},
[
createElement("el-date-picker", {
props: {
placeholder: this.placeholder,
value: this.value,
type: "daterange",
rangeSeparator:"至",
startPlaceholder:"开始日期",
endPlaceholder:"结束日期",
},
style: {
width: this.rederWidth
},
on: {
input: value => {
if (value) {
const startDate = moment(value[0]).format("YYYY-MM-DD");
const endDate = moment(value[1]).format("YYYY-MM-DD");
this.$emit("update:startDate", startDate);
this.$emit("update:endDate", endDate);
this.callback && this.callback();
}
}
}
}),
createElement(
"span",
{
slot: "reference"
},
[
column.label,
createElement("i", {
class: this.filterIcon,
style: {
marginLeft: "4px"
}
})
]
)
]
)
]
);
}
}
};
</script>
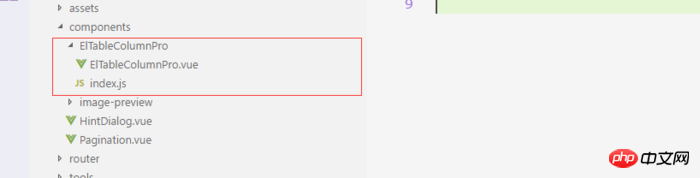
<!-- index.js -->
import ElTableColumnPro from './ElTableColumnPro'
ElTableColumnPro.install = function(Vue) {
Vue.component(ElTableColumnPro.name, ElTableColumnPro);
};
export default ElTableColumnPro;インストール
import ElTableColumnPro from 'components/ElTableColumnPro/index'
...
...
...
Vue.use(ElTableColumnPro)
使用
 <el-table :data="bankFlow" style="width:100%" stripe>
    <el-table-column-pro :visible="showMore" prop="transactionId" label="流水号" :width="120"> </el-table-column-pro>
    <el-table-column-pro prop="clientCode" label="客户代码 " :width="120" placeholder="请输入客户代码" :callback="requestTransactionLogs" renderType="input" :param.sync="request_params.clientCode"> </el-table-column-pro>
    <el-table-column-pro prop="eventTypeName" label="事件 " placeholder="请选择事件"  :selectList="listEventEnum" :callback="requestTransactionLogs" renderType="select" :param.sync="request_params.event" :width="100"> </el-table-column-pro>
    <el-table-column-pro prop="createTime" :callback="requestTransactionLogs" :startDate.sync="request_params.startDate" :endDate.sync="request_params.endDate" :formatter="$timeformat" label="时间" renderType="date" :width="180" ></el-table-column-pro>
 </el-table>
 <el-table :data="lists.content" v-loading="loading" @row-dblclick="detail" >
    <el-table-column-pro :width="120" prop="clientCode" label="客户代码 " align="center" header-align="center" placeholder="请输入客户代码" :callback="getLists" renderType="input" :param.sync="params.clientCode"></el-table-column-pro>
    <el-table-column-pro label="内容 " placeholder="请输入内容" :callback="getLists" renderType="input" :param.sync="params.content">
        <template slot-scope="scope">
           <pre class="brush:php;toolbar:false">{{scope.row.content}}
以上がVUE は ElTableColumn を拡張しますの詳細内容です。詳細については、PHP 中国語 Web サイトの他の関連記事を参照してください。

ホットAIツール

Undresser.AI Undress
リアルなヌード写真を作成する AI 搭載アプリ

AI Clothes Remover
写真から衣服を削除するオンライン AI ツール。

Undress AI Tool
脱衣画像を無料で

Clothoff.io
AI衣類リムーバー

AI Hentai Generator
AIヘンタイを無料で生成します。

人気の記事
ホットツール

メモ帳++7.3.1
使いやすく無料のコードエディター

SublimeText3 中国語版
中国語版、とても使いやすい

ゼンドスタジオ 13.0.1
強力な PHP 統合開発環境

ドリームウィーバー CS6
ビジュアル Web 開発ツール

SublimeText3 Mac版
神レベルのコード編集ソフト(SublimeText3)
ホットトピック
 7478
7478
 15
1377
52
77
11
19
33
15
1377
52
77
11
19
33

 PHP の SNMP 拡張機能を使用するにはどうすればよいですか?
Jun 02, 2023 am 10:22 AM
PHP の SNMP 拡張機能を使用するにはどうすればよいですか?
Jun 02, 2023 am 10:22 AM
PHP の SNMP 拡張機能は、PHP が SNMP プロトコルを介してネットワーク デバイスと通信できるようにする拡張機能です。この拡張機能を使用すると、CPU、メモリ、ネットワークインターフェイスなどのネットワークデバイスの構成情報やルータ、スイッチなどの情報を簡単に取得および変更できます。また、スイッチングデバイスのポートなどの制御操作も実行できます。この記事では、SNMP プロトコルの基本知識、PHP の SNMP 拡張機能をインストールする方法、PHP で SNMP 拡張機能を使用してネットワーク デバイスを監視および制御する方法を紹介します。 1.SN
 最初から最後まで: PHP 拡張機能 cURL を使用して HTTP リクエストを行う方法
Jul 29, 2023 pm 05:07 PM
最初から最後まで: PHP 拡張機能 cURL を使用して HTTP リクエストを行う方法
Jul 29, 2023 pm 05:07 PM
最初から最後まで: HTTP リクエストに php 拡張機能 cURL を使用する方法 はじめに: Web 開発では、多くの場合、サードパーティ API または他のリモート サーバーと通信する必要があります。 cURL を使用して HTTP リクエストを行うのは、一般的で強力な方法です。この記事では、PHP を使用して cURL を拡張して HTTP リクエストを実行する方法を紹介し、いくつかの実用的なコード例を示します。 1. 準備 まず、php に cURL 拡張機能がインストールされていることを確認します。コマンドラインで php-m|grepcurl を実行して確認できます。
 PHP 関数の拡張機能とサードパーティ モジュール
Apr 13, 2024 pm 02:12 PM
PHP 関数の拡張機能とサードパーティ モジュール
Apr 13, 2024 pm 02:12 PM
PHP 関数の機能を拡張するには、拡張機能とサードパーティのモジュールを使用できます。拡張機能は、pecl パッケージ マネージャーを通じてインストールおよび有効化できる追加の関数とクラスを提供します。サードパーティ モジュールは特定の機能を提供し、Composer パッケージ マネージャーを通じてインストールできます。実際の例には、拡張機能を使用して複雑な JSON データを解析したり、モジュールを使用してデータを検証したりすることが含まれます。
 CENTOS7でmbstring拡張機能をインストールするにはどうすればよいですか?
Jan 06, 2024 pm 09:59 PM
CENTOS7でmbstring拡張機能をインストールするにはどうすればよいですか?
Jan 06, 2024 pm 09:59 PM
1.UncaughtError:Calltoundependentfunctionmb_strlen(); 上記のエラーが発生した場合、mbstring 拡張機能がインストールされていないことを意味します; 2. PHP インストール ディレクトリ cd/temp001/php-7.1.0/ext/mbstring に入ります 3. phpize( /usr/local/bin /phpize または /usr/local/php7-abel001/bin/phpize) コマンドを使用して、php 拡張機能 4../configure--with-php-config=/usr/local/php7-abel をインストールします。
 Aurora Push 拡張機能を使用して PHP アプリケーションにバッチ メッセージ プッシュ機能を実装する方法
Jul 25, 2023 pm 08:07 PM
Aurora Push 拡張機能を使用して PHP アプリケーションにバッチ メッセージ プッシュ機能を実装する方法
Jul 25, 2023 pm 08:07 PM
Aurora Push 拡張機能を使用して PHP アプリケーションにバッチ メッセージ プッシュ機能を実装する方法 モバイル アプリケーションの開発において、メッセージ プッシュは非常に重要な機能です。 Jiguang Push は、豊富な機能とインターフェイスを提供する、一般的に使用されるメッセージ プッシュ サービスです。この記事では、Aurora Push 拡張機能を使用して、PHP アプリケーションにバッチ メッセージ プッシュ機能を実装する方法を紹介します。ステップ 1: Jiguang Push アカウントを登録し、API キーを取得する まず、Jiguang Push の公式 Web サイト (https://www.jiguang.cn/push) に登録する必要があります。
 PHP の ZipArchive 拡張機能を使用するにはどうすればよいですか?
Jun 02, 2023 am 08:13 AM
PHP の ZipArchive 拡張機能を使用するにはどうすればよいですか?
Jun 02, 2023 am 08:13 AM
PHP は、Web アプリケーションの開発やファイルの処理に使用できる人気のあるサーバー側言語です。 PHP 用の ZipArchive 拡張機能は、PHP で zip ファイルを操作するための強力なツールです。この記事では、PHP の ZipArchive 拡張機能を使用して zip ファイルを作成、読み取り、変更する方法について説明します。 1. ZipArchive 拡張機能をインストールする ZipArchive 拡張機能を使用する前に、拡張機能がインストールされていることを確認する必要があります。インストール方法は以下のとおりです。 1. インストールします。
 PHP の POSIX 拡張機能を使用するにはどうすればよいですか?
Jun 03, 2023 am 08:01 AM
PHP の POSIX 拡張機能を使用するにはどうすればよいですか?
Jun 03, 2023 am 08:01 AM
PHP の POSIX 拡張機能は、PHP が POSIX 準拠のオペレーティング システムと対話できるようにする関数と定数のセットです。 POSIX (PortableOperatingSystemInterface) は、ソフトウェア開発者がさまざまな UNIX または UNIX 類似のオペレーティング システム上で実行できるアプリケーションを作成できるように設計された一連のオペレーティング システム インターフェイス標準です。この記事では、PHP 用の POSIX 拡張機能のインストールと使用方法を紹介します。 1. PHP の POSIX 拡張機能を次の場所にインストールします。
 PHP の Phar 拡張機能を使用するにはどうすればよいですか?
May 31, 2023 pm 11:31 PM
PHP の Phar 拡張機能を使用するにはどうすればよいですか?
May 31, 2023 pm 11:31 PM
PHP の開発とアプリケーション シナリオの継続的な拡張により、Phar 拡張機能は PHP プログラミングの重要な部分になりました。 Phar は PHPArchive の略語で、複数の PHP ファイルとリソースを 1 つのファイルにパッケージ化し、配布と管理を容易にします。この記事では、PHP の Phar 拡張機能を使用してパッケージ化および管理する方法を紹介します。 Phar 拡張機能のインストール まず、PHP に Phar 拡張機能がインストールされているかどうかを確認する必要があります。 Linux では、ターミナルから次のコマンドを入力します: php -m
