Pythonは3Dグラフィックスを描画します
この記事では、主に 3D グラフィックスを描画するための Python を紹介します。これは、必要な友人に参考にしていただけるようになりました。 3D グラフィックスは、データ分析、データ モデリング、グラフィックス、画像の分野で使用されます。以下では、Python を使用して 3D 散布点、3D 面、3D 輪郭、3D 直線 (曲線)、3D の描画を含む 3D グラフィックスを描画する方法を紹介します。文章。
準備作業:
Python で 3D グラフィックスを描画するには、引き続きよく使用される描画モジュール matplotlib を使用しますが、mpl_toolkits ツールキットをインストールする必要があります。インストール方法は次のとおりです: Python インストール ディレクトリの Scripts フォルダーに移動します。 Windows のコマンド ラインを使用して次を実行します。 pip --upgrade matplotlib をインストールするだけで、このコマンドを Linux 環境で直接実行できます。
このモジュールをインストールした後、mpl_tookits の下で mplot3d クラスを呼び出して 3D グラフィックスを描画できます。
以下は一例です。
1 スパイラル 3D 曲線、結果は次のとおりです: 3. 3D 輪郭を描画しますfrom mpl_toolkits.mplot3d import Axes3D import matplotlib.pyplot as plt import numpy as np fig = plt.figure() ax = fig.add_subplot(111, projection='3d') # Make data u = np.linspace(0, 2 * np.pi, 100) v = np.linspace(0, np.pi, 100) x = 10 * np.outer(np.cos(u), np.sin(v)) y = 10 * np.outer(np.sin(u), np.sin(v)) z = 10 * np.outer(np.ones(np.size(u)), np.cos(v)) # Plot the surface ax.plot_surface(x, y, z, color='b') plt.show()
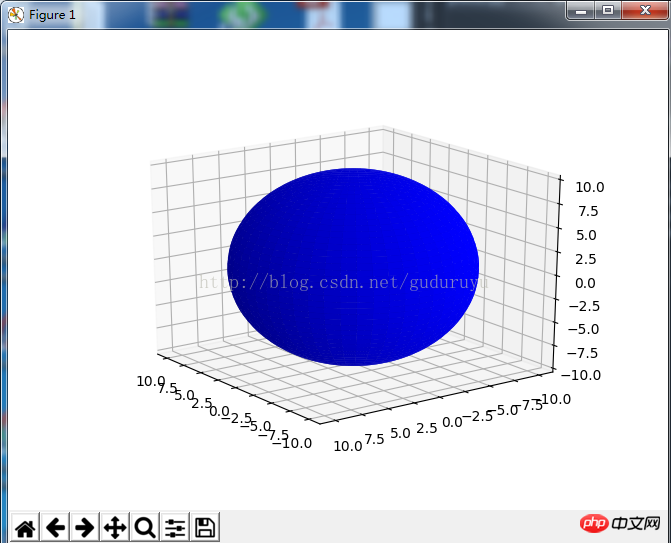 描画結果は次のとおりです:
import matplotlib as mpl
from mpl_toolkits.mplot3d import Axes3D
import numpy as np
import matplotlib.pyplot as plt

mpl.rcParams['legend.fontsize'] = 10

fig = plt.figure()
ax = fig.gca(projection='3d')
theta = np.linspace(-4 * np.pi, 4 * np.pi, 100)
z = np.linspace(-2, 2, 100)
r = z**2 + 1
x = r * np.sin(theta)
y = r * np.cos(theta)
ax.plot(x, y, z, label='parametric curve')
ax.legend()

plt.show()
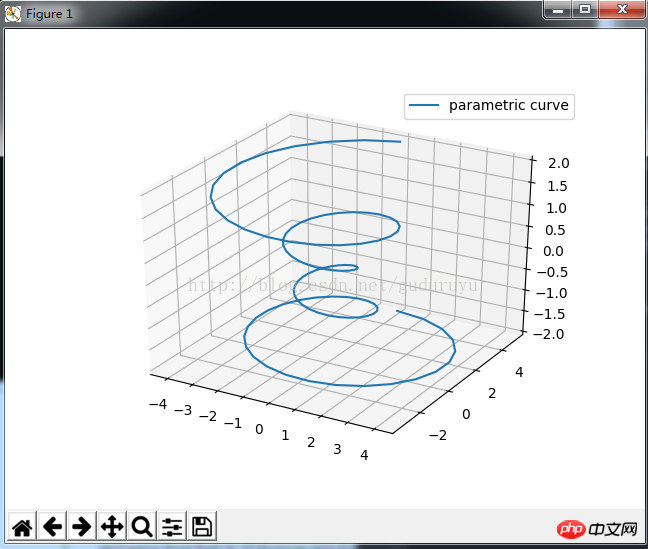 描画結果は以下の通りです:
from mpl_toolkits.mplot3d import axes3d
import matplotlib.pyplot as plt
from matplotlib import cm

fig = plt.figure()
ax = fig.gca(projection='3d')
X, Y, Z = axes3d.get_test_data(0.05)
cset = ax.contour(X, Y, Z, zdir='z', offset=-100, cmap=cm.coolwarm)
cset = ax.contour(X, Y, Z, zdir='x', offset=-40, cmap=cm.coolwarm)
cset = ax.contour(X, Y, Z, zdir='y', offset=40, cmap=cm.coolwarm)

ax.set_xlabel('X')
ax.set_xlim(-40, 40)
ax.set_ylabel('Y')
ax.set_ylim(-40, 40)
ax.set_zlabel('Z')
ax.set_zlim(-100, 100)

plt.show()
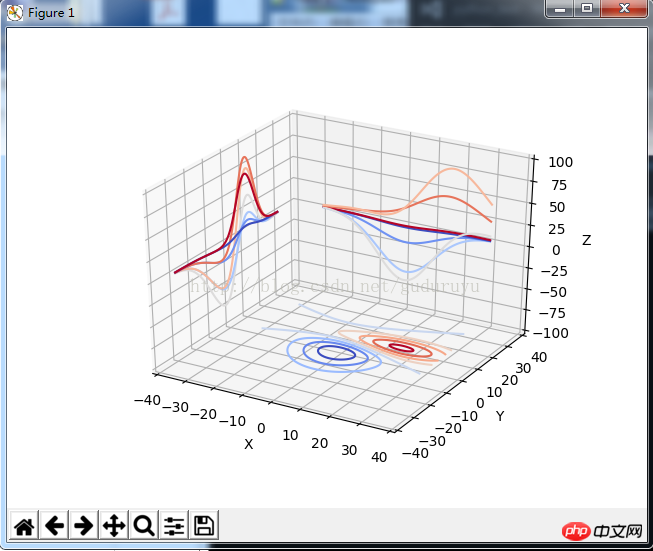 描画結果は以下の通りです:
from mpl_toolkits.mplot3d import Axes3D
import matplotlib.pyplot as plt
import numpy as np

fig = plt.figure()
ax = fig.add_subplot(111, projection='3d')
x, y = np.random.rand(2, 100) * 4
hist, xedges, yedges = np.histogram2d(x, y, bins=4, range=[[0, 4], [0, 4]])

# Construct arrays for the anchor positions of the 16 bars.
# Note: np.meshgrid gives arrays in (ny, nx) so we use 'F' to flatten xpos,
# ypos in column-major order. For numpy >= 1.7, we could instead call meshgrid
# with indexing='ij'.
xpos, ypos = np.meshgrid(xedges[:-1] + 0.25, yedges[:-1] + 0.25)
xpos = xpos.flatten('F')
ypos = ypos.flatten('F')
zpos = np.zeros_like(xpos)

# Construct arrays with the dimensions for the 16 bars.
dx = 0.5 * np.ones_like(zpos)
dy = dx.copy()
dz = hist.flatten()

ax.bar3d(xpos, ypos, zpos, dx, dy, dz, color='b', zsort='average')

plt.show()
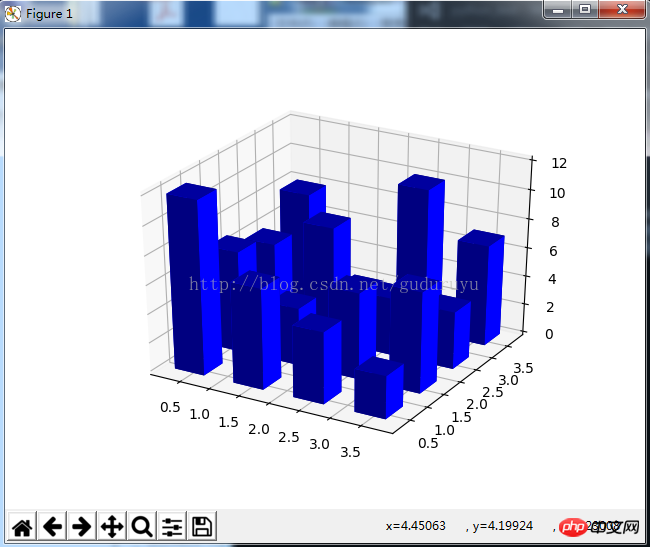 描画 結果は次のとおりです:
from mpl_toolkits.mplot3d import axes3d
import matplotlib.pyplot as plt


fig = plt.figure()
ax = fig.add_subplot(111, projection='3d')

# Grab some test data.
X, Y, Z = axes3d.get_test_data(0.05)

# Plot a basic wireframe.
ax.plot_wireframe(X, Y, Z, rstride=10, cstride=10)

plt.show()
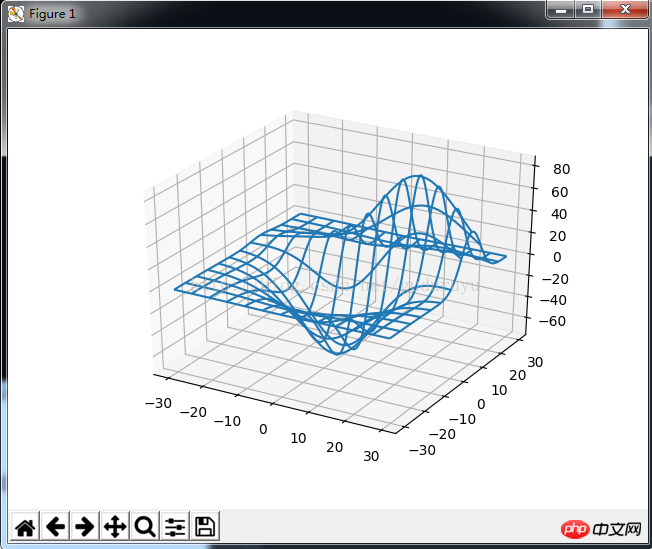 結果は次のとおりです:
8 . 3D テキストを描画します
from mpl_toolkits.mplot3d import Axes3D
import matplotlib.pyplot as plt
import numpy as np


n_radii = 8
n_angles = 36

# Make radii and angles spaces (radius r=0 omitted to eliminate duplication).
radii = np.linspace(0.125, 1.0, n_radii)
angles = np.linspace(0, 2*np.pi, n_angles, endpoint=False)

# Repeat all angles for each radius.
angles = np.repeat(angles[..., np.newaxis], n_radii, axis=1)

# Convert polar (radii, angles) coords to cartesian (x, y) coords.
# (0, 0) is manually added at this stage, so there will be no duplicate
# points in the (x, y) plane.
x = np.append(0, (radii*np.cos(angles)).flatten())
y = np.append(0, (radii*np.sin(angles)).flatten())

# Compute z to make the pringle surface.
z = np.sin(-x*y)

fig = plt.figure()
ax = fig.gca(projection='3d')

ax.plot_trisurf(x, y, z, linewidth=0.2, antialiased=True)

plt.show(
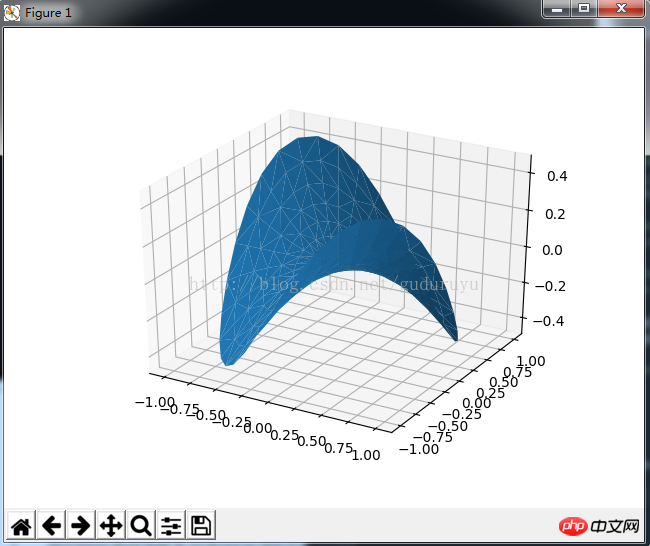
描画結果は次のとおりです:
9. 3D 棒グラフ
from mpl_toolkits.mplot3d import Axes3D
import matplotlib.pyplot as plt
import numpy as np


def randrange(n, vmin, vmax):
 '''''
 Helper function to make an array of random numbers having shape (n, )
 with each number distributed Uniform(vmin, vmax).
 '''
 return (vmax - vmin)*np.random.rand(n) + vmin

fig = plt.figure()
ax = fig.add_subplot(111, projection='3d')

n = 100

# For each set of style and range settings, plot n random points in the box
# defined by x in [23, 32], y in [0, 100], z in [zlow, zhigh].
for c, m, zlow, zhigh in [('r', 'o', -50, -25), ('b', '^', -30, -5)]:
 xs = randrange(n, 23, 32)
 ys = randrange(n, 0, 100)
 zs = randrange(n, zlow, zhigh)
 ax.scatter(xs, ys, zs, c=c, marker=m)

ax.set_xlabel('X Label')
ax.set_ylabel('Y Label')
ax.set_zlabel('Z Label')

plt.show()
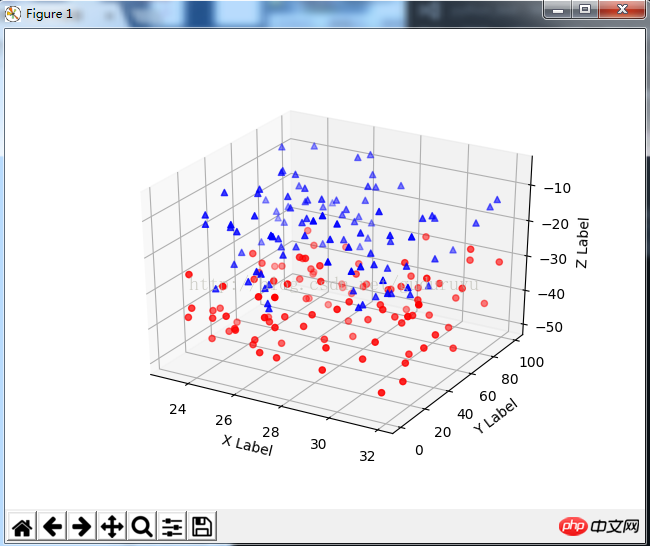 の描画結果は次のとおりです。
関連推奨事項:
Pythonでグラフィックを描く 例の詳しい説明
以上がPythonは3Dグラフィックスを描画しますの詳細内容です。詳細については、PHP 中国語 Web サイトの他の関連記事を参照してください。

ホットAIツール

Undresser.AI Undress
リアルなヌード写真を作成する AI 搭載アプリ

AI Clothes Remover
写真から衣服を削除するオンライン AI ツール。

Undress AI Tool
脱衣画像を無料で

Clothoff.io
AI衣類リムーバー

AI Hentai Generator
AIヘンタイを無料で生成します。

人気の記事

ホットツール

メモ帳++7.3.1
使いやすく無料のコードエディター

SublimeText3 中国語版
中国語版、とても使いやすい

ゼンドスタジオ 13.0.1
強力な PHP 統合開発環境

ドリームウィーバー CS6
ビジュアル Web 開発ツール

SublimeText3 Mac版
神レベルのコード編集ソフト(SublimeText3)

ホットトピック
 7467
7467
 15
15
 1376
1376
 52
52
 77
77
 11
11
 19
19
 20
20
 mysqlは支払う必要がありますか
Apr 08, 2025 pm 05:36 PM
MySQLには、無料のコミュニティバージョンと有料エンタープライズバージョンがあります。コミュニティバージョンは無料で使用および変更できますが、サポートは制限されており、安定性要件が低く、技術的な能力が強いアプリケーションに適しています。 Enterprise Editionは、安定した信頼性の高い高性能データベースを必要とするアプリケーションに対する包括的な商業サポートを提供し、サポートの支払いを喜んでいます。バージョンを選択する際に考慮される要因には、アプリケーションの重要性、予算編成、技術スキルが含まれます。完璧なオプションはなく、最も適切なオプションのみであり、特定の状況に応じて慎重に選択する必要があります。
 インストール後にMySQLの使用方法
Apr 08, 2025 am 11:48 AM
この記事では、MySQLデータベースの操作を紹介します。まず、MySQLWorkBenchやコマンドラインクライアントなど、MySQLクライアントをインストールする必要があります。 1. mysql-uroot-pコマンドを使用してサーバーに接続し、ルートアカウントパスワードでログインします。 2。CreatedAtaBaseを使用してデータベースを作成し、データベースを選択します。 3. createTableを使用してテーブルを作成し、フィールドとデータ型を定義します。 4. INSERTINTOを使用してデータを挿入し、データをクエリし、更新することでデータを更新し、削除してデータを削除します。これらの手順を習得することによってのみ、一般的な問題に対処することを学び、データベースのパフォーマンスを最適化することでMySQLを効率的に使用できます。
 MySQLはダウンロード後にインストールできません
Apr 08, 2025 am 11:24 AM
MySQLのインストール障害の主な理由は次のとおりです。1。許可の問題、管理者として実行するか、SUDOコマンドを使用する必要があります。 2。依存関係が欠落しており、関連する開発パッケージをインストールする必要があります。 3.ポート競合では、ポート3306を占めるプログラムを閉じるか、構成ファイルを変更する必要があります。 4.インストールパッケージが破損しているため、整合性をダウンロードして検証する必要があります。 5.環境変数は誤って構成されており、環境変数はオペレーティングシステムに従って正しく構成する必要があります。これらの問題を解決し、各ステップを慎重に確認して、MySQLを正常にインストールします。
 MySQLダウンロードファイルが破損しており、インストールできません。修復ソリューション
Apr 08, 2025 am 11:21 AM
mysqlダウンロードファイルは破損していますが、どうすればよいですか?残念ながら、MySQLをダウンロードすると、ファイルの破損に遭遇できます。最近は本当に簡単ではありません!この記事では、誰もが迂回を避けることができるように、この問題を解決する方法について説明します。それを読んだ後、損傷したMySQLインストールパッケージを修復するだけでなく、将来の行き詰まりを避けるために、ダウンロードとインストールプロセスをより深く理解することもできます。最初に、ファイルのダウンロードが破損した理由について話しましょう。これには多くの理由があります。ネットワークの問題は犯人です。ダウンロードプロセスの中断とネットワーク内の不安定性は、ファイル腐敗につながる可能性があります。ダウンロードソース自体にも問題があります。サーバーファイル自体が壊れており、もちろんダウンロードすると壊れています。さらに、いくつかのウイルス対策ソフトウェアの過度の「情熱的な」スキャンもファイルの破損を引き起こす可能性があります。診断問題:ファイルが本当に破損しているかどうかを判断します
 MySQLインストール後に開始できないサービスのソリューション
Apr 08, 2025 am 11:18 AM
MySQLは開始を拒否しましたか?パニックにならないでください、チェックしてみましょう!多くの友人は、MySQLのインストール後にサービスを開始できないことを発見し、彼らはとても不安でした!心配しないでください、この記事はあなたがそれを落ち着いて対処し、その背後にある首謀者を見つけるためにあなたを連れて行きます!それを読んだ後、あなたはこの問題を解決するだけでなく、MySQLサービスの理解と問題のトラブルシューティングのためのあなたのアイデアを改善し、より強力なデータベース管理者になることができます! MySQLサービスは開始に失敗し、単純な構成エラーから複雑なシステムの問題に至るまで、多くの理由があります。最も一般的な側面から始めましょう。基本知識:サービススタートアッププロセスMYSQLサービススタートアップの簡単な説明。簡単に言えば、オペレーティングシステムはMySQL関連のファイルをロードし、MySQLデーモンを起動します。これには構成が含まれます
 mysqlはインターネットが必要ですか?
Apr 08, 2025 pm 02:18 PM
MySQLは、基本的なデータストレージと管理のためにネットワーク接続なしで実行できます。ただし、他のシステムとのやり取り、リモートアクセス、または複製やクラスタリングなどの高度な機能を使用するには、ネットワーク接続が必要です。さらに、セキュリティ対策(ファイアウォールなど)、パフォーマンスの最適化(適切なネットワーク接続を選択)、およびデータバックアップは、インターネットに接続するために重要です。
 MySQLインストール後にデータベースのパフォーマンスを最適化する方法
Apr 08, 2025 am 11:36 AM
MySQLパフォーマンスの最適化は、インストール構成、インデックス作成、クエリの最適化、監視、チューニングの3つの側面から開始する必要があります。 1。インストール後、INNODB_BUFFER_POOL_SIZEパラメーターやclose query_cache_sizeなど、サーバーの構成に従ってmy.cnfファイルを調整する必要があります。 2。過度のインデックスを回避するための適切なインデックスを作成し、説明コマンドを使用して実行計画を分析するなど、クエリステートメントを最適化します。 3. MySQL独自の監視ツール(ShowProcessList、ShowStatus)を使用して、データベースの健康を監視し、定期的にデータベースをバックアップして整理します。これらの手順を継続的に最適化することによってのみ、MySQLデータベースのパフォーマンスを改善できます。
 高負荷アプリケーションのMySQLパフォーマンスを最適化する方法は?
Apr 08, 2025 pm 06:03 PM
MySQLデータベースパフォーマンス最適化ガイドリソース集約型アプリケーションでは、MySQLデータベースが重要な役割を果たし、大規模なトランザクションの管理を担当しています。ただし、アプリケーションのスケールが拡大すると、データベースパフォーマンスのボトルネックが制約になることがよくあります。この記事では、一連の効果的なMySQLパフォーマンス最適化戦略を検討して、アプリケーションが高負荷の下で効率的で応答性の高いままであることを保証します。実際のケースを組み合わせて、インデックス作成、クエリ最適化、データベース設計、キャッシュなどの詳細な主要なテクノロジーを説明します。 1.データベースアーキテクチャの設計と最適化されたデータベースアーキテクチャは、MySQLパフォーマンスの最適化の基礎です。いくつかのコア原則は次のとおりです。適切なデータ型を選択し、ニーズを満たす最小のデータ型を選択すると、ストレージスペースを節約するだけでなく、データ処理速度を向上させることもできます。


