Vue.js を使用して構成可能なログイン フォームを実装する手順の詳細な説明
今回は、Vue.js で設定可能なログイン フォームを実装する手順について詳しく説明します。Vue.js で設定可能なログイン フォームを実装するための 注意事項とは何ですか。見て。
ビジネスシナリオ
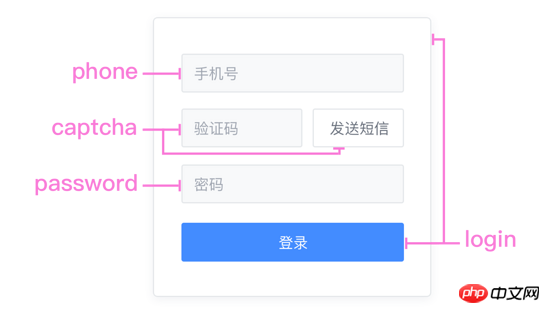
以前は、プロジェクトは携帯電話番号 + パスワードログインのみをサポートしており、フロントエンドがフォームを直接記述していましたが、その後、 
フォーム認証 メソッドを使用できます。パスワードなどをすぐに入力できます。フォームコンポーネント。高結合性と低結合性、高結合性と低結合性...これを 10 回繰り返します~
.
├ common
├ captcha.vue
|  ├ password.vue
|  └ phone.vue
├ login
|  └ index.vue
├ register
|  └ index.vue
└ resetPassword
  └ index.vue
コード
リクエストサーバー構成データ:/* 参数说明:
* 'password': 密码登录
* 'captcha': 短信验证码登录
* 'password_or_captcha': 密码或短信登录
* 'password_with_captcha': 密码+短信登录
*/
config: {
login_methods: 'password'
}.login-card .login-header h3 登录 .login-content phone(ref="phone") password( v-if="isPasswordMode" ref="password" ) captcha( v-if="isCaptchaMode" ref="captcha" ) template(v-if="isPasswordWithCaptchaMode") captcha(ref="captcha") password(ref="password") template(v-if="isPasswordOrCaptchaMode") ... el-button(@click="login") 登录
async login () {
 if (!this.validate()) return
 const loginData = this.getLoginData()
 await this.postLogin(loginData)
 ...
}validate () {
const phone = this.$refs.phone.validate()
let isPass = false
if (this.isPasswordMode) {
if (this.$refs.password) isPass = this.$refs.password.validate()
}
if (this.isCaptchaMode) {
if (this.$refs.captcha) isPass = this.$refs.captcha.validate()
}
if (this.isPasswordWithCaptchaMode) ...
if (this.isPasswordOrCaptchaMode) ...
isPass = phone && isPass
return isPass
}.login-password el-form( :model="form" :rules="rules" ref="form" @submit.native.prevent="" ) el-form-item(prop="password") el-input( v-model="form.password" type="password" name="password" )
validate () {
 let res = false
 this.$refs.form.validate((valid) => {
  res = valid
 })
 return res
}computed: {
...mapState('login', {
phone: state => state.phone,
password: state => state.password,
captcha: state => state.captcha
}),
},
methods: {
...
getLoginData () {
let mode = ''
const phone = this.phone
...
const data = { phone }
if (this.isPasswordMode) {
mode = 'password'
data.password = password
}
if (this.isCaptchaMode) {
mode = 'captcha'
data.captcha = captcha
}
if (this.isPasswordWithCaptchaMode) ...
if (this.isPasswordOrCaptchaMode) ...
data.mode = mode
return data
}
}補足:
全選択と全選択解除のvue.jsサンプルコードnew Vue({
el: '#app',
data: {
checked: false,
checkedNames: [],
checkedArr: ["Runoob", "Taobao", "Google"]
},
methods: {
changeAllChecked: function() {
if (this.checked) {
this.checkedNames = this.checkedArr
} else {
this.checkedNames = []
}
}
},
watch: {
"checkedNames": function() {
if (this.checkedNames.length == this.checkedArr.length) {
this.checked = true
} else {
this.checked = false
}
}
}
})Vue が HTML 文字列を HTML に変換する手順の詳細な説明
Koa2 ファイルのアップロードおよびダウンロードのケースの詳細な説明
以上がVue.js を使用して構成可能なログイン フォームを実装する手順の詳細な説明の詳細内容です。詳細については、PHP 中国語 Web サイトの他の関連記事を参照してください。

ホットAIツール

Undresser.AI Undress
リアルなヌード写真を作成する AI 搭載アプリ

AI Clothes Remover
写真から衣服を削除するオンライン AI ツール。

Undress AI Tool
脱衣画像を無料で

Clothoff.io
AI衣類リムーバー

AI Hentai Generator
AIヘンタイを無料で生成します。

人気の記事

ホットツール

メモ帳++7.3.1
使いやすく無料のコードエディター

SublimeText3 中国語版
中国語版、とても使いやすい

ゼンドスタジオ 13.0.1
強力な PHP 統合開発環境

ドリームウィーバー CS6
ビジュアル Web 開発ツール

SublimeText3 Mac版
神レベルのコード編集ソフト(SublimeText3)

ホットトピック
 7540
7540
 15
15
 1380
1380
 52
52
 83
83
 11
11
 21
21
 86
86
 WebSocket と JavaScript を使用してオンライン音声認識システムを実装する方法
Dec 17, 2023 pm 02:54 PM
WebSocket と JavaScript を使用してオンライン音声認識システムを実装する方法 はじめに: 技術の継続的な発展により、音声認識技術は人工知能の分野の重要な部分になりました。 WebSocket と JavaScript をベースとしたオンライン音声認識システムは、低遅延、リアルタイム、クロスプラットフォームという特徴があり、広く使用されるソリューションとなっています。この記事では、WebSocket と JavaScript を使用してオンライン音声認識システムを実装する方法を紹介します。
 WebSocket と JavaScript: リアルタイム監視システムを実装するための主要テクノロジー
Dec 17, 2023 pm 05:30 PM
WebSocketとJavaScript:リアルタイム監視システムを実現するためのキーテクノロジー はじめに: インターネット技術の急速な発展に伴い、リアルタイム監視システムは様々な分野で広く利用されています。リアルタイム監視を実現するための重要なテクノロジーの 1 つは、WebSocket と JavaScript の組み合わせです。この記事では、リアルタイム監視システムにおける WebSocket と JavaScript のアプリケーションを紹介し、コード例を示し、その実装原理を詳しく説明します。 1.WebSocketテクノロジー
 JavaScript と WebSocket を使用してリアルタイムのオンライン注文システムを実装する方法
Dec 17, 2023 pm 12:09 PM
JavaScript と WebSocket を使用してリアルタイム オンライン注文システムを実装する方法の紹介: インターネットの普及とテクノロジーの進歩に伴い、ますます多くのレストランがオンライン注文サービスを提供し始めています。リアルタイムのオンライン注文システムを実装するには、JavaScript と WebSocket テクノロジを使用できます。 WebSocket は、TCP プロトコルをベースとした全二重通信プロトコルで、クライアントとサーバー間のリアルタイム双方向通信を実現します。リアルタイムオンラインオーダーシステムにおいて、ユーザーが料理を選択して注文するとき
 WebSocketとJavaScriptを使ったオンライン予約システムの実装方法
Dec 17, 2023 am 09:39 AM
WebSocket と JavaScript を使用してオンライン予約システムを実装する方法 今日のデジタル時代では、ますます多くの企業やサービスがオンライン予約機能を提供する必要があります。効率的かつリアルタイムのオンライン予約システムを実装することが重要です。この記事では、WebSocket と JavaScript を使用してオンライン予約システムを実装する方法と、具体的なコード例を紹介します。 1. WebSocket とは何ですか? WebSocket は、単一の TCP 接続における全二重方式です。
 JavaScript と WebSocket: 効率的なリアルタイム天気予報システムの構築
Dec 17, 2023 pm 05:13 PM
JavaScript と WebSocket: 効率的なリアルタイム天気予報システムの構築 はじめに: 今日、天気予報の精度は日常生活と意思決定にとって非常に重要です。テクノロジーの発展に伴い、リアルタイムで気象データを取得することで、より正確で信頼性の高い天気予報を提供できるようになりました。この記事では、JavaScript と WebSocket テクノロジを使用して効率的なリアルタイム天気予報システムを構築する方法を学びます。この記事では、具体的なコード例を通じて実装プロセスを説明します。私たちは
 簡単な JavaScript チュートリアル: HTTP ステータス コードを取得する方法
Jan 05, 2024 pm 06:08 PM
JavaScript チュートリアル: HTTP ステータス コードを取得する方法、特定のコード例が必要です 序文: Web 開発では、サーバーとのデータ対話が頻繁に発生します。サーバーと通信するとき、多くの場合、返された HTTP ステータス コードを取得して操作が成功したかどうかを判断し、さまざまなステータス コードに基づいて対応する処理を実行する必要があります。この記事では、JavaScript を使用して HTTP ステータス コードを取得する方法を説明し、いくつかの実用的なコード例を示します。 XMLHttpRequestの使用
 Laravel フォームクラスを使用するためのヒント: 効率を向上させる方法
Mar 11, 2024 pm 12:51 PM
フォームは、Web サイトまたはアプリケーションの作成に不可欠な部分です。 Laravel は人気のある PHP フレームワークとして、豊富で強力なフォーム クラスを提供し、フォーム処理をより簡単かつ効率的にします。この記事では、Laravel フォームクラスを使用して開発効率を向上させるためのヒントをいくつか紹介します。以下、具体的なコード例を挙げて詳しく説明します。フォームの作成 Laravel でフォームを作成するには、まずビューに対応する HTML フォームを記述する必要があります。フォームを操作するときは、Laravel を使用できます
 JavaScript と WebSocket: 効率的なリアルタイム画像処理システムの構築
Dec 17, 2023 am 08:41 AM
JavaScript は Web 開発で広く使用されているプログラミング言語であり、WebSocket はリアルタイム通信に使用されるネットワーク プロトコルです。 2 つの強力な機能を組み合わせることで、効率的なリアルタイム画像処理システムを構築できます。この記事では、JavaScript と WebSocket を使用してこのシステムを実装する方法と、具体的なコード例を紹介します。まず、リアルタイム画像処理システムの要件と目標を明確にする必要があります。リアルタイムの画像データを収集できるカメラ デバイスがあるとします。


