
Tantan のスタックされたスライディング コンポーネントが重要な役割を果たします。興味のある方は、Vue で Tantan のスタック コンポーネントを作成する方法を見てみましょう。レンダリングは次のとおりです。
前書き こんにちは、Tantan について言えば、このプログラムに精通しているはずです (結局のところ、多くの女の子がいます) Tantan の積み重ねられたスライド コンポーネントは、ブランドをスムーズに反転できるようにするために重要な役割を果たします。関数、vue を使用して Tantan スタッキング コンポーネントを作成する方法を見てみましょう
1. 関数分析 Tantan を使用するだけで、スタッキングとスライド関数が非常に簡単であることがわかります。画像にまとめます:
含まれる基本的な機能ポイントの簡単な概要:
画像の積み重ね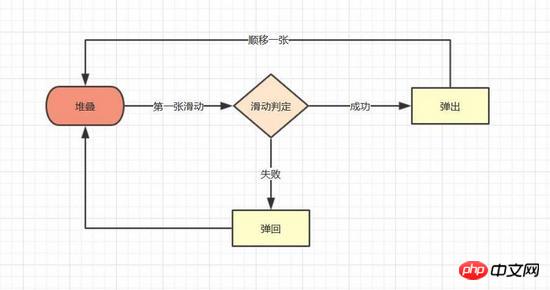 最初の画像のスライド
機能のポイントを要約すると、コンポーネントの実装のアイデアがより明確になります
インターネットの例にはスタックされた画像エフェクトがたくさんありますが、実装方法は似ており、主に親レイヤーにパースペクティブとパースペクティブ原点を設定してサブレイヤーのパースペクティブを設定します。サブレイヤーの軸値はスタッキング効果をシミュレートできます。具体的なコードは次のとおりです
上記は単なる静的コードのセットであるため、vue コンポーネントを作成する必要があります。コンポーネント テンプレート stack.vue を最初に使用します。テンプレートでは、v-for を使用してスタック ノードをトラバースし、:style を使用して各項目のスタイルを変更します。コードは次のとおりです
// 图片堆叠dom
 <!--opacity: 0 隐藏我们不想看到的stack-item层级-->
 <!--z-index: -1 调整stack-item层级"-->
<ul class="stack">
 <li class="stack-item" style="transform: translate3d(0px, 0px, 0px);opacity: 1;z-index: 10;"><img src="1.png" alt="01"></li>
 <li class="stack-item" style="transform: translate3d(0px, 0px, -60px);opacity: 1;z-index: 1"><img src="2.png" alt="02"></li>
 <li class="stack-item" style="transform: translate3d(0px, 0px, -120px);opacity: 1;z-index: 1"><img src="3.png" alt="03"></li>
 <li class="stack-item" style="transform: translate3d(0px, 0px, -180px);opacity: 0;z-index: -1"><img src="4.png" alt="04"></li>
 <li class="stack-item" style="transform: translate3d(0px, 0px, -180px);opacity: 0;z-index: -1"><img src="5.png" alt="05"></li>
</ul>
<style>
.stack {
 width: 100%;
 height: 100%;
 position: relative;
 perspective: 1000px; //子元素视距
 perspective-origin: 50% 150%; //子元素透视位置
 -webkit-perspective: 1000px;
 -webkit-perspective-origin: 50% 150%;
 margin: 0;
 padding: 0;
 }
 .stack-item{
 background: #fff;
 height: 100%;
 width: 100%;
 border-radius: 4px;
 text-align: center;
 overflow: hidden;
 }
 .stack-item img {
 width: 100%;
 display: block;
 pointer-events: none;
 }
</style>
: スタイルは、配列や関数だけでなくオブジェクトもバインドできます。これは、トラバースするときに非常に便利です
最も基本的な dom 構造が構築されました。次のステップは、最初の画像を「移動」させることです2。画像スライディング
画像スライディング効果は多くのシーンで現れますが、その原理はタッチイベントを監視し、変位を取得し、次にtranslate3Dを通じてターゲットの変位を変更するだけなので、実装したい手順は次のとおりです。
Touches イベントをスタックにバインドしますジェスチャの位置変化の値を監視して保存します
最初の画像の css 属性のtranslate3Dのx、yの値を変更します
### # 具体的な実装
<template>
<ul class="stack">
<li class="stack-item" v-for="(item, index) in pages" :style="[transform(index)]">
<img :src="item.src">
</li>
</ul>
</template>
<script>
export default {
props: {
// pages数据包含基础的图片数据
pages: {
type: Array,
default: []
}
},
data () {
return {
// basicdata数据包含组件基本数据
basicdata: {
currentPage: 0 // 默认首图的序列
},
// temporaryData数据包含组件临时数据
temporaryData: {
opacity: 1, // 记录opacity
zIndex: 10, // 记录zIndex
visible: 3 // 记录默认显示堆叠数visible
}
}
},
methods: {
// 遍历样式
transform (index) {
if (index >= this.basicdata.currentPage) {
let style = {}
let visible = this.temporaryData.visible
let perIndex = index - this.basicdata.currentPage
// visible可见数量前滑块的样式
if (index <= this.basicdata.currentPage + visible - 1) {
style['opacity'] = '1'
style['transform'] = 'translate3D(0,0,' + -1 * perIndex * 60 + 'px' + ')'
style['zIndex'] = visible - index + this.basicdata.currentPage
style['transitionTimingFunction'] = 'ease'
style['transitionDuration'] = 300 + 'ms'
} else {
style['zIndex'] = '-1'
style['transform'] = 'translate3D(0,0,' + -1 * visible * 60 + 'px' + ')'
}
return style
}
}
}
}
</script>タッチエンド/マウスアップ後に条件のトリガー判定を行います。ここではまず簡単な条件で判定を行い、同時に最初の画像のポップアップとリバウンドの効果を与えます
<template>
<ul class="stack">
<li class="stack-item" v-for="(item, index) in pages"
:style="[transformIndex(index),transform(index)]"
@touchstart.stop.capture="touchstart"
@touchmove.stop.capture="touchmove"
@touchend.stop.capture="touchend"
@mousedown.stop.capture="touchstart"
@mouseup.stop.capture="touchend"
@mousemove.stop.capture="touchmove">
<img :src="item.src">
</li>
</ul>
</template>
<script>
export default {
props: {
// pages数据包含基础的图片数据
pages: {
type: Array,
default: []
}
},
data () {
return {
// basicdata数据包含组件基本数据
basicdata: {
start: {}, // 记录起始位置
end: {}, // 记录终点位置
currentPage: 0 // 默认首图的序列
},
// temporaryData数据包含组件临时数据
temporaryData: {
poswidth: '', // 记录位移
posheight: '', // 记录位移
tracking: false // 是否在滑动,防止多次操作,影响体验
}
}
},
methods: {
touchstart (e) {
if (this.temporaryData.tracking) {
return
}
// 是否为touch
if (e.type === 'touchstart') {
if (e.touches.length > 1) {
this.temporaryData.tracking = false
return
} else {
// 记录起始位置
this.basicdata.start.t = new Date().getTime()
this.basicdata.start.x = e.targetTouches[0].clientX
this.basicdata.start.y = e.targetTouches[0].clientY
this.basicdata.end.x = e.targetTouches[0].clientX
this.basicdata.end.y = e.targetTouches[0].clientY
}
// pc操作
} else {
this.basicdata.start.t = new Date().getTime()
this.basicdata.start.x = e.clientX
this.basicdata.start.y = e.clientY
this.basicdata.end.x = e.clientX
this.basicdata.end.y = e.clientY
}
this.temporaryData.tracking = true
},
touchmove (e) {
// 记录滑动位置
if (this.temporaryData.tracking && !this.temporaryData.animation) {
if (e.type === 'touchmove') {
this.basicdata.end.x = e.targetTouches[0].clientX
this.basicdata.end.y = e.targetTouches[0].clientY
} else {
this.basicdata.end.x = e.clientX
this.basicdata.end.y = e.clientY
}
// 计算滑动值
this.temporaryData.poswidth = this.basicdata.end.x - this.basicdata.start.x
this.temporaryData.posheight = this.basicdata.end.y - this.basicdata.start.y
}
},
touchend (e) {
this.temporaryData.tracking = false
// 滑动结束,触发判断
},
// 非首页样式切换
transform (index) {
if (index > this.basicdata.currentPage) {
let style = {}
let visible = 3
let perIndex = index - this.basicdata.currentPage
// visible可见数量前滑块的样式
if (index <= this.basicdata.currentPage + visible - 1) {
style['opacity'] = '1'
style['transform'] = 'translate3D(0,0,' + -1 * perIndex * 60 + 'px' + ')'
style['zIndex'] = visible - index + this.basicdata.currentPage
style['transitionTimingFunction'] = 'ease'
style['transitionDuration'] = 300 + 'ms'
} else {
style['zIndex'] = '-1'
style['transform'] = 'translate3D(0,0,' + -1 * visible * 60 + 'px' + ')'
}
return style
}
},
// 首页样式切换
transformIndex (index) {
// 处理3D效果
if (index === this.basicdata.currentPage) {
let style = {}
style['transform'] = 'translate3D(' + this.temporaryData.poswidth + 'px' + ',' + this.temporaryData.posheight + 'px' + ',0px)'
style['opacity'] = 1
style['zIndex'] = 10
return style
}
}
}
}
</script>再積み重ねはコンポーネントの最後の機能であり、最も重要で複雑な機能でもあります。私たちのコードでは、スタック項目の並べ替えは、バインディングのtransformIndexとtransform関数に依存します: style。この関数で決定される条件は、currentPageを変更して、再スタックを完了するために+1する必要があるかどうかです。 ?
答えはそれほど単純ではありません。スライドアウトは 300 ミリ秒持続するアニメーション効果であり、currentPage の変更によって引き起こされる再配置はすぐに変更され、アニメーションの進行が中断されます。したがって、最初にtransform関数のソート条件を変更してから、currentPageを変更する必要があります。
####具体的な実装
transform関数のソート条件を変更
currentPage+1
onTransitionEndイベントを追加し、スライドアウト終了後にスタックリスト内のコードを再配置
<template>
<ul class="stack">
<li class="stack-item" v-for="(item, index) in pages"
:style="[transformIndex(index),transform(index)]"
@touchmove.stop.capture="touchmove"
@touchstart.stop.capture="touchstart"
@touchend.stop.capture="touchend"
@mousedown.stop.capture="touchstart"
@mouseup.stop.capture="touchend"
@mousemove.stop.capture="touchmove">
<img :src="item.src">
</li>
</ul>
</template>
<script>
export default {
props: {
// pages数据包含基础的图片数据
pages: {
type: Array,
default: []
}
},
data () {
return {
// basicdata数据包含组件基本数据
basicdata: {
start: {}, // 记录起始位置
end: {}, // 记录终点位置
currentPage: 0 // 默认首图的序列
},
// temporaryData数据包含组件临时数据
temporaryData: {
poswidth: '', // 记录位移
posheight: '', // 记录位移
tracking: false, // 是否在滑动,防止多次操作,影响体验
animation: false, // 首图是否启用动画效果,默认为否
opacity: 1 // 记录首图透明度
}
}
},
methods: {
touchstart (e) {
if (this.temporaryData.tracking) {
return
}
// 是否为touch
if (e.type === 'touchstart') {
if (e.touches.length > 1) {
this.temporaryData.tracking = false
return
} else {
// 记录起始位置
this.basicdata.start.t = new Date().getTime()
this.basicdata.start.x = e.targetTouches[0].clientX
this.basicdata.start.y = e.targetTouches[0].clientY
this.basicdata.end.x = e.targetTouches[0].clientX
this.basicdata.end.y = e.targetTouches[0].clientY
}
// pc操作
} else {
this.basicdata.start.t = new Date().getTime()
this.basicdata.start.x = e.clientX
this.basicdata.start.y = e.clientY
this.basicdata.end.x = e.clientX
this.basicdata.end.y = e.clientY
}
this.temporaryData.tracking = true
this.temporaryData.animation = false
},
touchmove (e) {
// 记录滑动位置
if (this.temporaryData.tracking && !this.temporaryData.animation) {
if (e.type === 'touchmove') {
this.basicdata.end.x = e.targetTouches[0].clientX
this.basicdata.end.y = e.targetTouches[0].clientY
} else {
this.basicdata.end.x = e.clientX
this.basicdata.end.y = e.clientY
}
// 计算滑动值
this.temporaryData.poswidth = this.basicdata.end.x - this.basicdata.start.x
this.temporaryData.posheight = this.basicdata.end.y - this.basicdata.start.y
}
},
touchend (e) {
this.temporaryData.tracking = false
this.temporaryData.animation = true
// 滑动结束,触发判断
// 简单判断滑动宽度超出100像素时触发滑出
if (Math.abs(this.temporaryData.poswidth) >= 100) {
// 最终位移简单设定为x轴200像素的偏移
let ratio = Math.abs(this.temporaryData.posheight / this.temporaryData.poswidth)
this.temporaryData.poswidth = this.temporaryData.poswidth >= 0 ? this.temporaryData.poswidth + 200 : this.temporaryData.poswidth - 200
this.temporaryData.posheight = this.temporaryData.posheight >= 0 ? Math.abs(this.temporaryData.poswidth * ratio) : -Math.abs(this.temporaryData.poswidth * ratio)
this.temporaryData.opacity = 0
// 不满足条件则滑入
} else {
this.temporaryData.poswidth = 0
this.temporaryData.posheight = 0
}
},
// 非首页样式切换
transform (index) {
if (index > this.basicdata.currentPage) {
let style = {}
let visible = 3
let perIndex = index - this.basicdata.currentPage
// visible可见数量前滑块的样式
if (index <= this.basicdata.currentPage + visible - 1) {
style['opacity'] = '1'
style['transform'] = 'translate3D(0,0,' + -1 * perIndex * 60 + 'px' + ')'
style['zIndex'] = visible - index + this.basicdata.currentPage
style['transitionTimingFunction'] = 'ease'
style['transitionDuration'] = 300 + 'ms'
} else {
style['zIndex'] = '-1'
style['transform'] = 'translate3D(0,0,' + -1 * visible * 60 + 'px' + ')'
}
return style
}
},
// 首页样式切换
transformIndex (index) {
// 处理3D效果
if (index === this.basicdata.currentPage) {
let style = {}
style['transform'] = 'translate3D(' + this.temporaryData.poswidth + 'px' + ',' + this.temporaryData.posheight + 'px' + ',0px)'
style['opacity'] = this.temporaryData.opacity
style['zIndex'] = 10
if (this.temporaryData.animation) {
style['transitionTimingFunction'] = 'ease'
style['transitionDuration'] = 300 + 'ms'
}
return style
}
}
}
}
</script>角度オフセットの原理は、ユーザーがタッチするたびにユーザーのタッチ位置を記録し、最大オフセット角度を計算し、スライド変位が発生すると角度が最大オフセット角度まで直線的に増加することです。
スタックを使用するときに特に行う必要があることは次のとおりです:
touchmove で必要な角度と方向を計算します
touchend と onTransitionEnd で角度をゼロに設定します
スライドアウトを決定します面積比、主にオフセットを使用して面積比を取得し、判定を完了します。完全なコードとデモは github で参照できます。ソース コードはここには掲載されません。この記事が気に入ったら、github でご覧ください。:star:️ してください。そして最後に、皆さんが Tantan:green_heart:
であなたの元ガールフレンドを見つけられることを願っています。 , 今後のお役に立てれば幸いです。
関連記事:
vue-cliスキャフォールディングを使用してVueプロジェクトの下でプロジェクト構造を初期化する詳細な説明vueからリクエストされたデータ内の特定の項目の値を変更する方法
JavaScript Starry Navigation Column 実装方法
以上がvue を使用してスライディング スタック コンポーネントを作成する (詳細なチュートリアル)の詳細内容です。詳細については、PHP 中国語 Web サイトの他の関連記事を参照してください。


![[Web フロントエンド] Node.js クイック スタート](https://img.php.cn/upload/course/000/000/067/662b5d34ba7c0227.png)


