ionic2 で自動生成器を使用する手順は何ですか?
この記事では、ionic2 の自動ジェネレーターの使用方法を主に紹介します。必要な方は参考にしてください。 ionic2 は、アプリケーションの作成を自動的に支援するコマンドライン機能であり、時間を大幅に節約し、速度を向上させます。プロジェクトの重要な部分を開発するため。
ionic ジェネレーターを使用すると、次の部分を自動的に作成できます:
•component
•directive•page
•provider
これを通じて新しいページを作成します。コマンド ページでは、このコマンドは ionic2 プロジェクトで最もよく使用されます
コマンド ラインを入力して次のコマンドを実行するだけです:
ionic g page login
# Results:
√ Create app/pages/login/login.html
√ Create app/pages/login/login.scss
√ Create app/pages/login/login.ts
login.ts:
import {Component} from '@angular/core';
import {NavController} from 'ionic-angular';
@Component({
 templateUrl: 'build/pages/login/login.html',
})
export class LoginPage {
 constructor(public nav: NavController) {}
}login.html:
<ion-header>
 <ion-navbar>
 <ion-title>
  login
 </ion-title>
 </ion-navbar>
</ion-header>
<ion-content padding class="login">
</ion-content>
コンポーネントは、アプリケーションの任意の部分で使用できるコードの一部です
次のコマンドでコンポーネントを作成します:
ionic g component myComponent
# Results:
√ Create app/components/my-component/my-component.html
√ Create app/components/my-component/my-component.ts
my-component.ts:
import {Component} from '@angular/core';
@Component({
 selector: 'my-component',
 templateUrl: 'build/components/my-component/my-component.html'
})
export class MyComponent {
 text: string = "";
 constructor() {
 this.text = 'Hello World';
 }
}ディレクティブ、アプリケーションが任意の要素で使用できる修飾子属性。
ionic g directive myDirective
# Results:
√ Create app/components/my-directive/my-directive.ts
my-directive.ts:
import {Directive} from '@angular/core';
@Directive({
 selector: '[my-directive]' // Attribute selector
})
export class MyDirective {
 constructor() {
 console.log('Hello World');
 }
}次に、新しいサービス (プロバイダー) を作成します。プロバイダーは、REST API、ローカル ストレージ、SQLite などへのデータ接続を処理する責任があります。
これを作成するには、ターミナルに移動して次のコマンドを実行します:
ionic g provider userService
# Results:
√ Create app/providers/user-service/user-service.ts
サービス コードは次のとおりです:
user-service.ts:
import {Injectable} from '@angular/core';
import {Http} from '@angular/http';
import 'rxjs/add/operator/map';
@Injectable()
export class UserService {
 data: any = null;
 constructor(public http: Http) { }
 load() { if (this.data) {
 }
 return new Promise(resolve => {
 this.http.get('path/to/data.json')
  .map(res => res.json())
  .subscribe(data => {
  this.data = data;
  resolve(this.data);
  });
 });
 }
}パイプラインのバリエーションでは、テキストを大文字で表示したり、通貨値や日付形式を表示したりするなど、あらゆるデータにテンプレートを使用できます。
ionic g pipe myPipe
# Results:
√ Create app/pipes/myPipe.ts
私たちのパイプラインのコードは次のとおりです
myPipe.ts:
import {Injectable, Pipe} from '@angular/core';
@Pipe({
 name: 'my-pipe'
})
@Injectable()
export class MyPipe {
 transform(value: string, args: any[]) {
 value = value + ''; // make sure it's a string
 return value.toLowerCase();
 }
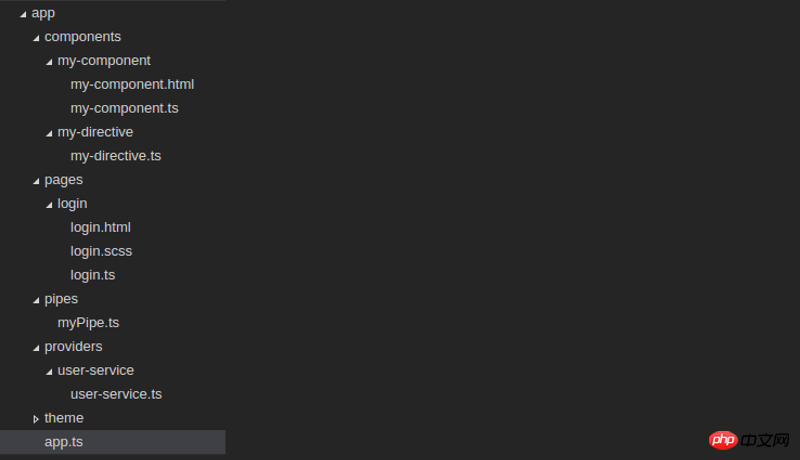
}最後に、私たちが生成したアプリケーション構造は次のとおりです:
 上記は私がコンパイルしたものです。将来すべての人に役立ちます。
関連記事:
操作イベントコマンドng-clickを使用して複数のパラメータを渡すAngularの例txtファイルのアップロードプレビュー機能を実装するJavaScriptコードコントローラー間の通信のAngularjs実装例まとめ以上がionic2 で自動生成器を使用する手順は何ですか?の詳細内容です。詳細については、PHP 中国語 Web サイトの他の関連記事を参照してください。

ホットAIツール

Undresser.AI Undress
リアルなヌード写真を作成する AI 搭載アプリ

AI Clothes Remover
写真から衣服を削除するオンライン AI ツール。

Undress AI Tool
脱衣画像を無料で

Clothoff.io
AI衣類リムーバー

AI Hentai Generator
AIヘンタイを無料で生成します。

人気の記事

ホットツール

メモ帳++7.3.1
使いやすく無料のコードエディター

SublimeText3 中国語版
中国語版、とても使いやすい

ゼンドスタジオ 13.0.1
強力な PHP 統合開発環境

ドリームウィーバー CS6
ビジュアル Web 開発ツール

SublimeText3 Mac版
神レベルのコード編集ソフト(SublimeText3)

ホットトピック
 7530
7530
 15
15
 1379
1379
 52
52
 82
82
 11
11
 21
21
 76
76
 独自のJavaScriptライブラリを作成および公開するにはどうすればよいですか?
Mar 18, 2025 pm 03:12 PM
記事では、JavaScriptライブラリの作成、公開、および維持について説明し、計画、開発、テスト、ドキュメント、およびプロモーション戦略に焦点を当てています。
 ブラウザでのパフォーマンスのためにJavaScriptコードを最適化するにはどうすればよいですか?
Mar 18, 2025 pm 03:14 PM
この記事では、ブラウザでJavaScriptのパフォーマンスを最適化するための戦略について説明し、実行時間の短縮、ページの負荷速度への影響を最小限に抑えることに焦点を当てています。
 フロントエンドのサーマルペーパーレシートのために文字化けしたコード印刷に遭遇した場合はどうすればよいですか?
Apr 04, 2025 pm 02:42 PM
フロントエンドのサーマルペーパーチケット印刷のためのよくある質問とソリューションフロントエンド開発におけるチケット印刷は、一般的な要件です。しかし、多くの開発者が実装しています...
 ブラウザ開発者ツールを使用してJavaScriptコードを効果的にデバッグするにはどうすればよいですか?
Mar 18, 2025 pm 03:16 PM
この記事では、ブラウザ開発者ツールを使用した効果的なJavaScriptデバッグについて説明し、ブレークポイントの設定、コンソールの使用、パフォーマンスの分析に焦点を当てています。
 誰がより多くのPythonまたはJavaScriptを支払われますか?
Apr 04, 2025 am 12:09 AM
スキルや業界のニーズに応じて、PythonおよびJavaScript開発者には絶対的な給与はありません。 1. Pythonは、データサイエンスと機械学習でさらに支払われる場合があります。 2。JavaScriptは、フロントエンドとフルスタックの開発に大きな需要があり、その給与もかなりです。 3。影響要因には、経験、地理的位置、会社の規模、特定のスキルが含まれます。
 ソースマップを使用して、マイナイドJavaScriptコードをデバッグするにはどうすればよいですか?
Mar 18, 2025 pm 03:17 PM
この記事では、ソースマップを使用して、元のコードにマッピングすることにより、Minified JavaScriptをデバッグする方法について説明します。ソースマップの有効化、ブレークポイントの設定、Chrome DevtoolsやWebpackなどのツールの使用について説明します。
 Console.log出力の違い結果:なぜ2つの呼び出しが異なるのですか?
Apr 04, 2025 pm 05:12 PM
Console.log出力の違いの根本原因に関する詳細な議論。この記事では、Console.log関数の出力結果の違いをコードの一部で分析し、その背後にある理由を説明します。 �...
 JavaScriptを使用して、同じIDを持つArray要素を1つのオブジェクトにマージする方法は?
Apr 04, 2025 pm 05:09 PM
同じIDを持つ配列要素をJavaScriptの1つのオブジェクトにマージする方法は?データを処理するとき、私たちはしばしば同じIDを持つ必要性に遭遇します...


