

反応ネイティブは円弧ドラッグのプログレスバーを作成します
今回はreact-nativeを使ってアークドラッグプログレスバーを作る方法を紹介します。react-nativeでアークドラッグプログレスバーを作る際の注意点は何ですか?
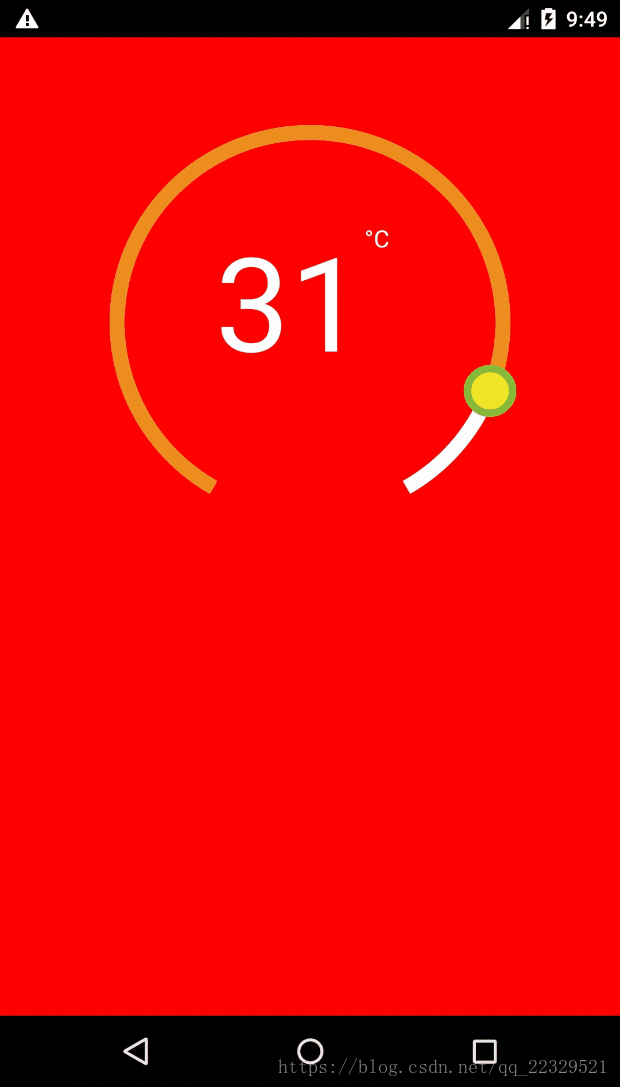
最初にレンダリングを見てみましょう
要求にはこのレンダリングの非ネイティブ実装が必要であるため、
難易度1: svgを使用した描画
難易度2: クリックイベントの処理
-
難易度 3: カプセル化
描画の必要があるため、svg が使用されます
ここでは、Baidu が svg と API のチュートリアルに従います
コード ブロックを表示
render() {
return (
<View pointerEvents={'box-only'}
//事件处理
{...this._panResponder.panHandlers}>
//实际圆环
{this._renderCircleSvg()}
// 计算中心距离
<View
style={{
position: 'relative',
top: -this.props.height / 2 - this.props.r,
left: this.props.width / 2 - this.props.r,
flex: 1,
}}>
// 暴露给外部渲染圆环中心的接口
{this.props.renderCenterView(this.state.temp)}
</View>
</View>
);
_renderCircleSvg() {
//中心点
const cx = this.props.width / 2;
const cy = this.props.height / 2;
//计算是否有偏差角 对应图就是下面缺了一块的
const prad = this.props.angle / 2 * (Math.PI / 180);
//三角计算起点
const startX = -(Math.sin(prad) * this.props.r) + cx;
const startY = cy + Math.cos(prad) * this.props.r;
//终点
const endX = Math.sin(prad) * this.props.r + cx;
const endY = cy + Math.cos(prad) * this.props.r;
// 计算进度点
const progress = parseInt(
this._circlerate() * (360 - this.props.angle) / 100,
10
);
// 根据象限做处理 苦苦苦 高中数学全忘了,参考辅助线
const t = progress + this.props.angle / 2;
const progressX = cx - Math.sin(t * (Math.PI / 180)) * this.props.r;
const progressY = cy + Math.cos(t * (Math.PI / 180)) * this.props.r;
// SVG的描述 这里百度下就知道什么意思
const descriptions = [
'M',
startX,
startY,
'A',
this.props.r,
this.props.r,
0,
1,
1,
endX,
endY,
].join(' ');
const progressdescription = [
'M',
startX,
startY,
'A',
this.props.r,
this.props.r,
0,
//根据角度是否是0,1 看下效果就知道了
t >= 180 + this.props.angle / 2 ? 1 : 0,
1,
progressX,
progressY,
].join(' ');
return (
<Svg
height={this.props.height}
width={this.props.width}
style={styles.svg}>
<Path
d={descriptions}
fill="none"
stroke={this.props.outArcColor}
strokeWidth={this.props.strokeWidth} />
<Path
d={progressdescription}
fill="none"
stroke={this.props.progressvalue}
strokeWidth={this.props.strokeWidth} />
<Circle
cx={progressX}
cy={progressY}
r={this.props.tabR}
stroke={this.props.tabStrokeColor}
strokeWidth={this.props.tabStrokeWidth}
fill={this.props.tabColor} />
</Svg>
);
}
}イベント処理コード ブロック
// 参考react native 官网对手势的讲解
 iniPanResponder() {
 this.parseToDeg = this.parseToDeg.bind(this);
 this._panResponder = PanResponder.create({
  // 要求成为响应者:
  onStartShouldSetPanResponder: () => true,
  onStartShouldSetPanResponderCapture: () => true,
  onMoveShouldSetPanResponder: () => true,
  onMoveShouldSetPanResponderCapture: () => true,
  onPanResponderGrant: evt => {
  // 开始手势操作。给用户一些视觉反馈,让他们知道发生了什么事情!
  if (this.props.enTouch) {
   this.lastTemper = this.state.temp;
   const x = evt.nativeEvent.locationX;
   const y = evt.nativeEvent.locationY;
   this.parseToDeg(x, y);
  }
  },
  onPanResponderMove: (evt, gestureState) => {
  if (this.props.enTouch) {
   let x = evt.nativeEvent.locationX;
   let y = evt.nativeEvent.locationY;
   if (Platform.OS === 'android') {
   x = evt.nativeEvent.locationX + gestureState.dx;
   y = evt.nativeEvent.locationY + gestureState.dy;
   }
   this.parseToDeg(x, y);
  }
  },
  onPanResponderTerminationRequest: () => true,
  onPanResponderRelease: () => {
  if (this.props.enTouch) this.props.complete(this.state.temp);
  },
  // 另一个组件已经成为了新的响应者,所以当前手势将被取消。
  onPanResponderTerminate: () => {},
  // 返回一个布尔值,决定当前组件是否应该阻止原生组件成为JS响应者
  // 默认返回true。目前暂时只支持android。
  onShouldBlockNativeResponder: () => true,
 });
 }
//画象限看看就知道了 就是和中线点计算角度
parseToDeg(x, y) {
 const cx = this.props.width / 2;
 const cy = this.props.height / 2;
 let deg;
 let temp;
 if (x >= cx && y <= cy) {
  deg = Math.atan((cy - y) / (x - cx)) * 180 / Math.PI;
  temp =
  (270 - deg - this.props.angle / 2) /
   (360 - this.props.angle) *
   (this.props.max - this.props.min) +
  this.props.min;
 } else if (x >= cx && y >= cy) {
  deg = Math.atan((cy - y) / (cx - x)) * 180 / Math.PI;
  temp =
  (270 + deg - this.props.angle / 2) /
   (360 - this.props.angle) *
   (this.props.max - this.props.min) +
  this.props.min;
 } else if (x <= cx && y <= cy) {
  deg = Math.atan((x - cx) / (y - cy)) * 180 / Math.PI;
  temp =
  (180 - this.props.angle / 2 - deg) /
   (360 - this.props.angle) *
   (this.props.max - this.props.min) +
  this.props.min;
 } else if (x <= cx && y >= cy) {
  deg = Math.atan((cx - x) / (y - cy)) * 180 / Math.PI;
  if (deg < this.props.angle / 2) {
  deg = this.props.angle / 2;
  }
  temp =
  (deg - this.props.angle / 2) /
   (360 - this.props.angle) *
   (this.props.max - this.props.min) +
  this.props.min;
 }
 if (temp <= this.props.min) {
  temp = this.props.min;
 }
 if (temp >= this.props.max) {
  temp = this.props.max;
 }
 //因为提供步长,所欲需要做接近步长的数
 temp = this.getTemps(temp);
 this.setState({
  temp,
 });
 this.props.valueChange(this.state.temp);
 }
 getTemps(tmps) {
 const k = parseInt((tmps - this.props.min) / this.props.step, 10);
 const k1 = this.props.min + this.props.step * k;
 const k2 = this.props.min + this.props.step * (k + 1);
 if (Math.abs(k1 - tmps) > Math.abs(k2 - tmps)) return k2;
 return k1;
}完全なコード ブロック
import React, { Component } from 'react';
import { View, StyleSheet, PanResponder, Platform, Text } from 'react-native';
import Svg, { Circle, Path } from 'react-native-svg';
export default class CircleView extends Component {
static propTypes = {
height: React.PropTypes.number,
width: React.PropTypes.number,
r: React.PropTypes.number,
angle: React.PropTypes.number,
outArcColor: React.PropTypes.object,
progressvalue: React.PropTypes.object,
tabColor: React.PropTypes.object,
tabStrokeColor: React.PropTypes.object,
strokeWidth: React.PropTypes.number,
value: React.PropTypes.number,
min: React.PropTypes.number,
max: React.PropTypes.number,
tabR: React.PropTypes.number,
step: React.PropTypes.number,
tabStrokeWidth: React.PropTypes.number,
valueChange: React.PropTypes.func,
renderCenterView: React.PropTypes.func,
complete: React.PropTypes.func,
enTouch: React.PropTypes.boolean,
};
static defaultProps = {
width: 300,
height: 300,
r: 100,
angle: 60,
outArcColor: 'white',
strokeWidth: 10,
value: 20,
min: 10,
max: 70,
progressvalue: '#ED8D1B',
tabR: 15,
tabColor: '#EFE526',
tabStrokeWidth: 5,
tabStrokeColor: '#86BA38',
valueChange: () => {},
complete: () => {},
renderCenterView: () => {},
step: 1,
enTouch: true,
};
constructor(props) {
super(props);
this.state = {
temp: this.props.value,
};
this.iniPanResponder();
}
iniPanResponder() {
this.parseToDeg = this.parseToDeg.bind(this);
this._panResponder = PanResponder.create({
// 要求成为响应者:
onStartShouldSetPanResponder: () => true,
onStartShouldSetPanResponderCapture: () => true,
onMoveShouldSetPanResponder: () => true,
onMoveShouldSetPanResponderCapture: () => true,
onPanResponderGrant: evt => {
// 开始手势操作。给用户一些视觉反馈,让他们知道发生了什么事情!
if (this.props.enTouch) {
this.lastTemper = this.state.temp;
const x = evt.nativeEvent.locationX;
const y = evt.nativeEvent.locationY;
this.parseToDeg(x, y);
}
},
onPanResponderMove: (evt, gestureState) => {
if (this.props.enTouch) {
let x = evt.nativeEvent.locationX;
let y = evt.nativeEvent.locationY;
if (Platform.OS === 'android') {
x = evt.nativeEvent.locationX + gestureState.dx;
y = evt.nativeEvent.locationY + gestureState.dy;
}
this.parseToDeg(x, y);
}
},
onPanResponderTerminationRequest: () => true,
onPanResponderRelease: () => {
if (this.props.enTouch) this.props.complete(this.state.temp);
},
// 另一个组件已经成为了新的响应者,所以当前手势将被取消。
onPanResponderTerminate: () => {},
// 返回一个布尔值,决定当前组件是否应该阻止原生组件成为JS响应者
// 默认返回true。目前暂时只支持android。
onShouldBlockNativeResponder: () => true,
});
}
componentWillReceiveProps(nextProps) {
if (nextProps.value != this.state.temp) {
this.state = {
temp: nextProps.value,
};
}
}
parseToDeg(x, y) {
const cx = this.props.width / 2;
const cy = this.props.height / 2;
let deg;
let temp;
if (x >= cx && y <= cy) {
deg = Math.atan((cy - y) / (x - cx)) * 180 / Math.PI;
temp =
(270 - deg - this.props.angle / 2) /
(360 - this.props.angle) *
(this.props.max - this.props.min) +
this.props.min;
} else if (x >= cx && y >= cy) {
deg = Math.atan((cy - y) / (cx - x)) * 180 / Math.PI;
temp =
(270 + deg - this.props.angle / 2) /
(360 - this.props.angle) *
(this.props.max - this.props.min) +
this.props.min;
} else if (x <= cx && y <= cy) {
deg = Math.atan((x - cx) / (y - cy)) * 180 / Math.PI;
temp =
(180 - this.props.angle / 2 - deg) /
(360 - this.props.angle) *
(this.props.max - this.props.min) +
this.props.min;
} else if (x <= cx && y >= cy) {
deg = Math.atan((cx - x) / (y - cy)) * 180 / Math.PI;
if (deg < this.props.angle / 2) {
deg = this.props.angle / 2;
}
temp =
(deg - this.props.angle / 2) /
(360 - this.props.angle) *
(this.props.max - this.props.min) +
this.props.min;
}
if (temp <= this.props.min) {
temp = this.props.min;
}
if (temp >= this.props.max) {
temp = this.props.max;
}
temp = this.getTemps(temp);
this.setState({
temp,
});
this.props.valueChange(this.state.temp);
}
getTemps(tmps) {
const k = parseInt((tmps - this.props.min) / this.props.step, 10);
const k1 = this.props.min + this.props.step * k;
const k2 = this.props.min + this.props.step * (k + 1);
if (Math.abs(k1 - tmps) > Math.abs(k2 - tmps)) return k2;
return k1;
}
render() {
return (
<View pointerEvents={'box-only'} {...this._panResponder.panHandlers}>
{this._renderCircleSvg()}
<View
style={{
position: 'relative',
top: -this.props.height / 2 - this.props.r,
left: this.props.width / 2 - this.props.r,
flex: 1,
}}>
{this.props.renderCenterView(this.state.temp)}
</View>
</View>
);
}
_circlerate() {
let rate = parseInt(
(this.state.temp - this.props.min) *
100 /
(this.props.max - this.props.min),
10
);
if (rate < 0) {
rate = 0;
} else if (rate > 100) {
rate = 100;
}
return rate;
}
_renderCircleSvg() {
const cx = this.props.width / 2;
const cy = this.props.height / 2;
const prad = this.props.angle / 2 * (Math.PI / 180);
const startX = -(Math.sin(prad) * this.props.r) + cx;
const startY = cy + Math.cos(prad) * this.props.r; // // 最外层的圆弧配置
const endX = Math.sin(prad) * this.props.r + cx;
const endY = cy + Math.cos(prad) * this.props.r;
// 计算进度点
const progress = parseInt(
this._circlerate() * (360 - this.props.angle) / 100,
10
);
// 根据象限做处理 苦苦苦 高中数学全忘了,参考辅助线
const t = progress + this.props.angle / 2;
const progressX = cx - Math.sin(t * (Math.PI / 180)) * this.props.r;
const progressY = cy + Math.cos(t * (Math.PI / 180)) * this.props.r;
const descriptions = [
'M',
startX,
startY,
'A',
this.props.r,
this.props.r,
0,
1,
1,
endX,
endY,
].join(' ');
const progressdescription = [
'M',
startX,
startY,
'A',
this.props.r,
this.props.r,
0,
t >= 180 + this.props.angle / 2 ? 1 : 0,
1,
progressX,
progressY,
].join(' ');
return (
<Svg
height={this.props.height}
width={this.props.width}
style={styles.svg}>
<Path
d={descriptions}
fill="none"
stroke={this.props.outArcColor}
strokeWidth={this.props.strokeWidth} />
<Path
d={progressdescription}
fill="none"
stroke={this.props.progressvalue}
strokeWidth={this.props.strokeWidth} />
<Circle
cx={progressX}
cy={progressY}
r={this.props.tabR}
stroke={this.props.tabStrokeColor}
strokeWidth={this.props.tabStrokeWidth}
fill={this.props.tabColor} />
</Svg>
);
}
}
const styles = StyleSheet.create({
svg: {},
});外部呼び出し
<View style={styles.container}>
  <CircleProgress
   width={width}
   height={height}
   r={r}
   angle={60}
   min={5}
   max={35}
   step={0.5}
   value={22}
   complete={temp => {
   }}
   valueChange={temp => {}}
   renderCenterView={temp => (
   <View style={{ flex: 1 }}>
   </View>
   )}
   enTouch={true} />
</View>この記事の事例を読んだ後は、この方法を習得したと思います。さらに興味深い情報については、PHP 中国語 Web サイトの他の関連記事に注目してください。
推奨読書:
vuex ページが更新された後にデータを保存できない場合の対処方法
以上が反応ネイティブは円弧ドラッグのプログレスバーを作成しますの詳細内容です。詳細については、PHP 中国語 Web サイトの他の関連記事を参照してください。

ホットAIツール

Undresser.AI Undress
リアルなヌード写真を作成する AI 搭載アプリ

AI Clothes Remover
写真から衣服を削除するオンライン AI ツール。

Undress AI Tool
脱衣画像を無料で

Clothoff.io
AI衣類リムーバー

AI Hentai Generator
AIヘンタイを無料で生成します。

人気の記事
ホットツール

メモ帳++7.3.1
使いやすく無料のコードエディター

SublimeText3 中国語版
中国語版、とても使いやすい

ゼンドスタジオ 13.0.1
強力な PHP 統合開発環境

ドリームウィーバー CS6
ビジュアル Web 開発ツール

SublimeText3 Mac版
神レベルのコード編集ソフト(SublimeText3)
ホットトピック
 7517
7517
 15
1378
52
79
11
21
66
15
1378
52
79
11
21
66

 React と WebSocket を使用してリアルタイム チャット アプリを構築する方法
Sep 26, 2023 pm 07:46 PM
React と WebSocket を使用してリアルタイム チャット アプリを構築する方法
Sep 26, 2023 pm 07:46 PM
React と WebSocket を使用してリアルタイム チャット アプリケーションを構築する方法 はじめに: インターネットの急速な発展に伴い、リアルタイム コミュニケーションがますます注目を集めています。ライブチャット アプリは、現代の社会生活や仕事生活に不可欠な部分になっています。この記事では、React と WebSocket を使用して簡単なリアルタイム チャット アプリケーションを構築する方法と、具体的なコード例を紹介します。 1. 技術的な準備 リアルタイム チャット アプリケーションの構築を開始する前に、次のテクノロジとツールを準備する必要があります。 React: 構築用の 1 つ
 React フロントエンドとバックエンドの分離ガイド: フロントエンドとバックエンドの分離と独立したデプロイメントを実現する方法
Sep 28, 2023 am 10:48 AM
React フロントエンドとバックエンドの分離ガイド: フロントエンドとバックエンドの分離と独立したデプロイメントを実現する方法
Sep 28, 2023 am 10:48 AM
React フロントエンドとバックエンドの分離ガイド: フロントエンドとバックエンドの分離と独立したデプロイメントを実現する方法、特定のコード例が必要です 今日の Web 開発環境では、フロントエンドとバックエンドの分離がトレンドになっています。フロントエンド コードとバックエンド コードを分離することで、開発作業がより柔軟かつ効率的になり、チームのコラボレーションが促進されます。この記事では、React を使用してフロントエンドとバックエンドの分離を実現し、それによって分離と独立したデプロイの目標を達成する方法を紹介します。まず、フロントエンドとバックエンドの分離とは何かを理解する必要があります。従来の Web 開発モデルでは、フロントエンドとバックエンドが結合されています。
 React と Flask を使用してシンプルで使いやすい Web アプリケーションを構築する方法
Sep 27, 2023 am 11:09 AM
React と Flask を使用してシンプルで使いやすい Web アプリケーションを構築する方法
Sep 27, 2023 am 11:09 AM
React と Flask を使用してシンプルで使いやすい Web アプリケーションを構築する方法 はじめに: インターネットの発展に伴い、Web アプリケーションのニーズはますます多様化および複雑化しています。使いやすさとパフォーマンスに対するユーザーの要件を満たすために、最新のテクノロジー スタックを使用してネットワーク アプリケーションを構築することがますます重要になっています。 React と Flask は、フロントエンドおよびバックエンド開発用の 2 つの非常に人気のあるフレームワークであり、うまく連携してシンプルで使いやすい Web アプリケーションを構築します。この記事では、React と Flask を活用する方法について詳しく説明します。
 React と RabbitMQ を使用して信頼性の高いメッセージング アプリを構築する方法
Sep 28, 2023 pm 08:24 PM
React と RabbitMQ を使用して信頼性の高いメッセージング アプリを構築する方法
Sep 28, 2023 pm 08:24 PM
React と RabbitMQ を使用して信頼性の高いメッセージング アプリケーションを構築する方法 はじめに: 最新のアプリケーションは、リアルタイム更新やデータ同期などの機能を実現するために、信頼性の高いメッセージングをサポートする必要があります。 React はユーザー インターフェイスを構築するための人気のある JavaScript ライブラリであり、RabbitMQ は信頼性の高いメッセージング ミドルウェアです。この記事では、React と RabbitMQ を組み合わせて信頼性の高いメッセージング アプリケーションを構築する方法を紹介し、具体的なコード例を示します。 RabbitMQ の概要:
 React レスポンシブ デザイン ガイド: アダプティブ フロントエンド レイアウト効果を実現する方法
Sep 26, 2023 am 11:34 AM
React レスポンシブ デザイン ガイド: アダプティブ フロントエンド レイアウト効果を実現する方法
Sep 26, 2023 am 11:34 AM
React レスポンシブ デザイン ガイド: アダプティブ フロントエンド レイアウト効果を実現する方法 モバイル デバイスの人気と、マルチスクリーン エクスペリエンスに対するユーザーの需要の高まりに伴い、レスポンシブ デザインは最新のフロントエンド開発における重要な考慮事項の 1 つとなっています。 React は、現在最も人気のあるフロントエンド フレームワークの 1 つであり、開発者がアダプティブ レイアウト効果を実現するのに役立つ豊富なツールとコンポーネントを提供します。この記事では、React を使用してレスポンシブ デザインを実装するためのガイドラインとヒントをいくつか紹介し、参考として具体的なコード例を示します。 Reactを使用したファイル
 React コード デバッグ ガイド: フロントエンドのバグをすばやく見つけて解決する方法
Sep 26, 2023 pm 02:25 PM
React コード デバッグ ガイド: フロントエンドのバグをすばやく見つけて解決する方法
Sep 26, 2023 pm 02:25 PM
React コード デバッグ ガイド: フロントエンドのバグをすばやく見つけて解決する方法 はじめに: React アプリケーションを開発するとき、アプリケーションをクラッシュさせたり、不正な動作を引き起こしたりする可能性のあるさまざまなバグに遭遇することがよくあります。したがって、デバッグ スキルを習得することは、すべての React 開発者にとって不可欠な能力です。この記事では、フロントエンドのバグを見つけて解決するための実践的なテクニックをいくつか紹介し、読者が React アプリケーションのバグをすばやく見つけて解決できるようにする具体的なコード例を示します。 1. デバッグツールの選択: In Re
 React Router ユーザーガイド: フロントエンドルーティング制御の実装方法
Sep 29, 2023 pm 05:45 PM
React Router ユーザーガイド: フロントエンドルーティング制御の実装方法
Sep 29, 2023 pm 05:45 PM
ReactRouter ユーザーガイド: フロントエンドルーティング制御の実装方法 シングルページアプリケーションの人気に伴い、フロントエンドルーティングは無視できない重要な部分になりました。 React エコシステムで最も人気のあるルーティング ライブラリとして、ReactRouter は豊富な機能と使いやすい API を提供し、フロントエンド ルーティングの実装を非常にシンプルかつ柔軟にします。この記事では、ReactRouter の使用方法と具体的なコード例を紹介します。 ReactRouter を最初にインストールするには、次のものが必要です
 React と Google BigQuery を使用して高速データ分析アプリケーションを構築する方法
Sep 26, 2023 pm 06:12 PM
React と Google BigQuery を使用して高速データ分析アプリケーションを構築する方法
Sep 26, 2023 pm 06:12 PM
React と Google BigQuery を使用して高速データ分析アプリケーションを構築する方法 はじめに: 今日の情報爆発の時代において、データ分析はさまざまな業界で不可欠なリンクとなっています。中でも、高速かつ効率的なデータ分析アプリケーションを構築することは、多くの企業や個人が追求する目標となっています。この記事では、React と Google BigQuery を使用して高速データ分析アプリケーションを構築する方法を紹介し、詳細なコード例を示します。 1. 概要 React はビルドするためのツールです
