この記事では、vue-meta を使用してヘッダー タグをよりエレガントに管理する方法を主に詳しく紹介しますので、参考として共有します。
Vue SPA アプリケーションで、HTML の head タグを変更したい場合は、コード内で直接変更できます:
// 改下title
document.title = 'what?'
// 引入一段script
let s = document.createElement('script')
s.setAttribute('src', './vconsole.js')
document.head.appendChild(s)
// 修改meta信息,或者给html标签添加属性...
// 此处省略一大坨代码...
今日は、head タグ vue -meta を管理するよりエレガントな方法を紹介します
vue-meta の概要
SSR + Streaming をサポートする Vue 2.0 コンポーネントでページのメタ情報を管理します。主に HMTL ヘッダー タグの管理に使用され、SSR もサポートされます。
vue-metaには以下の特徴があります:使い方を紹介する前に、最近よく使われているサーバーサイドレンダリング(SSR、Server Side Render)という言葉を簡単に言うと、アクセスするときです。ページの場合、サーバーはレンダリングされたページをブラウザに直接返します。
vue-meta が SSR をサポートしていることはわかっています。以下の紹介は 2 つの部分に分かれています:
クライアントエントリーファイルに vue-meta プラグインをインストールします
import Vue from 'vue'
import VueRouter from 'vue-router'
import VueMeta from 'vue-meta'
Vue.use(VueRouter)
Vue.use(VueMeta)
/* eslint-disable no-new */
new Vue({
el: '#app',
router,
template: '<App/>',
components: { App }
})その後、コンポーネントで使用できます
export default {
 data () {
  return {
   myTitle: '标题'
  }
 },
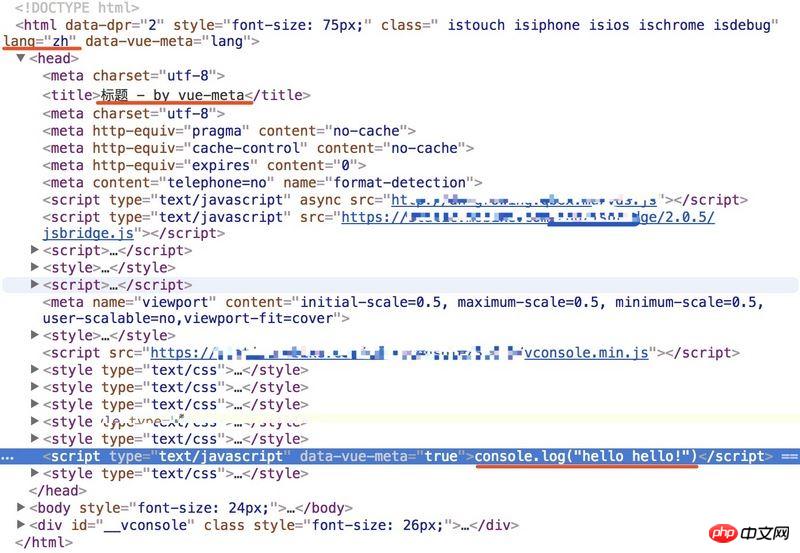
 metaInfo: {
  title: this.myTitle,
  titleTemplate: '%s - by vue-meta',
  htmlAttrs: {
   lang: 'zh'
  },
  script: [{innerHTML: 'console.log("hello hello!")', type: 'text/javascript'}],
  __dangerouslyDisableSanitizers: ['script']
 },
 ...
}ページの表示を見てみましょう
 Nuxt.jsに慣れている学生は、メタ情報設定のkeyNameが矛盾していることに気づくでしょう。次の設定方法で変更できます:
// vue-meta configuration
Vue.use(Meta, {
 keyName: 'head', // the component option name that vue-meta looks for meta info on.
 attribute: 'data-n-head', // the attribute name vue-meta adds to the tags it observes
 ssrAttribute: 'data-n-head-ssr', // the attribute name that lets vue-meta know that meta info has already been server-rendered
 tagIDKeyName: 'hid' // the property name that vue-meta uses to determine whether to overwrite or append a tag
})より包括的で詳細な API については、vue-meta github を参照してください
Server サーバーステップ 1. $meta オブジェクトをコンテキストに挿入します
server-entry.js:
import app from './app'

const router = app.$router
const meta = app.$meta() // here

export default (context) => {
 router.push(context.url)
 context.meta = meta // and here
 return app
}$meta は主に、inject メソッドとrefresh メソッドを提供します。サーバー側で使用される inject メソッドは、設定された metaInfo を返します。クライアント側で使用される refresh メソッドは、メタ情報を更新するために使用されます。
ステップ 2. inject() メソッドを使用してページを出力しますserver.js:
app.get('*', (req, res) => {
 const context = { url: req.url }
 renderer.renderToString(context, (error, html) => {
  if (error) return res.send(error.stack)
  const bodyOpt = { body: true }
  const {
   title, htmlAttrs, bodyAttrs, link, style, script, noscript, meta
  } = context.meta.inject()
  return res.send(`
   <!doctype html>
   <html data-vue-meta-server-rendered ${htmlAttrs.text()}>
    <head>
     ${meta.text()}
     ${title.text()}
     ${link.text()}
     ${style.text()}
     ${script.text()}
     ${noscript.text()}
    </head>
    <body ${bodyAttrs.text()}>
     ${html}
     <script src="/assets/vendor.bundle.js"></script>
     <script src="/assets/client.bundle.js"></script>
     ${script.text(bodyOpt)}
    </body>
   </html>
  `)
 })
})vue-meta の使用方法については前に説明しましたが、これらの機能がどのように機能するのか疑問に思われるかもしれません。実装されたら、ソースコードを共有します。
クライアントレンダリングとサーバーレンダリングを区別するにはどうすればよいですか?vue-meta は、コンポーネントに設定されているメタ情報を beforeCreate() フック関数の this.$metaInfo に置きます。他のライフサイクルでは、this.$metaInfo の下のプロパティにアクセスできます。
if (typeof this.$options[options.keyName] === 'function') {
 if (typeof this.$options.computed === 'undefined') {
  this.$options.computed = {}
 }
 this.$options.computed.$metaInfo = this.$options[options.keyName]
}vue-meta は、created などのライフサイクルのフック関数で $metaInfo の変更を監視し、変更が発生した場合、$meta の下の更新メソッドが呼び出されます。これが、metaInfo が応答性の高い理由です。
created () {
 if (!this.$isServer && this.$metaInfo) {
  this.$watch('$metaInfo', () => {
   batchID = batchUpdate(batchID, () => this.$meta().refresh())
  })
 }
},サーバー側は主に$meta配下にinjectメソッドを公開しており、injectメソッドを呼び出すと対応する情報が返されます。
クライアントとサーバーはどのようにタグを変更しますか?この記事の冒頭で説明したように、
return function updateTitle (title = document.title) {
 document.title = title
}サーバー側をネイティブ js で直接変更します。これは、テキスト メソッドを使用して
return function titleGenerator (type, data) {
 return {
  text () {
   return `<${type} ${attribute}="true">${data}</${type}>`
  }
 }
}のラベルを文字列形式で返します。
__危険なほど消毒剤を無効にします何をしましたか?vue-meta は、__dangerouslyDisableSanitizers が設定されている場合、デフォルトで特殊文字列をエスケープします。
const escapeHTML = (str) => typeof window === 'undefined' // server-side escape sequence ? String(str) .replace(/&/g, '&') .replace(/</g, '<') .replace(/>/g, '>') .replace(/"/g, '"') .replace(/'/g, ''') // client-side escape sequence : String(str) .replace(/&/g, '\u0026') .replace(/</g, '\u003c') .replace(/>/g, '\u003e') .replace(/"/g, '\u0022') .replace(/'/g, '\u0027')
ついに
私は Nuxt.js の vue-meta に初めて触れました。 Nuxt.js について学びたい場合は、Nuxt.js の実践を読んで、Nuxt.js の落とし穴を共有してください。記事内に不明瞭な表現や不適切な表現がありましたら、ご批判・修正をお願いいたします。
上記は私があなたのためにまとめたものです。
関連記事:
Vueの要素を介してアイコンアイコンを使用するVue.set()を使用してデータへの動的な応答を実現する方法画像の動的バインディングとデータリターン画像パスを実装する方法vuevueで静的画像を動的に変更してネットワーク画像をリクエストする方法vueでのプリロードウォッチの使用方法AngularでブラウザプラグインBatarangを使用する方法ペーストボードのコピーを実装する方法JS 関数の使用 JS の数値型 (詳細なチュートリアル)以上がvue-metaを使用してヘッダータグを管理する方法の詳細内容です。詳細については、PHP 中国語 Web サイトの他の関連記事を参照してください。