Angular サーバー側レンダリング方法の概要
今回は、Angular のサーバーサイド レンダリングの方法と、Angular のサーバーサイド レンダリングの注意点についてまとめました。実際の事例を見てみましょう。
Angular Universal
Angular は、サーバー側レンダリングのためのフロントエンドとバックエンドの同型ソリューションを提供します。これは、サーバー側で Angular アプリケーションを実行するテクノロジーです。
標準の Angular アプリケーションがブラウザーで実行され、ユーザーの操作に応じて DOM でページをレンダリングします。
Angular Universal は、サーバー側レンダリング (SSR) と呼ばれるプロセスを通じて、サーバー上に静的なアプリケーション ページを生成します。
これらのページを生成し、ブラウザーからの要求に応じて直接応答できます。 ページを HTML ファイルに事前生成し、それをサーバーの静的ファイルとして提供することもできます。
仕組み
ユニバーサル アプリケーションを作成するには、platform-server パッケージをインストールする必要があります。 platform-server パッケージは、サーバー側の DOM 実装、XMLHttpRequest、およびその他の低レベル機能を提供しますが、ブラウザーには依存しなくなりました。 platform-server 包。 platform-server 包提供了服务端的 DOM 实现、XMLHttpRequest 和其它底层特性,但不再依赖浏览器。
你要使用 platform-server 模块而不是 platform-browser 模块来编译这个客户端应用,并且在一个 Web 服务器上运行这个 Universal 应用。
服务器(下面的示例中使用的是 Node Express 服务器)会把客户端对应用页面的请求传给 renderModuleFactory 函数。
renderModuleFactory 函数接受一个模板 HTML 页面(通常是 index.html)、一个包含组件的 Angular 模块和一个用于决定该显示哪些组件的路由作为输入。
该路由从客户端的请求中传给服务器。 每次请求都会给出所请求路由的一个适当的视图。
renderModuleFactory 在模板中的 <app>
platform-browser モジュールの代わりに platform-server モジュールを使用する必要があります。 サーバー (以下の例では Node Express サーバーが使用されています) は、アプリケーション ページに対するクライアントのリクエストを renderModuleFactory 関数に渡します。 renderModuleFactory 関数は、テンプレート HTML ページ (通常はindex.html)、コンポーネントを含む Angular モジュール、およびどのコンポーネントを表示するかを決定するルートを入力として受け入れます。
このルートはクライアントのリクエストからサーバーに渡されます。 各リクエストは、リクエストされたルートの適切なビューを提供します。 renderModuleFactory は、テンプレートの<app> タグ内のビューをレンダリングし、クライアント用の完成した HTML ページを作成します。 - 最後に、サーバーはレンダリングされたページをクライアントに返します。 なぜサーバーサイドレンダリングをするのか
- 3つの主な理由:
- ウェブクローラー(SEO)に役立つ
携帯電話や低電力デバイスでのパフォーマンスを向上させる
最初のページを素早く表示するWeb クローラー (SEO) を支援します
Google、Bing、Baidu、Facebook、Twitter およびその他の検索エンジンまたはソーシャル メディア サイトは、Web クローラーに依存して、アプリのコンテンツにインデックスを付け、そのコンテンツをインターネット検索で見つけられるようにします。
これらの Web クローラーは、人間のように高度にインタラクティブな Angular アプリに移動してインデックスを作成できない場合があります。 Angular Universal は、JavaScript を必要とせずに検索、リンク、参照が可能なアプリケーションの静的バージョンを生成できます。また、各 URL が完全にレンダリングされたページを返すため、サイトをプレビューすることもできます。Web クローラーを有効にすることは、検索エンジン最適化 (SEO) と呼ばれることがよくあります。
携帯電話および低電力デバイスのパフォーマンスの向上
一部のデバイスは JavaScript をサポートしていないか、JavaScript の実装が不十分であり、その結果、許容できないユーザー エクスペリエンスが生じています。 このような場合、サーバーでレンダリングされ、JavaScript を使用しないバージョンのアプリが必要になる場合があります。 いくつかの制限はありますが、アプリをまったく使用する方法がない場合は、このバージョンが唯一の選択肢になる可能性があります。 🎜ホームページを素早く表示する🎜🎜🎜 ユーザーを引き付けるには、ホームページを素早く表示することが重要です。 🎜🎜ページの読み込みに 3 秒以上かかると、モバイル Web サイトの 53% が放棄されます。 ユーザーが何か別のことをする前にユーザーの注意を引くために、アプリはより速く起動する必要があります。 🎜🎜Angular Universal を使用すると、アプリケーション全体と同じように見えるアプリケーションの「ランディング ページ」を生成できます。 これらのランディング ページは純粋な HTML であり、JavaScript が無効になっていても表示されます。 これらのページはブラウザ イベントを処理しませんが、routerLink を使用してサイト内を移動できます。 🎜実際には、ユーザーの注意を引き続けるために、ランディング ページの静的バージョンを使用することもできます。 同時に、舞台裏で完全な Angular アプリケーションをロードすることになります。 ユーザーは、ランディング ページがほぼ即座に表示されることを期待し、完全なアプリがロードされると、完全にインタラクティブなエクスペリエンスが得られることになります。
サンプル分析
以下は、GitHub にある私のサンプルプロジェクト angular-universal-starter に基づいて説明します。
このプロジェクトは、最初の記事のサンプル プロジェクトと同様、Angular CLI に基づいて開発およびビルドされているため、それらの唯一の違いはサーバー側のレンダリングに必要な構成です。
インストール ツール
開始する前に、次のパッケージをインストールする必要があります (サンプル プロジェクトは設定済みです。npm install だけです): npm install 即可):
@angular/platform-server- Universal 的服务端元件。@nguniversal/module-map-ngfactory-loader- 用于处理服务端渲染环境下的惰性加载。@nguniversal/express-engine- Universal 应用的 Express 引擎。ts-loader- 用于对服务端应用进行转译。express- Node Express 服务器
使用下列命令安装它们:
npm install --save @angular/platform-server @nguniversal/module-map-ngfactory-loader ts-loader @nguniversal/express-engine express
项目配置
配置工作有:
创建服务端应用模块:src/app/app.server.module.ts
修改客户端应用模块:src/app/app.module.ts
创建服务端应用的引导程序文件:src/main.server.ts
修改客户端应用的引导程序文件:src/main.ts
创建 TypeScript 的服务端配置:src/tsconfig.server.json
修改 @angular/cli 的配置文件:.angular-cli.json
创建 Node Express 的服务程序:server.ts
创建服务端预渲染的程序:prerender.ts
创建 Webpack 的服务端配置:webpack.server.config.js
1、创建服务端应用模块:src/app/app.server.module.ts
import { NgModule } from '@angular/core';
import { ServerModule, ServerTransferStateModule } from '@angular/platform-server';
import { ModuleMapLoaderModule } from '@nguniversal/module-map-ngfactory-loader';
import { AppBrowserModule } from './app.module';
import { AppComponent } from './app.component';
// 可以注册那些在 Universal 环境下运行应用时特有的服务提供商
@NgModule({
  imports: [
    AppBrowserModule, // 客户端应用的 AppModule
    ServerModule, // 服务端的 Angular 模块
    ModuleMapLoaderModule, // 用于实现服务端的路由的惰性加载
    ServerTransferStateModule, // 在服务端导入,用于实现将状态从服务器传输到客户端
  ],
  bootstrap: [AppComponent],
})
export class AppServerModule {
}服务端应用模块(习惯上叫作 AppServerModule)是一个 Angular 模块,它包装了应用的根模块 AppModule,以便 Universal 可以在你的应用和服务器之间进行协调。 AppServerModule 还会告诉 Angular 再把你的应用以 Universal 方式运行时,该如何引导它。
2、修改客户端应用模块:src/app/app.module.ts
@NgModule({
  imports: [
    AppRoutingModule,
    BrowserModule.withServerTransition({appId: 'my-app'}),
    TransferHttpCacheModule, // 用于实现服务器到客户端的请求传输缓存,防止客户端重复请求服务端已完成的请求
    BrowserTransferStateModule, // 在客户端导入,用于实现将状态从服务器传输到客户端
    HttpClientModule
  ],
  declarations: [
    AppComponent,
    HomeComponent
  ],
  providers: [],
  bootstrap: [AppComponent]
})
export class AppBrowserModule {
  constructor(@Inject(PLATFORM_ID) private platformId: Object,
        @Inject(APP_ID) private appId: string) {

    // 判断运行环境为客户端还是服务端
    const platform = isPlatformBrowser(platformId) ? 'in the browser' : 'on the server';
    console.log(`Running ${platform} with appId=${appId}`);
  }
}将 NgModule 的元数据中 BrowserModule 的导入改成 BrowserModule.withServerTransition({appId: 'my-app'}),Angular 会把 appId 值(它可以是任何字符串)添加到服务端渲染页面的样式名中,以便它们在客户端应用启动时可以被找到并移除。
此时,我们可以通过依赖注入(@Inject(PLATFORM_ID) 及 @Inject(APP_ID))取得关于当前平台和 appId 的运行时信息:
constructor(@Inject(PLATFORM_ID) private platformId: Object,
      @Inject(APP_ID) private appId: string) {

  // 判断运行环境为客户端还是服务端
  const platform = isPlatformBrowser(platformId) ? 'in the browser' : 'on the server';
  console.log(`Running ${platform} with appId=${appId}`);
}3、创建服务端应用的引导程序文件:src/main.server.ts
该文件导出服务端模块:
export { AppServerModule } from './app/app.server.module';4、修改客户端应用的引导程序文件:src/main.ts
监听 DOMContentLoaded 事件,在发生 DOMContentLoaded 事件时运行我们的代码,以使 TransferState 正常工作
import { enableProdMode } from '@angular/core';
import { platformBrowserDynamic } from '@angular/platform-browser-dynamic';
import { AppBrowserModule } from './app/app.module';
import { environment } from './environments/environment';
if (environment.production) {
  enableProdMode();
}
// 在 DOMContentLoaded 时运行我们的代码,以使 TransferState 正常工作
document.addEventListener('DOMContentLoaded', () => {
  platformBrowserDynamic().bootstrapModule(AppBrowserModule);
});5、创建 TypeScript 的服务端配置:src/tsconfig.server.json
{
 "extends": "../tsconfig.json",
 "compilerOptions": {
  "outDir": "../out-tsc/app",
  "baseUrl": "./",
  "module": "commonjs",
  "types": [
   "node"
  ]
 },
 "exclude": [
  "test.ts",
  "**/*.spec.ts"
 ],
 "angularCompilerOptions": {
  "entryModule": "app/app.server.module#AppServerModule"
 }
}与 tsconfig.app.json 的差异在于:
module 属性必须是 commonjs,这样它才能被 require() 方法导入你的服务端应用。
angularCompilerOptions 部分有一些面向 AOT 编译器的选项:
entryModule - 服务端应用的根模块,其格式为 path/to/file#ClassName。
6、修改 @angular/cli 的配置文件:.angular-cli.json
在 apps
-
@angular/platform-server- Universal のサーバー コンポーネント。 🎜 - 🎜
@nguniversal/module-map-ngfactory-loader- サーバー側のレンダリング環境で遅延読み込みを処理するために使用されます。 🎜 - 🎜
@nguniversal/express-engine- ユニバーサル アプリケーション用の Express エンジン。 🎜 - 🎜
ts-loader- サーバー側アプリケーションの変換に使用されます。 🎜 - 🎜
express- Node Express サーバー 🎜
{
  "platform": "server",
  "root": "src",
  "outDir": "dist/server",
  "assets": [
   "assets",
   "favicon.ico"
  ],
  "index": "index.html",
  "main": "main.server.ts",
  "test": "test.ts",
  "tsconfig": "tsconfig.server.json",
  "testTsconfig": "tsconfig.spec.json",
  "prefix": "",
  "styles": [
   "styles.scss"
  ],
  "scripts": [],
  "environmentSource": "environments/environment.ts",
  "environments": {
   "dev": "environments/environment.ts",
   "prod": "environments/environment.prod.ts"
  }
}src/app/app.server.module.ts 🎜 import 'zone.js/dist/zone-node';
import 'reflect-metadata';
import { enableProdMode } from '@angular/core';
import * as express from 'express';
import { join } from 'path';
import { readFileSync } from 'fs';
// Faster server renders w/ Prod mode (dev mode never needed)
enableProdMode();
// Express server
const app = express();
const PORT = process.env.PORT || 4000;
const DIST_FOLDER = join(process.cwd(), 'dist');
// Our index.html we'll use as our template
const template = readFileSync(join(DIST_FOLDER, 'browser', 'index.html')).toString();
// * NOTE :: leave this as require() since this file is built Dynamically from webpack
const {AppServerModuleNgFactory, LAZY_MODULE_MAP} = require('./dist/server/main.bundle');
// Express Engine
import { ngExpressEngine } from '@nguniversal/express-engine';
// Import module map for lazy loading
import { provideModuleMap } from '@nguniversal/module-map-ngfactory-loader';
// Our Universal express-engine (found @ https://github.com/angular/universal/tree/master/modules/express-engine)
app.engine('html', ngExpressEngine({
bootstrap: AppServerModuleNgFactory,
providers: [
provideModuleMap(LAZY_MODULE_MAP)
]
}));
app.set('view engine', 'html');
app.set('views', join(DIST_FOLDER, 'browser'));
/* - Example Express Rest API endpoints -
app.get('/api/**', (req, res) => { });
*/
// Server static files from /browser
app.get('*.*', express.static(join(DIST_FOLDER, 'browser'), {
maxAge: '1y'
}));
// ALl regular routes use the Universal engine
app.get('*', (req, res) => {
res.render('index', {req});
});
// Start up the Node server
app.listen(PORT, () => {
console.log(`Node Express server listening on http://localhost:${PORT}`);
});src/app/app.module.ts🎜// Load zone.js for the server.
import 'zone.js/dist/zone-node';
import 'reflect-metadata';
import { readFileSync, writeFileSync, existsSync, mkdirSync } from 'fs';
import { join } from 'path';
import { enableProdMode } from '@angular/core';
// Faster server renders w/ Prod mode (dev mode never needed)
enableProdMode();
// Import module map for lazy loading
import { provideModuleMap } from '@nguniversal/module-map-ngfactory-loader';
import { renderModuleFactory } from '@angular/platform-server';
import { ROUTES } from './static.paths';
// * NOTE :: leave this as require() since this file is built Dynamically from webpack
const {AppServerModuleNgFactory, LAZY_MODULE_MAP} = require('./dist/server/main.bundle');
const BROWSER_FOLDER = join(process.cwd(), 'browser');
// Load the index.html file containing referances to your application bundle.
const index = readFileSync(join('browser', 'index.html'), 'utf8');
let previousRender = Promise.resolve();
// Iterate each route path
ROUTES.forEach(route => {
const fullPath = join(BROWSER_FOLDER, route);
// Make sure the directory structure is there
if (!existsSync(fullPath)) {
mkdirSync(fullPath);
}
// Writes rendered HTML to index.html, replacing the file if it already exists.
previousRender = previousRender.then(_ => renderModuleFactory(AppServerModuleNgFactory, {
document: index,
url: route,
extraProviders: [
provideModuleMap(LAZY_MODULE_MAP)
]
})).then(html => writeFileSync(join(fullPath, 'index.html'), html));
});NgModule のメタデータ内の BrowserModule のインポートを BrowserModule.withServerTransition に変更します。 ({appId: 'my-app'})、Angular は、クライアント アプリケーションの起動時に検索して削除できるように、サーバーでレンダリングされたページのスタイル名に appId 値 (任意の文字列を指定できます) を追加します。 🎜🎜この時点で、依存関係注入 (@Inject(PLATFORM_ID) および @Inject(APP_ID)) を通じて、現在のプラットフォームと appId に関する実行時情報を取得できます。 🎜3. サーバー アプリケーションのブートストラップ ファイルを作成します: src/main.server.ts🎜🎜このファイルはサーバー モジュールをエクスポートします: 🎜// Work around for https://github.com/angular/angular-cli/issues/7200
const path = require('path');
const webpack = require('webpack');
module.exports = {
entry: {
server: './server.ts', // This is our Express server for Dynamic universal
prerender: './prerender.ts' // This is an example of Static prerendering (generative)
},
target: 'node',
resolve: {extensions: ['.ts', '.js']},
externals: [/(node_modules|main\..*\.js)/,], // Make sure we include all node_modules etc
output: {
path: path.join(__dirname, 'dist'), // Puts the output at the root of the dist folder
filename: '[name].js'
},
module: {
rules: [
{test: /\.ts$/, loader: 'ts-loader'}
]
},
plugins: [
new webpack.ContextReplacementPlugin(
/(.+)?angular(\|\/)core(.+)?/, // fixes WARNING Critical dependency: the request of a dependency is an expression
path.join(__dirname, 'src'), // location of your src
{} // a map of your routes
),
new webpack.ContextReplacementPlugin(
/(.+)?express(\|\/)(.+)?/, // fixes WARNING Critical dependency: the request of a dependency is an expression
path.join(__dirname, 'src'),
{}
)
]
};{
"scripts": {
"ng": "ng",
"start": "ng serve -o",
"ssr": "npm run build:ssr && npm run serve:ssr",
"prerender": "npm run build:prerender && npm run serve:prerender",
"build": "ng build",
"build:client-and-server-bundles": "ng build --prod && ng build --prod --app 1 --output-hashing=false",
"build:prerender": "npm run build:client-and-server-bundles && npm run webpack:server && npm run generate:prerender",
"build:ssr": "npm run build:client-and-server-bundles && npm run webpack:server",
"generate:prerender": "cd dist && node prerender",
"webpack:server": "webpack --config webpack.server.config.js --progress --colors",
"serve:prerender": "cd dist/browser && http-server",
"serve:ssr": "node dist/server"
}
}src/tsconfig .server.json🎜export const ROUTES = [ '/', '/lazy' ];
tsconfig.app.json の違いは次のとおりです。 🎜🎜module 属性は、require( によってサーバー アプリケーションにインポートできるように commonjs である必要があります) ) 方法 。 🎜🎜angularCompilerOptions セクションには、AOT コンパイラーのオプションがいくつかあります: 🎜- 🎜entryModule - サーバー アプリケーションのルート モジュール (形式は path/to/file#ClassName) 。 🎜
.angular-cli.json🎜🎜 apps の下に追加します: 🎜{
"platform": "server",
"root": "src",
"outDir": "dist/server",
"assets": [
"assets",
"favicon.ico"
],
"index": "index.html",
"main": "main.server.ts",
"test": "test.ts",
"tsconfig": "tsconfig.server.json",
"testTsconfig": "tsconfig.spec.json",
"prefix": "",
"styles": [
"styles.scss"
],
"scripts": [],
"environmentSource": "environments/environment.ts",
"environments": {
"dev": "environments/environment.ts",
"prod": "environments/environment.prod.ts"
}
}7、创建 Node Express 的服务程序:server.ts
import 'zone.js/dist/zone-node';
import 'reflect-metadata';
import { enableProdMode } from '@angular/core';
import * as express from 'express';
import { join } from 'path';
import { readFileSync } from 'fs';
// Faster server renders w/ Prod mode (dev mode never needed)
enableProdMode();
// Express server
const app = express();
const PORT = process.env.PORT || 4000;
const DIST_FOLDER = join(process.cwd(), 'dist');
// Our index.html we'll use as our template
const template = readFileSync(join(DIST_FOLDER, 'browser', 'index.html')).toString();
// * NOTE :: leave this as require() since this file is built Dynamically from webpack
const {AppServerModuleNgFactory, LAZY_MODULE_MAP} = require('./dist/server/main.bundle');
// Express Engine
import { ngExpressEngine } from '@nguniversal/express-engine';
// Import module map for lazy loading
import { provideModuleMap } from '@nguniversal/module-map-ngfactory-loader';
// Our Universal express-engine (found @ https://github.com/angular/universal/tree/master/modules/express-engine)
app.engine('html', ngExpressEngine({
  bootstrap: AppServerModuleNgFactory,
  providers: [
    provideModuleMap(LAZY_MODULE_MAP)
  ]
}));
app.set('view engine', 'html');
app.set('views', join(DIST_FOLDER, 'browser'));
/* - Example Express Rest API endpoints -
 app.get('/api/**', (req, res) => { });
*/
// Server static files from /browser
app.get('*.*', express.static(join(DIST_FOLDER, 'browser'), {
  maxAge: '1y'
}));
// ALl regular routes use the Universal engine
app.get('*', (req, res) => {
  res.render('index', {req});
});
// Start up the Node server
app.listen(PORT, () => {
  console.log(`Node Express server listening on http://localhost:${PORT}`);
});8、创建服务端预渲染的程序:prerender.ts
// Load zone.js for the server.
import 'zone.js/dist/zone-node';
import 'reflect-metadata';
import { readFileSync, writeFileSync, existsSync, mkdirSync } from 'fs';
import { join } from 'path';
import { enableProdMode } from '@angular/core';
// Faster server renders w/ Prod mode (dev mode never needed)
enableProdMode();
// Import module map for lazy loading
import { provideModuleMap } from '@nguniversal/module-map-ngfactory-loader';
import { renderModuleFactory } from '@angular/platform-server';
import { ROUTES } from './static.paths';
// * NOTE :: leave this as require() since this file is built Dynamically from webpack
const {AppServerModuleNgFactory, LAZY_MODULE_MAP} = require('./dist/server/main.bundle');
const BROWSER_FOLDER = join(process.cwd(), 'browser');
// Load the index.html file containing referances to your application bundle.
const index = readFileSync(join('browser', 'index.html'), 'utf8');
let previousRender = Promise.resolve();
// Iterate each route path
ROUTES.forEach(route => {
  const fullPath = join(BROWSER_FOLDER, route);
  // Make sure the directory structure is there
  if (!existsSync(fullPath)) {
    mkdirSync(fullPath);
  }
  // Writes rendered HTML to index.html, replacing the file if it already exists.
  previousRender = previousRender.then(_ => renderModuleFactory(AppServerModuleNgFactory, {
    document: index,
    url: route,
    extraProviders: [
      provideModuleMap(LAZY_MODULE_MAP)
    ]
  })).then(html => writeFileSync(join(fullPath, 'index.html'), html));
});9、创建 Webpack 的服务端配置:webpack.server.config.js
Universal 应用不需要任何额外的 Webpack 配置,Angular CLI 会帮我们处理它们。但是由于本例子的 Node Express 的服务程序是 TypeScript 应用(server.ts及prerender.ts),所以要使用 Webpack 来转译它。这里不讨论 Webpack 的配置,需要了解的移步 Webpack官网
// Work around for https://github.com/angular/angular-cli/issues/7200
const path = require('path');
const webpack = require('webpack');
module.exports = {
entry: {
server: './server.ts', // This is our Express server for Dynamic universal
prerender: './prerender.ts' // This is an example of Static prerendering (generative)
},
target: 'node',
resolve: {extensions: ['.ts', '.js']},
externals: [/(node_modules|main\..*\.js)/,], // Make sure we include all node_modules etc
output: {
path: path.join(__dirname, 'dist'), // Puts the output at the root of the dist folder
filename: '[name].js'
},
module: {
rules: [
{test: /\.ts$/, loader: 'ts-loader'}
]
},
plugins: [
new webpack.ContextReplacementPlugin(
/(.+)?angular(\\|\/)core(.+)?/, // fixes WARNING Critical dependency: the request of a dependency is an expression
path.join(__dirname, 'src'), // location of your src
{} // a map of your routes
),
new webpack.ContextReplacementPlugin(
/(.+)?express(\\|\/)(.+)?/, // fixes WARNING Critical dependency: the request of a dependency is an expression
path.join(__dirname, 'src'),
{}
)
]
};测试配置
通过上面的配置,我们就制作完成一个可在服务端渲染的 Angular Universal 应用。
在 package.json 的 scripts 区配置 build 和 serve 有关的命令:
{
  "scripts": {
    "ng": "ng",
    "start": "ng serve -o",
    "ssr": "npm run build:ssr && npm run serve:ssr",
    "prerender": "npm run build:prerender && npm run serve:prerender",
    "build": "ng build",
    "build:client-and-server-bundles": "ng build --prod && ng build --prod --app 1 --output-hashing=false",
    "build:prerender": "npm run build:client-and-server-bundles && npm run webpack:server && npm run generate:prerender",
    "build:ssr": "npm run build:client-and-server-bundles && npm run webpack:server",
    "generate:prerender": "cd dist && node prerender",
    "webpack:server": "webpack --config webpack.server.config.js --progress --colors",
    "serve:prerender": "cd dist/browser && http-server",
    "serve:ssr": "node dist/server"
  }
}开发只需运行 npm run start执行 npm run ssr 编译应用程序,并启动一个Node Express来为应用程序提供服务 http://localhost:4000
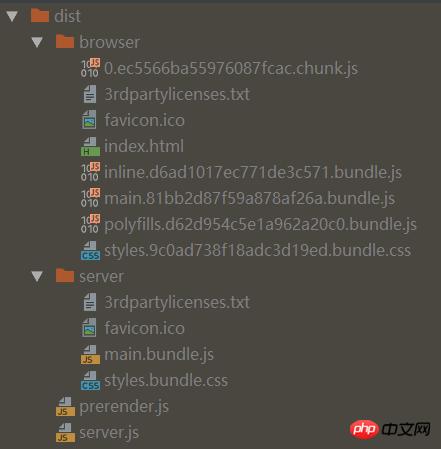
dist目录:

执行npm run prerender - 编译应用程序并预渲染应用程序文件,启动一个演示http服务器,以便您可以查看它 http://localhost:8080
注意: 要将静态网站部署到静态托管平台,您必须部署dist/browser文件夹, 而不是dist文件夹
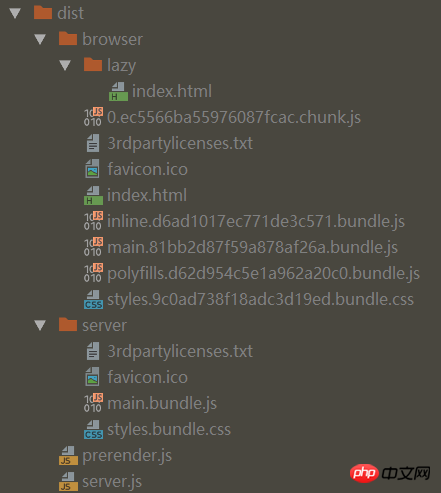
dist目录:

根据项目实际的路由信息并在根目录的 static.paths.ts 中配置,提供给 prerender.ts 解析使用。
export const ROUTES = [
  '/',
  '/lazy'
];
因此,从dist目录可以看到,服务端预渲染会根据配置好的路由在 browser 生成对应的静态index.html。如 / 对应 /index.html,/lazy 对应 /lazy/index.html。
服务器到客户端的状态传输
在前面的介绍中,我们在 app.server.module.ts 中导入了 ServerTransferStateModule,在 app.module.ts 中导入了 BrowserTransferStateModule 和 TransferHttpCacheModule。
这三个模块都与服务器到客户端的状态传输有关:
ServerTransferStateModule:在服务端导入,用于实现将状态从服务器传输到客户端BrowserTransferStateModule:在客户端导入,用于实现将状态从服务器传输到客户端TransferHttpCacheModule:用于实现服务器到客户端的请求传输缓存,防止客户端重复请求服务端已完成的请求
使用这几个模块,可以解决 http请求在服务端和客户端分别请求一次 的问题。
比如在 home.component.ts 中有如下代码:
import { Component, OnDestroy, OnInit } from '@angular/core';
import { HttpClient } from '@angular/common/http';
import { Observable } from 'rxjs/Observable';
@Component({
  selector: 'app-home',
  templateUrl: './home.component.html',
  styleUrls: ['./home.component.scss']
})
export class HomeComponent implements OnInit, OnDestroy {
  constructor(public http: HttpClient) {
  }

  ngOnInit() {
    this.poiSearch(this.keyword, '北京市').subscribe((data: any) => {
      console.log(data);
    });
  }

  ngOnDestroy() {
  }

  poiSearch(text: string, city?: string): Observable<any> {
    return this.http.get(encodeURI(`http://restapi.amap.com/v3/place/text?keywords=${text}&city=${city}&offset=20&key=55f909211b9950837fba2c71d0488db9&extensions=all`));
  }
}代码运行之后,
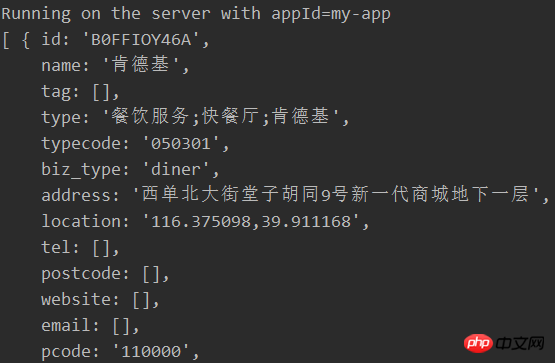
服务端请求并打印:

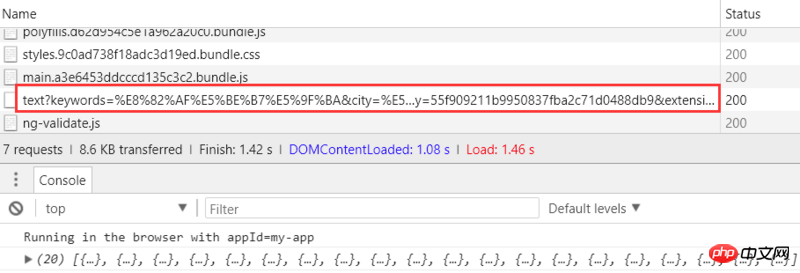
客户端再一次请求并打印:

方法1:使用 TransferHttpCacheModule
使用 TransferHttpCacheModule 很简单,代码不需要改动。在 app.module.ts 中导入之后,Angular自动会将服务端请求缓存到客户端,换句话说就是服务端请求到数据会自动传输到客户端,客户端接收到数据之后就不会再发送请求了。
方法2:使用 BrowserTransferStateModule
该方法稍微复杂一些,需要改动一些代码。
调整 home.component.ts 代码如下:
import { Component, OnDestroy, OnInit } from '@angular/core';
import { makeStateKey, TransferState } from '@angular/platform-browser';
import { HttpClient } from '@angular/common/http';
import { Observable } from 'rxjs/Observable';
const KFCLIST_KEY = makeStateKey('kfcList');
@Component({
  selector: 'app-home',
  templateUrl: './home.component.html',
  styleUrls: ['./home.component.scss']
})
export class HomeComponent implements OnInit, OnDestroy {
  constructor(public http: HttpClient,
        private state: TransferState) {
  }

  ngOnInit() {

    // 采用一个标记来区分服务端是否已经拿到了数据,如果没拿到数据就在客户端请求,如果已经拿到数据就不发请求
    const kfcList:any[] = this.state.get(KFCLIST_KEY, null as any);
    if (!this.kfcList) {
      this.poiSearch(this.keyword, '北京市').subscribe((data: any) => {
        console.log(data);
        this.state.set(KFCLIST_KEY, data as any); // 存储数据
      });
    }
  }

  ngOnDestroy() {
    if (typeof window === 'object') {
      this.state.set(KFCLIST_KEY, null as any); // 删除数据
    }
  }
  poiSearch(text: string, city?: string): Observable<any> {
    return this.http.get(encodeURI(`http://restapi.amap.com/v3/place/text?keywords=${text}&city=${city}&offset=20&key=55f909211b9950837fba2c71d0488db9&extensions=all`));
  }
}使用
const KFCLIST_KEY = makeStateKey('kfcList')创建储存传输数据的 StateKeyHomeComponentのコンストラクターにTransferStateを挿入しますHomeComponent的构造函数中注入TransferState在
ngOnInit中根据this.state.get(KFCLIST_KEY, null as any)判断数据是否存在(不管是服务端还是客户端),存在就不再请求,不存在则请求数据并通过this.state.set(KFCLIST_KEY, data as any)存储传输数据在
ngOnDestroy
this.state.get(KFCLIST_KEY , null as any) データが存在するかどうか (サーバーかクライアントか) を判断します。存在する場合は要求しません。存在しない場合は、データを要求し、 を渡します。 this.state.set(KFCLIST_KEY, data as any ) 送信データを保存
ngOnDestroy では、現在クライアントであるかどうかで保存データを削除するかどうかを決定します
この記事の事例を読んだ後、あなたはその方法をマスターしたと思います。よりエキサイティングな内容については、php 中国語 Web サイトの他の関連記事にご注意ください。
以上がAngular サーバー側レンダリング方法の概要の詳細内容です。詳細については、PHP 中国語 Web サイトの他の関連記事を参照してください。

ホットAIツール

Undresser.AI Undress
リアルなヌード写真を作成する AI 搭載アプリ

AI Clothes Remover
写真から衣服を削除するオンライン AI ツール。

Undress AI Tool
脱衣画像を無料で

Clothoff.io
AI衣類リムーバー

Video Face Swap
完全無料の AI 顔交換ツールを使用して、あらゆるビデオの顔を簡単に交換できます。

人気の記事

ホットツール

メモ帳++7.3.1
使いやすく無料のコードエディター

SublimeText3 中国語版
中国語版、とても使いやすい

ゼンドスタジオ 13.0.1
強力な PHP 統合開発環境

ドリームウィーバー CS6
ビジュアル Web 開発ツール

SublimeText3 Mac版
神レベルのコード編集ソフト(SublimeText3)

ホットトピック
 7715
7715
 15
15
 1641
1641
 14
14
 1395
1395
 52
52
 1289
1289
 25
25
 1232
1232
 29
29
 Angular のメタデータとデコレータについて話しましょう
Feb 28, 2022 am 11:10 AM
この記事では、Angular の学習を継続し、Angular のメタデータとデコレータを理解し、それらの使用法を簡単に理解します。
 Ubuntu 24.04 に Angular をインストールする方法
Mar 23, 2024 pm 12:20 PM
Angular.js は、動的アプリケーションを作成するための無料でアクセスできる JavaScript プラットフォームです。 HTML の構文をテンプレート言語として拡張することで、アプリケーションのさまざまな側面を迅速かつ明確に表現できます。 Angular.js は、コードの作成、更新、テストに役立つさまざまなツールを提供します。さらに、ルーティングやフォーム管理などの多くの機能も提供します。このガイドでは、Ubuntu24 に Angular をインストールする方法について説明します。まず、Node.js をインストールする必要があります。 Node.js は、ChromeV8 エンジンに基づく JavaScript 実行環境で、サーバー側で JavaScript コードを実行できます。ウブにいるために
 Angular Learning State Manager NgRx の詳細な説明
May 25, 2022 am 11:01 AM
この記事では、Angular のステートマネージャー NgRx について深く理解し、NgRx の使用方法を紹介します。
 フロントエンド開発に PHP と Angular を使用する方法
May 11, 2023 pm 04:04 PM
インターネットの急速な発展に伴い、フロントエンド開発テクノロジーも常に改善され、反復されています。 PHP と Angular は、フロントエンド開発で広く使用されている 2 つのテクノロジーです。 PHP は、フォームの処理、動的ページの生成、アクセス許可の管理などのタスクを処理できるサーバー側スクリプト言語です。 Angular は、単一ページ アプリケーションの開発やコンポーネント化された Web アプリケーションの構築に使用できる JavaScript フレームワークです。この記事では、PHPとAngularをフロントエンド開発に使用する方法と、それらを組み合わせる方法を紹介します。
 Angular のサーバーサイド レンダリング (SSR) について説明する記事
Dec 27, 2022 pm 07:24 PM
Angular Universal をご存知ですか?これは、Web サイトがより優れた SEO サポートを提供するのに役立ちます。
 Angular + NG-ZORRO でバックエンド システムを迅速に開発
Apr 21, 2022 am 10:45 AM
この記事では、Angular の実践的な経験を共有し、angualr と ng-zorro を組み合わせてバックエンド システムを迅速に開発する方法を学びます。
 Angular で Monaco エディターを使用する方法の簡単な分析
Oct 17, 2022 pm 08:04 PM
Angularでモナコエディタを使用するにはどうすればよいですか?以下の記事は、最近業務で使用したangularでのmonaco-editorの使い方を記録したものですので、皆様のお役に立てれば幸いです。
 Angular の独立したコンポーネントの簡単な分析とその使用方法を説明します。
Jun 23, 2022 pm 03:49 PM
この記事では、Angular の独立コンポーネント、Angular で独立コンポーネントを作成する方法、および既存のモジュールを独立コンポーネントにインポートする方法について説明します。


