

この記事は主に、キャンバスに画像モザイクを実装するためのサンプルコードに関する関連情報を紹介します。内容は非常に優れているので、参考として共有します。
1. ネイティブキャンバス実装に使用するAPI
1) getContext(contextID) ---キャンバス上に描画するための環境を返します
Canvas.getContext('2d') // 返回一个 CanvasRenderingContext2D 对象,使用它可以绘制到 Canvas 元素中
2)drawImage
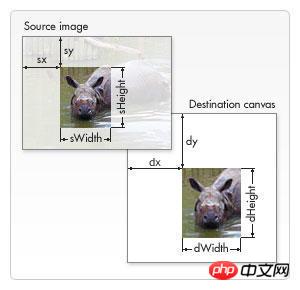
drawImage(imgObj, x, y)  // 按原图大小绘制, x、y为图片在画布中的位置坐标
drawImage(imgObj, x, y, width, height) // 按指定宽高绘制
drawImage(imgObj, sourceX, sourceY, sourceWidth, sourceHeight, destX, destY, destWidth, destHeight) // 从原来图片上某一个位置开始(sourceX,sourceY),指定长宽进行剪切(sourceWidth,sourceHeight),然后将剪切的内容放到位置为(destX,destY),宽度为(destWidth),高度为(destHeight)的位置上
3) getImageData( x, y , width, height) --- 長方形領域の画像情報を取得します
ctx.getImageData(0, 0, 10, 10) // 获取左上角坐标为(0, 0),宽高为区域内的图像信息
// 返回ImageData: { width: 10, height: 10, data: Uint8ClampedArray[400] }4) beginPath() --- パスを開始する、または現在のパスをリセットします 5) rect(x, y, width, height) -- -長方形を描画します
6) lineWidth ---現在の線の幅を設定または返します
7) fillStyle ---描画を塗りつぶすために使用される色、グラデーション、またはモードを設定または返します
ctx.fillStyle = color|gradient|pattern
8) ストロークスタイル - -- ストロークに使用される色、グラデーション、またはパターンを設定または返します
9) globalAlpha --- 描画の現在の透明度の値を設定または返します
10) fill() --- 現在の画像 (パス) を塗りつぶします。デフォルトの色は黒です
【注意】パスが閉じていない場合、fill()メソッドはパスの終点から始点まで線を追加してパスを閉じてからパスを塗りつぶします。
11) ストローク() --- 実際には、moveTo() メソッドと lineTo() メソッドで定義されたパスを描画します。デフォルトの色は黒です
12) toDataURL(type, encoderOptions) ---画像をエクスポートします。type は画像の種類、encoderOptions の画質、[0, 1]
Canvas.toDataURL("image/png", 1)2 を簡略化します。 Canvas 書き込みライブラリ、Canvas に不足しているオブジェクト モデルを提供します
fabric.js でできること
1) Canvas 上にグラフィックスを作成して塗りつぶします (画像、テキスト、通常のグラフィックス、およびグラフィックスを形成するための複雑なパスを含む)
2)グラフィックをグラデーションカラーで塗りつぶします 3) グラフィックを結合します (組み合わせグラフィック、グラフィックテキスト、写真などを含む) 4) グラフィックアニメーションを設定し、ユーザーインタラクションを設定します 5) JSON、SVG データなどを生成します 3実装に使用するfabric.js APIを使用します1) Canvasを宣言しますlet canvas =new fabric.Canvas('canvas') {
width: 200,
height: 200
}let imgInstance = new fabric.Image(imgElement,{
left: 0,
top: 0,
width: 100,
height: 100,
angle: 0
}canvas.setBackgroundImage(imgInstance)
canvas.on('mouse:down', function(options) {
   console.log(options.e.clientX, options.e.clientY)
})

// 监听事件
/*
   mouse:down :鼠标按下时
   mouse:move :鼠标移动时
   mouse:up :鼠标抬起时
   after:render :画布重绘后
   object:selected:对象被选中
   object:moving:对象移动
   object:rotating:对象被旋转
   object:added:对象被加入
   object:removed对象被移除
*/let rect = new fabric.Rect({
left: 0,
top: 0,
width: 100,
height: 100
})canvas.add(rect)
4. ネイティブキャンバスの実装コード
<template>
<p class="container">
<p class="operations">
<ul>
<li @click="mosaic">马赛克</li>
<li @click="addText">添加文字</li>
<li @click="tailor">裁剪</li>
<li @click="rotate">旋转</li>
<li @click="exportImg">导出图片</li>
</ul>
</p>
<canvas ref="imgContent" class="img-wrap">
你的浏览器太low
</canvas>
</div>
</template>
<script>
export default {
data () {
return {
context: '',
canvas: '',
isMasic: false,
isText: false,
isTailor: false,
isTranslate: false,
squareEdgeLength: 20,
angle: 0,
img: ''
}
},
mounted () {
this.initData()
},
methods: {
initData () {
let imgContent = this.$refs.imgContent
this.canvas = imgContent
this.context = imgContent.getContext('2d')
let Img = new Image()
this.image = Img
Img.crossOrigin = "Anonymous"
Img.src = 'http://oia85104s.bkt.clouddn.com/PictureUnlock_193139.pictureunlock.jpg'
this.canvas.setAttribute('width', Img.width)
this.canvas.setAttribute('height', Img.height)
let self = this
Img.onload = () => {
let beginX, beginY, endX, endY
self.context.drawImage(Img, 0, 0)
self.context.save()
self.canvas.addEventListener('mousedown', e => {
beginX = e.offsetX
beginY = e.offsetY
self.canvas.addEventListener('mouseup', e => {
endX = e.offsetX
endY = e.offsetY
if (self.isMasic) {
self.makeGrid(beginX, beginY, endX - beginX, endY - beginY)
return
}
if (self.isTailor) {
self.context.drawImage(Img, beginX, beginY, endX - beginX, endY - beginY, 0, 0, endX - beginX, endY - beginY)
return
}
})
})
}
},
drawRect (x, y, width, height, fillStyle, lineWidth, strokeStyle, globalAlpha) {
this.context.beginPath()
this.context.rect(x, y, width, height)
this.context.lineWidth = lineWidth
this.context.strokeStyle = strokeStyle
fillStyle && (this.context.fillStyle = fillStyle)
globalAlpha && (this.context.globalAlpha = globalAlpha)
this.context.fill()
this.context.stroke()
},
// 打马赛克
mosaic () {
let self = this
this.resetClickStatus()
this.isMasic = true
},
makeGrid (beginX, beginY, rectWidth, rectHight) {
const row = Math.round(rectWidth / this.squareEdgeLength) + 1
const column = Math.round(rectHight / this.squareEdgeLength) + 1
for (let i = 0; i < row * column; i++) {
let x = (i % row) * this.squareEdgeLength + beginX
let y = parseInt(i / row) * this.squareEdgeLength + beginY
this.setColor(x, y)
}
},
setColor (x, y) {
const imgData = this.context.getImageData(x, y, this.squareEdgeLength, this.squareEdgeLength).data
let r = 0, g = 0, b = 0
console.log(this.context.getImageData(x, y, this.squareEdgeLength, this.squareEdgeLength), JSON.stringify(imgData))
for (let i = 0; i < imgData.length; i += 4) {
r += imgData[i]
g += imgData[i + 1]
b += imgData[i + 2]
}
r = Math.round(r / (imgData.length / 4))
g = Math.round(g / (imgData.length / 4))
b = Math.round(b / (imgData.length / 4))
this.drawRect(x, y, this.squareEdgeLength, this.squareEdgeLength, `rgb(${r}, ${g}, ${b})`, 2, `rgb(${r}, ${g}, ${b})`)
},
// 添加文字
addText () {
this.resetClickStatus()
this.isText = true
console.log('添加文字')
},
// 裁剪
tailor () {
this.resetClickStatus()
this.isTailor = true
console.log('裁剪')
} ,
// 旋转
rotate () {
// if (this.angle === 360) {
// this.angle = 90
// } else {
// this.angle += 90
// }
// if ([90, 270].includes(this.angle)) {
// this.canvas.setAttribute('width', this.image.height)
// this.canvas.setAttribute('height', this.image.width)
// } else {
// this.canvas.setAttribute('width', this.image.width)
// this.canvas.setAttribute('height', this.image.height)
// }
const x = this.image.width / 2
const y = this.image.height / 2
this.context.clearRect(0,0, this.canvas.width, this.canvas.height) // 清理画布内容
this.context.translate(x, y)
this.context.rotate(90 * Math.PI / 180)
this.context.translate(-x, -y)
this.context.drawImage(this.image, 0, 0)
},
resetClickStatus () {
this.isMasic = false
this.isText = false
this.isTailor = false
this.isTranslate = false
},
exportImg () {
this.resetClickStatus()
const exportUrl = this.canvas.toDataURL("image/jpeg")
let a = document.createElement('a')
a.setAttribute('download', '')
a.href = exportUrl
document.body.appendChild(a)
a.click()
}
}
}
</script>
<style scoped lang="less">
.operations {
width: 1200px;
margin: 0 auto;
ul {
display: flex;
align-items: center;
margin-bottom: 30px;
li {
list-style: none;
margin-right: 20px;
cursor: pointer;
}
}
}
.img-wrap {
display: block;
margin: 0 auto;
}
</style>以上がキャンバスを使用して画像モザイクを実装する方法の詳細内容です。詳細については、PHP 中国語 Web サイトの他の関連記事を参照してください。


![[Web フロントエンド] Node.js クイック スタート](https://img.php.cn/upload/course/000/000/067/662b5d34ba7c0227.png)


