

iview の ui フレームワークを使用してプレーヤーをカスタマイズする
今回は、iview の ui フレームワークを使用してプレーヤーをカスタマイズする方法について説明します。iview の ui フレームワークを使用してプレーヤーをカスタマイズする場合の注意点は何ですか? ここで実際のケースを見てみましょう。

写真 2 - サイドバーを折りたたむ;
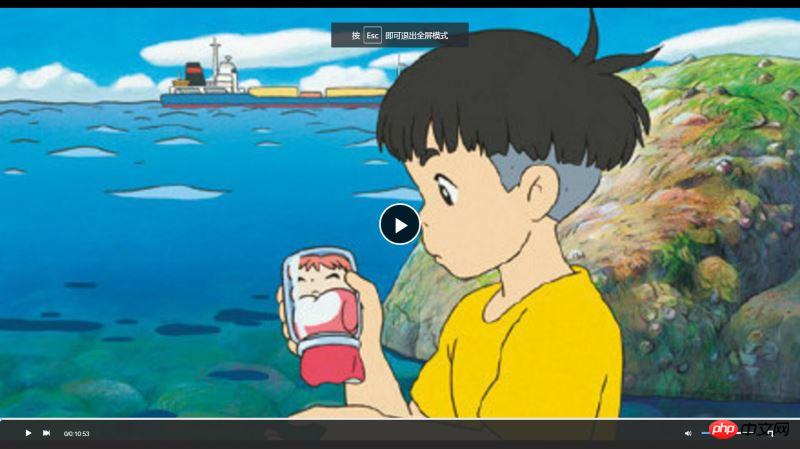
写真 3: 全画面。
前に書きました
このプロジェクトでは、iview の ui フレームワークを使用する必要がありますが、ここでのフォーカスは ui フレームワークに基づいています。 js で開発した vue-video-player の使い方と、video.js での API の操作方法について説明します。 vue-video-player プロジェクトのアドレス: https://github.com/surmon-china/vue-video-player。 video.js ドキュメントのアドレス: http://docs.videojs.com/docs/api/player.html。 プロジェクト ディレクトリ: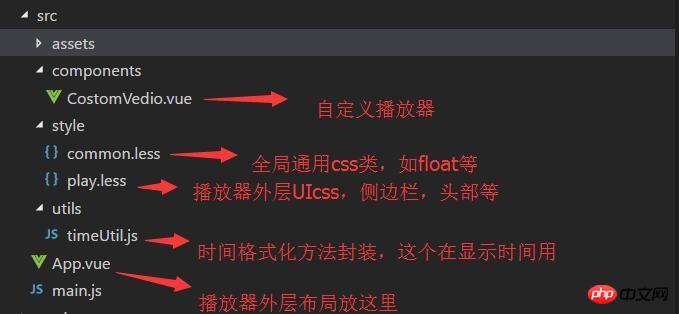
1. 外側の UI レイアウト
図 1 からわかるように、このプロジェクトは 2 列のアダプティブ レイアウトを使用しており、右側は固定されたプレイリストです。幅は 500px です。プレイリスト ボックスはハンドルのクリックに応じて拡大または縮小でき、プレイリスト ボックスもプレイリストの拡大/縮小に応じて幅を調整します。 (録画したアニメーションはアップロードするには大きすぎるため、私のプログラムを複製して実行して見ることができます)。 HTML コードの構造は次のとおりです: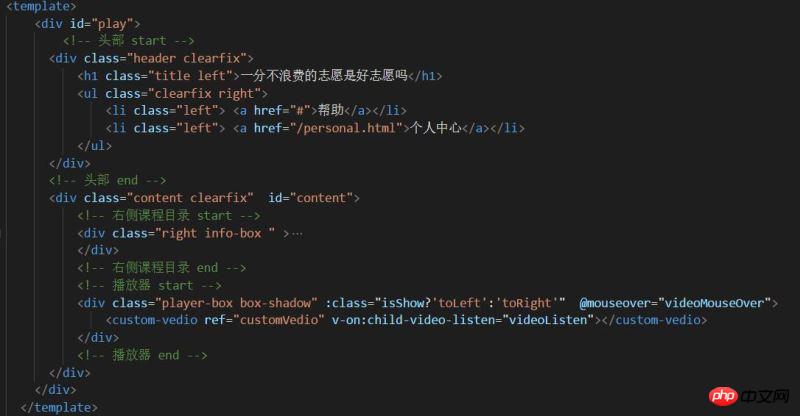
view plain copy
.transition{
       transition: all 1s ease;
       -moz-transition: all 1s ease;
       -webkit-transition: all 1s ease;
       -o-transition: all 1s ease;
   }
view plain copy
.toLeft{
        .transition;
        margin-right: 540px !important;
    }
    .toRight{
        .transition;
        margin-right: 40px !important;
    }
    .toHide{
        .transition;
        right: -500px !important;
    }
    .toShow{
        .transition;
        right: 0px !important;
    }
view plain copy
// 播放区
    .player-box{
        margin-right: 540px;
        height: 100%;
        position: relative;
    }
view plain copy
//侧边信息区
    .info-box{
        width: 520px;
        height: 100%;
        background: transparent;
        position: relative;
        overflow: hidden;
    }
[css] view plain copy
// 内容区
.content{
    background: #292929;
    position: relative;
    padding: 20px 0 20px 20px;

}2 番目に、プレーヤー ui
カスタマイズされたプレーヤー全体。 ui コンポーネント - CostomVedio.vue にカプセル化されています。再生領域は vue-video-player プレーヤーを使用しますが、下部のコントロール バーはカスタマイズされており、プレーヤーに付属の controlBar は使用されません。デザイン兄さんのリクエストなので、プレイヤーのUIをカスタマイズする必要があります。 HTML 構造コードは次のとおりです:view plain copy
<template>
<p class="custom-video-outer-box" @mouseover="videoMouseOver">
<video-player class="video-player-box"
ref="videoPlayer"
:options="playerOptions"
:playsinline="true"
customEventName="customstatechangedeventname"
@play="onPlayerPlay($event)"
@pause="onPlayerPause($event)"
@ended="onPlayerEnded($event)"
@waiting="onPlayerWaiting($event)"
@playing="onPlayerPlaying($event)"
@loadeddata="onPlayerLoadeddata($event)"
@timeupdate="onPlayerTimeupdate($event)"
@statechanged="playerStateChanged($event)"
@ready="playerReadied"
>
<!-- @canplay="onPlayerCanplay($event)" -->
<!-- @canplaythrough="onPlayerCanplaythrough($event)" -->
</video-player>
<!-- 底部进度条 start -->
<transition name="fade">
<p class="bottomCtrl" v-show="isBottomCtrlShow" id="bottomCtrl">
<!-- -->
<!-- <p class="bottomCtrl" v-show="false"> -->
<!-- <p class="bottomCtrl" > -->
<Slider v-model="playerCtrl.currentTimeInt" class="progress-slider" :max="playerCtrl.durationInt" :tip-format="progressTipFormat" @on-change="progressChange"></Slider>
<p class="clearfix" >
<p class="left">
<!-- 暂停 -->
<span v-on:click="play" v-if="!playerCtrl.isPlay" class="icon">
<Icon type="play"></Icon>
</span>
<!-- 播放 -->
<span v-else v-on:click="pause" class="icon">
<Icon type="stop"></Icon>
</span>
<!-- 下一曲 -->
<span class="icon" v-on:click="nextClick">
<Icon type="skip-forward"></Icon>
</span>
<span class="time">
{{playerCtrl.currentTime}}/{{playerCtrl.duration}}
</span>
</p>
<p class="right clearfix">
<p class="voice-box clearfix left">
<!-- 音量 -->
<Icon type="volume-medium" class="left icon"></Icon>
<Slider v-model="playerCtrl.voiceSlider" class="voice-slider left " max=100 @on-change="volumeChange"></Slider>
</p>
<!-- 全屏 -->
<span class="icon left" @click="fullScreenHandle">
<Icon type="crop" class="full-screen" ></Icon>
</span>
</p>
</p>
</p>
</transition>
</p>
</template>具体的なアイデアは、プレーヤーを使用して再生領域を埋め、位置決めを使用して再生領域の下部にあるカスタム controlBar を固定することです。 controlBar の -index は十分な大きさでなければなりません。そうしないと、全画面表示時に最上位レイヤーに表示されなくなります。
CSS スタイル:view plain copy
<style lang="less">
.video-player-box{
height: 100% !important;
width: 100% !important;
}
//底部进度条
.bottomCtrl{
line-height: 60px;
height: 60px;
overflow: visible;
position: absolute;
bottom: 0;
left: 0;
background-color: rgba(45, 45, 45, .92);
width: 100%;
padding: 0 50px;
color: #fff;
z-index: 999999999999999;
.icon{
font-size: 16px;
line-height: 60px;
cursor: pointer;
}
.icon+.icon{
margin-left: 20px;
}
}
.custom-video-outer-box{
position: relative;
height: 100%;
width: 100%;
}
.progress-slider{
position: absolute;
width: 100%;
top: 0;
left: 0;
height: 18px;
line-height: 18px;
.ivu-slider-wrap{
margin: 0 !important;
border-radius: 0 !important;
}
.ivu-slider-button-wrap{
line-height: normal !important;
}
.ivu-slider-button{
height: 8px !important;
width: 8px !important;
}
}
.voice-box{
.voice-slider{
width: 100px;
margin-left: 20px;
}
.ivu-slider-wrap{
margin: 27px 0 !important;
}
}
.time{
margin-left: 25px;
}
.full-screen{
margin-left: 25px;
line-height: 60px;
}
.ivu-progress-outer{
padding: 0 10px !important;
}
.vjs-big-play-button{
height: 80px !important;
width: 80px !important;
line-height: 80px !important;
text-align: center;
background:rgba(0, 0, 0, 0.8) !important;
border-radius: 50% !important;
top: 50% !important;
left: 50% !important;
margin-left: -40px !important;
margin-top: -40px !important;
}
#vjs_video_3{
max-height: 100% !important;
width: 100% !important;
height: 100% !important;
}
.video-player-box>p{
height: 100% !important;
width: 100% !important;
}
.video-js .vjs-big-play-button{
font-size: 5em !important;
}
video{
max-height: 100% !important;
}
</style>3. カスタム controlBar 関数を実装します
次のステップは、再生、一時停止、次の曲、再生の進行状況、残り時間、全画面表示などのカスタム controlBar 関数を実装することです。 、音量調整など。 ここではまず、video.jsの対応するAPIを確認する必要があります。英語ですが、非常に明確に書かれており、理解しやすいです。 video.js APIドキュメントアドレス: http://docs.videojs.com/docs/api/player.html1. 再生、一時停止、次の曲、全画面表示は主に追加したカスタムボタンのクリックイベントを監視します、その後、プレーヤー API を呼び出して、対応する操作を実行し、状態を変更します。view plain copy
// 播放
play(){
this.player.play();
},
// 暂停
pause(){
this.player.pause();
},
//下一曲
nextClick(){
console.log("自定义","下一曲点击");
},
//全屏
fullScreenHandle(){
console.log("全屏");
if(!this.player.isFullscreen()){
this.player.requestFullscreen();
this.player.isFullscreen(true);
}else{
this.player.exitFullscreen();
this.player.isFullscreen(false);
}
},view plain copy
<video-player class="video-player-box"
ref="videoPlayer"
:options="playerOptions"
:playsinline="true"
customEventName="customstatechangedeventname"
@play="onPlayerPlay($event)"
@pause="onPlayerPause($event)"
@ended="onPlayerEnded($event)"
@waiting="onPlayerWaiting($event)"
@playing="onPlayerPlaying($event)"
@loadeddata="onPlayerLoadeddata($event)"
@timeupdate="onPlayerTimeupdate($event)"
@statechanged="playerStateChanged($event)"
@ready="playerReadied"
>
<!-- @canplay="onPlayerCanplay($event)" -->
<!-- @canplaythrough="onPlayerCanplaythrough($event)" -->
</video-player>これらの状態の変化に基づいて、再生ボタンの表示中に「一時停止」を表示するなど、UI を適宜変更できます。一時停止時の「再生」などの機能。
view plain copy
//时间更新
           onPlayerTimeupdate(player){
               this.playerCtrl.currentTime=timeUtil.secondToDate(player.currentTime());
               this.playerCtrl.currentTimeInt=Math.floor(player.currentTime());
               console.log("当前音量",player.volume());
},view plain copy @on-change="progressChange"
view plain copy
//进度条被拉动
           progressChange(val){
               this.player.currentTime(val);
               this.playerCtrl.currentTimeInt=val;
               this.playerCtrl.currentTime=timeUtil.secondToDate(val);
},拿到定点的值,然后通过player的currentTime设置跳到定点播放。
音量调节的做法跟播放进度相似:
一开始初始化的时候记得配置
view plain copy
muted:false,//开始声音
来开启声音,否则静音状态下调节声音无效。
使用player.volume(val)这个api设置音量,其中val=0,表示声音off,val=1表示声音最大,0.5表示声音设置在half。
四:总结
最后在app.vue/需要用到这个播放器的地方 引入自定义播放器组件即可。vue-video-player是大神基于video.js开发的适用于vue.js框架的组件,具有良好兼容性,所以我们在vue中使用这个播放器组件本质还是使用video.js,我们要更多的去了解video.js中的api并使用他。
相信看了本文案例你已经掌握了方法,更多精彩请关注php中文网其它相关文章!
推荐阅读:
以上がiview の ui フレームワークを使用してプレーヤーをカスタマイズするの詳細内容です。詳細については、PHP 中国語 Web サイトの他の関連記事を参照してください。

ホットAIツール

Undresser.AI Undress
リアルなヌード写真を作成する AI 搭載アプリ

AI Clothes Remover
写真から衣服を削除するオンライン AI ツール。

Undress AI Tool
脱衣画像を無料で

Clothoff.io
AI衣類リムーバー

AI Hentai Generator
AIヘンタイを無料で生成します。

人気の記事
ホットツール

メモ帳++7.3.1
使いやすく無料のコードエディター

SublimeText3 中国語版
中国語版、とても使いやすい

ゼンドスタジオ 13.0.1
強力な PHP 統合開発環境

ドリームウィーバー CS6
ビジュアル Web 開発ツール

SublimeText3 Mac版
神レベルのコード編集ソフト(SublimeText3)
ホットトピック
 7517
7517
 15
1378
52
79
11
21
66
15
1378
52
79
11
21
66

 VUEのボタンに関数を追加する方法
Apr 08, 2025 am 08:51 AM
VUEのボタンに関数を追加する方法
Apr 08, 2025 am 08:51 AM
HTMLテンプレートのボタンをメソッドにバインドすることにより、VUEボタンに関数を追加できます。 VUEインスタンスでメソッドを定義し、関数ロジックを書き込みます。
 VueでBootstrapの使用方法
Apr 07, 2025 pm 11:33 PM
VueでBootstrapの使用方法
Apr 07, 2025 pm 11:33 PM
vue.jsでBootstrapを使用すると、5つのステップに分かれています。ブートストラップをインストールします。 main.jsにブートストラップをインポートしますブートストラップコンポーネントをテンプレートで直接使用します。オプション:カスタムスタイル。オプション:プラグインを使用します。
 vue.jsでJSファイルを参照する方法
Apr 07, 2025 pm 11:27 PM
vue.jsでJSファイルを参照する方法
Apr 07, 2025 pm 11:27 PM
vue.jsでJSファイルを参照するには3つの方法があります。タグ;; mounted()ライフサイクルフックを使用した動的インポート。 Vuex State Management Libraryを介してインポートします。
 VueでWatchの使用方法
Apr 07, 2025 pm 11:36 PM
VueでWatchの使用方法
Apr 07, 2025 pm 11:36 PM
Vue.jsの監視オプションにより、開発者は特定のデータの変更をリッスンできます。データが変更されたら、Watchはコールバック関数をトリガーして更新ビューまたはその他のタスクを実行します。その構成オプションには、すぐにコールバックを実行するかどうかを指定する即時と、オブジェクトまたは配列の変更を再帰的に聴くかどうかを指定するDEEPが含まれます。
 Vueによる前のページに戻る方法
Apr 07, 2025 pm 11:30 PM
Vueによる前のページに戻る方法
Apr 07, 2025 pm 11:30 PM
vue.jsには、前のページに戻る4つの方法があります。$ router.go(-1)$ router.back()outes&lt; router-link to =&quot;/&quot; Component Window.history.back()、およびメソッド選択はシーンに依存します。
 Vueはマーキー/テキストスクロール効果を実現します
Apr 07, 2025 pm 10:51 PM
Vueはマーキー/テキストスクロール効果を実現します
Apr 07, 2025 pm 10:51 PM
CSSアニメーションまたはサードパーティライブラリを使用して、VUEでマーキー/テキストスクロール効果を実装します。この記事では、CSSアニメーションの使用方法を紹介します。スクロールテキストを作成し、テキストを&lt; div&gt;をラップします。 CSSアニメーションを定義し、オーバーフローを設定します:非表示、幅、アニメーション。キーフレームを定義し、アニメーションの開始と終了時にtranslatex()を設定します。期間、スクロール速度、方向などのアニメーションプロパティを調整します。
 Vue Paginationの使用方法
Apr 08, 2025 am 06:45 AM
Vue Paginationの使用方法
Apr 08, 2025 am 06:45 AM
ページネーションは、パフォーマンスとユーザーエクスペリエンスを向上させるために、大きなデータセットを小さなページに分割するテクノロジーです。 VUEでは、次の組み込みメソッドを使用してページを使用できます。ページの総数を計算します。TotalPages()トラバーサルページ番号:V-For Directive on Currentページを設定します。
 Vueのバージョンを照会する方法
Apr 07, 2025 pm 11:24 PM
Vueのバージョンを照会する方法
Apr 07, 2025 pm 11:24 PM
Vue Devtoolsを使用してブラウザのコンソールでVueタブを表示することにより、Vueバージョンを照会できます。 NPMを使用して、「NPM List -G Vue」コマンドを実行します。 package.jsonファイルの「依存関係」オブジェクトでVueアイテムを見つけます。 Vue CLIプロジェクトの場合、「Vue -Version」コマンドを実行します。 &lt; script&gt;でバージョン情報を確認してくださいVueファイルを参照するHTMLファイルにタグを付けます。
