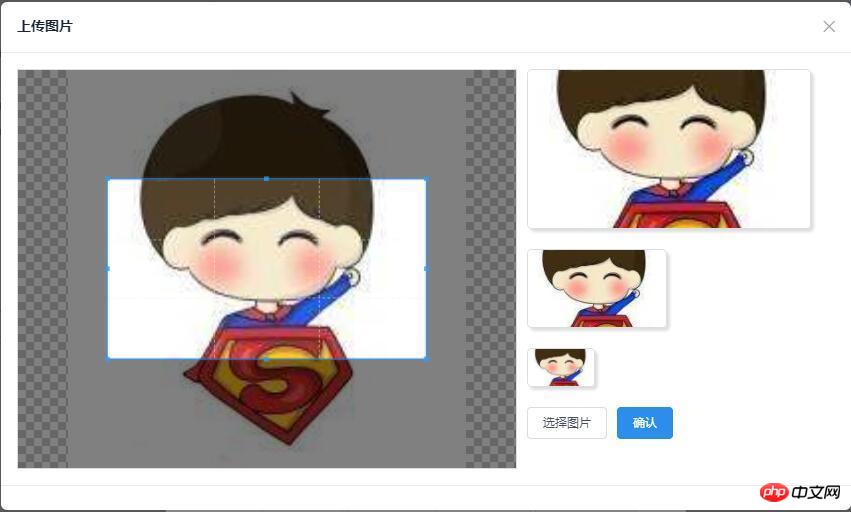
この記事では、vue をカプセル化した Cropper.js に基づいたオンライン画像トリミング コンポーネント機能を主に紹介します。これは非常に優れており、必要な友人は参考にしてください。
レンダリングは次のとおりです。

: デモ ダウンロード
cropper.js
github:cropper.js
公式サイト(デモ)
cropper.jsインストール
npmまたはbowerインストール
クローンダウンロード: ダウンロードアドレス
git clone https://github.com/fengyuanchen/cropper.git
cropper.jsを参照
主にcropper.jsとcropper.cssの2つのファイルを参照します
npm install cropper
# or
bower install cropper
注: Cropper.js プラグインを使用する前に、まず jquery ファイルを導入する必要があります
簡単な使い方
スクリーンショットに使用する p コンテナを構築します
<script src="/path/to/jquery.js"></script><!-- jQuery is required -->
<link href="/path/to/cropper.css" rel="external nofollow" rel="stylesheet">
<script src="/path/to/cropper.js"></script>
スタイルを追加しますコンテナを作成し、img をコンテナ全体に埋め込みます (非常に重要)
<!-- Wrap the image or canvas element with a block element (container) --> <p>  </p>
cropper.js メソッドを呼び出してスクリーンショット コントロールを初期化します
/* Limit image width to avoid overflow the container */
img {
 max-width: 100%; /* This rule is very important, please do not ignore this! */
}その他の詳細な API については、github を参照してください。 :cropper.js
vueコンポーネントにカプセル化されました
カプセル化 vueコンポーネントで解決する必要がある問題
cropper.js関連
クリックして画像を選択する入力ボックスをシミュレートします選択した画像の形式とサイズを制限します
画像の切り抜きを再選択します
切り抜きを確認し、base64 形式の画像情報を取得します
vue 関連
非親コンポーネントと子コンポーネント間の通信の問題
入力をシミュレートするボックスをクリックして画像を選択し、選択した画像に形式とサイズの制限を課します
非表示の入力タグを構築し、この入力のクリックをシミュレートして画像を選択する機能を実現します
$('#image').cropper({
 aspectRatio: 16 / 9,
 crop: function(e) {
 // Output the result data for cropping image.
 console.log(e.x);
 console.log(e.y);
 console.log(e.width);
 console.log(e.height);
 console.log(e.rotate);
 console.log(e.scaleX);
 console.log(e.scaleY);
 }
});監視用のメソッドをバインドします入力に対するコンテンツの変更、アップロードされたファイルの取得、形式とサイズの検証の実行
<!-- input框 --> <input id="myCropper-input" type="file" :accept="imgCropperData.accept" ref="inputer" @change="handleFile"> //模拟点击 document.getElementById('myCropper-input').click();
トリミングする画像を再選択します
初めて画像を選択した後、間違いなく問題に直面することになります画像を再選択する必要がある場合は、上記の手順で画像を選択した後、FileRender() メソッドを通じて画像の主な情報を取得する必要があります。問題を解決するには、クロップ ボックスを再構築します。 Cropper.js が提供する公式のデモを確認すると、公式の方法では動的にクロッピング コンテナを追加して動作する方法が使用されていることがわかります。
// imgCropperData: {
// accept: 'image/gif, image/jpeg, image/png, image/bmp',
// }
handleFile (e) {
 let _this = this;
 let inputDOM = this.$refs.inputer;
 // 通过DOM取文件数据
 _this.file = inputDOM.files[0];
 // 判断文件格式
 if (_this.imgCropperData.accept.indexOf(_this.file.type) == -1) {
 _this.$Modal.error({
  title: '格式错误',
  content: '您选择的图片格式不正确!'
 });
 return;
 }
 // 判断文件大小限制
 if (_this.file.size > 5242880) {
 _this.$Modal.error({
  title: '超出限制',
  content: '您选择的图片过大,请选择5MB以内的图片!'
 });
 return;
 }
 var reader = new FileReader();
 // 将图片将转成 base64 格式
 reader.readAsDataURL(_this.file);
 reader.onload = function () {
 _this.imgCropperData.imgSrc = this.result;
 _this.initCropper();
 }
}トリミングを確認し、base64形式で画像情報を取得
// 初始化剪切
initCropper () {
let _this = this;
// 初始化裁剪区域
_this.imgObj = $('');
let $avatarPreview = $('.avatar-preview');
$('#myCropper-workspace').empty().html(_this.imgObj);
_this.imgObj.cropper({
aspectRatio: _this.proportionX / _this.proportionY,
preview: $avatarPreview,
crop: function(e) {
}
});
}アップロード用データを構築
let $imgData = _this.imgObj.cropper('getCroppedCanvas')
imgBase64Data = $imgData.toDataURL('image/png');
親コンポーネントと子コンポーネント以外のコンポーネント間の通信の問題
これまでのプロジェクトでは、親コンポーネントと子コンポーネント間の通信パラメータは、一般的に
の 2 つのメソッドを使用してルーターにパラメータを配置し、route.params.xxx または Route.query.xxx を呼び出して取得していました。
プロパティを介した通信
ここでは、eventBusを使用してコンポーネント間の通信を行います
ステップ
1. Bコンポーネントのバスコンポーネントを宣言してAコンポーネントにパラメータを渡します// 构造上传图片的数据
let formData = new FormData();
// 截取字符串
let photoType = imgBase64Data.substring(imgBase64Data.indexOf(",") + 1);
//进制转换
const b64toBlob = (b64Data, contentType = '', sliceSize = 512) => {
const byteCharacters = atob(b64Data);
const byteArrays = [];
for(let offset = 0; offset < byteCharacters.length; offset += sliceSize) {
const slice = byteCharacters.slice(offset, offset + sliceSize);
const byteNumbers = new Array(slice.length);
for(let i = 0; i < slice.length; i++) {
byteNumbers[i] = slice.charCodeAt(i);
}
const byteArray = new Uint8Array(byteNumbers);
byteArrays.push(byteArray);
}
const blob = new Blob(byteArrays, {
type: contentType
});
return blob;
}
const contentType = 'image/jepg';
const b64Data2 = photoType;
const blob = b64toBlob(b64Data2, contentType);
formData.append("file", blob, "client-camera-photo.png")
formData.append("type", _this.imgType)2コンポーネント A でバス コンポーネントを参照し、そのパラメーターの変化をリアルタイムで監視します
//bus.js
import Vue from 'vue';
export default new Vue();
// A.vue
import Bus from '../../components/bus/bus.js'
export default {
 components: { Bus },
 data () {},
 created: function () {
 Bus.$on('getTarget', imgToken => {
  var _this = this;
  console.log(imgToken);
  ...
 });
 }
}参考:
vue-$on
vue-$emitvue.js ロード (4) - vue2.0s のeventBus は兄弟コンポーネント通信を実装します
vue の画像選択とスクリーンショットのプラグインの完全なコード
// B.vue
// 传参
Bus.$emit('getTarget', imgToken);
上記がこの記事の全内容です。その他の関連コンテンツについては、PHP 中国語 Web サイトをご覧ください。
関連する推奨事項:
iview テーブルレンダリング統合スイッチの紹介 Angular での better-scroll プラグインの使用方法の紹介以上がCropper.js に基づいて vue をカプセル化し、オンライン画像トリミング コンポーネントの機能を実装します。の詳細内容です。詳細については、PHP 中国語 Web サイトの他の関連記事を参照してください。