
この記事では、React-Reflux についての基本的な紹介を中心に紹介します。これは、必要な友人に参考にしていただけるようにしています。
仕事の関係で、React + Reflux の開発を使用する必要があります。ここ数日、私たちは皆、特に Reflux について学ぶことに熱心に取り組んでいます。オンラインで見つけた情報の多くは、現在のペースでは更新が早すぎて、古いドキュメントの一部の構文は更新できません。ほとんどの初心者にとって、また学者にとっては、確かに多くの混乱があります。この記事は初心者または React マスターに興味のある友人のみに適しています。寄り道してください。 ! !
早速、本題に入りましょう~
「言語を学ぶには hello world を使用し、フレームワークを学ぶには todolist を使用します。」という一般的なことわざを引用します。今日は todolist を使用して説明します。
比較として、todolist-rawはTodolistの追加と削除にRefluxを使用しませんが、react-refluxはtodolistの追加と削除にRefluxを使用します。
まずはコンポーネントのレンダリングを見てみましょう:
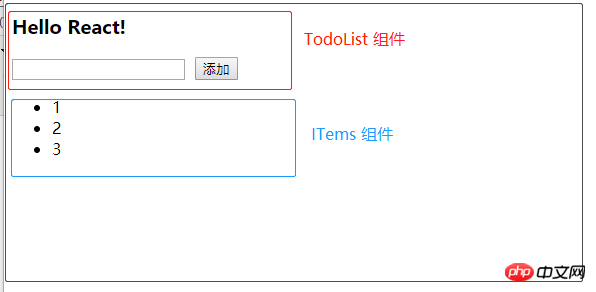
create-react-appとyarnを使用する環境を準備する必要があります。これら 2 つのツールの簡略化されたプロジェクト ディレクトリは次のとおりです:
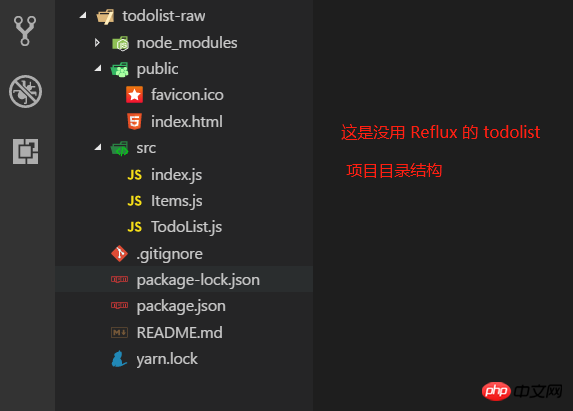
1. todolist-raw いくつかのファイルしかなく、内部のコードは比較的単純です。道士なら誰でも一目で理解できると思います。
package.jsonの構成は以下の通りです。 {
"name": "todolist-raw",
"version": "0.1.0",
"private": true,
"dependencies": {
"react": "^16.4.1",
"react-dom": "^16.4.1",
"react-scripts": "1.1.4"
},
"scripts": {
"start": "react-scripts start",
"build": "react-scripts build",
"test": "react-scripts test --env=jsdom",
"eject": "react-scripts eject"
}
}
yarn を使用しています。Rflux をインストールした後、プロンプト "react-scripts" は内部コマンドではなく、 yarn start を開始できず、後で試行を繰り返しても差し引かれました tongue - h そして、 tongue -autoclean は問題ありませんでした。ここまで言っておきますが、実際、私が遭遇した問題はバージョンの非対称性の問題ではありません。説明できないバグが発生した場合はスレッドを整理することをお勧めします。かゆみ?かゆくなったら掻くだけ! ! !
index.html は次のとおりです:一部のコメントを削除しただけで、自動生成されたものから変更はありません。 <!DOCTYPE html>
<html>
<head>
<meta charset="utf-8">
<meta name="viewport" content="width=device-width, initial-scale=1, shrink-to-fit=no">
<link rel="shortcut icon" href="%PUBLIC_URL%/favicon.ico">
<title>TodoList-raw</title>
</head>
<body>
<noscript>
You need to enable JavaScript to run this app.
</noscript>
<div id="root"></div>
</body>
</html>
1 import React from 'react';
2 import ReactDOM from 'react-dom';
3 import TodoList from './TodoList';
4
5 ReactDOM.render(<TodoList />, document.getElementById('root'));
TodoList.jsは次のとおりです:
import React, { Component, Fragment } from 'react';
import Items from './Items';

class TodoList extends Component {

  constructor(props) {
    super(props);
    this.state = {
      items: [1, 2, 3],
      isC: false
    };

    this.handlerClick = this.handlerClick.bind(this);
  }
  // 添加一个 item 项
  handlerClick() {
    const val = this.refs.inputEl.value;
    this.refs.inputEl.value = '';
    const items = [...this.state.items, val]; // 最好不要直接操作 state
    this.setState({items}); // es6 语法,等价于 {items: items}
    }

  // 删除某一个 item 项,点击就删除
  handlerDelete(index) {
    const items = [...this.state.items];
    items.splice(index, 1);
    this.setState({items});
  }

  render() {
    return (
      <Fragment>
        <h3>Hello React!</h3>
        <input
          ref="inputEl"
          style={{marginRight: "10px"}}
        />
        <button onClick={this.handlerClick}>添加</button>
        <Items
          msg={this.state.items}
          func={this.handlerDelete.bind(this)} />
      </Fragment>
    );
  }
}

export default TodoList;
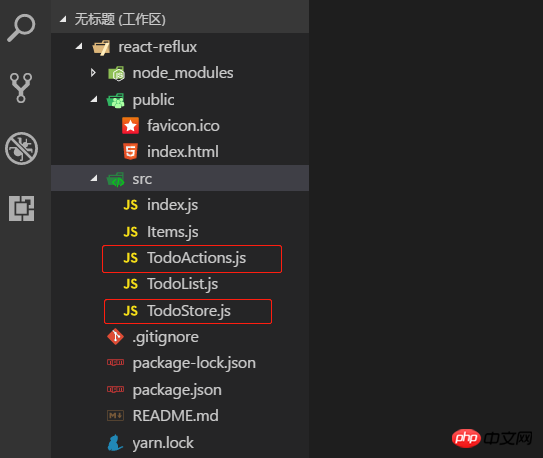
a. this .handlerClick = this.handlerClick.bind(this); React は jsx 構文を使用します。従来の HTML イベントと同様に、括弧は使用できません。 binding、このタグは js ファイル内にあり、従来の HTML バインディング イベントが直接呼び出されるため、バインディング イベントは機能しません。したがって、jsx のタグ バインディング イベントは参照にバインドされます。そして、この js ファイル (コンポーネント) にバインドする必要があります。したがって、jsx のラベルのイベントは です。これは私の理解です。正しいかどうかはわかりません いいえ、間違っている場合は修正してください。 b. 代码很少阅读起来应该没难度,而且上面也有一些注释了。不过还是要啰嗦一下。React 是用数据(data)基于状态(state)来驱动视图(view),也就是搞来搞去都是在搞数据,用数据改变状态来达到渲染视图的目的,大多是在虚拟内存处理,通过什么 diff 比较算法,层层计较然后达到提高性能,加快视图渲染的目的。额,我只能用“非常快”来形容 React 的性能,当然,性能的事还是跟实际代码复杂度相关,我只想说 React 确实出众!扯远了...,既然是基于状态(state),所以要有 state,在 constructor 中定义了,而且处理业务时改变 state,比如 handlerClick,deleteClick 中都是先用变量保存下来,通过 this.setState() 方法在设置回去! c. 父子关系的组件,父组件可通过属性来给子组件传参,就像这样:<Items msg={this.state.items} />,子组件可通过 this.props.msg 拿到 items。 Items.js 代码如下: 注意,父组件传递方法给子组件时,this 指向的是子组件,所以通过属性传递时,需要用函数绑定 bind() 绑定父组件的 this。 最后,通过 cmd 命令行,yarn start 运行任务即可实现一个简单的 TodoList 功能。 2. react-reflux: 通过 Reflux 来实现简单的 TodoList (基本法关联 Component)。 2.1 简单地说明下为什么要 Reflux 架构,如图(自己画的组件树结构!),不存在父子关系的组件(如 B 和 E)通讯势必会很困难而且麻烦,需要一个中间件(Store)来存储数据,类似于订阅者和发布者(中间人模式)一样,大家都往 Store 中存取数据就好,不需要层层走关系了,避免了层层传递数据的灾难! 2.2 关于 Actions、Store 和 Component 的关系,可以这么理解:Store 作为一个中间人有订阅和发布的功能,Actions 就是 Component 触发的动作,Actions 被 Store 监听着,组件有新动作了, Store 就会做出相应的处理(回调函数)更改 Store 中的数据通过 this.trigger(this.items) 发布消息[就相当于更新 items], Component 监听着 Store,用一些手段(mixin 或回调函数)关联起 Component 中的状态信息(state.items)和 Store 中的信息(items),这就是所谓的单向数据流,单向表示一个方向流动,不能反向。 2.3 目录结构和前面的 todolist-raw 没多大区别,就是多了 TodoActions.js 和 TodoStore.js 两个文件。如图: 2.4 一言不合就贴代码。首先 index.js 代码没变化,就不贴了,TodoActions.js 代码如下: TodoStore.js 代码如下: 说明:多个监听用 listenables,单个监听 this.listenTo(addItem, 'addItem'); 多个监听的时候定义处理函数是 on + ActionName 驼峰式命名。定义初始值和监听可以写在 init 方法外面,就像上面那样(已注释)。 2.5 Actions 和 Store 都写好了,就差最后一步,整合到组件 Component 中,才算有点意义了!TodoList.js 代码如下: 说明:这是基本的添加关联,需要在组件挂载时监听 Store,需要定义一个回调函数 onStatusChange(),组件卸载时解除监听 this.unsubscribe(),Store 源码如下: 不传 bindContext 更新不了状态,回调函数 onStatusChange 中报异常,传入 this 就好了。如图: Items.js 代码如下: 3. react-reflux: 通过 Reflux 来实现简单的 TodoList (简便法关联 Component)。 3.1 先安装 react-mixin 和 axios: npm install react-mixin,npm install axios。结合异步操作实现简便 Store 关联 Component。 安装两个依赖之后,修改 TodoStore.js 和 TodoList.js 代码如下: 我贴:TodoStore.js: 我再贴:TodoList.js: 修改之后 yarn start 启动项目,截图如下: 4. 说在后面的话:本篇文章只是关于 React-Reflux 基础入门的一些知识,没有涉及实战应用,读者自酌。对于 React 我也是初学者,难免有许多不准确的地方,有待提高,欢迎各位道友留言指正。 4.1 好了,简单地分享就到此结束了,谢谢阅读~~~ 以上就是本文的全部内容,希望对大家的学习有所帮助,更多相关内容请关注PHP中文网! 相关推荐:import React, { Component } from 'react';
class Items extends Component {
constructor(props) {
super(props);
this.func = this.props.func;
}
render() {
return (
<ul>
{this.props.msg.map((item, index) => <li
key={index}
onClick={this.func.bind(this, index)}
>{item}</li>
)}
</ul>
);
}
}
export default Items;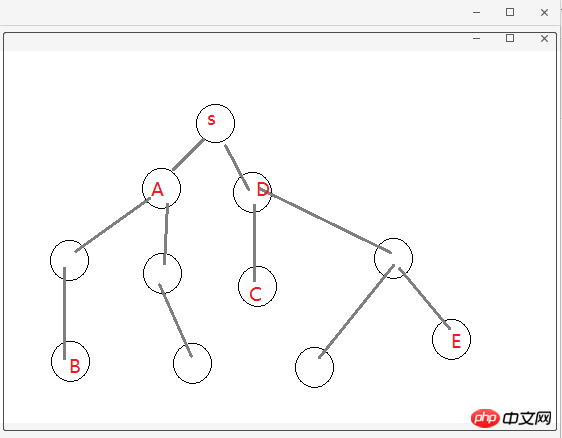
import Reflux from 'reflux';

const TodoActions = Reflux.createActions([
    'getAll',
    'addItem',
    'deleteItem'
]);
export default TodoActions;import Reflux from 'reflux';
import Actions from './TodoActions';
const TodoStore = Reflux.createStore({
// items: [1, 2, 3],
// listenables: Actions,
init() {
console.log('TodoStore init method~');
this.items = [1, 2, 3]; // 给个初始值
this.listenables = Actions; // 监听 TodoActions.js
// this.listenTo(addItem, 'addItem');
},
onGetAll() {
console.log('onGetAll');
this.trigger(this.items);
},
onAddItem(model) {
console.log('onAddItem---', model);
this.items.unshift(model);
this.trigger(this.items);
},
onDeleteItem(index) {
console.log('onDeleteItem---', index);
this.items.splice(index, 1);
this.trigger(this.items);
}
})
export default TodoStore;import React, { Component, Fragment } from 'react';
import Actions from './TodoActions';
import TodoStore from './TodoStore';
import Items from './Items';
class TodoList extends Component {
constructor(props) {
super(props);
this.state = {
items: [],
isC: false
};
this.handlerClick = this.handlerClick.bind(this);
}
// 组件挂载
componentDidMount() {
this.unsubscribe = TodoStore.listen(this.onStatusChange, this);
Actions.getAll();
}
// 组件移除
componentWillUnmount() {
console.log('componentWillUnmount');
this.unsubscribe(); // 解除监听
}
// callback
onStatusChange(items) {
this.setState({items});
}
// 添加一个 item 项
handlerClick() {
const val = this.refs.inputEl.value;
this.refs.inputEl.value = '';
Actions.addItem(val);
}
render() {
return (
<Fragment>
<h3>Hello React-Reflux!</h3>
<input
ref="inputEl"
style={{marginRight: "10px"}}
/>
<button onClick={this.handlerClick}>添加</button>
<Items msg={this.state.items} />
</Fragment>
);
}
}
export default TodoList;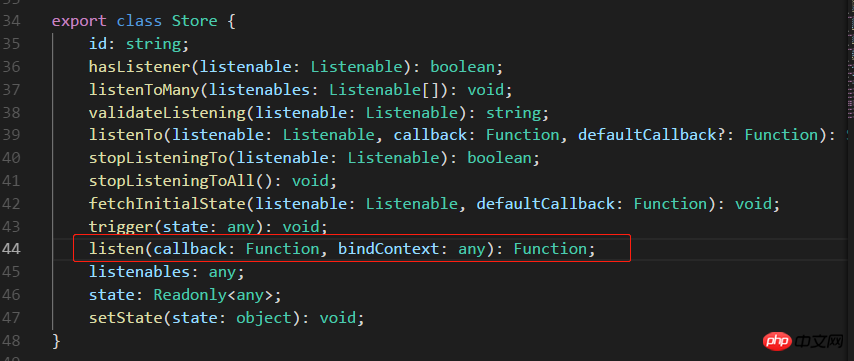

import React, { Component } from 'react';
import Actions from './TodoActions';

class Items extends Component {
    render() {
        return (
            <ul>
                {this.props.msg.map((item, index) => <li
                        key={index}
                        onClick={this.handlerDelete.bind(this, index)}
                    >{item}</li>
                )}
            </ul>
        );
    }
    handlerDelete(index) {
        Actions.deleteItem(index);
    }
}

export default Items;import Reflux from 'reflux';
import Actions from './TodoActions';
import Axios from 'axios';
const TodoStore = Reflux.createStore({
// items: [3, 2, 1],
// listenables: Actions,
init() {
console.log('TodoStore init method~');
this.items = [3, 2, 1]; // 初始值,此处不是 state, mark-1 -2 -3 都可以直接操作
this.listenables = Actions;
},
onGetAll() {
console.log('onGetAll');
Axios.get('https://api.github.com/')
.then(res => {
const keys = Object.keys(res.data);
console.log('axios-response-keys: ', keys);
this.items = keys; // mark-1
this.trigger(this.items);
})
.catch(err => console.log('axios-error: ', err));
},
onAddItem(model) {
console.log('onAddItem---', model);
this.items.unshift(model); // mark-2
console.log('TodoStore-items: ', this.items);
this.trigger(this.items);
},
onDeleteItem(index) {
console.log('onDeleteItem---', index);
this.items.splice(index, 1); // mark-3
this.trigger(this.items);
}
})
export default TodoStore;import React, { Component, Fragment } from 'react';
import ReactMixin from 'react-mixin';
import Reflux from 'reflux';
import Actions from './TodoActions';
import TodoStore from './TodoStore';
import Items from './Items';
class TodoList extends Component {
constructor(props) {
super(props);
this.state = {
items: [],
isC: false
};
this.handlerClick = this.handlerClick.bind(this);
}
// 组件挂载
componentDidMount() {
Actions.getAll();
}
// 添加一个 item 项
handlerClick() {
const val = this.refs.inputEl.value;
this.refs.inputEl.value = '';
if (!val) {
alert('Please enter the data which type of number or string');
return false;
}
Actions.addItem(val);
}
render() {
return (
<Fragment>
<h3>Hello React-Reflux!</h3>
<input
ref="inputEl"
style={{marginRight: "10px"}}
/>
<button onClick={this.handlerClick}>添加</button>
<Items msg={this.state.items} />
</Fragment>
);
}
}
// 用 Reflux.connect 将 Store 和 Component 组合在一起
ReactMixin.onClass(TodoList, Reflux.connect(TodoStore, 'items'));
export default TodoList;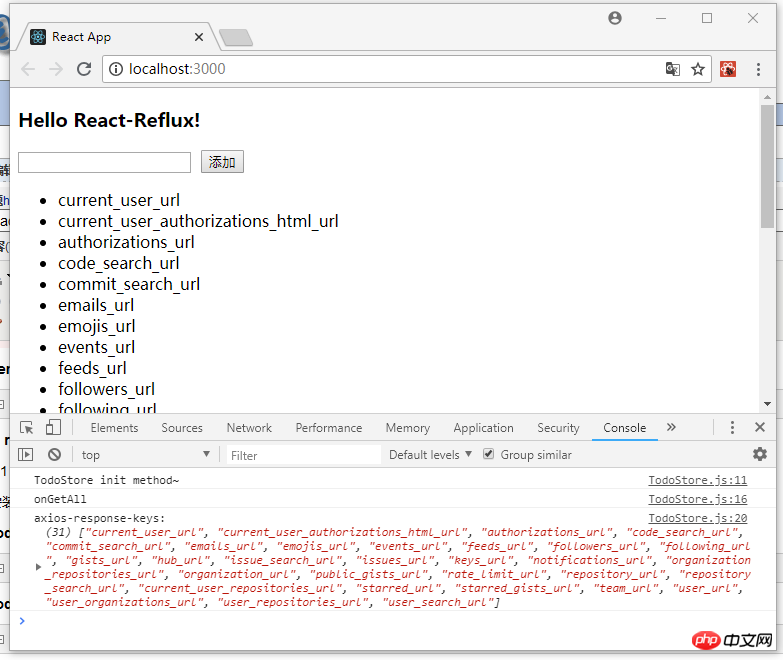
以上がReact-Reflux の基本的な紹介の詳細内容です。詳細については、PHP 中国語 Web サイトの他の関連記事を参照してください。