Angular で DOM を正しく操作する方法
この記事は、Angular で DOM を正しく操作する方法を主に紹介しています。これで、必要な友達に共有できます。
古いプロジェクトを引き継ぐことになりました。 Angular プロジェクトでは DOM の操作に JQuery が広範囲に使用されていましたが、これは非常に単純です。では、Angular を使用して DOM をエレガントに操作するにはどうすればよいでしょうか? 要素の取得 1. ElementRef --- View内のネイティブ要素を囲むラッパー
コンポーネントのコンストラクターにElementRefを注入して、コンポーネント要素全体のパッケージを取得します。
@Component({
  selector: 'app-test-page',
  templateUrl: './test-page.component.html',
  styleUrls: ['./test-page.component.scss']
})
export class TestPageComponent implements OnInit {

  constructor(    private el: ElementRef
  ) { }

  ngOnInit() {
  }

  getDomTest() {
    console.dir(this.el);
  }
}
ElementRefのnativeElementは、コンポーネントの最も外側のDOM要素です。次に、ネイティブ DOM 配置メソッドを通じて、指定されたセレクター要素を取得できます。
  getDomTest() {
    console.dir(this.el.nativeElement.querySelector('.test-get-dom')); // 获取指定的子元素
}@viewChild は指定された要素を取得でき、指定されたメソッドは実行できます。ローカル変数またはコンポーネント タイプである必要があります。
// HTML
<p class="tip-test-wrapper">
<button class="test-get-dom" (click)="getDomTest()">测试获取DOM</button>
</p>
<app-dialog></app-dialog>
// ts
import { DialogComponent } from './../../common/components/dialog/dialog.component';
@Component({
selector: 'app-test-page',
templateUrl: './test-page.component.html',
styleUrls: ['./test-page.component.scss']
})
export class TestPageComponent implements OnInit {
// 通过本地变量获取元素 可通过read来指定获取的元素类型
@ViewChild('testdom' , { read: ViewContainerRef }) viewcontainer: ViewContainerRef;
@ViewChild('testdom') viewelement: ElementRef;
// 通过组件类型来获取
@ViewChild(DialogComponent) viewcontent: DialogComponent;
constructor(
private el: ElementRef
) { }
ngOnInit() {
}
getDomTest() {
// console.dir(this.el.nativeElement.querySelector('.test-get-dom'));
console.dir(this.viewcontainer);
console.dir(this.viewelement);
console.dir(this.viewcontent);
}
}
注: ElementRef または @viewChild は要素を取得し、ngAfterViewInit サイクルの後に使用する必要があります。
3. @viewChildren -- You can use ViewChildren to get the {@link QueryList} of elements or directives from the view DOM. 複数取得する必要がある場合、@viewChild は条件を満たす最初の要素を返します条件を満たす要素 要素はどうでしょうか?@viewChildren は、条件を満たすすべての要素のリストを返します。 セレクターの指定方法は@viewChildと統一しています。
// 复制一个元素
<p class="tip-test-wrapper">
<button class="test-get-dom" #testdom (click)="getDomTest()">测试获取DOM</button>
</p>
<p class="tip-test-wrapper">
<button class="test-get-dom" #testdom (click)="getDomTest()">测试获取DOM</button>
</p>
</p>
<app-dialog></app-dialog>
<app-dialog></app-dialog>// tsimport { DialogComponent } from './../../common/components/dialog/dialog.component';
@Component({
selector: 'app-test-page',
templateUrl: './test-page.component.html',
styleUrls: ['./test-page.component.scss']
})
export class TestPageComponent implements OnInit {
@ViewChild('testdom' , { read: ViewContainerRef }) viewcontainer: ViewContainerRef;
@ViewChild('testdom') viewelement: ElementRef; @ViewChildren('testdom') viewelements: QueryList<any>; @ViewChild(DialogComponent) viewcontent: DialogComponent; @ViewChildren(DialogComponent) viewcontents: QueryList<DialogComponent>;
constructor( private el: ElementRef
) { }
ngOnInit() {
}
getDomTest() { // console.dir(this.el.nativeElement.querySelector('.test-get-dom')); // console.dir(this.viewcontainer);
console.dir(this.viewelement);
console.dir(this.viewelements);
console.dir(this.viewcontent);
console.dir(this.viewcontents);
} 
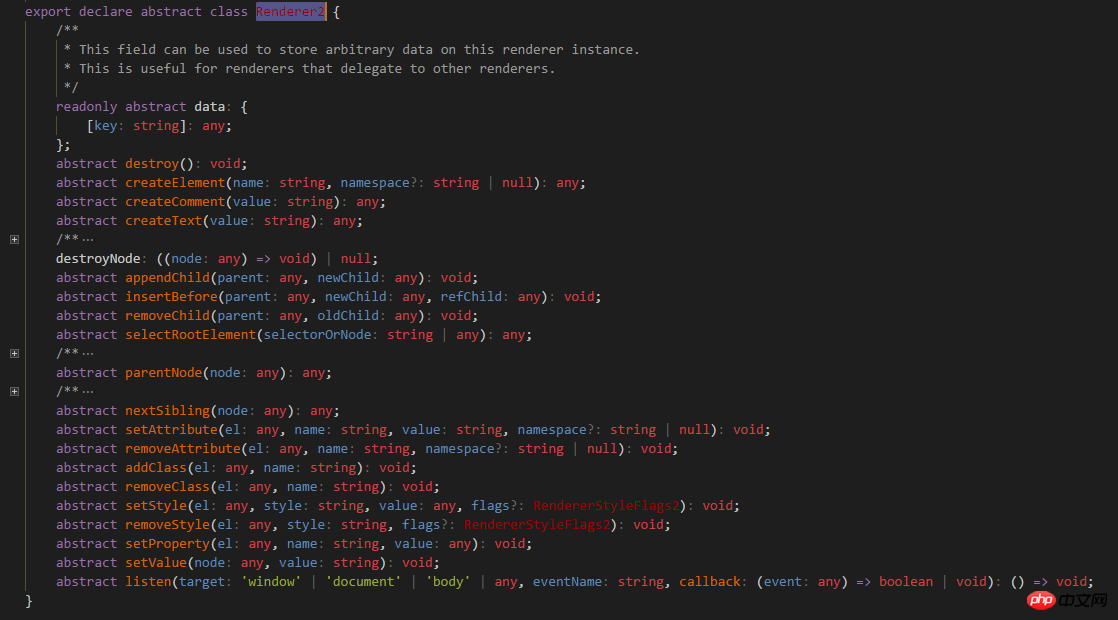
Renderer2、を導入し、constructに注入します。
import { Component, OnInit , ViewContainerRef , ElementRef , ViewChild, , ViewChildren, QueryList} from '@angular/core';
import { DialogComponent } from './../../common/components/dialog/dialog.component';
@Component({
selector: 'app-test-page',
templateUrl: './test-page.component.html',
styleUrls: ['./test-page.component.scss']
})
export class TestPageComponent implements OnInit {
@ViewChild('testdom' , { read: ViewContainerRef }) viewcontainer: ViewContainerRef;
@ViewChild('testdom') viewelement: ElementRef;
@ViewChildren('testdom') viewelements: QueryList<any>;
@ViewChild(DialogComponent) viewcontent: DialogComponent;
@ViewChildren(DialogComponent) viewcontents: QueryList<DialogComponent>;
constructor(
private el: ElementRef
) { }
ngOnInit() {
}
getDomTest() {
}
}renderer2 は、次のような豊富な API を提供しています:

ネイティブ JS と jQuery は、それぞれ jsonp を使用して「現在の天気情報」を取得します
以上がAngular で DOM を正しく操作する方法の詳細内容です。詳細については、PHP 中国語 Web サイトの他の関連記事を参照してください。

ホットAIツール

Undresser.AI Undress
リアルなヌード写真を作成する AI 搭載アプリ

AI Clothes Remover
写真から衣服を削除するオンライン AI ツール。

Undress AI Tool
脱衣画像を無料で

Clothoff.io
AI衣類リムーバー

AI Hentai Generator
AIヘンタイを無料で生成します。

人気の記事

ホットツール

メモ帳++7.3.1
使いやすく無料のコードエディター

SublimeText3 中国語版
中国語版、とても使いやすい

ゼンドスタジオ 13.0.1
強力な PHP 統合開発環境

ドリームウィーバー CS6
ビジュアル Web 開発ツール

SublimeText3 Mac版
神レベルのコード編集ソフト(SublimeText3)

ホットトピック
 7555
7555
 15
15
 1382
1382
 52
52
 83
83
 11
11
 28
28
 96
96
 Angular のメタデータとデコレータについて話しましょう
Feb 28, 2022 am 11:10 AM
この記事では、Angular の学習を継続し、Angular のメタデータとデコレータを理解し、それらの使用法を簡単に理解します。
 Angular Learning State Manager NgRx の詳細な説明
May 25, 2022 am 11:01 AM
この記事では、Angular のステートマネージャー NgRx について深く理解し、NgRx の使用方法を紹介します。
 Ubuntu 24.04 に Angular をインストールする方法
Mar 23, 2024 pm 12:20 PM
Angular.js は、動的アプリケーションを作成するための無料でアクセスできる JavaScript プラットフォームです。 HTML の構文をテンプレート言語として拡張することで、アプリケーションのさまざまな側面を迅速かつ明確に表現できます。 Angular.js は、コードの作成、更新、テストに役立つさまざまなツールを提供します。さらに、ルーティングやフォーム管理などの多くの機能も提供します。このガイドでは、Ubuntu24 に Angular をインストールする方法について説明します。まず、Node.js をインストールする必要があります。 Node.js は、ChromeV8 エンジンに基づく JavaScript 実行環境で、サーバー側で JavaScript コードを実行できます。ウブにいるために
 Angular のサーバーサイド レンダリング (SSR) について説明する記事
Dec 27, 2022 pm 07:24 PM
Angular Universal をご存知ですか?これは、Web サイトがより優れた SEO サポートを提供するのに役立ちます。
 フロントエンド開発に PHP と Angular を使用する方法
May 11, 2023 pm 04:04 PM
インターネットの急速な発展に伴い、フロントエンド開発テクノロジーも常に改善され、反復されています。 PHP と Angular は、フロントエンド開発で広く使用されている 2 つのテクノロジーです。 PHP は、フォームの処理、動的ページの生成、アクセス許可の管理などのタスクを処理できるサーバー側スクリプト言語です。 Angular は、単一ページ アプリケーションの開発やコンポーネント化された Web アプリケーションの構築に使用できる JavaScript フレームワークです。この記事では、PHPとAngularをフロントエンド開発に使用する方法と、それらを組み合わせる方法を紹介します。
 Angular + NG-ZORRO でバックエンド システムを迅速に開発
Apr 21, 2022 am 10:45 AM
この記事では、Angular の実践的な経験を共有し、angualr と ng-zorro を組み合わせてバックエンド システムを迅速に開発する方法を学びます。
 Angular で Monaco エディターを使用する方法の簡単な分析
Oct 17, 2022 pm 08:04 PM
Angularでモナコエディタを使用するにはどうすればよいですか?以下の記事は、最近業務で使用したangularでのmonaco-editorの使い方を記録したものですので、皆様のお役に立てれば幸いです。
 Angular の独立したコンポーネントの簡単な分析とその使用方法を説明します。
Jun 23, 2022 pm 03:49 PM
この記事では、Angular の独立コンポーネント、Angular で独立コンポーネントを作成する方法、および既存のモジュールを独立コンポーネントにインポートする方法について説明します。


