nginx プロキシを使用して、異なるドメイン名を承認する WeChat Web ページをサポートする
この記事では主に、WeChat Web ページでさまざまなドメイン名を認証するための nginx プロキシの使用方法を紹介します。これには特定の参照値があります。今、それをみんなと共有しています。必要な友人はそれを参照できます。
ちょっとした見出しであることを認めます。今回プロジェクトを開発するときに問題が発生しました。yafに基づいており、ドメイン名m.baidu.com(例として) を持つ 2 つの古い WeChat プロジェクトがありました。 Web ページの認証ドメイン名はm.baidu.comに入力され、今回新しく開発されたプロジェクトはlaravelに基づいており、ドメイン名はwechat.baidu です。 comですが、Web ページがドメイン名を承認したらどうすればよいですか? 、これは嘘です。もちろん、ほとんどの人はそのような苦痛に遭遇することはありません。
前提条件
laravel5.5

php7.1.0

nginx1.10

overtrue/laravel-wechat
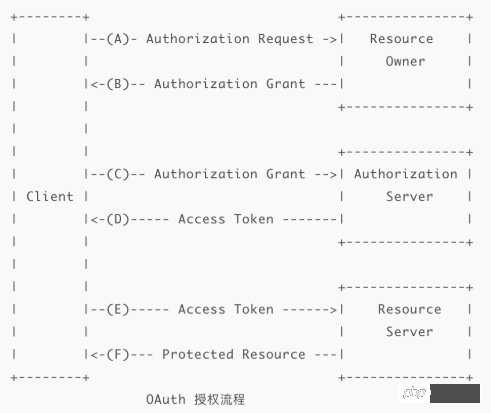
WeChat OAuthを理解する
このプロセスを理解する必要があります
写真を提供してくれた超神に感謝します
このプロセスから、コールバック url ドメイン名が実際には Web ページの承認されたドメイン名であることがわかります。この場合、偽物を作成できますか?
ドメイン名 wechat.baidu.com のプロジェクトの下に、Web ページの承認済みドメイン名も m.baidu と記述します。 com、その後、nginx をプロキシとして使用し、location に基づいて wechat.baidu.com に転送します;
rewrite overtrue/ laravel-wechatミドルウェア
このミドルウェアを書き直す必要があるのはなぜですか?ミドルウェアはデフォルトでドメイン名を直接取得するため、wechat.baidu.comを使用すると, その後、デフォルトではコールバック後にwechat.baidu.comにジャンプしますが、実際には # でm.baidu.com
にジャンプしたいのです。 ##Middleware フォルダーの下に新しいミドルウェア OAuthAuthenticate を作成し、Overtrue\LaravelWeChat\Middleware\OAuthAuthenticate;:
namespace App\Http\Middleware;


use Illuminate\Http\Request;
use Illuminate\Support\Facades\App;
use Illuminate\Support\Facades\Event;
use Overtrue\LaravelWeChat\Events\WeChatUserAuthorized;
use Overtrue\LaravelWeChat\Middleware\OAuthAuthenticate as BaseAuthenticate;

class OAuthAuthenticate extends BaseAuthenticate
{


    public function handle($request, \Closure $next, $account = 'default', $scopes = null)
    {
        // $account 与 $scopes 写反的情况
        if (is_array($scopes) || (\is_string($account) && str_is('snsapi_*', $account))) {
            list($account, $scopes) = [$scopes, $account];
            $account || $account = 'default';
        }

        $isNewSession = false;
        $sessionKey = \sprintf('wechat.oauth_user.%s', $account);
        $config = config(\sprintf('wechat.official_account.%s', $account), []);
        $officialAccount = app(\sprintf('wechat.official_account.%s', $account));
        $scopes = $scopes ?: array_get($config, 'oauth.scopes', ['snsapi_base']);

        if (is_string($scopes)) {
            $scopes = array_map('trim', explode(',', $scopes));
        }

        $session = session($sessionKey, []);

        if (!$session) {
            if ($request->has('code')) {
                session([$sessionKey => $officialAccount->oauth->user() ?? []]);
                $isNewSession = true;

                Event::fire(new WeChatUserAuthorized(session($sessionKey), $isNewSession, $account));

                return redirect()->to($this->getTargetUrl($request));
            }

            session()->forget($sessionKey);


            //本地和测试环境下使用这个
            if(App::environment()=='local' ||App::environment()=="test"){
                return $officialAccount->oauth->scopes($scopes)->redirect($request->fullUrl());
            }


            $query = $request->getQueryString();

            $question = $request->getBaseUrl().$request->getPathInfo() == '/' ? '/?' : '?';

            $url= $query ? $request->getPathInfo().$question.$query : $request->getPathInfo();

            $url="http://m.baidu.com".$url; //就这一步很重要

            return $officialAccount->oauth->scopes($scopes)->redirect($url);
        }

        Event::fire(new WeChatUserAuthorized(session($sessionKey), $isNewSession, $account));

        return $next($request);
    }


}kernel を継承します。 .php $routeMiddleware に
"wechat.oauth.baidu.com"=>OAuthAuthenticate::class
Thisコード設定は「CORS を実装するための Nginx 設定」を参照していますが、これを直接コピーして//在m.baidu.com域名配置下,设置location规则,所有router以/official_account开头的都去wechat.baidu.com下,然后设置跨域 location /official_account/{ add_header 'Access-Control-Allow-Origin' "$http_origin"; add_header 'Access-Control-Allow-Methods' 'GET, POST, PUT, DELETE, OPTIONS'; add_header 'Access-Control-Allow-Headers' 'DNT,X-Mx-ReqToken,Keep-Alive,User-Agent,X-Requested-With,If-Modified-Since,Cache-Control,Content-Type,Authorization,X-CSRF-TOKEN,X-XSRF-TOKEN'; add_header 'Access-Control-Allow-Credentials' 'true'; if ($request_method = 'OPTIONS') { add_header 'Access-Control-Allow-Origin' "$http_origin"; add_header 'Access-Control-Allow-Methods' 'GET, POST, PUT, DELETE, OPTIONS'; add_header 'Access-Control-Allow-Headers' 'DNT,X-Mx-ReqToken,Keep-Alive,User-Agent,X-Requested-With,If-Modified-Since,Cache-Control,Content-Type,Authorization,X-CSRF-TOKEN,X-XSRF-TOKEN'; add_header 'Access-Control-Allow-Credentials' 'true'; #add_header 'Access-Control-Max-Age' 1728000; # 20 天 #add_header 'Content-Type' 'text/html charset=UTF-8'; #add_header 'Content-Length' 0; return 200; } # 这下面是要被代理的后端服务器,它们就不需要修改代码来支持跨域了 proxy_pass http://wechat.m.liaorusanshe.com; # proxy_set_header Host $host; proxy_redirect off; #proxy_set_header X-Real-IP $remote_addr; #proxy_set_header X-Forwarded-For $proxy_add_x_forwarded_for; proxy_connect_timeout 60; proxy_read_timeout 60; proxy_send_timeout 60; }ログイン後にコピー
proxy_pass で使用すると、400 リクエスト ヘッダーまたは Cookie が大きすぎます エラーが発生します。 「400 Bad Request Request Header Or Cookie Too Large」 を確認すると、> を確認すると、解決できます。次の 3 つの設定を削除してください:
         proxy_set_header Host $host;
         proxy_set_header X-Real-IP $remote_addr;
        proxy_set_header X-Forwarded-For $proxy_add_x_forwarded_for;
nginx proxy_pass を使用してジャンプする場合、現在アクセスされている IP アドレスをバックエンドに送信する必要があるため、nginx がトリガーされます。 #bug 無限ループが発生します。この状況に遭遇した人がいるかどうかはわかりません。 その後、再起動すれば完了です。
上記がこの記事の全内容です。皆様の学習に少しでもお役に立てれば幸いです。その他の関連コンテンツについては、PHP 中国語 Web サイトをご覧ください。
関連する推奨事項:
Nginx ポート マッピング設定以上がnginx プロキシを使用して、異なるドメイン名を承認する WeChat Web ページをサポートするの詳細内容です。詳細については、PHP 中国語 Web サイトの他の関連記事を参照してください。

ホットAIツール

Undresser.AI Undress
リアルなヌード写真を作成する AI 搭載アプリ

AI Clothes Remover
写真から衣服を削除するオンライン AI ツール。

Undress AI Tool
脱衣画像を無料で

Clothoff.io
AI衣類リムーバー

AI Hentai Generator
AIヘンタイを無料で生成します。

人気の記事

ホットツール

メモ帳++7.3.1
使いやすく無料のコードエディター

SublimeText3 中国語版
中国語版、とても使いやすい

ゼンドスタジオ 13.0.1
強力な PHP 統合開発環境

ドリームウィーバー CS6
ビジュアル Web 開発ツール

SublimeText3 Mac版
神レベルのコード編集ソフト(SublimeText3)

ホットトピック
 Laravel と CodeIgniter の最新バージョンの比較
Jun 05, 2024 pm 05:29 PM
Laravel 9 と CodeIgniter 4 の最新バージョンでは、更新された機能と改善が提供されます。 Laravel9はMVCアーキテクチャを採用しており、データベース移行、認証、テンプレートエンジンなどの機能を提供します。 CodeIgniter4 は、HMVC アーキテクチャを使用してルーティング、ORM、およびキャッシュを提供します。パフォーマンスの面では、Laravel9 のサービスプロバイダーベースの設計パターンと CodeIgniter4 の軽量フレームワークにより、優れたパフォーマンスが得られます。実際のアプリケーションでは、Laravel9 は柔軟性と強力な機能を必要とする複雑なプロジェクトに適しており、CodeIgniter4 は迅速な開発や小規模なアプリケーションに適しています。
 Laravel - アーティザンコマンド
Aug 27, 2024 am 10:51 AM
Laravel - アーティザン コマンド - Laravel 5.7 には、新しいコマンドを処理およびテストするための新しい方法が付属しています。これには職人コマンドをテストする新しい機能が含まれており、そのデモについては以下で説明します。
 Laravel と CodeIgniter: 大規模プロジェクトにはどちらのフレームワークが適していますか?
Jun 04, 2024 am 09:09 AM
大規模プロジェクト用のフレームワークを選択する場合、Laravel と CodeIgniter にはそれぞれ独自の利点があります。 Laravel はエンタープライズレベルのアプリケーション向けに設計されており、モジュール設計、依存関係の注入、強力な機能セットを提供します。 CodeIgniter は、速度と使いやすさを重視した、小規模から中規模のプロジェクトに適した軽量フレームワークです。複雑な要件と多数のユーザーを伴う大規模なプロジェクトには、Laravel のパワーとスケーラビリティがより適しています。単純なプロジェクトやリソースが限られている状況では、CodeIgniter の軽量で迅速な開発機能がより理想的です。
 Laravel と CodeIgniter ではどちらが初心者に優しいでしょうか?
Jun 05, 2024 pm 07:50 PM
初心者にとって、CodeIgniter は学習曲線が緩やかで機能は少ないですが、基本的なニーズはカバーしています。 Laravel は幅広い機能セットを提供しますが、学習曲線はわずかに急になります。パフォーマンスの点では、Laravel と CodeIgniter はどちらも良好なパフォーマンスを示します。 Laravel にはより広範なドキュメントとアクティブなコミュニティ サポートがあり、CodeIgniter はよりシンプルで軽量で、強力なセキュリティ機能を備えています。ブログアプリケーションを構築する実際のケースでは、Laravel の EloquentORM を使用するとデータ操作が簡素化されますが、CodeIgniter ではより手動の構成が必要になります。
 Laravel と CodeIgniter ではどちらのテンプレート エンジンが優れていますか?
Jun 03, 2024 am 11:30 AM
Laravel の Blade と CodeIgniter の Twig テンプレート エンジンを比較し、プロジェクトのニーズと個人的な好みに基づいて選択してください。Blade は MVC 構文に基づいており、適切なコード編成とテンプレートの継承を促進します。 Twig は、柔軟な構文、強力なフィルター、拡張サポート、セキュリティ サンドボックスを提供するサードパーティ ライブラリです。
 Laravel と CodeIgniter: 小規模プロジェクトにはどちらのフレームワークが適していますか?
Jun 04, 2024 pm 05:29 PM
小規模なプロジェクトの場合、Laravel は強力な機能とセキュリティを必要とする大規模なプロジェクトに適しています。 CodeIgniter は、軽量さと使いやすさを必要とする非常に小規模なプロジェクトに適しています。
 Laravel - アーティザン コンソール
Aug 27, 2024 am 10:51 AM
Laravel - Artisan Console - Laravel フレームワークは、コマンドラインを介した対話のための 3 つの主要なツール、つまり Artisan、Ticker、REPL を提供します。この章ではArtisanについて詳しく説明します。
 Laravel - ページネーションのカスタマイズ
Aug 27, 2024 am 10:51 AM
Laravel - ページネーションのカスタマイズ - Laravel には、ユーザーまたは開発者がページネーション機能を組み込むのに役立つページネーションの機能が含まれています。 Laravel ページネーターは、クエリ ビルダーおよび Eloquent ORM と統合されています。自動ページネーションメソッド


