角度コンポーネント通信の解析
この記事では、主に角度コンポーネント通信の分析を紹介します。これを必要とする友人に共有します。
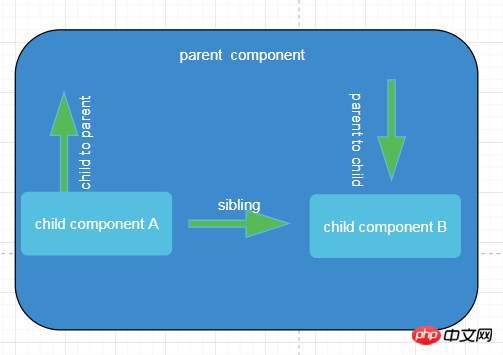
この記事では、主に次の種類のアプリケーションコンポーネント通信を紹介します。 Angular 通信について話します

- 親コンポーネント => 子コンポーネント
- 親コンポーネント
- コンポーネント A = >
親コンポーネント= > ; 子コンポーネント
| | ローカル変数||
|
|
||
| service | service |
Rxjsの観察 |
| Rxjs の観察 |
localStorage、sessionStorage |
|
|
上記の表は、使用できる通信ソリューションをまとめたものです。用語の最後の 3 つは汎用であり、Angular コンポーネント間で使用できます。これらは、redux と Promise を含む最も強力な使用方法です。機能状態管理について、一つずつ説明しましょう 親コンポーネント => 子コンポーネント@input、最も一般的に使用される方法
settersetterは@input属性をインターセプトすることです。コンポーネントでは、セッターを必要とする入力属性を処理する必要があることがよくあります。セッターとゲッターは一緒に使用されることがよくあります。これは、angular を通じて検出されます。ライフサイクルフックの使用はお勧めしません。使用したい場合は、Angular ドキュメントを参照してください@Component({
selector: 'app-parent',
template: '<p>childText:<app-child></app-child></p>',
styleUrls: ['./parent.component.css']
})
export class ParentComponent implements OnInit {
varString: string;
constructor() { }
ngOnInit() {
this.varString = '从父组件传过来的' ;
}
}ログイン後にコピー import { Component, OnInit, Input } from '@angular/core';
@Component({
selector: 'app-child',
template: '<h1 id="textContent">{{textContent}}</h1>',
styleUrls: ['./child.component.css']
})
export class ChildComponent implements OnInit {
@Input() public textContent: string ;
constructor() { }
ngOnInit() {
}
}ログイン後にコピー
@ViewChild() は、通常、サブコンポーネントの非プライベートメソッドを呼び出すために使用されます。import { Component, OnInit, Input } from '@angular/core';
@Component({
selector: 'app-child',
template: '<h1 id="textContent">{{textContent}}</h1>',
styleUrls: ['./child.component.css']
})
export class ChildComponent implements OnInit {
_textContent:string;
@Input()
set textContent(text: string){
this._textContent = !text: "啥都没有给我" ? text ;
} ;
get textContent(){
return this._textContent;
}
constructor() { }
ngOnInit() {
}
}ログイン後にコピー import {Component, OnInit, ViewChild} from '@angular/core';
import {ViewChildChildComponent} from "../view-child-child/view-child-child.component";
@Component({
selector: 'app-parent',
templateUrl: './parent.component.html',
styleUrls: ['./parent.component.css']
})
export class ParentComponent implements OnInit {
varString: string;
@ViewChild(ViewChildChildComponent)
viewChildChildComponent: ViewChildChildComponent;
constructor() { }
ngOnInit() {
this.varString = '从父组件传过来的' ;
}
clickEvent(clickEvent: any) {
console.log(clickEvent);
this.viewChildChildComponent.myName(clickEvent.value);
}
}ログイン後にコピー ローカル変数 ローカル変数は viewChild に似ており、parent.component.html を変更し、変数
|
以上が角度コンポーネント通信の解析の詳細内容です。詳細については、PHP 中国語 Web サイトの他の関連記事を参照してください。

ホットAIツール

Undresser.AI Undress
リアルなヌード写真を作成する AI 搭載アプリ

AI Clothes Remover
写真から衣服を削除するオンライン AI ツール。

Undress AI Tool
脱衣画像を無料で

Clothoff.io
AI衣類リムーバー

AI Hentai Generator
AIヘンタイを無料で生成します。

人気の記事

ホットツール

メモ帳++7.3.1
使いやすく無料のコードエディター

SublimeText3 中国語版
中国語版、とても使いやすい

ゼンドスタジオ 13.0.1
強力な PHP 統合開発環境

ドリームウィーバー CS6
ビジュアル Web 開発ツール

SublimeText3 Mac版
神レベルのコード編集ソフト(SublimeText3)

ホットトピック
 7566
7566
 15
15
 1386
1386
 52
52
 87
87
 11
11
 28
28
 105
105
 VueでBootstrapの使用方法
Apr 07, 2025 pm 11:33 PM
vue.jsでBootstrapを使用すると、5つのステップに分かれています。ブートストラップをインストールします。 main.jsにブートストラップをインポートしますブートストラップコンポーネントをテンプレートで直接使用します。オプション:カスタムスタイル。オプション:プラグインを使用します。
 HTML、CSS、およびJavaScriptの役割:コアの責任
Apr 08, 2025 pm 07:05 PM
HTMLはWeb構造を定義し、CSSはスタイルとレイアウトを担当し、JavaScriptは動的な相互作用を提供します。 3人はWeb開発で職務を遂行し、共同でカラフルなWebサイトを構築します。
 ブートストラップにスプリットラインを書く方法
Apr 07, 2025 pm 03:12 PM
ブートストラップスプリットラインを作成するには2つの方法があります。タグを使用して、水平方向のスプリットラインを作成します。 CSS Borderプロパティを使用して、カスタムスタイルのスプリットラインを作成します。
 H5は何を参照していますか?コンテキストの探索
Apr 12, 2025 am 12:03 AM
H5ReferStoHtml5、apivotaltechnologyinwebdevelopment.1)html5introduceSnewelementsandapisforrich、dynamicwebapplications.2)Itupp ortsmultimediawithoutplugins、endancingurexperiencecrossdevices.3)semanticelementsimprovecontentstructurendseo.4)H5'srespo
 HTML、CSS、およびJavaScriptの理解:初心者向けガイド
Apr 12, 2025 am 12:02 AM
webdevelopmentReliesOnhtml、css、andjavascript:1)htmlStructuresContent、2)cssStylesit、および3)Javascriptaddsinteractivity、形成、
 ブートストラップのフレームワークをセットアップする方法
Apr 07, 2025 pm 03:27 PM
Bootstrapフレームワークをセットアップするには、次の手順に従う必要があります。1。CDNを介してブートストラップファイルを参照してください。 2。独自のサーバーでファイルをダウンロードしてホストします。 3。HTMLにブートストラップファイルを含めます。 4.必要に応じてSASS/LESSをコンパイルします。 5。カスタムファイルをインポートします(オプション)。セットアップが完了したら、Bootstrapのグリッドシステム、コンポーネント、スタイルを使用して、レスポンシブWebサイトとアプリケーションを作成できます。
 ブートストラップに写真を挿入する方法
Apr 07, 2025 pm 03:30 PM
ブートストラップに画像を挿入する方法はいくつかあります。HTMLIMGタグを使用して、画像を直接挿入します。ブートストラップ画像コンポーネントを使用すると、レスポンシブ画像とより多くのスタイルを提供できます。画像サイズを設定し、IMG-Fluidクラスを使用して画像を適応可能にします。 IMGボーダークラスを使用して、境界線を設定します。丸い角を設定し、IMGラウンドクラスを使用します。影を設定し、影のクラスを使用します。 CSSスタイルを使用して、画像をサイズ変更して配置します。背景画像を使用して、背景イメージCSSプロパティを使用します。


