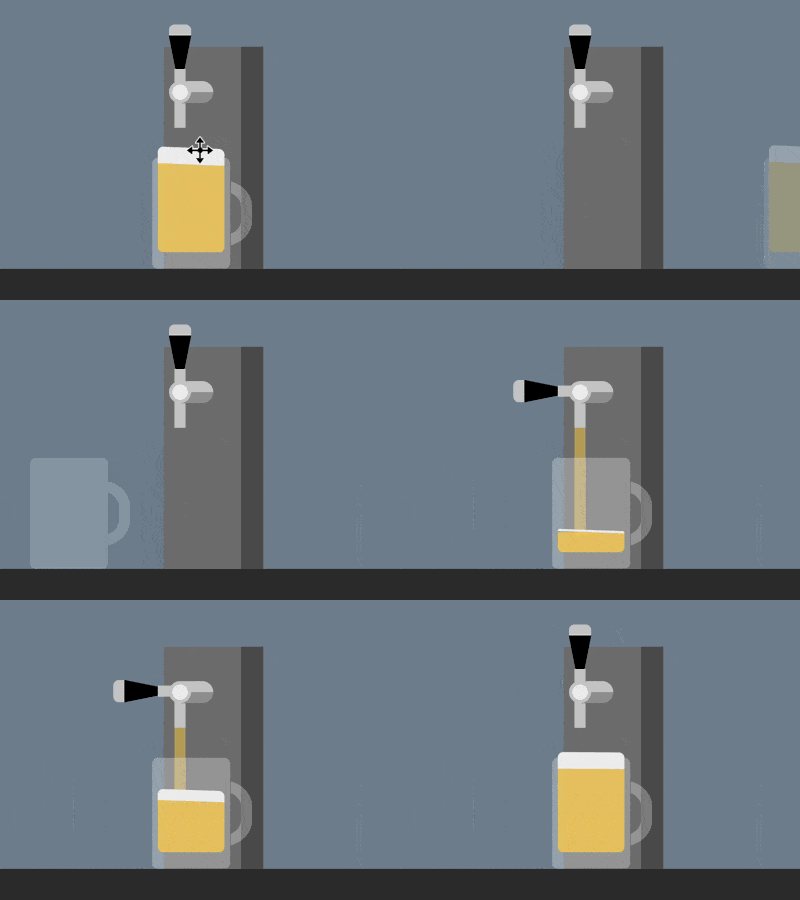
この記事の内容は、純粋な CSS を使用して生ビールを持ち上げる特殊効果を実現する方法に関するものです (ソースコードが添付されています)。必要な友人が参考になれば幸いです。あなたへ。
エフェクトのプレビュー

ソースコードのダウンロード
https://github.com/comehope/front-end-daily-challenges
コード解釈
domを定義し、コンテナにはワイン樽を表す.keg 元素和表示啤酒杯的 .glass 元素。酒桶有 2 个子元素,.handle 表示把手,.pipe 表示出水管,酒杯有 1 个表示啤酒的子元素 .beerが含まれます:
1 2 3 4 5 6 7 8 9 | <div>
<div>
<span></span>
<span></span>
</div>
<div>
<span></span>
</div>
</div>
|
ログイン後にコピー
中央揃え:
1 2 3 4 5 6 7 8 9 10 | body {
margin: 0;
height: 100vh;
display: flex;
justify-content: center;
background: linear-gradient(
lightslategray 300px,
#333 300px
);
}
|
ログイン後にコピー
コンテナの寸法と疑似要素の共通プロパティを定義します:
1 2 3 4 5 6 7 8 9 10 11 | .container {
width: 700px;
height: 300px;
position: relative;
}
.container *::before,
.container *::after {
content: '';
position: absolute;
}
|
ログイン後にコピー
バレルを描画します:
1 2 3 4 5 6 7 8 9 10 11 12 | .keg {
position: absolute;
width: 90px;
height: 200px;
background: linear-gradient(
to right,
#777 70px,
#555 70px
);
bottom: 0;
left: 310px;
}
|
ログイン後にコピー
水道管とそのブラケットを描画します:
1 2 3 4 5 6 7 8 9 10 11 12 13 14 15 16 17 18 19 20 21 22 23 24 25 26 27 | .keg .pipe {
position: absolute;
width: 10px;
height: 40px;
background-color: #ccc;
top: 33px;
left: 10px;
}
.keg .pipe::before {
width: 40px;
height: 20px;
background:
radial-gradient(
circle at 10px 10px,
#eee 7px,
#ccc 7px, #ccc 10px,
transparent 10px
),
linear-gradient(
#ccc 50%,
#999 50%
);
border-radius: 10px;
top: -2px;
left: -5px;
}
|
ログイン後にコピー
ハンドルを描画します:
1 2 3 4 5 6 7 8 9 10 11 12 13 14 15 16 17 18 19 20 21 22 23 24 25 | .keg .handle {
position: absolute;
border-style: solid;
border-width: 50px 10px 0 10px;
border-color: black transparent transparent transparent;
top: -10px;
left: 5px;
}
.keg .handle::before {
width: 20px;
height: 10px;
background-color: #ccc;
top: -60px;
left: -10px;
border-radius: 5px 5px 0 0;
}
.keg .handle::after {
width: 10px;
height: 20px;
background-color: #ccc;
top: -20px;
left: -5px;
}
|
ログイン後にコピー
ワイングラス:
1 2 3 4 5 6 7 8 9 10 11 12 13 14 15 16 17 18 19 20 | .glass {
position: absolute;
width: 70px;
height: 100px;
color: rgba(255, 255, 255, 0.3);
background-color: currentColor;
bottom: 0;
left: 300px;
border-radius: 5px;
}
.glass::before {
width: 50px;
height: 40px;
border: 10px solid;
top: 20px;
right: -20px;
border-radius: 0 40% 40% 0;
clip-path: inset(0 0 0 72%);
}
|
ログイン後にコピー
グラスの中にビールと泡を描きます:
1 2 3 4 5 6 7 8 9 10 11 12 13 14 15 16 17 18 | .beer {
position: absolute;
width: 60px;
height: 80px;
background-color: rgba(255, 206, 84, 0.8);
bottom: 15px;
left: 5px;
border-radius: 0 0 5px 5px;
border-top: solid rgba(255, 206, 84, 0.8);
}
.beer::before {
width: inherit;
height: 15px;
background-color: #eee;
top: -15px;
border-radius: 5px 5px 0 0;
}
|
ログイン後にコピー
次に、アニメーションを作成します。
ワイングラスのハンドルが押されるアニメーション効果を増やす:
1 2 3 4 5 6 7 8 9 10 11 12 13 14 | .keg .handle {
transform-origin: center 50px;
animation: handle 5s infinite;
}
@keyframes handle {
10%, 60% {
transform: rotate(0deg);
}
20%, 50% {
transform: rotate(-90deg);
}
}
|
ログイン後にコピー
ビールが注がれるアニメーション効果を増やす:
1 2 3 4 5 6 7 8 9 10 11 12 13 14 15 16 17 18 19 | .beer {
animation: fillup 5s infinite;
}
@keyframes fillup {
0%, 20% {
height: 0px;
border-width: 0px;
}
40% {
height: 40px;
}
80%, 100% {
height: 80px;
border-width: 5px;
}
}
|
ログイン後にコピー
ビールの泡立ちのアニメーション効果を増やす:
1 2 3 4 5 6 7 8 9 10 11 12 13 14 15 16 17 18 19 20 21 22 23 24 25 26 27 | .beer::before {
animation:
wave 0.5s infinite alternate,
fillup-foam 5s linear infinite;
}
@keyframes fillup-foam {
0%, 20% {
top: 0;
height: 0;
}
60%, 100% {
top: -15px;
height: 15px;
}
}
@keyframes wave {
from {
transform: skewY(-3deg);
}
to {
transform: skewY(3deg);
}
}
|
ログイン後にコピー
ワイングラスから流れ出るビールの効果を増やす注ぎ口:
1 2 3 4 5 6 7 8 9 10 11 12 13 14 15 16 17 18 19 20 21 22 23 24 25 26 27 28 29 30 | .keg .pipe::after {
width: 10px;
background-color: rgba(255, 206, 84, 0.5);
animation: flow 5s infinite;
}
@keyframes flow {
0%, 15% {
top: 40px;
height: 0;
}
20% {
height: 115px;
}
40% {
height: 75px;
}
55% {
top: 40px;
height: 50px;
}
60%, 100% {
top: 80px;
height: 0;
}
}
|
ログイン後にコピー
最後に、ワイングラスのスライド効果を追加します:
1 2 3 4 5 6 7 8 9 10 11 12 13 14 15 16 17 18 19 20 | .glass {
animation: slide 5s ease infinite;
}
@keyframes slide {
0% {
left: 0;
filter: opacity(0);
}
20%, 80% {
left: 300px;
filter: opacity(1);
}
100% {
left: 600px;
filter: opacity(0);
}
}
|
ログイン後にコピー
これで完了です。
関連する推奨事項:
純粋な CSS を使用して砂時計アニメーション効果を実現する方法
CSS と D3 を使用してランタンのセットを実装する方法 (コード付き)以上が純粋な CSS を使用して生ビールを持ち上げる特殊効果を実現する方法 (ソースコード添付)の詳細内容です。詳細については、PHP 中国語 Web サイトの他の関連記事を参照してください。


