

SpringBoot は Jsp と Thymeleaf をどのように統合しますか?

この記事の内容は、SpringBoot が Jsp と Thymeleaf を統合する方法についてです。必要な方は参考にしていただければ幸いです。
前書き
この記事では主に、簡単なユーザーの追加、削除、変更、クエリのサンプル プロジェクトを実装するための SpringBootintegrationJsp と SpringBootintegrationThymeleaf について説明します。先に述べておくと、項目は 3 つあり、2 つは個別に統合され、1 つはすべてを統合します。これらのいずれかが必要な場合は、対応するセクションの概要を参照してください。プロジェクトのソース コードが必要な場合は、一番下に直接ジャンプし、リンクからプロジェクト コードをダウンロードできます。
SpringBootはJspを統合します
開発準備
環境要件
JDK: 1.7以降
SQL: MySql
ここでは、ユーザー情報を保存するためにmysqlにユーザーテーブルを作成する必要があります。
データベーススクリプトは次のとおりです:
CREATE TABLE `t_user` (
  `id` int(11) NOT NULL AUTO_INCREMENT COMMENT '自增id',
  `name` varchar(10) DEFAULT NULL COMMENT '姓名',
  `age` int(2) DEFAULT NULL COMMENT '年龄',
  `password` varchar(24) NOT NULL COMMENT '密码',
  PRIMARY KEY (`id`)
) ENGINE=InnoDB AUTO_INCREMENT=17 DEFAULT CHARSET=utf8
新しいテーブルを作成したら、プロジェクトを作成しましょう。
私たちのプロジェクトは、Maven を通じて作成された通常の Web プロジェクトです。
プロジェクトを作成した後、対応するjarパッケージをダウンロードし、関連する開発を実行する必要があります。
これらの jar パッケージの場合、springBoot と Jsp に関連する jar を pom.xml ファイルに追加するだけです。
関連する注意事項が書かれているので、ここでは詳しく説明しません。
Maven の依存関係は次のとおりです:
 <dependencies>
        <!-- Spring Boot Web 依赖 核心 -->
        <dependency>
            <groupId>org.springframework.boot</groupId>
            <artifactId>spring-boot-starter-web</artifactId>
        </dependency>

        <!-- Spring Boot 热部署 class文件之后会自动重启 -->
        <dependency>
            <groupId>org.springframework.boot</groupId>
            <artifactId>spring-boot-devtools</artifactId>
            <optional>true</optional>
        </dependency>
        <!-- Spring Boot Test 依赖 -->
        <dependency>
            <groupId>org.springframework.boot</groupId>
            <artifactId>spring-boot-starter-test</artifactId>
            <scope>test</scope>
        </dependency>

        <!-- Spring Boot JPA -->
        <dependency>
            <groupId>org.springframework.boot</groupId>
            <artifactId>spring-boot-starter-data-jpa</artifactId>
        </dependency>

          <!-- Spring Boot Mybatis 依赖 -->
        <dependency>
            <groupId>org.mybatis.spring.boot</groupId>
            <artifactId>mybatis-spring-boot-starter</artifactId>
            <version>${mybatis-spring-boot}</version>
        </dependency>

        <dependency>
            <groupId>mysql</groupId>
            <artifactId>mysql-connector-java</artifactId>
        </dependency>

        <!--fastjson 相关jar -->
        <dependency>
            <groupId>com.alibaba</groupId>
            <artifactId>fastjson</artifactId>
            <version>${fastjson}</version>
        </dependency>

                <!--JSP 依赖  -->
        <!-- servlet依赖. -->
        <dependency>
            <groupId>javax.servlet</groupId>
            <artifactId>jstl</artifactId>
        </dependency>

        <dependency>
            <groupId>javax.servlet</groupId>
            <artifactId>javax.servlet-api</artifactId>
            <scope>provided</scope>
        </dependency>

        <!-- tomcat的支持.-->
        <dependency>
            <groupId>org.apache.tomcat.embed</groupId>
            <artifactId>tomcat-embed-jasper</artifactId>
            <scope>provided</scope>
        </dependency>
</dependencies> 関連する Jar パッケージをダウンロードした後、プロジェクトの構造を確認します。
まずはバックグラウンド関連のパッケージ説明:
src/main/java
com.pancm.web - Controller 层
com.pancm.dao - 数据操作层 DAO
com.pancm.pojo- 实体类
com.pancm.service - 业务逻辑层
Application - 应用启动类

src/main/resources
application.properties - 应用配置文件,应用启动会自动读取配置
フロントエンド関連のファイルストレージ説明:
src/main/webapp
WEB-INF - web.xml web相关的核心配置
WEB-INF/jsp - JSP文件的存放路径
プロジェクト全体構造図: 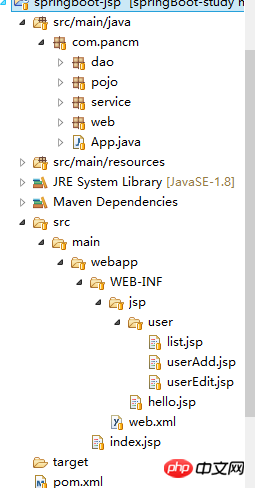
プロジェクト構造が確認できたら、対応する設定を追加していきます。
対応する設定をapplication.propertiesに追加するだけです。
データソースの構成は前のものと同様ですが、注意する必要があるのは、Jspの関連構成です。
springBoot のデフォルトでサポートされているテンプレートは Thymeleaf であるため、ここで対応する変更を加える必要があります。
構成は次のとおりです:
## 编码 banner.charset=UTF-8 server.tomcat.uri-encoding=UTF-8 spring.http.encoding.charset=UTF-8 spring.http.encoding.enabled=true spring.http.encoding.force=true spring.messages.encoding=UTF-8 ## 端口 server.port=8088 ## 数据源 spring.datasource.url=jdbc:mysql://localhost:3306/springBoot?useUnicode=true&characterEncoding=utf8 spring.datasource.username=root spring.datasource.password=123456 spring.datasource.driver-class-name=com.mysql.jdbc.Driver ## JSP配置 # 页面默认前缀 spring.mvc.view.prefix=/WEB-INF/jsp/ # 响应页面默认后缀 spring.mvc.view.suffix=.jsp
コードの作成
実際、ここでのコードは前の記事で説明したものと基本的に同じです。唯一の違いは、ここではデータベースの操作にJPAを使用していることです。ちなみに、JPA はこのフレームワークを使用しています)。
1つ目はエンティティクラスです。ここではJPAを使用しているため、以前のものとは少し異なり、いくつかのアノテーションが追加されています。
Entity: これがエンティティクラスであることを示します。
Table: このエンティティ クラスによってマップされるデータ テーブルの名前。
列: フィールドの属性を指定します。nullable は空でないかどうかを示し、unique は一意であるかどうかを示します。
すると、エンティティクラスのコードは以下のようになります。
@Entity
@Table(name = "t_user")
public class User {

     /** 编号 */
     @Id
     @GeneratedValue
     private Long id;
     /** 姓名 */
     @Column(nullable = false, unique = true)
     private String name;
     /** 密码*/
     @Column(nullable = false)
     private String password;
     /** 年龄 */
     @Column(nullable = false)
     private Integer age;

    //getter和setter略
} JPAを使用しているため、dao層はJpaRepositoryクラスを継承するだけでよく、エンティティクラスと主キーの型を指定する必要があります。
dao レイヤーのコードは次のとおりです:
@Mapper
public interface UserDao extends JpaRepository<User, Long>{

}ビジネスレイヤーは JPA を使用しますが、追加と変更には save を使用し、削除には findOne を使用して ID を渡す方法も非常に簡単です。 search、findAll はすべてをクエリするなどです。
サービスのコードは次のとおりです:
@Service
public class UserServiceImpl implements UserService {

    @Autowired
    private UserDao userDao;


    @Override
    public boolean addUser(User user) {
        boolean flag=false;
        try{
            userDao.save(user);
            flag=true;
        }catch(Exception e){
            System.out.println("新增失败!");
            e.printStackTrace();
        }
        return flag;
    }

    @Override
    public boolean updateUser(User user) {
        boolean flag=false;
        try{
            userDao.save(user);
            flag=true;
        }catch(Exception e){
            System.out.println("修改失败!");
            e.printStackTrace();
        }
        return flag;
    }

    @Override
    public boolean deleteUser(Long id) {
        boolean flag=false;
        try{
            userDao.delete(id);
            flag=true;
        }catch(Exception e){
            System.out.println("删除失败!");
            e.printStackTrace();
        }
        return flag;
    }

    @Override
    public User findUserById(Long id) {
        return userDao.findOne(id);
    }

    @Override
    public List<User> findAll() {
        return userDao.findAll();
    }
}コントロール層に関しては、ここでもJspが呼び出すためのインターフェースを提供しますが、このクラスのアノテーションは以前のRestControllerアノテーションを使用できません。データは json 形式で返されますが、返すときにインターフェースにジャンプする必要がある場合があるため、Controller アノテーションを使用する必要があります。メソッドで返したいデータ形式が json の場合は、メソッドに ResponseBody アノテーションを追加するだけです。
制御層のコードは次のとおりです:
@Controller
public class UserRestController {
        @Autowired
        private UserService userService;

        @RequestMapping("/hello")
        public String hello() {
            return "hello";
        }

        @RequestMapping("/")
        public String index() {
            return "redirect:/list";
        }


        @RequestMapping("/list")
        public String list(Model model) {
            System.out.println("查询所有");
            List<User> users=userService.findAll();
            model.addAttribute("users", users);
            return "user/list";
        }

        @RequestMapping("/toAdd")
        public String toAdd() {
            return "user/userAdd";
        }

        @RequestMapping("/add")
        public String add(User user) {
            userService.addUser(user);
            return "redirect:/list";
        }

        @RequestMapping("/toEdit")
        public String toEdit(Model model,Long id) {
            User user=userService.findUserById(id);
            model.addAttribute("user", user);
            return "user/userEdit";
        }

        @RequestMapping("/edit")
        public String edit(User user) {
            userService.updateUser(user);
            return "redirect:/list";
        }


        @RequestMapping("/toDelete")
        public String delete(Long id) {
            userService.deleteUser(id);
            return "redirect:/list";
        }
}機能テスト
バックエンド コードの紹介は以上です。フロントエンド JSP コードについては、これ以上は言いません (主な理由は次のとおりです)。インターフェイスが醜すぎます...)、プロジェクトを直接開始して効果を確認します。
プロジェクトを開始し、ブラウザで http://localhost:8088/list と入力します
メインインターフェイス: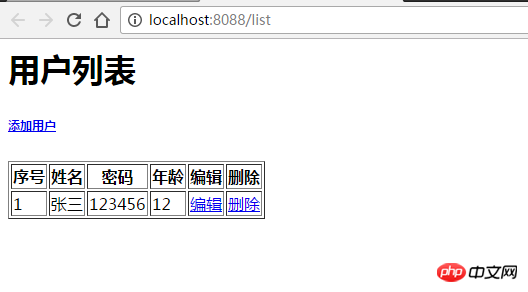
データを追加した後のインターフェイス: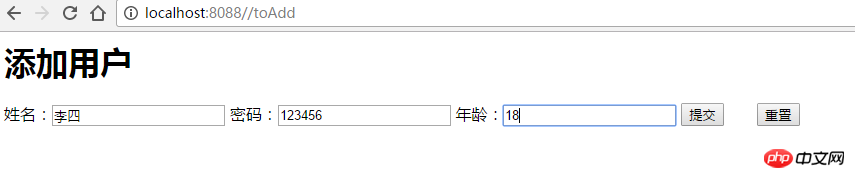
その他の変更や削除も可能です実現するには、ここにマップを 1 つずつ配置する必要はありません。
springBoot 統合 Jsp はここにあります。
SringBoot は Thymeleaf を統合します
Thymeleaf の概要
Thymeleaf は、Web および非 Web アプリケーションで使用できるテンプレート エンジンであり、XML/XHTML/HTML5、JavaScript、CSS、さらにはテキスト ファイルでも動作します。
Thymeleaf の使い方
私は Thymeleaf の使い方にあまり慣れていません。これはこの記事の主な内容ではありません。詳細については公式ドキュメントを確認してください。
https://www.thymeleaf.org/documentation.html
開発準備
基本的に上記のSringBoot統合Jspと同じなので、ここでは詳しく説明しません。
由于SpringBoot默认的模版引擎就是Thymeleaf,所以Maven 依赖这块只需要在原先的springBoot项目添加Thymeleaf的依赖就行。
  <dependency>
            <groupId>org.springframework.boot</groupId>
            <artifactId>spring-boot-starter-thymeleaf</artifactId>
</dependency>application.properties 配置这块,可以和之前的项目基本一致,需要注意的也只有spring.thymeleaf.cache配置,为false的时候是关闭Thymeleaf的缓存,更改界面之后会自动重启然后生效。
SringBoot整合Thymeleaf和SringBoot整合Jsp有个比较大的不同是,Thymeleaf的资源文件是放在src/main/resources目录下,Jsp的是放在src/main/webapp目录下。其中resources目录下的的static目录用于放置静态内容,比如css、js、jpg图片等。templates目录用于放置项目使用的页面模板,也就是.html文件。
它的项目结构图如下: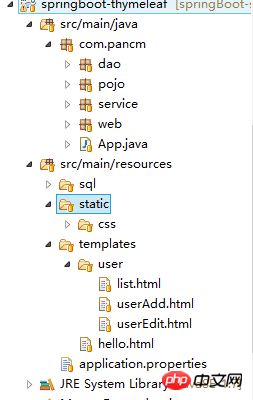
代码基本和SringBoot整合Jsp一致,这里就不在赘述了。
功能测试
启动该项目,在浏览器输入:http://localhost:8085
主界面: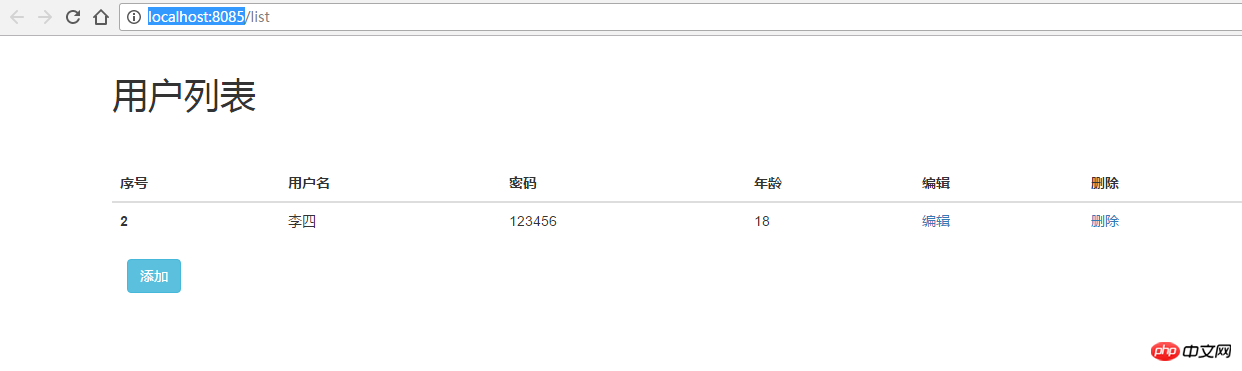
修改用户数据之后的:
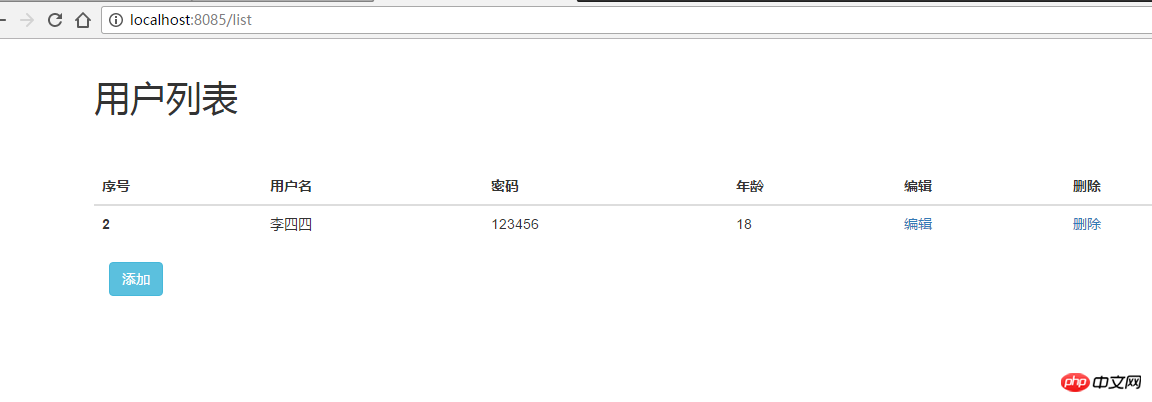
其它的功能也是可以实现的,这里就不再过多贴图了。
springBoot整合 Thymeleaf到这就结束了。
SpringBoot整合Jsp和Thymeleaf
注:这个是后来新加的一个项目。
SpringBoot单独整合Jsp和Thymeleaf都还好,没出现什么问题。但是在一起之后,就有了改变,因为SpringBoot默认的模板引擎是Thymeleaf,加上JSP之后,JSP的模板引擎并不会生效。但是如果想用JSP模板,此时的禁用到Thymeleaf,虽然可以通过多态更改配置实现,但是感觉太过麻烦了。于是研究了一下,找到了共存的方法。
和前面来两个项目区别如下:
之前的Jsp和Thymeleaf配置都是在application.properties
文件中,这里我将它们的配置改到代码中获取。
2.之前Thymeleaf相关文件是放在 src/main/resources 目录下,这里移动到WEB-INF目录下,和之前的jsp文件夹同级。
3.增加一个控制层,严格区分访问Jsp和Thymeleaf的路径。访问Jsp的路径前缀加上jsp,访问Thymeleaf前缀加上templates。
那么新增的配置代码如下:
@Configuration
@EnableWebMvc
@ComponentScan
public class WebConfig extends WebMvcConfigurerAdapter {

       @Bean
       public ViewResolver viewResolver() {
           InternalResourceViewResolver resolver = new InternalResourceViewResolver();
           resolver.setPrefix("/WEB-INF/");
           resolver.setSuffix(".jsp");
           resolver.setViewNames("jsp/*");
           resolver.setOrder(2);
           return resolver;
       }

       @Bean
       public ITemplateResolver templateResolver() {
           SpringResourceTemplateResolver templateResolver = new SpringResourceTemplateResolver();
           templateResolver.setTemplateMode("HTML5");
           templateResolver.setPrefix("/WEB-INF/");
           templateResolver.setSuffix(".html");
           templateResolver.setCharacterEncoding("utf-8");
           templateResolver.setCacheable(false);
           return templateResolver;
       }

       @Bean
       public SpringTemplateEngine templateEngine() {
           SpringTemplateEngine templateEngine = new SpringTemplateEngine();
           templateEngine.setTemplateResolver(templateResolver());
           return templateEngine;
       }

       @Bean
       public ThymeleafViewResolver viewResolverThymeLeaf() {
           ThymeleafViewResolver viewResolver = new ThymeleafViewResolver();
           viewResolver.setTemplateEngine(templateEngine());
           viewResolver.setCharacterEncoding("utf-8");
           viewResolver.setViewNames(new String[]{"thymeleaf/*"});
           viewResolver.setOrder(1);
           return viewResolver;
       }

       @Override
       public void configureDefaultServletHandling(DefaultServletHandlerConfigurer configurer) {
           configurer.enable();
       }

       @Override
       public void addResourceHandlers(ResourceHandlerRegistry registry) {
           super.addResourceHandlers(registry);
       }
}项目的结构图如下: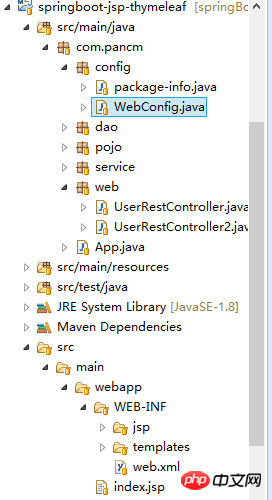
功能测试
在浏览器输入:http://localhost:8089/list
查看Thymeleaf模板的界面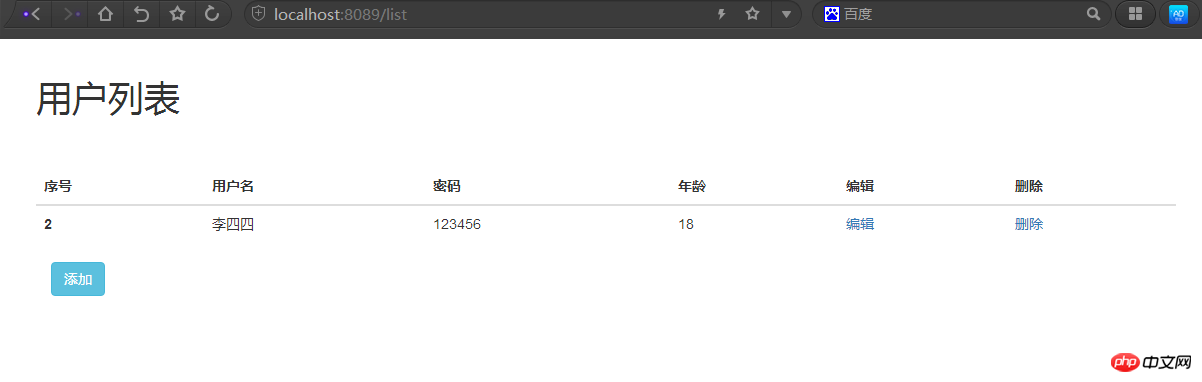
在浏览器输入:http://localhost:8089/list2
查看JSP模板的界面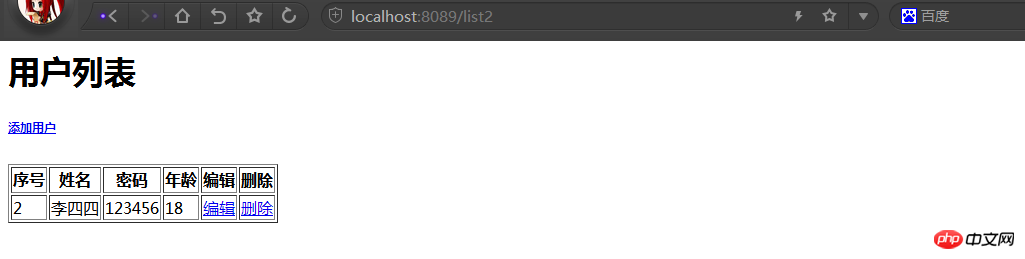
可以看到已经成功整合。
关于SpringBoot整合Jsp和Thymeleaf 到这里就结束了。
SpringBoot整合Jsp的项目工程地址:
https://github.com/xuwujing/springBoot-study/tree/master/springboot-jsp-jpa
SpringBoot整合Thymeleaf的项目工程地址:
https://github.com/xuwujing/springBoot-study/tree/master/springboot-thymeleaf
SpringBoot整合Jsp和Thymeleaf的项目工程地址:
https://github.com/xuwujing/springBoot-study/tree/master/springboot-jsp-thymeleaf
相关推荐:
SpringBoot整合Netty并使用Protobuf进行数据传输的实现过程
以上がSpringBoot は Jsp と Thymeleaf をどのように統合しますか?の詳細内容です。詳細については、PHP 中国語 Web サイトの他の関連記事を参照してください。

ホットAIツール

Undresser.AI Undress
リアルなヌード写真を作成する AI 搭載アプリ

AI Clothes Remover
写真から衣服を削除するオンライン AI ツール。

Undress AI Tool
脱衣画像を無料で

Clothoff.io
AI衣類リムーバー

AI Hentai Generator
AIヘンタイを無料で生成します。

人気の記事
ホットツール

メモ帳++7.3.1
使いやすく無料のコードエディター

SublimeText3 中国語版
中国語版、とても使いやすい

ゼンドスタジオ 13.0.1
強力な PHP 統合開発環境

ドリームウィーバー CS6
ビジュアル Web 開発ツール

SublimeText3 Mac版
神レベルのコード編集ソフト(SublimeText3)
ホットトピック
 7350
7350
 15
1628
14
1353
52
1265
25
1214
29
15
1628
14
1353
52
1265
25
1214
29

 2025年のトップ4 JavaScriptフレームワーク:React、Angular、Vue、Svelte
Mar 07, 2025 pm 06:09 PM
2025年のトップ4 JavaScriptフレームワーク:React、Angular、Vue、Svelte
Mar 07, 2025 pm 06:09 PM
この記事では、2025年の上位4つのJavaScriptフレームワーク(React、Angular、Vue、Svelte)を分析し、パフォーマンス、スケーラビリティ、将来の見通しを比較します。 強力なコミュニティと生態系のためにすべてが支配的なままですが、彼らの相対的なポップ
 Spring Boot Snakeyaml 2.0 CVE-2022-1471問題修正
Mar 07, 2025 pm 05:52 PM
Spring Boot Snakeyaml 2.0 CVE-2022-1471問題修正
Mar 07, 2025 pm 05:52 PM
この記事では、リモートコードの実行を可能にする重大な欠陥であるSnakeyamlのCVE-2022-1471の脆弱性について説明します。 Snakeyaml 1.33以降のSpring Bootアプリケーションをアップグレードする方法は、このリスクを軽減する方法を詳述し、その依存関係のアップデートを強調しています
 Javaのクラスロードメカニズムは、さまざまなクラスローダーやその委任モデルを含むどのように機能しますか?
Mar 17, 2025 pm 05:35 PM
Javaのクラスロードメカニズムは、さまざまなクラスローダーやその委任モデルを含むどのように機能しますか?
Mar 17, 2025 pm 05:35 PM
Javaのクラスロードには、ブートストラップ、拡張機能、およびアプリケーションクラスローダーを備えた階層システムを使用して、クラスの読み込み、リンク、および初期化が含まれます。親の委任モデルは、コアクラスが最初にロードされ、カスタムクラスのLOAに影響を与えることを保証します
 カフェインやグアバキャッシュなどのライブラリを使用して、Javaアプリケーションにマルチレベルキャッシュを実装するにはどうすればよいですか?
Mar 17, 2025 pm 05:44 PM
カフェインやグアバキャッシュなどのライブラリを使用して、Javaアプリケーションにマルチレベルキャッシュを実装するにはどうすればよいですか?
Mar 17, 2025 pm 05:44 PM
この記事では、カフェインとグアバキャッシュを使用してJavaでマルチレベルキャッシュを実装してアプリケーションのパフォーマンスを向上させています。セットアップ、統合、パフォーマンスの利点をカバーし、構成と立ち退きポリシー管理Best Pra
 node.js 20:キーパフォーマンスが向上し、新機能
Mar 07, 2025 pm 06:12 PM
node.js 20:キーパフォーマンスが向上し、新機能
Mar 07, 2025 pm 06:12 PM
node.js 20は、V8エンジンの改善、特により速いガベージコレクションとI/Oを介してパフォーマンスを大幅に向上させます。 新機能には、より良いWebセンブリのサポートと洗練されたデバッグツール、開発者の生産性とアプリケーション速度の向上が含まれます。
 Iceberg:データレイクテーブルの未来
Mar 07, 2025 pm 06:31 PM
Iceberg:データレイクテーブルの未来
Mar 07, 2025 pm 06:31 PM
大規模な分析データセットのオープンテーブル形式であるIcebergは、データの湖のパフォーマンスとスケーラビリティを向上させます。 内部メタデータ管理を通じて、寄木細工/ORCの制限に対処し、効率的なスキーマの進化、タイムトラベル、同時wを可能にします
 Javaで機能的なプログラミング技術を実装するにはどうすればよいですか?
Mar 11, 2025 pm 05:51 PM
Javaで機能的なプログラミング技術を実装するにはどうすればよいですか?
Mar 11, 2025 pm 05:51 PM
この記事では、Lambda式、Streams API、メソッド参照、およびオプションを使用して、機能プログラミングをJavaに統合することを調べます。 それは、簡潔さと不変性を通じてコードの読みやすさと保守性の改善などの利点を強調しています
 キュウリのステップ間でデータを共有する方法
Mar 07, 2025 pm 05:55 PM
キュウリのステップ間でデータを共有する方法
Mar 07, 2025 pm 05:55 PM
この記事では、キュウリの手順間でデータを共有する方法、シナリオコンテキスト、グローバル変数、引数の合格、およびデータ構造を比較する方法を調べます。 簡潔なコンテキストの使用、記述など、保守性のためのベストプラクティスを強調しています
