HTML5+css3 を使用して、よく使用される 12 個のボタン スイッチ スタイルを作成する方法 (完全なコードを添付)
昨今のフロントエンドWebページの開発では、デザイン性がより細部にまで反映されています。今回は、さまざまなスイッチボタンがどのように作られているかを詳しくご紹介します。 HTML5 css3 が皆さんのお役に立てれば幸いです。
HTML5 css3 を使用してボタン スイッチを作成する原理
デザインの要件に応じてさまざまな色を塗りつぶします。
#ボタン スイッチの形状では、特定の問題を詳細に分析する必要があります。たとえば、丸いボタン スイッチでは border-radius ステートメントを使用する必要があり、四角形のボタン スイッチでは、そのステートメントを使用する必要があります。 div設定などを直接使用できます。
-
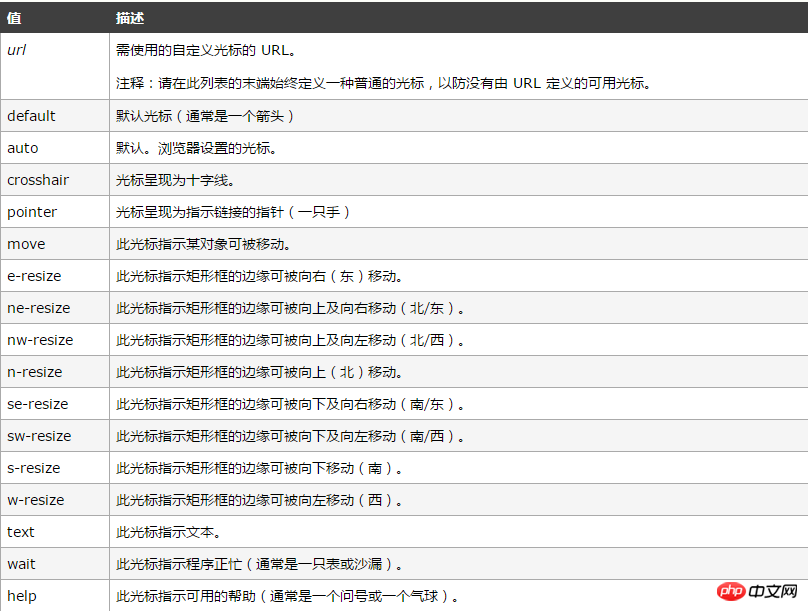
マウスのホバー時のカーソル スタイルの変換も、デザインの重視を反映しています。ここではカーソルの使用法に焦点を当てます。
カーソル。 Type 属性は、表示されるカーソルを指定します。この属性は、マウス ポインタが要素の境界内に置かれたときに使用されるカーソルの形状を定義します。ブラウザとの互換性の問題を心配する必要はありません。
カーソル属性の使用法を次の表に示します。

- ##この記事で説明する 12 個のボタン スイッチ スタイルは次のとおりです。ボタン、デフォルトボタン、リンクボタン、丸いボタン、入力ボックスボタン、ホバー時の色変更ボタン、シャドウボタン、ホバー時の表示ボタン、無効化ボタン、矢印マークボタン、リップルボタン、プレスエフェクトボタン。
#HTML5 css3を使用してボタン スイッチを作成するコード#<!DOCTYPE html>
<html>
<head>
<meta charset="UTF-8">
<title>各式各样的按钮</title>
<style type="text/css">
*{
margin: 0;
padding: 0;
}
.wrap{
width: 600px;
height: 400px;
margin: 0 auto;
/*background: pink;*/
padding: 30px 50px;
}
/*div按钮*/
.button5{
width: 100px;
height: 30px;
float: left;
/*position: absolute;*/
text-align: center;
padding-top: 10px;
margin:0px 10px ;
background: greenyellow;
border: 1px solid plum;
cursor: pointer;
border-radius: 50%;
}
/*链接按钮*/
.button2{
background: gold;
border: 1px solid greenyellow;
text-decoration: none;
display: inline-block;
padding: 10px 22px;
border-radius: 20px;
/*cursor: pointer;靠近按钮的一只手*/
}
/*按钮*/
.button3{
background: pink;
border: 1px solid blueviolet;
padding: 10px 28px;
cursor: pointer;
color: yellow;
border-radius: 40%;
}
/*输入框按钮*/
.button4{
background: cornflowerblue;
border: 3px solid yellow;
padding: 10px 20px;
border-radius: 20%;
outline-style: none;/*去除点击时外部框线*/
}
/*悬停变色按钮*/
.button6{
background: plum;
color: greenyellow;
border: 1px solid dodgerblue;
transition-duration: 1s;/*过渡时间*/
border-radius: 12px;
padding: 13px 18px;
margin-top: 20px;
outline-style: none;/*去除点击时外部框线*/
}
.button6:hover{
background: yellow;
color: magenta;
transition-duration: 1s;
}
/*阴影按钮*/
.button7{
/*display: inline-block;*/
border: none;
background: lime;
padding: 13px 18px;
margin-top: 20px;
/*outline-style: none;!*去除点击时外部框线*!*/
/*-webkit-transition-duration: 0.6s;*/
transition-duration: 0.6s;
/*设置按钮阴影*/
box-shadow: 0 8px 16px 0 rgba(0,255,0,0.2),0 6px 20px 0 rgba(0,0,255,0.1);
}
/*悬停出现阴影按钮*/
.button8{
border: none;
background: dodgerblue;
padding: 13px 18px;
margin-top: 20px;
transition-duration: 0.6s;
}
.button8:hover{
box-shadow: 0 12px 16px 0 rgba(0,255,0,0.24),0 17px 50px 0 rgba(0,0,255,0.19);
}
/*禁用按钮*/
.button9{
border: none;
background: green;
padding: 13px 18px;
margin-top: 20px;
opacity: 0.6;/*设置按钮的透明度*/
cursor: not-allowed;/*设置按钮为禁用状态*/
}
/*箭头标记按钮*/
.button10{
display: inline-block;
border: none;
background: red;
color: white;
padding: 20px;
text-align: center;
border-radius: 4px;
width: 180px;
font-size: 16px;/*可以通过字体控制button大小*/
transition: all 0.5s;
margin: 5px;
cursor: pointer;
}
.button10 span{
cursor: pointer;
display: inline-block;
position: relative;
transition: 0.5s;
}
.button10 span:after{
content: '»';
color: white;
position: absolute;
opacity: 0;/*先设置透明度为0,即不可见*/
right:-20px;/*新增箭头出来的方向*/
transition: 0.5s;
}
.button10:hover span{
padding-right: 15px;/*新增箭头与前面文字的距离*/
}
.button10:hover span:after{
opacity: 1;/*设置透明度为1,即可见状态*/
right: 0;
}
/*点击出现波纹效果按钮*/
.button11{
position: relative;/*必须添上这一句,否则波纹布满整个页面*/
background: dodgerblue;
border: none;
color: white;
width: 180px;
font-size: 16px;/*可以通过字体控制button大小*/
padding: 20px;
border-radius: 12px;
transition-duration: 0.4s;
overflow: hidden;
outline-style: none;/*去除点击时外部框线*/
}
.button11:after{
content:"";
background: aquamarine;
opacity: 0;
display: block;
position: absolute;
padding-top: 300%;
padding-left: 350%;
margin-left: -20px!important;
margin-top: -120%;
transition: all 0.5s;
}
.button11:active:after{
padding: 0;
margin: 0;
opacity: 1;
transition: 0.1s;
}
/*点击出现按压效果*/
.button12{
outline-style: none;/*去除点击时外部框线*/
padding: 20px;
color: white;
background: yellow;
border: none;
border-radius: 12px;
box-shadow: 0px 9px 0px rgba(144,144,144,1),0px 9px 25px rgba(0,0,0,.7);
}
.button12:hover{
background: gold;
}
.button12:active{
background: gold;
box-shadow: 0 5px #666;
transform: translateY(4px);
transition-duration: 0s;/*过渡效果持续时间*/
}
</style>
</head>
<body>
<div>
<div>5div按钮</div>
<p style="clear: both"><br></p>
<button>1默认按钮</button>
<a href="#">2链接按钮</a>
<button>3按钮</button>
<input type="button" value="4输入框按钮">
<button>6悬停变色按钮</button>
<button>7阴影按钮</button>
<button>8悬停出现阴影</button>
<button>9禁用按钮</button>
<button style="vertical-align: middle"><span>10箭头标记按钮</span></button>
<button>11波纹click</button>
<button>12按压效果click</button>
</div>
</body>
</html>
ボタン スイッチのスタイルは次のとおりです。図に示されている 示されている
以上がHTML5+css3 を使用して、よく使用される 12 個のボタン スイッチ スタイルを作成する方法 (完全なコードを添付)の詳細内容です。詳細については、PHP 中国語 Web サイトの他の関連記事を参照してください。

ホットAIツール

Undresser.AI Undress
リアルなヌード写真を作成する AI 搭載アプリ

AI Clothes Remover
写真から衣服を削除するオンライン AI ツール。

Undress AI Tool
脱衣画像を無料で

Clothoff.io
AI衣類リムーバー

AI Hentai Generator
AIヘンタイを無料で生成します。

人気の記事

ホットツール

メモ帳++7.3.1
使いやすく無料のコードエディター

SublimeText3 中国語版
中国語版、とても使いやすい

ゼンドスタジオ 13.0.1
強力な PHP 統合開発環境

ドリームウィーバー CS6
ビジュアル Web 開発ツール

SublimeText3 Mac版
神レベルのコード編集ソフト(SublimeText3)

ホットトピック
 7514
7514
 15
15
 1378
1378
 52
52
 79
79
 11
11
 19
19
 64
64
 Microsoft Teamsの白い画面を修正する方法
Apr 17, 2023 pm 05:07 PM
Microsoft Teams を再起動する Teams を起動した後に空白の画面が表示される場合は、まずアプリ自体を再起動することをお勧めします。 Microsoft Teams を閉じて再起動するには: タスクバーの通知領域にある Teams アイコンを右クリックし、メニューから [終了] をクリックします。 [スタート] メニューまたはデスクトップのショートカットから Microsoft Teams を再起動し、機能するかどうかを確認します。タスク マネージャーから Microsoft Teams を閉じる Teams プロセスの基本的な再起動が機能しない場合は、タスク マネージャーに移動してタスクを終了します。タスク マネージャーから Teams を閉じるには、次の手順を実行します。
 Windows セキュリティ ボタンとは何ですか?知っておくべきことすべて
Apr 13, 2023 pm 10:22 PM
Windows セキュリティ ボタンとは何ですか?名前が示すように、Windows セキュリティ ボタンは、ログイン メニューに安全にアクセスし、パスワードを使用してデバイスにログインできるようにするセキュリティ機能です。この場合、スマートフォンの方が確実に進んでいます。しかし、タブレットなどの Windows ポータブル デバイスには、望ましくないユーザーを締め出すだけの手段ではない Windows セキュリティ ボタンが追加され始めています。また、追加のログイン メニュー オプションも提供します。ただし、デスクトップ PC またはラップトップで Windows セキュリティ ボタンを見つけようとすると、がっかりするかもしれません。何故ですか?タブレットと PC Windows セキュリティ ボタンはタブレットに存在する物理的なボタンです
 Windows で配信最適化サービスを無効にする 5 つの方法
May 17, 2023 am 09:31 AM
Windows コンピューターで配信の最適化サービスを無効にする理由はさまざまです。しかし、読者からは、従うべき正しい手順がわからないという苦情が寄せられました。このガイドでは、配信の最適化サービスをいくつかの手順で無効にする方法について説明します。サービスの詳細については、「services.msc を開く方法」ガイドを参照してください。配信最適化サービスは何をするサービスですか?配信最適化サービスは、クラウド ホスティング ソリューションを備えた HTTP ダウンローダーです。これにより、Windows デバイスは Windows アップデート、アップグレード、アプリケーション、その他の大きなパッケージ ファイルを代替ソースからダウンロードできるようになります。さらに、展開内の複数のデバイスがこれらのパッケージをダウンロードできるようにすることで、帯域幅の消費を削減します。さらにウィンドさんは
 iPad Mini 6を再起動、強制再起動、シャットダウンする方法
Apr 29, 2023 pm 12:19 PM
iPad Mini 6 を強制的に再起動する方法 iPad Mini 6 の強制再起動は、一連のボタンを押すことで行われ、次のように動作します。 音量を上げるには押して放します。 音量を下げるには押して放します。 が表示されるまで電源/ロック ボタンを押して放します。 iPad Mini が強制的に再起動されたことを示す Apple ロゴ これで、iPad Mini 6 が強制的に再起動されました。強制再起動は通常、iPad Mini のフリーズ、アプリのフリーズ、その他の一般的な誤動作などのトラブルシューティングの目的で使用されます。第 6 世代 iPad Mini を強制的に再起動する手順について注意すべき点は、超薄型ベゼルを備え、
 書き換え後:
Windows 11でPS5コントローラーが認識されない場合の対処方法
May 09, 2023 pm 10:16 PM
<h3>PS5 コントローラーの接続について知っておくべきことは何ですか? </h3><p>DualSense コントローラーは優れていますが、コントローラーが接続されない、または検出されないという報告があります。この問題を解決する最も簡単な方法は、適切な USB ケーブルを使用してコントローラーを PC に接続することです。 </p><p>一部のゲームは、DualSense をネイティブにサポートしています。このような場合は、コントローラーを接続するだけで済みます。しかし、これにより、USB ケーブルがない場合や使いたくない場合はどうすればよいかなど、別の疑問が生じます。
 Microsoft Edgeブラウザのダウンロード履歴をクリアするにはどうすればよいですか?
Apr 21, 2023 am 09:34 AM
<ul><li><strong>クリックして入力:</strong>ChatGPT ツール プラグイン ナビゲーション</li></ul><h2>Edge でのダウンロード履歴の検索と削除< /h2> ;<p>他のブラウザと同様、Edge には<strong>ダウンロード機能があります。
 Vue を使用してボタンのカウントダウン効果を実装する方法
Sep 21, 2023 pm 02:03 PM
Vue を使用してボタンのカウントダウン効果を実装する方法 Web アプリケーションの人気が高まるにつれて、ユーザーがページを操作するときのユーザー エクスペリエンスを向上させるために、動的効果を使用する必要がよくあります。その中でもボタンのカウントダウンエフェクトは非常に一般的で実用的なエフェクトです。この記事では、Vue フレームワークを使用してボタンのカウントダウン効果を実装する方法と、具体的なコード例を紹介します。まず、ボタンとカウントダウン関数を含む Vue コンポーネントを作成する必要があります。 Vue では、コンポーネントは再利用可能な Vue インスタンスであり、ビューは
![Windows 11 の電源ボタンの動作を変更する [5 つのヒント]](https://img.php.cn/upload/article/000/887/227/169600135086895.png?x-oss-process=image/resize,m_fill,h_207,w_330) Windows 11 の電源ボタンの動作を変更する [5 つのヒント]
Sep 29, 2023 pm 11:29 PM
Windows 11 の電源ボタンの動作を変更する [5 つのヒント]
Sep 29, 2023 pm 11:29 PM
電源ボタンは PC をシャットダウンするだけではありませんが、これはデスクトップ ユーザーのデフォルトのアクションです。 Windows 11 で電源ボタンの動作を変更したい場合、それは思っているよりも簡単です。物理的な電源ボタンはスタート メニューのボタンとは異なるため、以下の変更はスタート メニューの操作には影響しないことに注意してください。さらに、デスクトップかラップトップかに応じて、電源オプションが若干異なります。 Windows 11 で電源ボタンの動作を変更する必要があるのはなぜですか?コンピュータをシャットダウンするよりもスリープ状態にすることが多い場合は、ハードウェア電源ボタン (つまり、PC の物理的な電源ボタン) の動作を変更すると効果があります。同じ考え方がスリープ モードや単にディスプレイをオフにする場合にも当てはまります。 Windows 11 を変更する


