この記事の内容は、vue-Router のナビゲーション ガードについての説明です。必要な方は参考にしていただければ幸いです。
この記事では、次のことを整理します。
前に説明したコンテンツ ルーター インスタンスの履歴属性は、すべてのジャンプ部分の実行に役立つため、ナビゲーション ガードのコンテンツも履歴に含まれます。

HTML5History クラス
push (location: RawLocation, onComplete?: Function, onAbort?: Function) {
    const { current: fromRoute } = this
    this.transitionTo(location, route => {
      pushState(cleanPath(this.base + route.fullPath))
      handleScroll(this.router, route, fromRoute, false)
      onComplete && onComplete(route)
    }, onAbort)
}push (ジャンプするときは $router です。push) を使用して、このプッシュ メソッドを見てみましょう。メソッド
transitionTo は、一連のジャンプ コンテンツを完了するために呼び出されますが、base.js クラスから継承されたメソッド
transitionTo は、ルーティング ジャンプを実装するために使用されます。 transitionTo のメイン プロセスは、confirmTranstion メソッドと uodateRoute メソッドの組み合わせです。中国語に翻訳すると、ルート ジャンプはまず確認ジャンプ プロセスを経て、確認プロセスが完了した後にルート更新操作を実行する必要があります。
transitionTo (location: RawLocation, onComplete?: Function, onAbort?: Function) {
    // 获取要跳转的并且经过处理的路由
    const route = this.router.match(location, this.current)
    // confirmTranstion确认跳转过程
    this.confirmTransition(route, () => {
      // 确认完毕后完成更新路由操作
      this.updateRoute(route)
      onComplete && onComplete(route)
      this.ensureURL()

      // fire ready cbs once
      if (!this.ready) {
        this.ready = true
        this.readyCbs.forEach(cb => { cb(route) })
      }
    }, err => {
      if (onAbort) {
        onAbort(err)
      }
      if (err && !this.ready) {
        this.ready = true
        this.readyErrorCbs.forEach(cb => { cb(err) })
      }
    })
  }
export function runQueue (queue: Array<?NavigationGuard>, fn: Function, cb: Function) {
  const step = index => {
  // 队列里已经没有内容可以执行了,那就代表队列执行完成了
    if (index >= queue.length) {
      cb()
    } else {
      // 如果队列内容存在就执行迭代函数
      if (queue[index]) {
        fn(queue[index], () => {
          step(index + 1)
        })
      // 什么也没有那就到下一步了
      } else {
        step(index + 1)
      }
    }
  }
  // 启动了
  step(0)
}現時点では、どのような警備員がいるのかを考えなければなりません。
##コンポーネント内のガード: beforeRouterEnter、beforeRouterUpdate、beforeRouteLeave
ポスト ガード:
グローバル ポストガード: afterEach
これらのガードがどのように登録されるかを考える必要があります。
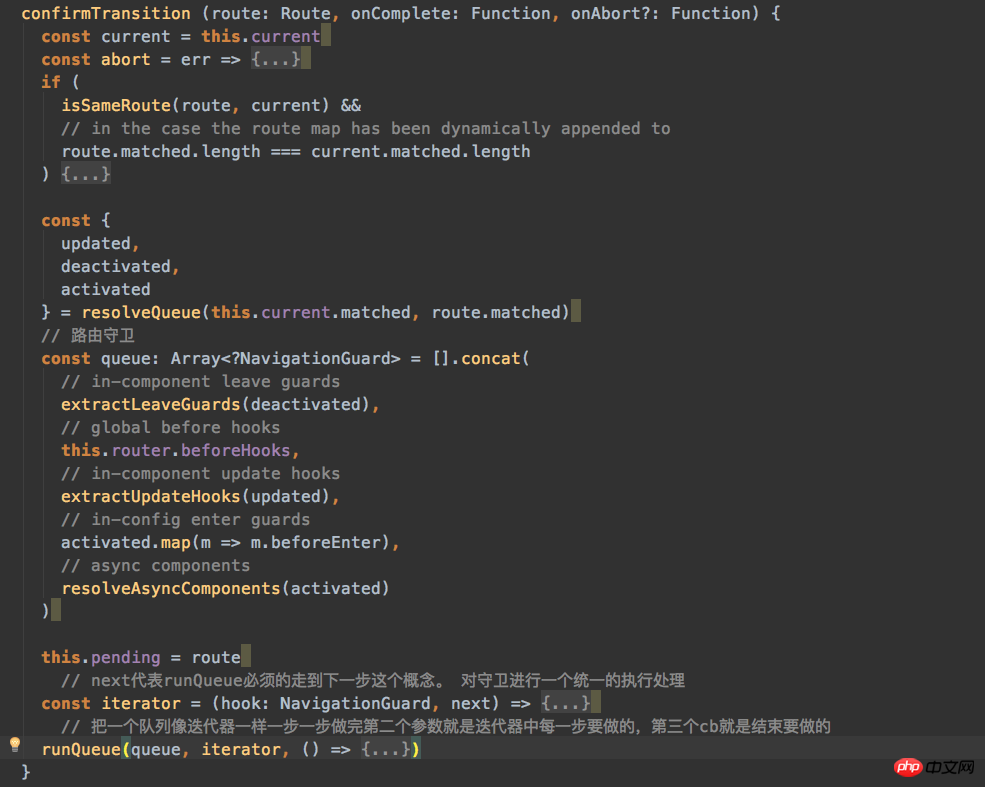
 // 拿到路由跳转中更新、摧毁、激活时对应展示的组件。
 const {
      updated,
      deactivated,
      activated
    } = resolveQueue(this.current.matched, route.matched)
    // 路由守卫
    const queue: Array<?NavigationGuard> = [].concat(
      // in-component leave guards
      extractLeaveGuards(deactivated),
      // global before hooks
      this.router.beforeHooks,
      // in-component update hooks
      extractUpdateHooks(updated),
      // in-config enter guards
      activated.map(m => m.beforeEnter),
      // async components
      resolveAsyncComponents(activated)
)#If破壊されたコンポーネントを取得し、コンポーネント内の残りのガードをすべて絞り出します。
次のステップは、ガードを処理する反復子を作成することです:
保证在守卫中可以停止并且跳转到其余路由,
保证守卫可以正常通过,
const iterator = (hook: NavigationGuard, next) => {
      if (this.pending !== route) {
        return abort()
      }
      try {
        hook(route, current, (to: any) => {
          // 传个false就直接执行路由的错误处理,然后停止什么都不做。
          if (to === false || isError(to)) {
            // next(false) -> abort navigation, ensure current URL
            this.ensureURL(true)
            abort(to)
          } else if (
          // 如果我们接受了一个可以操作的路径。
            typeof to === 'string' ||
            (typeof to === 'object' && (
              typeof to.path === 'string' ||
              typeof to.name === 'string'
            ))
          ) {
            // next('/') or next({ path: '/' }) -> redirect
            abort()
            // 我们就执行路由跳转操作,并且守卫队列停止下面的迭代
            if (typeof to === 'object' && to.replace) {
              this.replace(to)
            } else {
              this.push(to)
            }
          } else {
            // confirm transition and pass on the value
            // 接续迭代下去咯
            next(to)
          }
        })
      } catch (e) {
        abort(e)
      }
}next函数,之前在将runQueue的函数的时候,fn接收第二个参数(之前画过重点),第二个参数的回调函数是完成迭代器向下一步执行的功能。
下面会有一点乱:
所有的前置守卫都接收三个参数
beforeEnter(to,from,next)=>{
    //这个next就是我们看到的 hook里面接收的箭头函数((to:any)=>{})
    //这个箭头函数里面对迭代器的next进行了一下掉用,
    //保证在一定情况下迭代器可以向下走一步。
    next('/index')
    // 我们在这种next('/index')传递一个可以执行的路径时,(to:any)=>{}
    //这个箭头函数并不会调用迭代的next,而是跳转别的路径执行了push操作。
    // 如果我们不掉用守卫中的next,迭代器的next肯定并不会执行,守卫的迭代就停止了,
    // 守卫堵塞confirmTransition并不会执行完毕,也就不会由后面的更细路由操作了。
}runQueue(queue, iterator, () => {
const postEnterCbs = []
const isValid = () => this.current === route
// wait until async components are resolved before
// extracting in-component enter guards
const enterGuards = extractEnterGuards(activated, postEnterCbs, isValid)
const queue = enterGuards.concat(this.router.resolveHooks)
runQueue(queue, iterator, () => {
if (this.pending !== route) {
return abort()
}
this.pending = null
onComplete(route)
if (this.router.app) {
this.router.app.$nextTick(() => {
postEnterCbs.forEach(cb => { cb() })
})
}
})
})我们在把第一个queue(四个守卫与一个异步组件的加载)执行完毕后,要收集与执行第二个queue了,
第二个queue:
收集了被的激活组件内的进入守卫
全局的beforeResolve的守卫
收集完开始执行第二个queue的迭代。第二个queue执行完执行一下onComplete函数,代表着confirmTransition方法执行完毕了。确认路由的过程结束了,
下面就是updateRoute的过程。updateRoute的时候执行全部的后置守卫,因为更新路由之后,当前的路由已经变化了,所以在给守卫传参数的时候缓存了一下,之前的路由。
updateRoute (route: Route) {
    const prev = this.current
    this.current = route
    this.cb && this.cb(route)
    this.router.afterHooks.forEach(hook => {
      hook && hook(route, prev)
    })
}所以为什么afterEach没有next呢?因为afterEach根本不在迭代器之内,他就没有next来触发迭代器的下一步。
最后我们说一下beforeEach的内容:
我们设置beforeEach全局守卫的时候,守卫们存储在哪里?
beforeEach (fn: Function): Function {
    return registerHook(this.beforeHooks, fn)
}
function registerHook (list: Array<any>, fn: Function): Function {
  list.push(fn)
  // 返回值是一个function
  return () => {
    const i = list.indexOf(fn)
    if (i > -1) list.splice(i, 1)
  }
}</any>这段代码beforeEach是通过注册守卫的方式,将注册的全局前置守卫放在beforeHooks的容器内,这个容器里面装载着所有的前置守卫

一家人(全局的 前置进入、前置resolve、后置守卫)整整齐齐的放在对应的容器里面,容器是个数组,所以注册全局守卫的时候,是支持注册多个的,
router.beforeEach(()=>{xxx});
router.beforeEach(()=>{yyy});
// 这两个守卫都会执行,只是先注册的先执行,
// registerHook这个方法还可以清除对应的守卫,这个方法也可以使用我们来回答一下开篇的5个问题
beforeRouteLeave
next的作用,使导航守卫队列的继续向下迭代
afterEach根本不在导航守卫队列内,没有迭代的next
beforeEach是可以叠加的,所有的全局前置守卫按顺序存放在beforeHooks的数组里面,
路由跳转的核心方法是transitionTo,在跳转过程中经历了一次confirmTransition,
(beforeRouteLeave
在第一个queue迭代完毕后,执行第二个(beforeRouteEnter
在执行完毕后,开始执行updateRoute,之后执行全局的afterEach守卫。最后完成路由的跳转。
以上がvue-Router のナビゲーション ガードについて説明します。の詳細内容です。詳細については、PHP 中国語 Web サイトの他の関連記事を参照してください。