React の最初のレンダリング分析 2 (純粋な DOM 要素)
Oct 20, 2018 pm 02:42 PMこの記事は React の最初のレンダリング解析 2 (純粋な DOM 要素) に関するものです。必要な方は参考にしていただければ幸いです。
前の記事では、トップレベル オブジェクト ReactCompositeComponent[T] がどのように構築されるかを紹介しました。次に、batchedMountComponentIntoNode が何を行うかを見てみましょう。
この記事で説明するコール スタックは次のようになります:
|=ReactMount.render(nextElement, container, callback)     ___
|=ReactMount._renderSubtreeIntoContainer()                 |
  |-ReactMount._renderNewRootComponent()                   |
    |-instantiateReactComponent()                          |
    |~batchedMountComponentIntoNode()                  upper half
      |~mountComponentIntoNode()                       (平台无关)
        |-ReactReconciler.mountComponent()                 |
          |-ReactCompositeComponent.mountComponent()       |
          |-ReactCompositeComponent.performInitialMount()  |
            |-instantiateReactComponent()                 _|_
            |-ReactDOMComponent.mountComponent()       lower half
        |-_mountImageIntoNode()                      (HTML DOM 相关)
                                                          _|_
ソース コードを見ると、トランザクション関連のコードがたくさんあることがわかりますが、これは無視します。今のところ、それについては記事で説明します。当面は、transaction.perform を呼び出すとき、それは実際には最初のパラメーターでの関数呼び出しであることが理解できます。いくつかのテンプレート コードをスキップした後、実際に作業を行うのは mountComponentIntoNode メソッドです。
// 文件位置:src/renderers/dom/client/ReactMount.js

function mountComponentIntoNode(
    wrapperInstance,    // ReactCompositeComponent[T]
    container,          // document.getElementById("root")
    transaction,
    shouldReuseMarkup,
    context
) {
    ...

    var markup = ReactReconciler.mountComponent(
        wrapperInstance,
        transaction,
        null,
        ReactDOMContainerInfo(wrapperInstance, container),
        context,
        0 /* parentDebugID */
    );

    ...

    ReactMount._mountImageIntoNode(
        markup,
        container,
        wrapperInstance,
        shouldReuseMarkup,
        transaction
    );
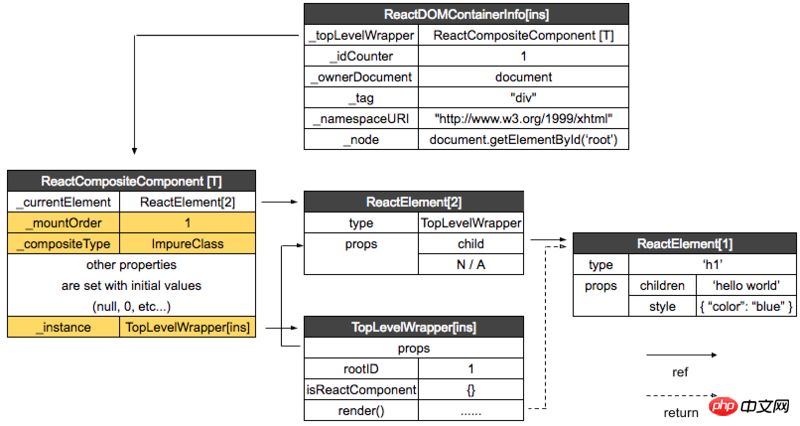
}ReactReconciler.mountComponent は DOM 要素の作成に使用されますが、 ReactMount._mountImageIntoNode は新しく作成された DOM です 要素はページに添付されます。 ReactReconciler.mountComponent は ReactCompositeComponent[T] の mountComponent メソッドを呼び出します。 mountComponent メソッドを確認する前に、まず hostContainerInfo を準備する必要があります。これは ReactDOMContainerInfo によって生成されます:
// 文件位置:src/renderers/shared/stack/reconciler/ReactContainerInfo.js

function ReactDOMContainerInfo(
    topLevelWrapper,     // ReactCompositeComponent[T]
    node                 // document.getElementById("root")
) {
    var info = {
        _topLevelWrapper: topLevelWrapper,
        _idCounter: 1,
        _ownerDocument: node ?
            node.nodeType === DOC_NODE_TYPE ? node : node.ownerDocument : null,
        _node: node,
        _tag: node ? node.nodeName.toLowerCase() : null,
        _namespaceURI: node ? node.namespaceURI : null,
    };

    ...

    return info;
}各インスタンス間の関係は次のようになります:

引き続き mountComponent メソッドを確認します。
// 文件位置:src/renderers/shared/stack/reconciler/ReactCompositeComponent.js

mountComponent: function (
    transaction,
    hostParent,
    hostContainerInfo,
    context
) {
    ...

    // this._currentElement 为ReactElement[2](TopLevelWrapper)
    var publicProps = this._currentElement.props;
    var publicContext = this._processContext(context);

    // TopLevelWrapper
    var Component = this._currentElement.type;

    ...

    // Initialize the public class
    var doConstruct = shouldConstruct(Component);

    // 生成TopLevelWrapper 实例
    var inst = this._constructComponent(
        doConstruct,
        publicProps,
        publicContext,
        updateQueue
    );

    ...

    var markup;

    ...

    markup = this.performInitialMount(renderedElement,
            hostParent, hostContainerInfo, transaction, context

    ...

    return markup;
},

performInitialMount: function (renderedElement, hostParent,
    hostContainerInfo, transaction, context) {

    // TopLevelWrapper 实例
    var inst = this._instance;

    ...

    // If not a stateless component, we now render
    if (renderedElement === undefined) {
        // 返回值为 ReactElement[1]
        renderedElement = this._renderValidatedComponent();
    }

    // 返回 ReactNodeTypes.HOST
    var nodeType = ReactNodeTypes.getType(renderedElement);

    this._renderedNodeType = nodeType;

    // instantiateReactComponent.js
    var child = this._instantiateReactComponent(
        renderedElement,
        nodeType !== ReactNodeTypes.EMPTY /* shouldHaveDebugID */
    );
    this._renderedComponent = child;

    var markup = ReactReconciler.mountComponent(
        child,
        transaction,
        hostParent,
        hostContainerInfo,
        this._processChildContext(context),
        debugID
    );

    ...

    return markup;
},var child = this._instantiateReactComponent を実行すると、前で説明した instantiateReactComponent## が実行されます。 #File:
// 文件位置:src/renderers/shared/stack/reconciler/instantiateReactComponent.js

function instantiateReactComponent(node, shouldHaveDebugID) {
    var instance;

    ...

    } else if (typeof node === 'object') {
        ...

        // element.type 为 ‘h1’
        if (typeof element.type === 'string') {
            instance = ReactHostComponent.createInternalComponent(element);
        }

    return instance;
}ReactDefaultInjection.inject() を実行して ReactDOMComponent を ReactHostComponent に挿入します。createInternalComponent は最終的に ReactDOMComponent:
// 文件位置:src/renderers/dom/shared/ReactDomComponent.js

function ReactDOMComponent(element) {
    // h1
    var tag = element.type;

    validateDangerousTag(tag);

    // ReactElement[1]
    this._currentElement = element;

    this._tag = tag.toLowerCase();
    this._namespaceURI = null;
    this._renderedChildren = null;
    this._previousStyle = null;
    this._previousStyleCopy = null;
    this._hostNode = null;
    this._hostParent = null;
    this._rootNodeID = 0;
    this._domID = 0;
    this._hostContainerInfo = null;
    this._wrapperState = null;
    this._topLevelWrapper = null;
    this._flags = 0;
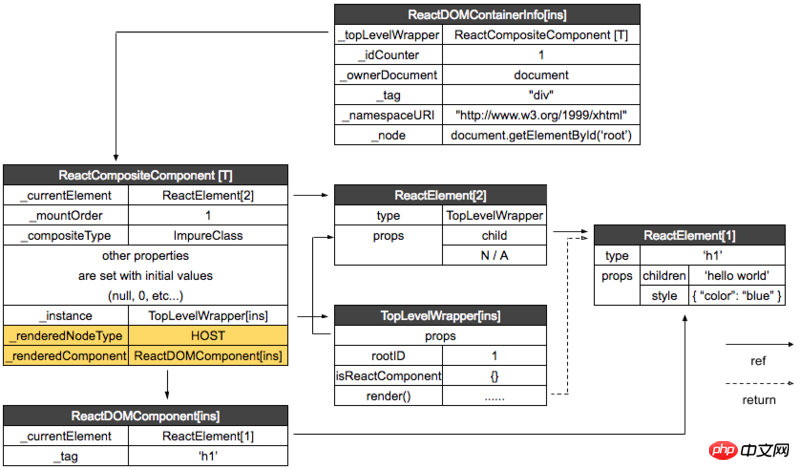
}ReactReconciler.mountComponent は ReactDomComponent の mountComponent メソッドを呼び出します。これには HTML DOM 関連のコンテンツが含まれます。これについては次の記事で説明します。
ここで、各インスタンス間の関係を見てみましょう:
 ##これまでのコールスタック:
|=ReactMount.render(nextElement, container, callback)     ___
|=ReactMount._renderSubtreeIntoContainer()                 |
  |-ReactMount._renderNewRootComponent()                   |
    |-instantiateReactComponent()                          |
    |~batchedMountComponentIntoNode()                  upper half
      |~mountComponentIntoNode()                       (平台无关)
        |-ReactReconciler.mountComponent()                 |
          |-ReactCompositeComponent.mountComponent()       |
          |-ReactCompositeComponent.performInitialMount()  |
            |-instantiateReactComponent()                 _|_
            |-ReactDOMComponent.mountComponent()       lower half
        |-_mountImageIntoNode()                 (HTML DOM 相关下一篇讲解)
                                                          _|_
以上がReact の最初のレンダリング分析 2 (純粋な DOM 要素)の詳細内容です。詳細については、PHP 中国語 Web サイトの他の関連記事を参照してください。

人気の記事

人気の記事

ホットな記事タグ

メモ帳++7.3.1
使いやすく無料のコードエディター

SublimeText3 中国語版
中国語版、とても使いやすい

ゼンドスタジオ 13.0.1
強力な PHP 統合開発環境

ドリームウィーバー CS6
ビジュアル Web 開発ツール

SublimeText3 Mac版
神レベルのコード編集ソフト(SublimeText3)

ホットトピック
 7124
7124
 9
9
 1534
1534
 14
14
 1256
1256
 25
25
 1205
1205
 29
29
 1153
1153
 46
46
 WebSocket と JavaScript を使用してオンライン音声認識システムを実装する方法
Dec 17, 2023 pm 02:54 PM
WebSocket と JavaScript を使用してオンライン音声認識システムを実装する方法
 WebSocket と JavaScript: リアルタイム監視システムを実装するための主要テクノロジー
Dec 17, 2023 pm 05:30 PM
WebSocket と JavaScript: リアルタイム監視システムを実装するための主要テクノロジー
 WebSocketとJavaScriptを使ったオンライン予約システムの実装方法
Dec 17, 2023 am 09:39 AM
WebSocketとJavaScriptを使ったオンライン予約システムの実装方法
 JavaScript と WebSocket を使用してリアルタイムのオンライン注文システムを実装する方法
Dec 17, 2023 pm 12:09 PM
JavaScript と WebSocket を使用してリアルタイムのオンライン注文システムを実装する方法
 JavaScript と WebSocket: 効率的なリアルタイム天気予報システムの構築
Dec 17, 2023 pm 05:13 PM
JavaScript と WebSocket: 効率的なリアルタイム天気予報システムの構築
 簡単な JavaScript チュートリアル: HTTP ステータス コードを取得する方法
Jan 05, 2024 pm 06:08 PM
簡単な JavaScript チュートリアル: HTTP ステータス コードを取得する方法
 JavaScript で HTTP ステータス コードを簡単に取得する方法
Jan 05, 2024 pm 01:37 PM
JavaScript で HTTP ステータス コードを簡単に取得する方法


