

Web 自動テスト (2) Selenium 3 で IE、Firefox、Chrome が起動 コード例

Selenium は、Web アプリケーションをテストするためのツールです。 Selenium テストは、実際のユーザーと同じようにブラウザーで直接実行されます。 「Web 自動テスト (2)」の最終章では、主に Web テストで Selenium 3 で使用される問題セットと解決策について説明しました。この記事では、主に IE、Firefox、Chrome を起動するためのコード例について説明します。参考としてのみご利用ください。
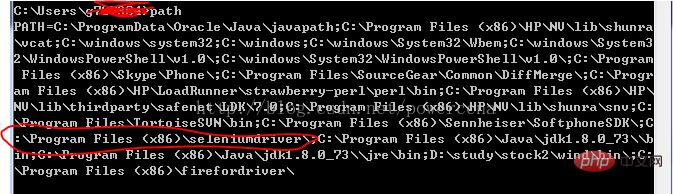
IE、Firefox、および Chrome を起動する前に、対応するブラウザのドライバー サーバーを Windows システム パス ディレクトリに設定する必要があります。
たとえば、ドライバーはこのディレクトリ C:\Program Files (x86)\seleniumdriver に配置されており、Windows システム パスの設定は次のとおりです。
IE コードの開始:
#!/usr/bin/env python
#coding=utf-8

from selenium import webdriver
import os
from selenium.common.exceptions import TimeoutException
from selenium.webdriver.support.ui import WebDriverWait # available since 2.4.0
from selenium.webdriver.support import expected_conditions as EC # available since 2.26.0
from selenium.webdriver.firefox.firefox_binary import FirefoxBinary

driver = webdriver.Ie()

# go to the google home page
driver.get("https://www.baidu.com/")

# the page is ajaxy so the title is originally this:
print driver.title

# find the element that's name attribute is q (the google search box)
inputElement = driver.find_element_by_name("wd")

# type in the search
inputElement.send_keys("cheese!")

# submit the form (although google automatically searches now without submitting)
inputElement.submit()

try:
    # we have to wait for the page to refresh, the last thing that seems to be updated is the title
    WebDriverWait(driver, 10).until(EC.title_contains("cheese!"))

    # You should see "cheese! - Google Search"
    print driver.title

finally:
    pass
#driver.quit()FireFox コードの開始:
#!/usr/bin/env python
#coding=utf-8

from selenium import webdriver
from selenium.common.exceptions import TimeoutException
from selenium.webdriver.support.ui import WebDriverWait # available since 2.4.0
from selenium.webdriver.support import expected_conditions as EC # available since 2.26.0
from selenium.webdriver.firefox.firefox_binary import FirefoxBinary

# Create a new instance of the Firefox driver
#binary = FirefoxBinary(r'C:\Program Files (x86)\Mozilla Firefox\firefox.exe')
#driver = webdriver.Firefox(firefox_binary=binary)

driver = webdriver.Firefox()

# go to the google home page
driver.get("https://www.baidu.com/")

# the page is ajaxy so the title is originally this:
print driver.title

# find the element that's name attribute is q (the google search box)
inputElement = driver.find_element_by_name("wd")

# type in the search
inputElement.send_keys("cheese!")

# submit the form (although google automatically searches now without submitting)
inputElement.submit()

try:
    # we have to wait for the page to refresh, the last thing that seems to be updated is the title
    WebDriverWait(driver, 10).until(EC.title_contains("cheese!"))

    # You should see "cheese! - Google Search"
    print driver.title

finally:
    pass
    #driver.quit()
Chrome コードの開始:
#!/usr/bin/env python
#coding=utf-8

from selenium import webdriver
import os
from selenium.common.exceptions import TimeoutException
from selenium.webdriver.support.ui import WebDriverWait # available since 2.4.0
from selenium.webdriver.support import expected_conditions as EC # available since 2.26.0
from selenium.webdriver.firefox.firefox_binary import FirefoxBinary

driver = webdriver.Chrome()

# go to the google home page
driver.get("https://www.baidu.com/")

# the page is ajaxy so the title is originally this:
print driver.title

# find the element that's name attribute is q (the google search box)
inputElement = driver.find_element_by_name("wd")

# type in the search
inputElement.send_keys("cheese!!")

# submit the form (although google automatically searches now without submitting)
inputElement.submit()

try:
    # we have to wait for the page to refresh, the last thing that seems to be updated is the title
    WebDriverWait(driver, 10).until(EC.title_contains("cheese!"))

    # You should see "cheese! - Google Search"
    print driver.title

finally:
    pass
#driver.quit()[推奨コース: Python ビデオ チュートリアル]
以上がWeb 自動テスト (2) Selenium 3 で IE、Firefox、Chrome が起動 コード例の詳細内容です。詳細については、PHP 中国語 Web サイトの他の関連記事を参照してください。

ホットAIツール

Undresser.AI Undress
リアルなヌード写真を作成する AI 搭載アプリ

AI Clothes Remover
写真から衣服を削除するオンライン AI ツール。

Undress AI Tool
脱衣画像を無料で

Clothoff.io
AI衣類リムーバー

AI Hentai Generator
AIヘンタイを無料で生成します。

人気の記事
ホットツール

メモ帳++7.3.1
使いやすく無料のコードエディター

SublimeText3 中国語版
中国語版、とても使いやすい

ゼンドスタジオ 13.0.1
強力な PHP 統合開発環境

ドリームウィーバー CS6
ビジュアル Web 開発ツール

SublimeText3 Mac版
神レベルのコード編集ソフト(SublimeText3)
ホットトピック
 7514
7514
 15
1378
52
79
11
19
64
15
1378
52
79
11
19
64

 2時間のPython計画:現実的なアプローチ
Apr 11, 2025 am 12:04 AM
2時間のPython計画:現実的なアプローチ
Apr 11, 2025 am 12:04 AM
2時間以内にPythonの基本的なプログラミングの概念とスキルを学ぶことができます。 1.変数とデータ型、2。マスターコントロールフロー(条件付きステートメントとループ)、3。機能の定義と使用を理解する4。
 Redisキューの読み方
Apr 10, 2025 pm 10:12 PM
Redisキューの読み方
Apr 10, 2025 pm 10:12 PM
Redisのキューを読むには、キュー名を取得し、LPOPコマンドを使用して要素を読み、空のキューを処理する必要があります。特定の手順は次のとおりです。キュー名を取得します:「キュー:キュー」などの「キュー:」のプレフィックスで名前を付けます。 LPOPコマンドを使用します。キューのヘッドから要素を排出し、LPOP Queue:My-Queueなどの値を返します。空のキューの処理:キューが空の場合、LPOPはnilを返し、要素を読む前にキューが存在するかどうかを確認できます。
 Redisのサーバーバージョンを表示する方法
Apr 10, 2025 pm 01:27 PM
Redisのサーバーバージョンを表示する方法
Apr 10, 2025 pm 01:27 PM
質問:Redisサーバーバージョンを表示する方法は?コマンドラインツールRedis-Cli-versionを使用して、接続されたサーバーのバージョンを表示します。 Info Serverコマンドを使用して、サーバーの内部バージョンを表示し、情報を解析および返信する必要があります。クラスター環境では、各ノードのバージョンの一貫性を確認し、スクリプトを使用して自動的にチェックできます。スクリプトを使用して、Pythonスクリプトとの接続やバージョン情報の印刷など、表示バージョンを自動化します。
 Redisでサーバーを開始する方法
Apr 10, 2025 pm 08:12 PM
Redisでサーバーを開始する方法
Apr 10, 2025 pm 08:12 PM
Redisサーバーを起動する手順には、以下が含まれます。オペレーティングシステムに従ってRedisをインストールします。 Redis-Server(Linux/Macos)またはRedis-Server.exe(Windows)を介してRedisサービスを開始します。 Redis-Cli ping(Linux/macos)またはRedis-Cli.exePing(Windows)コマンドを使用して、サービスステータスを確認します。 Redis-Cli、Python、node.jsなどのRedisクライアントを使用して、サーバーにアクセスします。
 ビジネスのニーズに応じてRedisメモリサイズを設定する方法は?
Apr 10, 2025 pm 02:18 PM
ビジネスのニーズに応じてRedisメモリサイズを設定する方法は?
Apr 10, 2025 pm 02:18 PM
Redisメモリサイズの設定は、次の要因を考慮する必要があります。データ量と成長傾向:保存されたデータのサイズと成長率を推定します。データ型:異なるタイプ(リスト、ハッシュなど)は異なるメモリを占めます。キャッシュポリシー:完全なキャッシュ、部分キャッシュ、フェージングポリシーは、メモリの使用に影響します。ビジネスピーク:トラフィックピークに対処するのに十分なメモリを残します。
 メモリに対するRedisの持続性の影響は何ですか?
Apr 10, 2025 pm 02:15 PM
メモリに対するRedisの持続性の影響は何ですか?
Apr 10, 2025 pm 02:15 PM
Redis Persistenceは余分なメモリを取り、RDBはスナップショットを生成するときに一時的にメモリの使用量を増加させ、AOFはログを追加するときにメモリを取り上げ続けます。影響要因には、データのボリューム、永続性ポリシー、Redis構成が含まれます。影響を緩和するために、RDBスナップショットポリシーを合理的に構成し、AOF構成を最適化し、ハードウェアをアップグレードし、メモリの使用量を監視できます。さらに、パフォーマンスとデータセキュリティのバランスを見つけることが重要です。
 Python vs. C:比較されたアプリケーションとユースケース
Apr 12, 2025 am 12:01 AM
Python vs. C:比較されたアプリケーションとユースケース
Apr 12, 2025 am 12:01 AM
Pythonは、データサイエンス、Web開発、自動化タスクに適していますが、Cはシステムプログラミング、ゲーム開発、組み込みシステムに適しています。 Pythonは、そのシンプルさと強力なエコシステムで知られていますが、Cは高性能および基礎となる制御機能で知られています。
 Redisメモリ構成パラメーターとは何ですか?
Apr 10, 2025 pm 02:03 PM
Redisメモリ構成パラメーターとは何ですか?
Apr 10, 2025 pm 02:03 PM
** Redisメモリ構成のコアパラメーターはMaxMemoryであり、Redisが使用できるメモリの量を制限します。この制限を超えると、Redisは、Maxmemory-Policyに従って除去戦略を実行します。これには、次のようになります。その他の関連パラメーターには、Maxmemory-Samples(LRUサンプル量)、RDB圧縮が含まれます
