
コンピュータ サイエンスで最も一般的に使用され、議論されているデータ構造の 1 つは、二分探索ツリーです。これは通常、非線形挿入アルゴリズムで導入される最初のデータ構造です。二分探索ツリーは二重リンク リストに似ており、各ノードには何らかのデータと他のノードへの 2 つのポインタが含まれていますが、それらのノードが相互に関連する方法が異なります。二分探索ツリー ノードへのポインタは、多くの場合「左」および「右」と呼ばれ、現在の値に関連付けられたサブツリーを示すために使用されます。このようなノードの単純な JavaScript 実装は次のとおりです。
var node = {
    value: 125,
    left: null,
    right: null
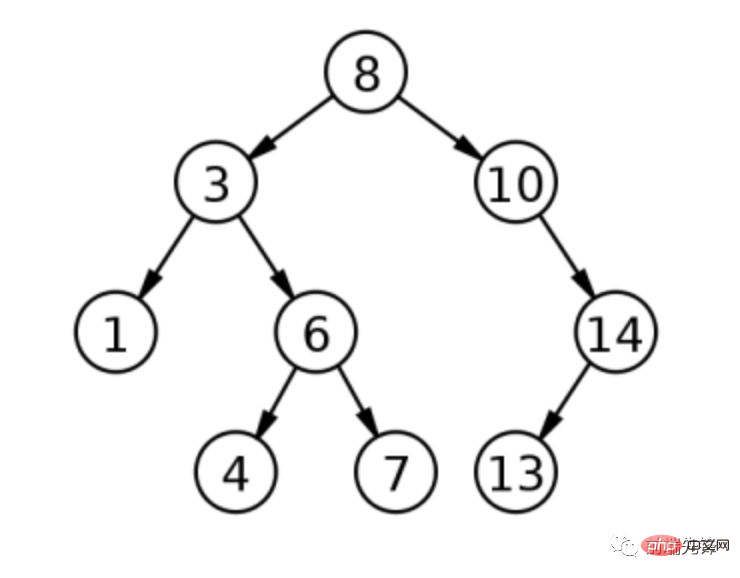
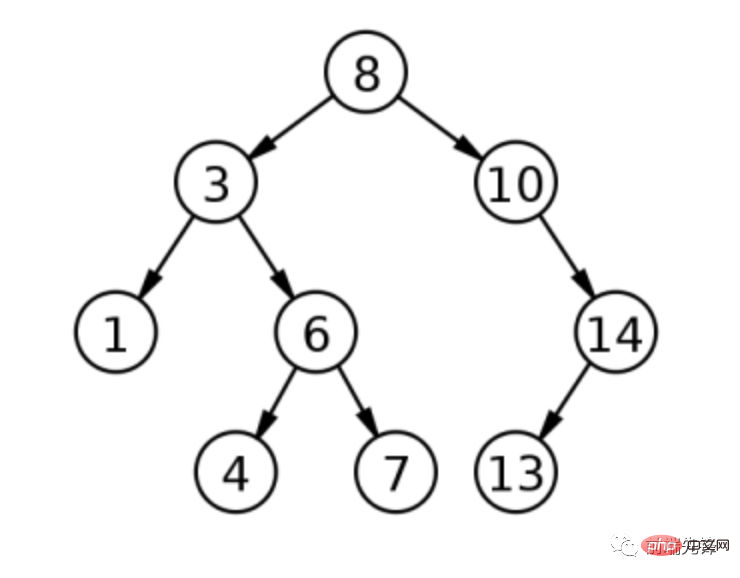
};名前からわかるように、二分探索ツリーは階層ツリー状の構造に編成されています。最初の項目がルート ノードとなり、追加の各値がそのルートの祖先としてツリーに追加されます。ただし、二分探索ツリーのノードの値は一意であり、含まれる値に従って順序付けされます。ノードの左側のサブツリーの値は常にノードの値より小さいため、次の値はノードの値よりも小さくなります。右側のサブツリーは常にノードの値より大きくなります。このようにして、二分探索ツリーでの値の検索は非常に簡単になります。探している値が作業中のノードより小さい場合は左に移動し、値が大きい場合は右に移動します。重複すると関係が壊れるため、二分探索木に重複は存在できません。以下の図は、単純な二分探索木を表しています。

#上の図は、ルート値 8 の二分探索木を表しています。値 3 を追加すると、3 は 8 未満であるため、ルートの左の子になります。値 1 を追加すると、1 は 8 より小さく (左側に)、さらに 1 は 3 より小さい (再び左側に) ため、値は 3 の左の子になります。値 10 を追加すると、10 は 8 より大きいため、follow の右側の子になります。値 6、4、7、14、13 を使用してこのプロセスを続けます。この二分探索木の深さは 3 です。これは、ルートから最も遠いノードが 3 ノードであることを意味します。
二分探索ツリーは最終的に自然にソートされた順序になるため、各ステップの可能性をすぐに排除できるため、データを迅速に検索するために使用できます。検索する必要があるノードの数を制限することで、検索を高速化できます。上のツリーで値 6 を見つけたいとします。ルートから始めて、6 が 8 より小さいと判断したため、ルートの左の子に進みます。 6 は 3 より大きいため、右のノードに移動します。正しい値を見つけることができます。したがって、この値を見つけるには、9 つのノードではなく 3 つのノードにアクセスするだけで済みます。
バイナリ検索ツリーを JavaScript で実装するには、最初のステップは基本インターフェイスを定義することです。
function BinarySearchTree() {
    this._root = null;
}

BinarySearchTree.prototype = {

    //restore constructor
    constructor: BinarySearchTree,

    add: function (value){
    },

    contains: function(value){
    },

    remove: function(value){
    },

    size: function(){
    },

    toArray: function(){
    },

    toString: function(){
    }

}; 基本インターフェイスは、値を追加および削除するメソッドを備えた他のデータ構造と似ています。また、JavaScript に役立ついくつかの便利なメソッド size()、toArray()、および toString() も追加しました。
二分探索ツリーの使用方法をマスターするには、contains() メソッドから始めるのが最善です。 contains() メソッドは値をパラメータとして受け取り、その値がツリー内に存在する場合は true を返し、それ以外の場合は false を返します。このメソッドは、基本的な二分検索アルゴリズムに従って、値が存在するかどうかを判断します。
BinarySearchTree.prototype = {
//more code
contains: function(value){
var found = false,
current = this._root
//make sure there's a node to search
while(!found && current){
//if the value is less than the current node's, go left
if (value < current.value){
current = current.left;
//if the value is greater than the current node's, go right
} else if (value > current.value){
current = current.right;
//values are equal, found it!
} else {
found = true;
}
}
//only proceed if the node was found
return found;
},
//more code
};検索はツリーのルートから開始されます。データが追加されていない場合は、ルートが存在しない可能性があるため、確認する必要があります。ツリーの走査は、前に説明した単純なアルゴリズムに従います。つまり、探している値が現在のノードより小さい場合は左に移動し、値が大きい場合は右に移動します。 current ポインタは、求められた値が見つかるまで (この場合、found は true に設定されます)、またはその方向のノードがなくなるまで、毎回上書きされます。 (この場合、値はツリーにありません)。
contains() で使用されるメソッドは、ツリーに新しい値を挿入するために使用することもできます。主な違いは、ツリー内の値を探すのではなく、新しい値を配置する場所を探すことです。
BinarySearchTree.prototype = {
//more code
add: function(value){
//create a new item object, place data in
var node = {
value: value,
left: null,
right: null
},
//used to traverse the structure
current;
//special case: no items in the tree yet
if (this._root === null){
this._root = node;
} else {
current = this._root;
while(true){
//if the new value is less than this node's value, go left
if (value < current.value){
//if there's no left, then the new node belongs there
if (current.left === null){
current.left = node;
break;
} else {
current = current.left;
}
//if the new value is greater than this node's value, go right
} else if (value > current.value){
//if there's no right, then the new node belongs there
if (current.right === null){
current.right = node;
break;
} else {
current = current.right;
}
//if the new value is equal to the current one, just ignore
} else {
break;
}
}
}
},
//more code
};二分探索ツリーに値を追加するときの特殊なケースは、値が存在しない場合です。根。この場合、ルートを新しい値に設定するだけで簡単に作業が完了します。それ以外の場合、基本的なアルゴリズムは contains() で使用されるものとまったく同じです。新しい値が現在のノードより小さい場合は左に進み、値が大きい場合は右に進みます。主な違いは、これ以上先に進めない場合に新しい値がここにあることです。したがって、左に移動する必要があるが、左のノードがない場合、新しい値は左のノードになります (右のノードと同じ)。重複がないため、同じ値を持つノードが見つかると操作は停止します。
在继续讨论 size() 方法之前,我想深入讨论树遍历。为了计算二叉搜索树的大小,必须要访问树中的每个节点。二叉搜索树通常会有不同类型的遍历方法,最常用的是有序遍历。通过处理左子树,然后是节点本身,然后是右子树,在每个节点上执行有序遍历。由于二叉搜索树以这种方式排序,从左到右,结果是节点以正确的排序顺序处理。对于 size() 方法,节点遍历的顺序实际上并不重要,但它对 toArray() 方法很重要。由于两种方法都需要执行遍历,我决定添加一个可以通用的 traverse() 方法:
BinarySearchTree.prototype = {

    //more code

    traverse: function(process){

        //helper function
        function inOrder(node){
            if (node){

                //traverse the left subtree
                if (node.left !== null){
                    inOrder(node.left);
                }

                //call the process method on this node
                process.call(this, node);

                //traverse the right subtree
                if (node.right !== null){
                    inOrder(node.right);
                }
            }
        }

        //start with the root
        inOrder(this._root);
    },

    //more code

};此方法接受一个参数 process,这是一个应该在树中的每个节点上运行的函数。该方法定义了一个名为 inOrder() 的辅助函数用于递归遍历树。注意,如果当前节点存在,则递归仅左右移动(以避免多次处理 null )。然后 traverse() 方法从根节点开始按顺序遍历,process() 函数处理每个节点。然后可以使用此方法实现size()、toArray()、toString():
BinarySearchTree.prototype = {

    //more code

    size: function(){
        var length = 0;

        this.traverse(function(node){
            length++;
        });

        return length;
    },

    toArray: function(){
        var result = [];

        this.traverse(function(node){
            result.push(node.value);
        });

        return result;
    },

    toString: function(){
        return this.toArray().toString();
    },

    //more code

};size() 和 toArray() 都调用 traverse() 方法并传入一个函数来在每个节点上运行。在使用 size()的情况下,函数只是递增长度变量,而 toArray() 使用函数将节点的值添加到数组中。 toString()方法在调用 toArray() 之前把返回的数组转换为字符串,并返回 。
删除节点时,你需要确定它是否为根节点。根节点的处理方式与其他节点类似,但明显的例外是根节点需要在结尾处设置为不同的值。为简单起见,这将被视为 JavaScript 代码中的一个特例。
删除节点的第一步是确定节点是否存在:
BinarySearchTree.prototype = {
//more code here
remove: function(value){
var found = false,
parent = null,
current = this._root,
childCount,
replacement,
replacementParent;
//make sure there's a node to search
while(!found && current){
//if the value is less than the current node's, go left
if (value < current.value){
parent = current;
current = current.left;
//if the value is greater than the current node's, go right
} else if (value > current.value){
parent = current;
current = current.right;
//values are equal, found it!
} else {
found = true;
}
}
//only proceed if the node was found
if (found){
//continue
}
},
//more code here
};remove()方法的第一部分是用二叉搜索定位要被删除的节点,如果值小于当前节点的话则向左移动,如果值大于当前节点则向右移动。当遍历时还会跟踪 parent 节点,因为你最终需要从其父节点中删除该节点。当 found 等于 true 时,current 的值是要删除的节点。
删除节点时需要注意三个条件:
1、叶子节点
2、只有一个孩子的节点
3、有两个孩子的节点
从二叉搜索树中删除除了叶节点之外的内容意味着必须移动值来对树正确的排序。前两个实现起来相对简单,只删除了一个叶子节点,删除了一个带有一个子节点的节点并用其子节点替换。最后一种情况有点复杂,以便稍后访问。
在了解如何删除节点之前,你需要知道节点上究竟存在多少个子节点。一旦知道了,你必须确定节点是否为根节点,留下一个相当简单的决策树:
BinarySearchTree.prototype = {
//more code here
remove: function(value){
var found = false,
parent = null,
current = this._root,
childCount,
replacement,
replacementParent;
//find the node (removed for space)
//only proceed if the node was found
if (found){
//figure out how many children
childCount = (current.left !== null ? 1 : 0) +
(current.right !== null ? 1 : 0);
//special case: the value is at the root
if (current === this._root){
switch(childCount){
//no children, just erase the root
case 0:
this._root = null;
break;
//one child, use one as the root
case 1:
this._root = (current.right === null ?
current.left : current.right);
break;
//two children, little work to do
case 2:
//TODO
//no default
}
//non-root values
} else {
switch (childCount){
//no children, just remove it from the parent
case 0:
//if the current value is less than its
//parent's, null out the left pointer
if (current.value < parent.value){
parent.left = null;
//if the current value is greater than its
//parent's, null out the right pointer
} else {
parent.right = null;
}
break;
//one child, just reassign to parent
case 1:
//if the current value is less than its
//parent's, reset the left pointer
if (current.value < parent.value){
parent.left = (current.left === null ?
current.right : current.left);
//if the current value is greater than its
//parent's, reset the right pointer
} else {
parent.right = (current.left === null ?
current.right : current.left);
}
break;
//two children, a bit more complicated
case 2:
//TODO
//no default
}
}
}
},
//more code here
};处理根节点时,这是一个覆盖它的简单过程。对于非根节点,必须根据要删除的节点的值设置 parent 上的相应指针:如果删除的值小于父节点,则 left 指针必须重置为 null (对于没有子节点的节点)或删除节点的 left 指针;如果删除的值大于父级,则必须将 right 指针重置为 null 或删除的节点的 right指针。
如前所述,删除具有两个子节点的节点是最复杂的操作。考虑二元搜索树的以下表示。

根为 8,左子为 3,如果 3 被删除会发生什么?有两种可能性:1(3 左边的孩子,称为有序前身)或4(右子树的最左边的孩子,称为有序继承者)都可以取代 3。
这两个选项中的任何一个都是合适的。要查找有序前驱,即删除值之前的值,请检查要删除的节点的左子树,并选择最右侧的子节点;找到有序后继,在删除值后立即出现的值,反转进程并检查最左侧的右子树。其中每个都需要另一次遍历树来完成操作:
BinarySearchTree.prototype = {

    //more code here

    remove: function(value){

        var found       = false,
            parent      = null,
            current     = this._root,
            childCount,
            replacement,
            replacementParent;

        //find the node (removed for space)

        //only proceed if the node was found
        if (found){

            //figure out how many children
            childCount = (current.left !== null ? 1 : 0) +
                         (current.right !== null ? 1 : 0);

            //special case: the value is at the root
            if (current === this._root){
                switch(childCount){

                    //other cases removed to save space

                    //two children, little work to do
                    case 2:

                        //new root will be the old root's left child
                        //...maybe
                        replacement = this._root.left;

                        //find the right-most leaf node to be
                        //the real new root
                        while (replacement.right !== null){
                            replacementParent = replacement;
                            replacement = replacement.right;
                        }

                        //it's not the first node on the left
                        if (replacementParent !== null){

                            //remove the new root from it's
                            //previous position
                            replacementParent.right = replacement.left;

                            //give the new root all of the old
                            //root's children
                            replacement.right = this._root.right;
                            replacement.left = this._root.left;
                        } else {

                            //just assign the children
                            replacement.right = this._root.right;
                        }

                        //officially assign new root
                        this._root = replacement;

                    //no default

                }

            //non-root values
            } else {

                switch (childCount){

                    //other cases removed to save space

                    //two children, a bit more complicated
                    case 2:

                        //reset pointers for new traversal
                        replacement = current.left;
                        replacementParent = current;

                        //find the right-most node
                        while(replacement.right !== null){
                            replacementParent = replacement;
                            replacement = replacement.right;
                        }

                        replacementParent.right = replacement.left;

                        //assign children to the replacement
                        replacement.right = current.right;
                        replacement.left = current.left;

                        //place the replacement in the right spot
                        if (current.value < parent.value){
                            parent.left = replacement;
                        } else {
                            parent.right = replacement;
                        }

                    //no default

                }

            }

        }

    },

    //more code here

};具有两个子节点的根节点和非根节点的代码几乎相同。此实现始终通过查看左子树并查找最右侧子节点来查找有序前驱。遍历是使用 while 循环中的 replacement 和 replacementParent 变量完成的。
replacement中的节点最终成为替换 current 的节点,因此通过将其父级的 right 指针设置为替换的 left 指针,将其从当前位置移除。
ルート ノードの場合、replacement がルート ノードの直接の子ノードである場合、replacementParent は null となるため、replacement の right ポインタは、ルートに設定された right ポインタです。
最後のステップは、置換ノードを正しい場所に割り当てることです。ルート ノードの場合、置換は新しいルートに設定され、非ルート ノードの場合、置換は元の parent 上の適切な場所に割り当てられます。
この実装に関する注意: ノードを常に順序付けされた先行ノードに置き換えると、ほとんどの値がツリーの片側に偏る不均衡なツリーが生じる可能性があります。バランスの取れていないツリーは検索の効率が低下することを意味するため、実際のシナリオでは注意が必要です。二分探索ツリーの実装では、ツリーの適切なバランスを維持するために、順序付き先行ノードと後続ノードのどちらを使用するかを決定することが重要です (自己平衡二分探索ツリーと呼ばれることがよくあります)。
このバイナリ検索ツリー実装の完全なソース コードは、私の GitHub にあります。代替実装については、Isaac Schlueter の GitHub フォーク をチェックすることもできます。
この記事は、https://segmentfault.com/a/1190000020044659
から転載されています。英語の元のアドレス: https://humanwhocodes.com/blog/2009/06/ 09/computer-science-in-javascript-binary-search-tree-part-1/
著者: Nicholas C. Zakas
推奨チュートリアル: 「JavaScript ビデオ」チュートリアル》
以上がJS で二分探索ツリーを実装する方法を理解するための 1 つの記事の詳細内容です。詳細については、PHP 中国語 Web サイトの他の関連記事を参照してください。