

Elasticsearch7.9 中国語検索の新バージョンを Laravel7 プロジェクトに簡単に統合

Laravel の次のチュートリアル コラムでは、新しいバージョンの Elasticsearch7.9 中国語検索を Laravel7 プロジェクトに簡単に統合する方法を紹介します。困っている友達!

#1. 統合された ik 中国語単語セグメンテーションを開始します。プラグイン Elasticsearch7.9 Docker Image
##コース推奨→:3、Model モデルを構成「Elasticsearch 全文検索実戦」 (実践ビデオ)コース 「1000 万レベルのデータ同時実行ソリューション (理論的実践)」
4, データのインポート
5. 検索
デモアドレス
 www.ar414.com/search?query=php�%...
検索範囲
記事の内容タイトル- タグ
- 結果の重み
- ##出現キーワード数
- ハイライト表示
- 単語分割表示
結果ページング
- #前書き
- 主な理由は、ブログを作りたいだけです ちなみに検索して記事にまとめます
Laravel Elasticsearch 多くの先輩方がチュートリアルや事例を書いていますが、Elasticsearchとlaravelのバージョンアップに伴い、以前の記事の多くがオープン ソース プロジェクトの場合は、ドキュメント (主に現在使用中のバージョンのドキュメントを参照し、チュートリアルで補足されている) を参照することをお勧めします。
Elasticsearch 7.9Laravel 7
elasticsearch-analysis-ik v7.9
- リファレンス
- ik 中国語の単語のセグメンテーションプラグイン
elasticsearch 公式ドキュメント
- 統合された ik 中国語単語セグメンテーションを使用する
- プラグイン Elasticsearch
Pull docker$ docker pull ar414/elasticsearch-7.9-ik-plugin
ログイン後にコピー
ログを作成し、Docker の再起動時のデータ損失を防ぐために、データ ストレージ ディレクトリ $ docker pull ar414/elasticsearch-7.9-ik-plugin
# が Docker コンテナにローカルにマッピングされます。
$ mkdir -p /data/elasticsearch/data
$ mkdir -p /data/elasticsearch/log
$ chmod -R 777 /data/elasticsearch/data
$ chmod -R 777 /data/elasticsearch/log
ログイン後にコピー
実行$ mkdir -p /data/elasticsearch/data $ mkdir -p /data/elasticsearch/log $ chmod -R 777 /data/elasticsearch/data $ chmod -R 777 /data/elasticsearch/log
検証docker run -d -p 9200:9200 -p 9300:9300 -e "discovery.type=single-node" -v /data/elasticsearch/data:/var/lib/elasticsearch -v /data/elasticsearch/log:/var/log/elasticsearch ar414/elasticsearch-7.9-ik-pluginログイン後にコピー
$ curl http://localhost:9200{
  "name" : "01ac21393985",  "cluster_name" : "docker-cluster",  "cluster_uuid" : "h8L336qcRb2i1aydOv04Og",  "version" : {
    "number" : "7.9.0",    "build_flavor" : "default",    "build_type" : "docker",    "build_hash" : "a479a2a7fce0389512d6a9361301708b92dff667",    "build_date" : "2020-08-11T21:36:48.204330Z",    "build_snapshot" : false,    "lucene_version" : "8.6.0",    "minimum_wire_compatibility_version" : "6.8.0",    "minimum_index_compatibility_version" : "6.0.0-beta1"
  },  "tagline" : "You Know, for Search"}
ログイン後にコピー
中国語の単語のセグメンテーションをテスト$ curl http://localhost:9200{
"name" : "01ac21393985", "cluster_name" : "docker-cluster", "cluster_uuid" : "h8L336qcRb2i1aydOv04Og", "version" : {
"number" : "7.9.0", "build_flavor" : "default", "build_type" : "docker", "build_hash" : "a479a2a7fce0389512d6a9361301708b92dff667", "build_date" : "2020-08-11T21:36:48.204330Z", "build_snapshot" : false, "lucene_version" : "8.6.0", "minimum_wire_compatibility_version" : "6.8.0", "minimum_index_compatibility_version" : "6.0.0-beta1"
}, "tagline" : "You Know, for Search"}
curl -X POST "http://localhost:9200/_analyze?pretty" -H 'Content-Type: application/json' -d'
{
  "analyzer": "ik_max_word",
  "text":     "laravel天下无敌"
}
'{
  "tokens" : [
    {
      "token" : "laravel",      "start_offset" : 0,      "end_offset" : 7,      "type" : "ENGLISH",      "position" : 0    },    {
      "token" : "天下无敌",      "start_offset" : 7,      "end_offset" : 11,      "type" : "CN_WORD",      "position" : 1    },    {
      "token" : "天下",      "start_offset" : 7,      "end_offset" : 9,      "type" : "CN_WORD",      "position" : 2    },    {
      "token" : "无敌",      "start_offset" : 9,      "end_offset" : 11,      "type" : "CN_WORD",      "position" : 3    }
  ]}
ログイン後にコピー
Laravel プロジェクトで Elasticsearch を使用するcurl -X POST "http://localhost:9200/_analyze?pretty" -H 'Content-Type: application/json' -d'
{
"analyzer": "ik_max_word",
"text": "laravel天下无敌"
}
'{
"tokens" : [
{
"token" : "laravel", "start_offset" : 0, "end_offset" : 7, "type" : "ENGLISH", "position" : 0 }, {
"token" : "天下无敌", "start_offset" : 7, "end_offset" : 11, "type" : "CN_WORD", "position" : 1 }, {
"token" : "天下", "start_offset" : 7, "end_offset" : 9, "type" : "CN_WORD", "position" : 2 }, {
"token" : "无敌", "start_offset" : 9, "end_offset" : 11, "type" : "CN_WORD", "position" : 3 }
]}Elasticsearch公式 SDK が提供されており、Laravel プロジェクトでは、次のリンクに接続できます。 Elasticsearch の詳細 elegantly
. Laravel 自体が Scout の全文検索ソリューションを提供しています. デフォルトを変更するだけで済みます Algolia ドライバーはElasticSearch driver に置き換えられます。
 インストールlaravel/scout
Elasticsearch7.9 中国語検索の新バージョンを Laravel7 プロジェクトに簡単に統合$ composer require laravel/scout
$ composer require Elasticsearch7.9 中国語検索の新バージョンを Laravel7 プロジェクトに簡単に統合
ログイン後にコピー
$ composer require laravel/scout
$ composer require Elasticsearch7.9 中国語検索の新バージョンを Laravel7 プロジェクトに簡単に統合
- 設定
$ php artisan vendor:publish --provider="Laravel\Scout\ScoutServiceProvider"Copied File [\vendor\laravel\scout\config\scout.php] To [\config\scout.php]Publishing complete.
ログイン後にコピー
Scoutドライバーの指定$ php artisan vendor:publish --provider="Laravel\Scout\ScoutServiceProvider"Copied File [\vendor\laravel\scout\config\scout.php] To [\config\scout.php]Publishing complete.
- 最初のタイプ:
- .env
ファイルで
を指定 (推奨) #2 番目のタイプ:SCOUT_DRIVER=Matchish\ScoutElasticSearch\Engines\ElasticSearchEngine
ログイン後にコピーconfig/scout.php
'driver' => env('SCOUT_DRIVER', 'algolia')改为'driver' => env('SCOUT_DRIVER', 'Matchish\ScoutElasticSearch\Engines\ElasticSearchEngine')-
Docker デプロイメントを使用する場合は、docker0# の IP を使用します##、Linux は ifconfig を通じてチェックします。
-
.env
config/app で構成します。 .phpELASTICSEARCH_HOST=172.17.0.1:9200
ログイン後にコピー登録サービス<div class="code" style="position:relative; padding:0px; margin:0px;"><pre class="brush:php;toolbar:false">'providers' => [ // Other Service Providers \Matchish\ScoutElasticSearch\ElasticSearchServiceProvider::class],</pre><div class="contentsignin">ログイン後にコピー</div></div>設定キャッシュをクリア -
$ php artisan config:clear
ログイン後にコピーLaravel が Elasticsearch に接続されました实际业务中使用
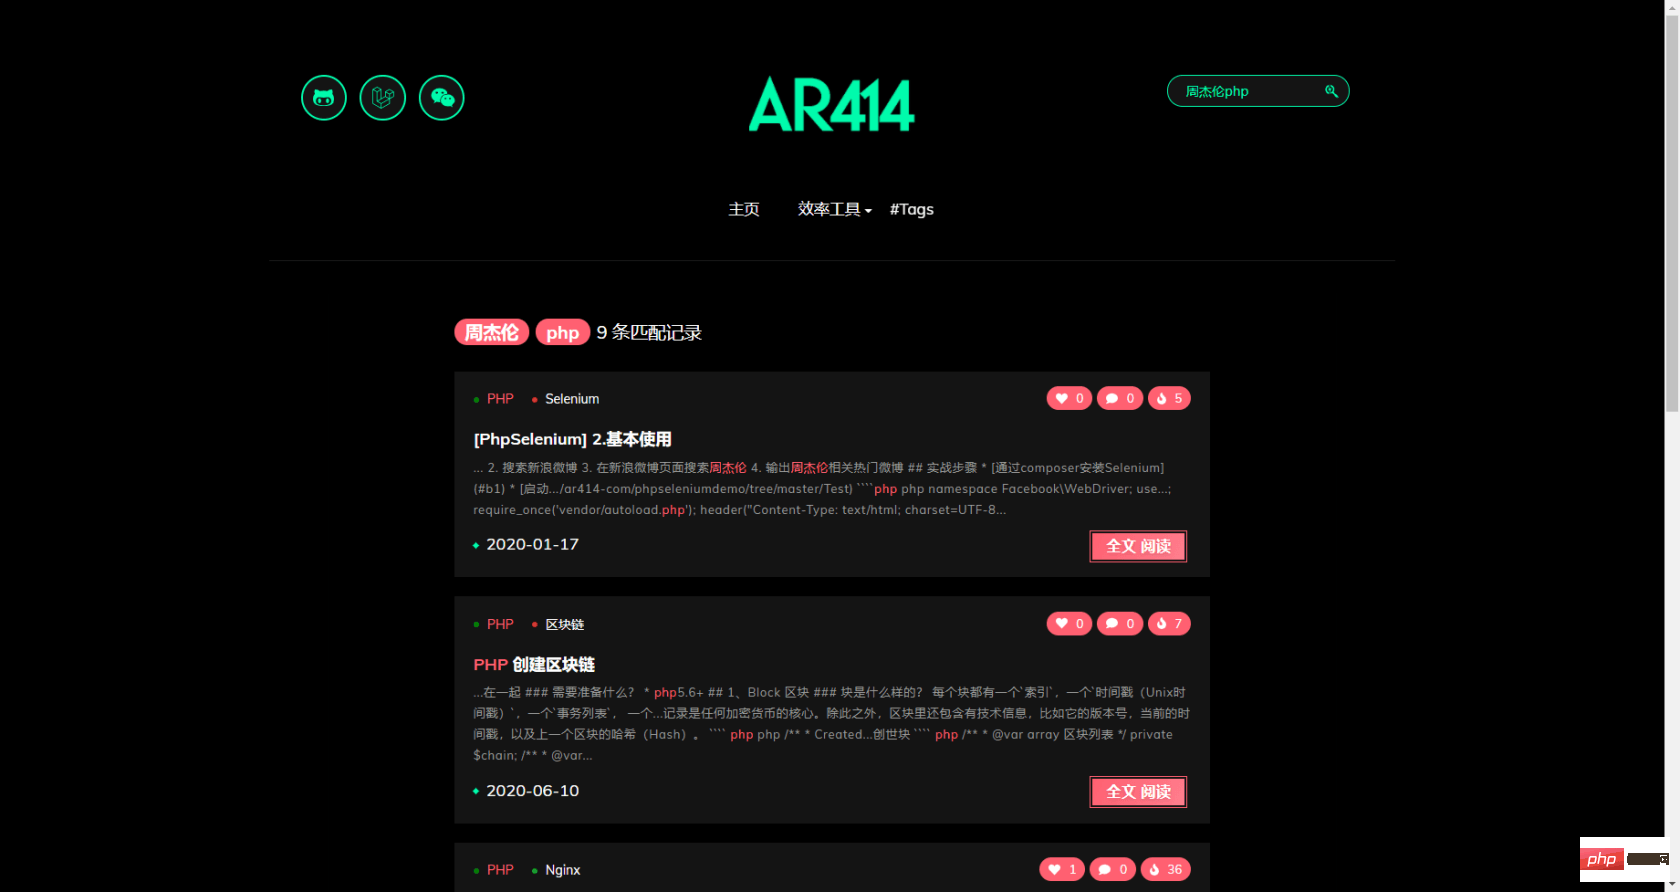
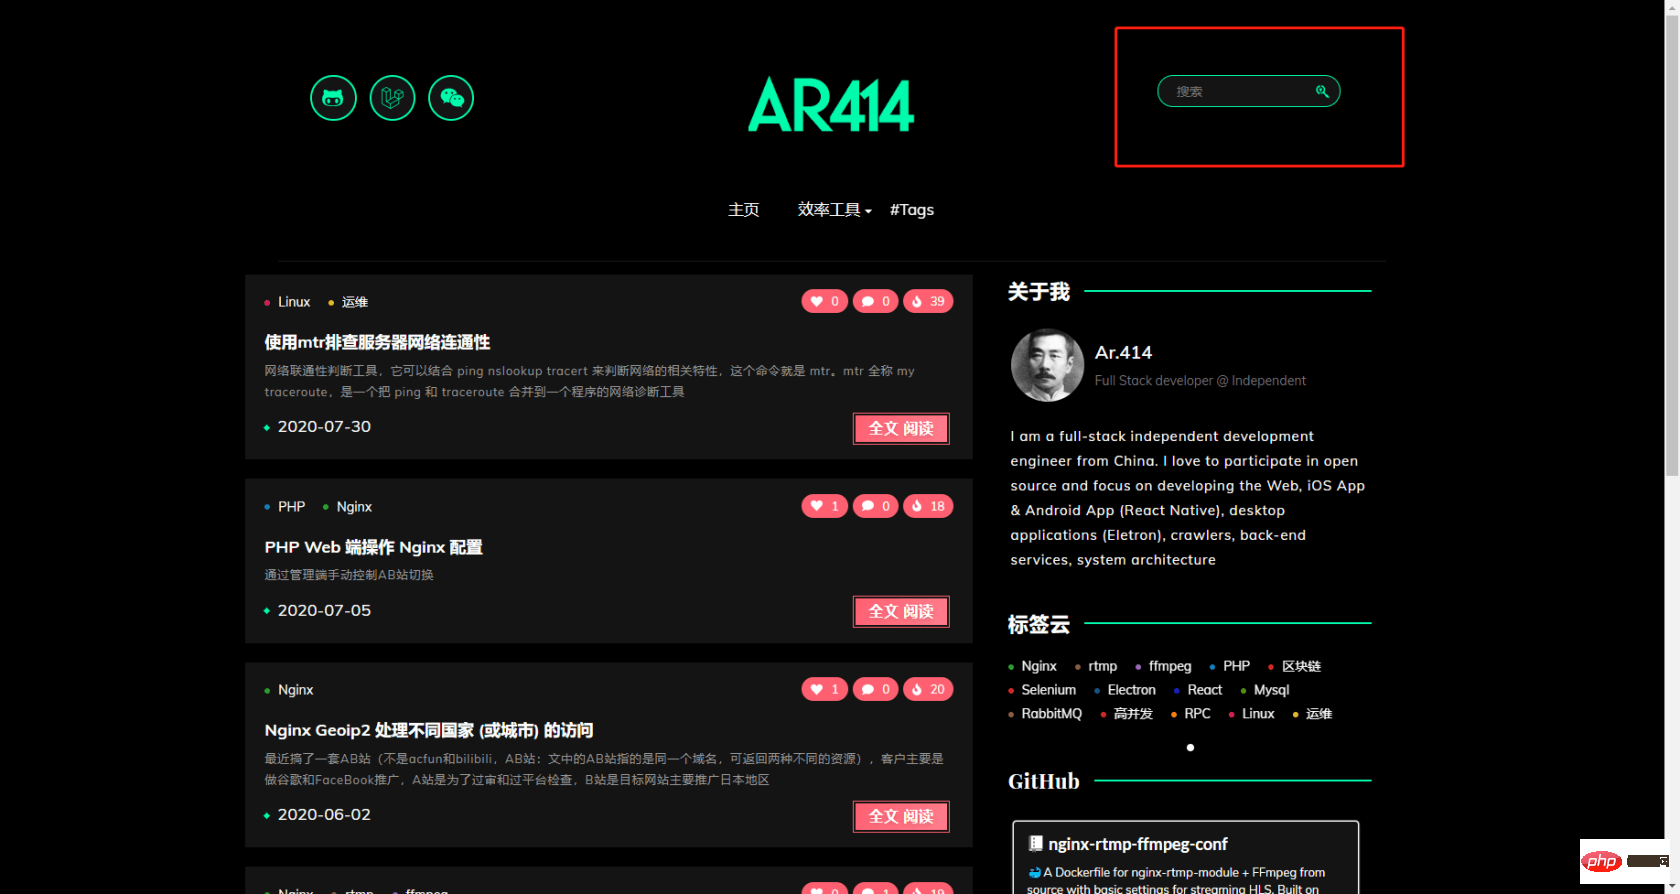
需求

通过博客右上角的搜索框可以搜索到与关键词相关的文章,从以下几点匹配
- 文章内容
- 文章标题
- 文章标签
涉及到2张 Mysql表 以及字段
- article
- title
- tags
- article_content
- content
为文章配置 Elasticsearch 索引
-
创建索引配置文件(config/elasticsearch.php)
$ touch config/elasticsearch.php
ログイン後にコピー -
elasticsearch.php 配置字段映射
<?phpreturn [ 'indices' => [ 'mappings' => [ 'blog-articles' => [ "properties"=> [ "content"=> [ "type"=> "text", "analyzer"=> "ik_max_word", "search_analyzer"=> "ik_smart" ], "tags"=> [ "type"=> "text", "analyzer"=> "ik_max_word", "search_analyzer"=> "ik_smart" ], "title"=> [ "type"=> "text", "analyzer"=> "ik_max_word", "search_analyzer"=> "ik_smart" ] ] ] ] ],];
ログイン後にコピー
- analyzer:字段文本的分词器
- search_analyzer:搜索词的分词器
- 根据具体业务场景选择(颗粒小占用资源多,一般场景analyzer使用ik_max_word,search_analyzer使用ik_smart):
- ik_max_word:ik中文分词插件提供,对文本进行最大数量分词
laravel天下无敌->laravel,天下无敌,天下,无敌 - ik_smart: ik中文分词插件提供,对文本进行最小数量分词
laravel天下无敌->laravel,天下无敌
- ik_max_word:ik中文分词插件提供,对文本进行最大数量分词
配置文章模型
建议先看一遍 Laravel Scout 使用文档
-
引入Laravel Scout
 namespace App\Models\Blog;

 use Laravel\Scout\Searchable;

 class Article extends BlogBaseModel
 {
     use Searchable;
 }
ログイン後にコピー -
指定索引(刚刚配置文件中的elasticsearch.indices.mappings.blog-articles)
 /**
  * 指定索引
  * @return string
  */
 public function searchableAs()
 {
     return 'blog-articles';
 }
ログイン後にコピー -
设置导入索引的数据字段
 /**
  * 设置导入索引的数据字段
  * @return array
  */
 public function toSearchableArray()
 {
     return [
         'content' => ArticleContent::query()
             ->where('article_id',$this->id)
             ->value('content'),
         'tags'    => implode(',',$this->tags),
         'title'   => $this->title
     ];
 }
ログイン後にコピー -
指定 搜索索引中存储的唯一ID
 /**
  * 指定 搜索索引中存储的唯一ID
  * @return mixed
  */
 public function getScoutKey()
 {
     return $this->id;
 }

 /**
  * 指定 搜索索引中存储的唯一ID的键名
  * @return string
  */
 public function getScoutKeyName()
 {
     return 'id';
 }
ログイン後にコピー
数据导入
其实是将数据表中的数据通过Elasticsearch导入到Lucene
Elasticsearch 是 Lucene 的封装,提供了 REST API 的操作接口- 一键自动导入:
php artisan scout:import - 导入指定模型:
php artisan scout:import ${model}
$ php artisan scout:import "App\Models\Blog\Article"Importing [App\Models\Blog\Article]Switching to the new index
5/5 [⚬⚬⚬⚬⚬⚬⚬⚬⚬⚬⚬⚬⚬⚬⚬⚬⚬⚬⚬⚬⚬⚬⚬⚬⚬⚬⚬⚬] 100%[OK] All [App\Models\Blog\Article] records have been imported.
ログイン後にコピー导入失败,常见原因:
- Unresolvable dependency resolving [Parameter #0 [ integer $retries ]] in class Elasticsearch\Transport
- 解决: 修改配置后,没有清除配置缓存
- invalid_index_name_exception
- 解决: searchableAs配置错误,为索引创建别名后,指定别名
检查索引是否正确
$ curl -XGET http://localhost:9200/blog-articles/_mapping?pretty{ "blog-articles_1598362919" : { "mappings" : { "properties" : { "__class_name" : { "type" : "text", "fields" : { "keyword" : { "type" : "keyword", "ignore_above" : 256 } } }, "content" : { "type" : "text", "analyzer" : "ik_max_word", "search_analyzer" : "ik_smart" }, "tags" : { "type" : "text", "analyzer" : "ik_max_word", "search_analyzer" : "ik_smart" }, "title" : { "type" : "text", "analyzer" : "ik_max_word", "search_analyzer" : "ik_smart" } } } }}ログイン後にコピー测试
-
创建一个测试命令行
$ php artisan make:command ElasticTest
ログイン後にコピー 代码
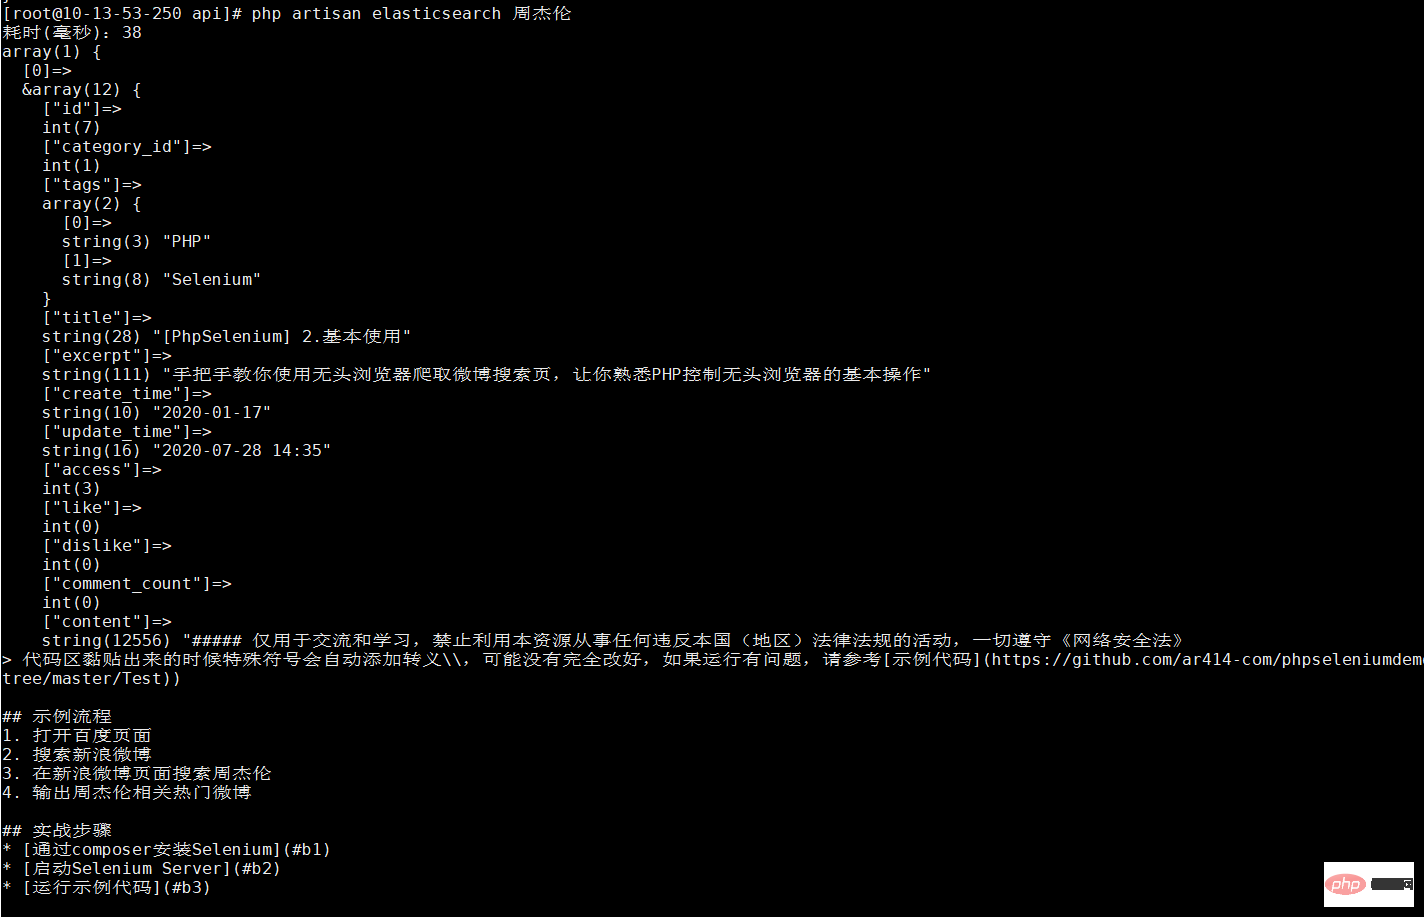
<?phpnamespace App\Console\Commands;use App\Models\Blog\Article;use App\Models\Blog\ArticleContent;use Illuminate\Console\Command;use Illuminate\Support\Carbon;class ElasticTest extends Command{ /** * The name and signature of the console command. * * @var string */ protected $signature = 'elasticsearch {query}'; /** * The console command description. * * @var string */ protected $description = 'elasticsearch test'; /** * Create a new command instance. * * @return void */ public function __construct() { parent::__construct(); } /** * Execute the console command. * * @return mixed */ public function handle() { // $startTime = Carbon::now()->getPreciseTimestamp(3); $articles = Article::search($this->argument('query'))->get()->toArray(); $userTime = Carbon::now()->getPreciseTimestamp(3) - $startTime; echo "耗时(毫秒):{$userTime} \n"; //content在另外一张表中,方便观察测试 这里输出 if(!empty($articles)) { foreach($articles as &$article) { $article = ArticleContent::query()->where('article_id',$article['id'])->value('content'); } } var_dump($articles); }}ログイン後にコピー- 测试
$ php artisan elasticsearch 周杰伦
ログイン後にコピー
- 复杂查询
例如:自定义高亮显示//ONGR\ElasticsearchDSL\Highlight\Highlight ArticleModel::search($query,function($client,$body) { $higlight = new Highlight(); $higlight->addField('content',['type' => 'plain']); $higlight->addField('title'); $higlight->addField('tags'); $body->addHighlight($higlight); $body->setSource(['title','tags']); return $client->search(['index' => (new ArticleModel())->searchableAs(), 'body' => $body->toArray()]); })->raw();ログイン後にコピー
复杂自定义查询回调中的$client和$body,可根据这两个包进行灵活操作
$client 官方 elasticsearch/elasticsearch package(https://packagist.org/packages/elasticsearch/elasticsearch)
$body ongr/elasticsearch-dsl package(https://packagist.org/packages/ongr/elasticsearch-dsl)
以上がElasticsearch7.9 中国語検索の新バージョンを Laravel7 プロジェクトに簡単に統合の詳細内容です。詳細については、PHP 中国語 Web サイトの他の関連記事を参照してください。

ホットAIツール

Undresser.AI Undress
リアルなヌード写真を作成する AI 搭載アプリ

AI Clothes Remover
写真から衣服を削除するオンライン AI ツール。

Undress AI Tool
脱衣画像を無料で

Clothoff.io
AI衣類リムーバー

AI Hentai Generator
AIヘンタイを無料で生成します。

人気の記事
ホットツール

メモ帳++7.3.1
使いやすく無料のコードエディター

SublimeText3 中国語版
中国語版、とても使いやすい

ゼンドスタジオ 13.0.1
強力な PHP 統合開発環境

ドリームウィーバー CS6
ビジュアル Web 開発ツール

SublimeText3 Mac版
神レベルのコード編集ソフト(SublimeText3)
ホットトピック
 7489
7489
 15
1377
52
77
11
19
41
15
1377
52
77
11
19
41

 Ubuntu および Debian 用の PHP 8.4 インストールおよびアップグレード ガイド
Dec 24, 2024 pm 04:42 PM
Ubuntu および Debian 用の PHP 8.4 インストールおよびアップグレード ガイド
Dec 24, 2024 pm 04:42 PM
PHP 8.4 では、いくつかの新機能、セキュリティの改善、パフォーマンスの改善が行われ、かなりの量の機能の非推奨と削除が行われています。 このガイドでは、Ubuntu、Debian、またはその派生版に PHP 8.4 をインストールする方法、または PHP 8.4 にアップグレードする方法について説明します。
 PHP 開発用に Visual Studio Code (VS Code) をセットアップする方法
Dec 20, 2024 am 11:31 AM
PHP 開発用に Visual Studio Code (VS Code) をセットアップする方法
Dec 20, 2024 am 11:31 AM
Visual Studio Code (VS Code とも呼ばれる) は、すべての主要なオペレーティング システムで利用できる無料のソース コード エディター (統合開発環境 (IDE)) です。 多くのプログラミング言語の拡張機能の大規模なコレクションを備えた VS Code は、
 PHPでHTML/XMLを解析および処理するにはどうすればよいですか?
Feb 07, 2025 am 11:57 AM
PHPでHTML/XMLを解析および処理するにはどうすればよいですか?
Feb 07, 2025 am 11:57 AM
このチュートリアルでは、PHPを使用してXMLドキュメントを効率的に処理する方法を示しています。 XML(拡張可能なマークアップ言語)は、人間の読みやすさとマシン解析の両方に合わせて設計された多用途のテキストベースのマークアップ言語です。一般的にデータストレージに使用されます
 JSON Web Tokens(JWT)とPHP APIでのユースケースを説明してください。
Apr 05, 2025 am 12:04 AM
JSON Web Tokens(JWT)とPHP APIでのユースケースを説明してください。
Apr 05, 2025 am 12:04 AM
JWTは、JSONに基づくオープン標準であり、主にアイデンティティ認証と情報交換のために、当事者間で情報を安全に送信するために使用されます。 1。JWTは、ヘッダー、ペイロード、署名の3つの部分で構成されています。 2。JWTの実用的な原則には、JWTの生成、JWTの検証、ペイロードの解析という3つのステップが含まれます。 3. PHPでの認証にJWTを使用する場合、JWTを生成および検証でき、ユーザーの役割と許可情報を高度な使用に含めることができます。 4.一般的なエラーには、署名検証障害、トークンの有効期限、およびペイロードが大きくなります。デバッグスキルには、デバッグツールの使用とロギングが含まれます。 5.パフォーマンスの最適化とベストプラクティスには、適切な署名アルゴリズムの使用、有効期間を合理的に設定することが含まれます。
 母音を文字列にカウントするPHPプログラム
Feb 07, 2025 pm 12:12 PM
母音を文字列にカウントするPHPプログラム
Feb 07, 2025 pm 12:12 PM
文字列は、文字、数字、シンボルを含む一連の文字です。このチュートリアルでは、さまざまな方法を使用してPHPの特定の文字列内の母音の数を計算する方法を学びます。英語の母音は、a、e、i、o、u、そしてそれらは大文字または小文字である可能性があります。 母音とは何ですか? 母音は、特定の発音を表すアルファベットのある文字です。大文字と小文字など、英語には5つの母音があります。 a、e、i、o、u 例1 入力:string = "tutorialspoint" 出力:6 説明する 文字列「TutorialSpoint」の母音は、u、o、i、a、o、iです。合計で6元があります
 今まで知らなかったことを後悔している 7 つの PHP 関数
Nov 13, 2024 am 09:42 AM
今まで知らなかったことを後悔している 7 つの PHP 関数
Nov 13, 2024 am 09:42 AM
あなたが経験豊富な PHP 開発者であれば、すでにそこにいて、すでにそれを行っていると感じているかもしれません。あなたは、運用を達成するために、かなりの数のアプリケーションを開発し、数百万行のコードをデバッグし、大量のスクリプトを微調整してきました。
 PHPでの後期静的結合を説明します(静的::)。
Apr 03, 2025 am 12:04 AM
PHPでの後期静的結合を説明します(静的::)。
Apr 03, 2025 am 12:04 AM
静的結合(静的::) PHPで後期静的結合(LSB)を実装し、クラスを定義するのではなく、静的コンテキストで呼び出しクラスを参照できるようにします。 1)解析プロセスは実行時に実行されます。2)継承関係のコールクラスを検索します。3)パフォーマンスオーバーヘッドをもたらす可能性があります。
 PHPマジックメソッド(__construct、__destruct、__call、__get、__setなど)とは何ですか?
Apr 03, 2025 am 12:03 AM
PHPマジックメソッド(__construct、__destruct、__call、__get、__setなど)とは何ですか?
Apr 03, 2025 am 12:03 AM
PHPの魔法の方法は何ですか? PHPの魔法の方法には次のものが含まれます。1。\ _ \ _コンストラクト、オブジェクトの初期化に使用されます。 2。\ _ \ _リソースのクリーンアップに使用される破壊。 3。\ _ \ _呼び出し、存在しないメソッド呼び出しを処理します。 4。\ _ \ _ get、dynamic属性アクセスを実装します。 5。\ _ \ _セット、動的属性設定を実装します。これらの方法は、特定の状況で自動的に呼び出され、コードの柔軟性と効率を向上させます。
