PHP7のデータベース接続と追加・削除・問い合わせ・変更の詳細解説(mysqli方式)
mysqli メソッドを使用して、次の機能を実現します (php7):
1. MySQL データベース サーバーに接続します; 2. test という名前のデータベースを作成します;
3. データベースに「testTable」という名前のデータ テーブルを作成します。データ テーブルには少なくとも 3 つのフィールドが含まれます。フィールド名、タイプ、属性はカスタマイズされます;
4. データベースに 3 つのレコードを挿入し、データ テーブル内のすべてのデータをクエリします;
5. レコードの 1 つを変更し、データ テーブル内のすべてのデータをクエリします;
6. レコードの 1 つを削除し、データ テーブル内のすべてのデータをクエリします;
<!DOCTYPE html>
<html>
<head>
<meta charset="UTF-8" >
<title>mysqli方法实现连接数据库,及增删查改</title>
</head>
<body>
<?php
$con = @mysqli_connect("localhost","root","15118595615");
if($con){
echo "数据库连接成功!</br>";
}
else{
echo "数据库连接失败!</br>";
}
$sql="CREATE DATABASE test";
if (mysqli_query($con,$sql)){
echo "数据库创建成功!</br>";
}else{
echo "数据库创建失败!</br>".mysqli_error($con)."</br>";
}
mysqli_select_db($con,"test");
$table="CREATE TABLE testTable(
student_id int(11) auto_increment primary key,
student_no char(10) not null unique,
student_name char(20) not null)";
if(mysqli_query($con,$table)){
echo "数据表创建成功!</br>";
}
else{
echo "数据表创建失败!</br>".mysqli_error($con)."</br>";
}
$mysqli=new mysqli("localhost","root","15118595615","test");
$query="select * from testTable";
$insertdatas=mysqli_query($con,"insert into testTable(student_id,student_no,student_name) values('null','20170001','张三')");
mysqli_free_result($insertdatas);
$insertdatas=mysqli_query($con,"insert into testTable(student_id,student_no,student_name) values('null','20170002','李四')");
mysqli_free_result($insertdatas);
$insertdatas=mysqli_query($con,"insert into testTable(student_id,student_no,student_name) values('null','20170003','王五')");
if($insertdatas){
echo "数据插入成功!</br>";
$result=$mysqli->query($query);
foreach($result as $row){
echo $row["student_id"].'  ';
echo $row["student_no"].'  ';
echo $row["student_name"]."</br>";
}
}
else{
echo "数据插入失败!</br>".mysqli_error($con)."</br>";
}
mysqli_free_result($insertdatas);
$up=mysqli_query($con,"update testTable set student_no='20180001' where student_name='张三'");
if($up){
echo "数据更新成功!</br>";
$result=$mysqli->query($query);
foreach($result as $row){
echo $row["student_id"].'  ';
echo $row["student_no"].'  ';
echo $row["student_name"]."</br>";
}
}
else{
echo "数据更新失败!</br>".mysqli_error($con)."</br>";
}
mysqli_free_result($up);
$del=mysqli_query($con,"delete from testTable where student_name='李四'");
if($del){
echo "数据删除成功!</br>";
$result=$mysqli->query($query);
foreach($result as $row){
echo $row["student_id"].'  ';
echo $row["student_no"].'  ';
echo $row["student_name"]."</br>";
}
}
else{
echo "数据删除失败!</br>".mysqli_error($con)."</br>";
}
mysqli_free_result($del);
mysqli_close($con);
?>
</body>
</html> コードを記述するときPHP7 と PHP5 のいくつかの違いに注意してください:
1. PHP7 では、PHP5 の
mysql() を mysqli() に置き換える必要があります; 2. PHP7 のクエリ ステートメントは次のように記述する必要があります。
mysqli( として)
c
ああ
n
n
e
c
t
、、
接続する、
#connect,sql)、PHP5 の書き方は PHP7 とは逆です。 mysql(
s
q q
私
、
SQL、
#sql、connect);注意:
各クエリの後に必ず mysqli_free_result() 関数を使用してリソースを解放してください。そうしないと、エラーが報告され、次のクエリ ステートメントを実行できません。私も初心者の頃は回り道をたくさんして大変な勉強になったので、初心者の友達が回り道をしないように少しでも役に立てれば嬉しいです! 1、连接MySQL数据库服务器;用mysqli方法 实现以下功能(php7):
2、创建一个名为test的数据库;
3、在该数据库内创建一个名为“testTable”的数据表,数据表至少包含三个字段,字段名字、类型和属性自定;
4、为该数据库插入三条记录,并查询该数据表的所有数据;
5、修改其中的一条记录,并查询该数据表的所有数据;
6、删除其中的一条记录,并查询该数据表的所有数据;<!DOCTYPE html><html><head><meta charset="UTF-8" ><title>mysqli方法实现连接数据库,及增删查改</title></head><body><?php
$con = @mysqli_connect("localhost","root","15118595615");
if($con){
echo "数据库连接成功!</br>";
}
else{
echo "数据库连接失败!</br>";
}
$sql="CREATE DATABASE test";
if (mysqli_query($con,$sql)){
echo "数据库创建成功!</br>";
}else{
echo "数据库创建失败!</br>".mysqli_error($con)."</br>";
}
mysqli_select_db($con,"test");
$table="CREATE TABLE testTable(
student_id int(11) auto_increment primary key,
student_no char(10) not null unique,
student_name char(20) not null)";
if(mysqli_query($con,$table)){
echo "数据表创建成功!</br>";
}
else{
echo "数据表创建失败!</br>".mysqli_error($con)."</br>";
}
$mysqli=new mysqli("localhost","root","15118595615","test");
$query="select * from testTable";
$insertdatas=mysqli_query($con,"insert into testTable(student_id,student_no,student_name) values('null','20170001','张三')");
mysqli_free_result($insertdatas);
$insertdatas=mysqli_query($con,"insert into testTable(student_id,student_no,student_name) values('null','20170002','李四')");
mysqli_free_result($insertdatas);
$insertdatas=mysqli_query($con,"insert into testTable(student_id,student_no,student_name) values('null','20170003','王五')");
if($insertdatas){
echo "数据插入成功!</br>";
$result=$mysqli->query($query);
foreach($result as $row){
echo $row["student_id"].'  ';
echo $row["student_no"].'  ';
echo $row["student_name"]."</br>";
}
}
else{
echo "数据插入失败!</br>".mysqli_error($con)."</br>";
}
mysqli_free_result($insertdatas);
$up=mysqli_query($con,"update testTable set student_no='20180001' where student_name='张三'");
if($up){
echo "数据更新成功!</br>";
$result=$mysqli->query($query);
foreach($result as $row){
echo $row["student_id"].'  ';
echo $row["student_no"].'  ';
echo $row["student_name"]."</br>";
}
}
else{
echo "数据更新失败!</br>".mysqli_error($con)."</br>";
}
mysqli_free_result($up);
$del=mysqli_query($con,"delete from testTable where student_name='李四'");
if($del){
echo "数据删除成功!</br>";
$result=$mysqli->query($query);
foreach($result as $row){
echo $row["student_id"].'  ';
echo $row["student_no"].'  ';
echo $row["student_name"]."</br>";
}
}
else{
echo "数据删除失败!</br>".mysqli_error($con)."</br>";
}
mysqli_free_result($del);
mysqli_close($con);
?></body></html>
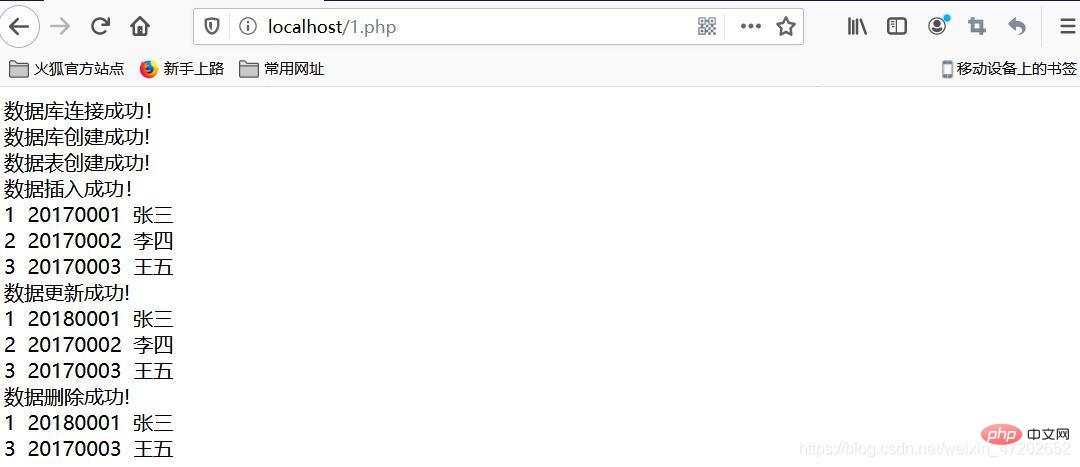
最终效果如下:
写代码的时候要注意PHP7和PHP5的一些差别:
1、PHP7要将PHP5的mysql()换成mysqli();
2、PHP7的查询语句要写成mysqli(
c
o
n
n
e
c
t
,
connect,
connect,sql),PHP5的写法和PHP7的相反mysql(
s
q
l
,
sql,
sql,connect);
温馨提示:
每次查询完之后一定要用mysqli_free_result()函数释放资源!不然会报错,无法执行下一条查询语句!初学的时候走了不少弯路,血的教训,希望能给初学的朋友帮助,少走弯路!
以上がPHP7のデータベース接続と追加・削除・問い合わせ・変更の詳細解説(mysqli方式)の詳細内容です。詳細については、PHP 中国語 Web サイトの他の関連記事を参照してください。

ホットAIツール

Undresser.AI Undress
リアルなヌード写真を作成する AI 搭載アプリ

AI Clothes Remover
写真から衣服を削除するオンライン AI ツール。

Undress AI Tool
脱衣画像を無料で

Clothoff.io
AI衣類リムーバー

AI Hentai Generator
AIヘンタイを無料で生成します。

人気の記事

ホットツール

メモ帳++7.3.1
使いやすく無料のコードエディター

SublimeText3 中国語版
中国語版、とても使いやすい

ゼンドスタジオ 13.0.1
強力な PHP 統合開発環境

ドリームウィーバー CS6
ビジュアル Web 開発ツール

SublimeText3 Mac版
神レベルのコード編集ソフト(SublimeText3)

ホットトピック
 7548
7548
 15
15
 1382
1382
 52
52
 83
83
 11
11
 22
22
 90
90
 PHP 致命的エラーの解決策: 未定義関数 mysqli_connect() の呼び出し
Jun 23, 2023 am 09:40 AM
PHP を使用して Web アプリケーションを作成する場合、データの保存に MySQL データベースがよく使用されます。 PHP は、MySQLi と呼ばれる MySQL データベースと対話する方法を提供します。ただし、MySQLi を使用している場合、以下に示すようなエラー メッセージが表示されることがあります。 PPHPFatalerror:Calltounknownfunctionmysqli_connect() このエラー メッセージは、PHP が MySQLi を見つけられないことを意味します。
 PHP PDO と mysqli: 比較対照
Feb 19, 2024 pm 12:24 PM
PDOPDO は、PHP に統合インターフェイスを提供するオブジェクト指向のデータベース アクセス抽象化レイヤーであり、同じコードを使用して異なるデータベース (Mysql、postgresql、oracle など) と対話できるようにします。 PDO は、基礎となるデータベース接続の複雑さを隠し、データベース操作を簡素化します。長所と短所 長所: 統一されたインターフェイス、複数のデータベースのサポート、データベース操作の簡素化、開発の困難さの軽減、プリペアドステートメントの提供、セキュリティの向上、トランザクション処理のサポート 短所: パフォーマンスはネイティブ拡張よりわずかに低い場合があり、外部ライブラリに依存し、オーバーヘッドが増加する可能性があります。デモ コードでは PDO を使用します。 mysql データベースに接続します: $db=newPDO("mysql:host=localhost;dbnam
 php が mysqli に接続できない場合はどうすればよいですか?
Nov 09, 2022 am 10:07 AM
php が mysqli に接続できない場合の解決策: 1. 「php.ini」ファイルを開きます; 2. 「mysqli.reconnect」を見つけます; 3. 「mysqli.reconnect = OFF」を「mysqli.reconnect = on」に変更します。
 php7.0にmongo拡張機能をインストールする方法
Nov 21, 2022 am 10:25 AM
php7.0 に mongo 拡張機能をインストールする方法: 1. mongodb ユーザー グループとユーザーを作成します; 2. mongodb ソース コード パッケージをダウンロードし、ソース コード パッケージを "/usr/local/src/" ディレクトリに配置します; 3. 「src/」ディレクトリに入ります; 4. ソースコードパッケージを解凍します; 5. mongodb ファイルディレクトリを作成します; 6. ファイルを「mongodb/」ディレクトリにコピーします; 7. mongodb 設定ファイルを作成して設定を変更します。
 php7がTCPポートが機能していないことを検出した場合の問題を解決する方法
Mar 22, 2023 am 09:30 AM
php5 では、fsockopen() 関数を使用して TCP ポートを検出できます。この機能を使用して、ネットワーク接続を開き、ネットワーク通信を実行できます。ただし、php7 では、fsockopen() 関数でポートを開けない、サーバーに接続できないなどの問題が発生する可能性があります。この問題を解決するには、socket_create() 関数とsocket_connect() 関数を使用して TCP ポートを検出します。
 PHP 警告: mysqli_connect(): (HY000/2002): 接続が拒否された場合の解決策
Jun 23, 2023 am 08:54 AM
PHP を使用して MySQL データベースに接続するときに次のエラー メッセージが表示された場合: PHPWarning:mysqli_connect():(HY000/2002):Connection拒否された場合は、以下の手順に従ってこの問題の解決を試みることができます。 MySQL サービスが正常に動作しているかどうかを確認するには、まず MySQL サービスが正常に動作しているかどうかを確認する必要がありますが、サービスが動作していない、または開始に失敗している場合は、接続拒否エラーが発生する可能性があります。あなたはできる
 mysqlの実行ファイルとは何ですか
Apr 11, 2023 am 10:38 AM
mysql の実行ファイルは mysqld です。mysqld は、Mysql サーバー プログラムを表す実行可能ファイルです。このファイルを実行すると、サーバー プロセスを直接開始できます。mysqld_safe は、間接的に mysqld を呼び出し、モニターも開始する起動スクリプトです。 。
 php7.0 にプラグインがインストールされているのに、まだインストールされていないと表示される場合はどうすればよいですか?
Apr 02, 2024 pm 07:39 PM
PHP 7.0 でインストールされているプラグインが表示されない問題を解決するには: プラグインの設定を確認し、プラグインを有効にします。 PHP を再起動して、構成の変更を適用します。プラグイン ファイルの権限をチェックして、それらが正しいことを確認します。不足している依存関係をインストールして、プラグインが適切に機能することを確認します。他のすべての手順が失敗した場合は、PHP を再構築します。他に考えられる原因としては、プラグインのバージョンに互換性がない、間違ったバージョンをロードしている、PHP 構成の問題などが挙げられます。


