

Redis フレームワークを統合して SpringBoot2.X を構築するための詳細なチュートリアル

redis データベース チュートリアル コラムでは SpringBoot2.X をゼロから構築するチュートリアルを紹介します

推奨 (無料): redis データベース チュートリアル
最近何を書けばいいのかわかりません。以前、Kafka と Springboot の統合に関する記事を書きました。皆さんの反応は非常に熱心です。ふふふ、私みんなに役立つと感じています。かなり良い結果で、目標は達成できたと考えられます。たまたま、今日のビジネス モジュールは redis を統合した Springboot です。以前にもやったことがあるので、既製のコードがあります。 cv 以降でも使えるので、時間があるのであげておきます。Springboot の Redis 統合のコード実装を整理しましょう。プロジェクトの構築からソースコードの実装まで、以下にすべてが含まれています。気長に読んでください。役に立つと信じてください。
わかりました。苦労せずに始めましょう。同様に、自分の PC に実装することをお勧めします。
個人公開アカウント: Java Architect Alliance 、毎日更新される技術記事
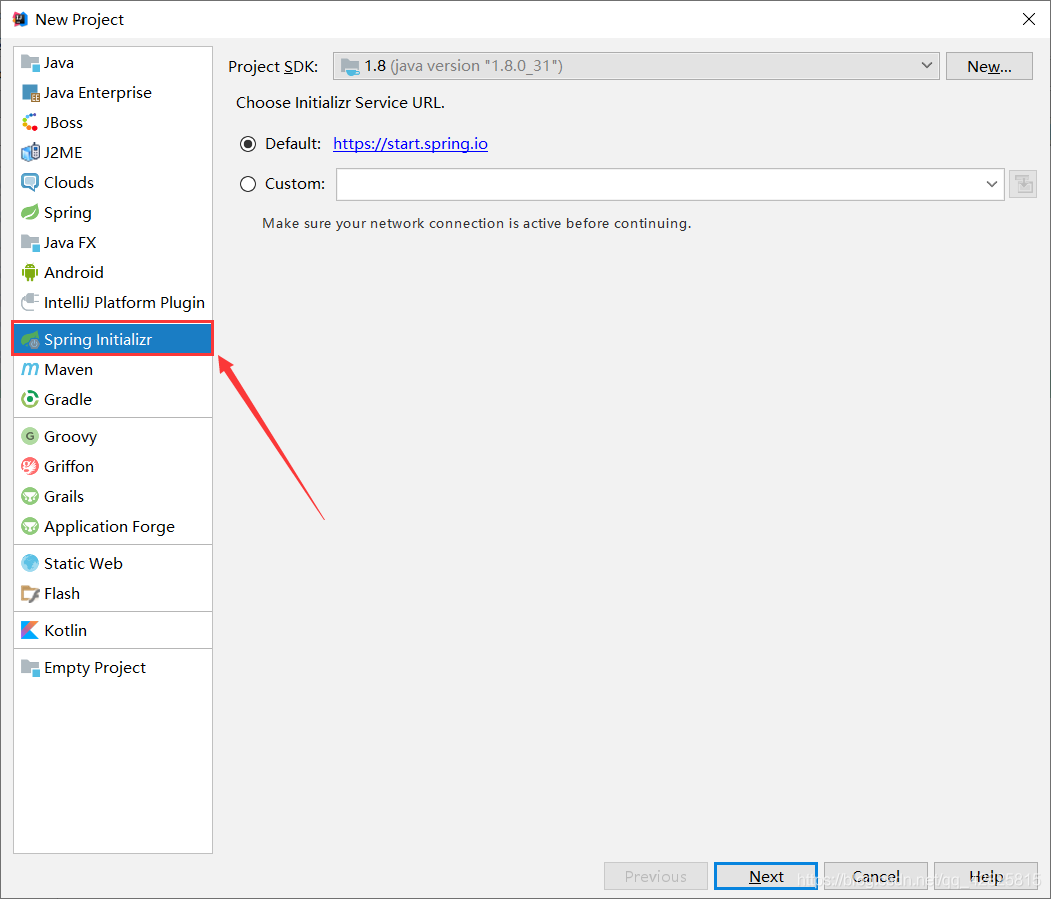
1. Spring Initializr を使用してプロジェクト Web プロジェクトを作成します
1. ファイル→新規→プロジェクト
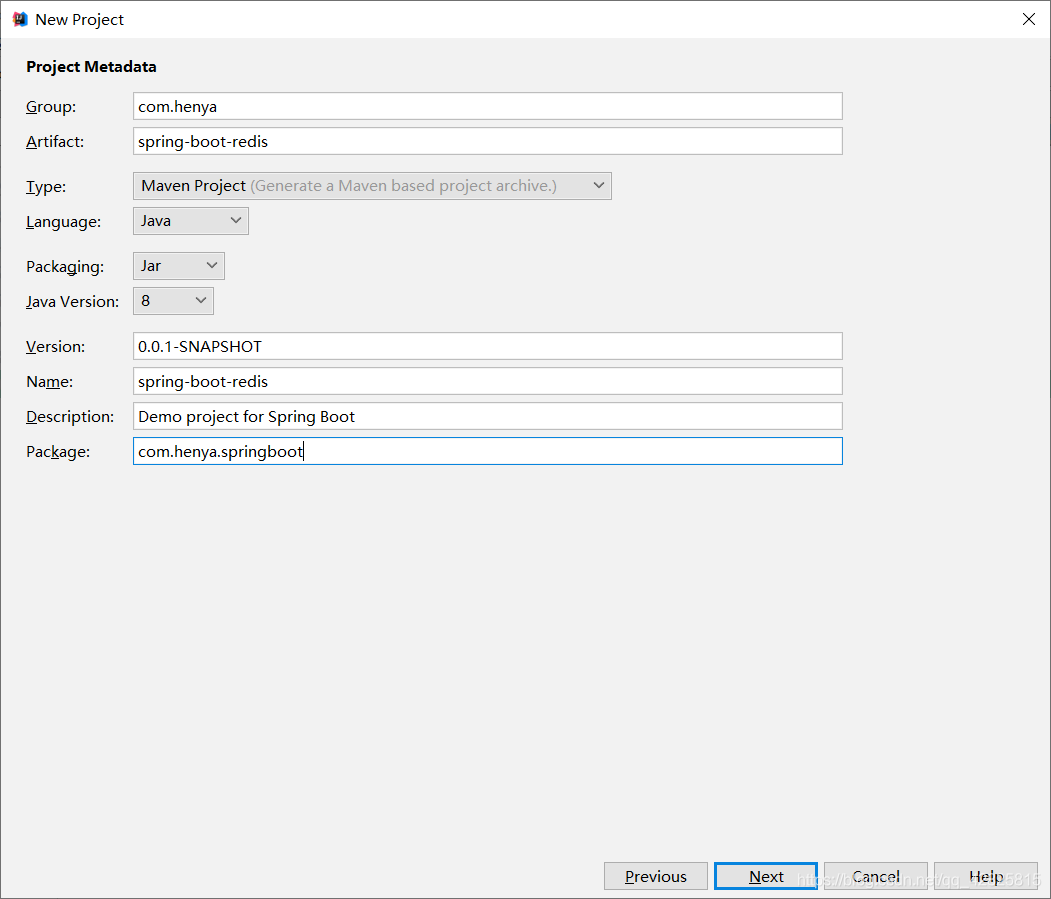
2図に示すように、[次へ] をクリックし、グループとアーティファクトに名前を付けます
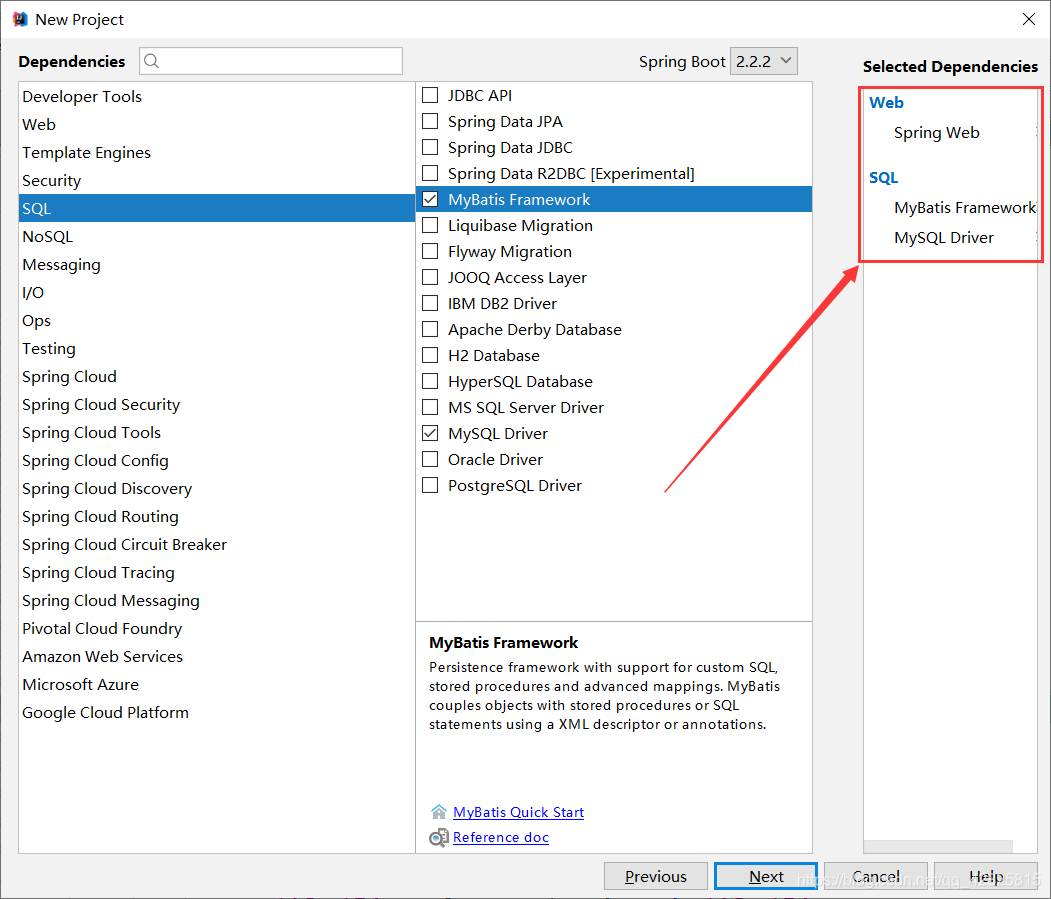
3. [次へ] をクリックした後、図に示すように、必要な依存関係を確認すると、Spring Initializr が自動的に実行されます。必要なスターターをインポートします
4。プロジェクトが正常に作成された後、pom.xml ファイル内の依存関係は次のとおりです
<?xml version="1.0" encoding="UTF-8"?>
<project xmlns="http://maven.apache.org/POM/4.0.0" xmlns:xsi="http://www.w3.org/2001/XMLSchema-instance"
	xsi:schemaLocation="http://maven.apache.org/POM/4.0.0 https://maven.apache.org/xsd/maven-4.0.0.xsd">
	<modelVersion>4.0.0</modelVersion>
	<parent>
		<groupId>org.springframework.boot</groupId>
		<artifactId>spring-boot-starter-parent</artifactId>
		<version>2.2.2.RELEASE</version>
		<relativePath/> <!-- lookup parent from repository -->
	</parent>
	<groupId>com.heny</groupId>
	<artifactId>spring-boot-redis</artifactId>
	<version>0.0.1-SNAPSHOT</version>
	<name>spring-boot-redis</name>
	<description>Demo project for Spring Boot</description>

	<properties>
		<java.version>1.8</java.version>
	</properties>

	<dependencies>
		<dependency>
			<groupId>org.springframework.boot</groupId>
			<artifactId>spring-boot-starter-web</artifactId>
		</dependency>
		<dependency>
			<groupId>org.mybatis.spring.boot</groupId>
			<artifactId>mybatis-spring-boot-starter</artifactId>
			<version>2.1.1</version>
		</dependency>

		<dependency>
			<groupId>mysql</groupId>
			<artifactId>mysql-connector-java</artifactId>
			<scope>runtime</scope>
		</dependency>
		<dependency>
			<groupId>org.springframework.boot</groupId>
			<artifactId>spring-boot-starter-test</artifactId>
			<scope>test</scope>
			<exclusions>
				<exclusion>
					<groupId>org.junit.vintage</groupId>
					<artifactId>junit-vintage-engine</artifactId>
				</exclusion>
			</exclusions>
		</dependency>
	</dependencies>

	<build>
		<plugins>
			<plugin>
				<groupId>org.springframework.boot</groupId>
				<artifactId>spring-boot-maven-plugin</artifactId>
			</plugin>
		</plugins>
	</build>

</project>
5. redis スターター
#
<dependency>
		<groupId>org.springframework.boot</groupId>
		<artifactId>spring-boot-starter-data-redis</artifactId>
	</dependency>
# を実装する必要があります
##
package com.henya.springboot.bean;

import java.io.Serializable;

public class Employee implements Serializable{

	private Integer id;
	private String lastName;
	private String email;
	private Integer gender; //性别 1男 0女
	private Integer dId;


	public Employee() {
		super();
	}


	public Employee(Integer id, String lastName, String email, Integer gender, Integer dId) {
		super();
		this.id = id;
		this.lastName = lastName;
		this.email = email;
		this.gender = gender;
		this.dId = dId;
	}

	public Integer getId() {
		return id;
	}
	public void setId(Integer id) {
		this.id = id;
	}
	public String getLastName() {
		return lastName;
	}
	public void setLastName(String lastName) {
		this.lastName = lastName;
	}
	public String getEmail() {
		return email;
	}
	public void setEmail(String email) {
		this.email = email;
	}
	public Integer getGender() {
		return gender;
	}
	public void setGender(Integer gender) {
		this.gender = gender;
	}
	public Integer getdId() {
		return dId;
	}
	public void setdId(Integer dId) {
		this.dId = dId;
	}
	@Override
	public String toString() {
		return "Employee [id=" + id + ", lastName=" + lastName + ", email=" + email + ", gender=" + gender + ", dId="
				+ dId + "]";
	}
}注: JavaBean オブジェクトを作成するときは、Serializable インターフェイスを実装する必要があります。実装しないと、次のエラーが報告されます:
7. application.properties 設定ファイルで Mybatis オペレーション データベースを統合するでデータ ソース情報を設定する
#serverTimezone用于指定时区,不然会报错
spring.datasource.url=jdbc:mysql://localhost:3306/cache?serverTimezone=UTC
spring.datasource.username=root
spring.datasource.password=123456

# 开启驼峰命名法规则
mybatis.configuration.map-underscore-to-camel-case=true
#日志级别
logging.level.com.henya.springboot.mapper=debug
8. Mybatis のアノテーション付きバージョンを使用して Mapper を作成します##
package com.henya.springboot.mapper;


import com.henya.springboot.bean.Employee;
import org.apache.ibatis.annotations.*;

@Mapper
public interface EmployeeMapper {

 @Select("SELECT * FROM employee WHERE id=#{id}")
 public Employee getEmpById(Integer id);

 @Update("UPDATE employee SET lastName=#{lastName},email=#{email},gender=#{gender},d_id=#{dId} WHERE id=#{id}")
 public void updateEmp(Employee employee);

 @Delete("DELETE FROM emlpoyee WHERE id=#{id}")
 public void delEmpById(Integer id);

 @Insert("INSERT INTO employee(lastName, email, gender, d_id) VALUES (#{lastName}, #{email}, #{gender}, #{dId})")
 public Employee insertEmp(Employee employee);

 @Select("SELECT * FROM employee WHERE lastName=#{lastName}")
 public Employee getEmpByLastName(String lastName);
}注:
インターフェイスをスキャンするには @MapperScan アノテーションを使用する必要がありますマッパーが配置されている場所。メイン プログラム クラスに追加するだけで済みます。さらに、@EnableCaching を使用してキャッシュを有効にします。
@MapperScan("com.henya.springboot.mapper")
@SpringBootApplication
@EnableCaching //开启缓存
public class SpringBootRedisApplication {

	public static void main(String[] args) {
		SpringApplication.run(SpringBootRedisApplication.class, args);
	}
}9. データベースまたは Redis キャッシュにアクセスするための Service クラスを作成します
package com.henya.springboot.service;
import com.henya.springboot.bean.Employee;
import com.henya.springboot.mapper.EmployeeMapper;
import org.springframework.beans.factory.annotation.Autowired;
import org.springframework.cache.annotation.*;
import org.springframework.stereotype.Service;

@CacheConfig(cacheNames = "emp") //抽取缓存的公共配置
@Service
public class EmployeeService {
 @Autowired
 EmployeeMapper employeeMapper;

 /**
 * @param id
 * @return
 */
 @Cacheable(cacheNames = {"emp"},keyGenerator = "myKeyGenerator")
 public Employee getEmpById(Integer id) {
 System.err.println("开始查询"+ id +"号员工");
 Employee employee = employeeMapper.getEmpById(id);
 return employee;
 }

 /**
 * @CachePut:既调用方法(这个方法必须要执行),又更新缓存数据
 * @param employee
 * @return
 */
 @CachePut(value = "emp",key = "#result.id")
 public Employee updateEmp(Employee employee){
 System.err.println("开始更新" + employee.getId() + "号员工");
 employeeMapper.updateEmp(employee);
 return employee;
 }

 /**
 * @CacheEvict:缓存清除
 * @param id
 */
 @CacheEvict(value = "emp",beforeInvocation = true)
 public void deleteEmp(Integer id){
 System.err.println("删除" + id + "员工");
 int i = 10/0;
}10. コントローラーを作成しますclass
package com.henya.springboot.controller;


import com.henya.springboot.bean.Employee;
import com.henya.springboot.service.EmployeeService;
import org.springframework.beans.factory.annotation.Autowired;
import org.springframework.web.bind.annotation.GetMapping;
import org.springframework.web.bind.annotation.PathVariable;
import org.springframework.web.bind.annotation.RestController;

/**
 * @Description:
 * @Author:HenYa
 * @CreatTime:2019/12/1 12:44
 */
@RestController
public class EmployeeController {
 @Autowired
 EmployeeService employeeService;

 @GetMapping("/emp/{id}")
 public Employee getEmpById(@PathVariable("id") Integer id){
 Employee employee = employeeService.getEmpById(id);
 return employee;
 }

 @GetMapping("/emp")
 public Employee updateEmp(Employee employee){
 Employee emp = employeeService.updateEmp(employee);
 return emp;
 }
} 2. SpringBoot が Redis を正常に統合するかどうかをテストします
#2. 再度アクセスすると、図のようにコンソールに SQL ログがありません。 
3. 現時点では、RedisDesktopManager ツールを使用して Redis を表示するときのデータがあり、図 
emp オブジェクトのみがシリアル化されます。ソース コードを見ると、Redis はデフォルトでシリアル化に Jdk を使用していることがわかります。 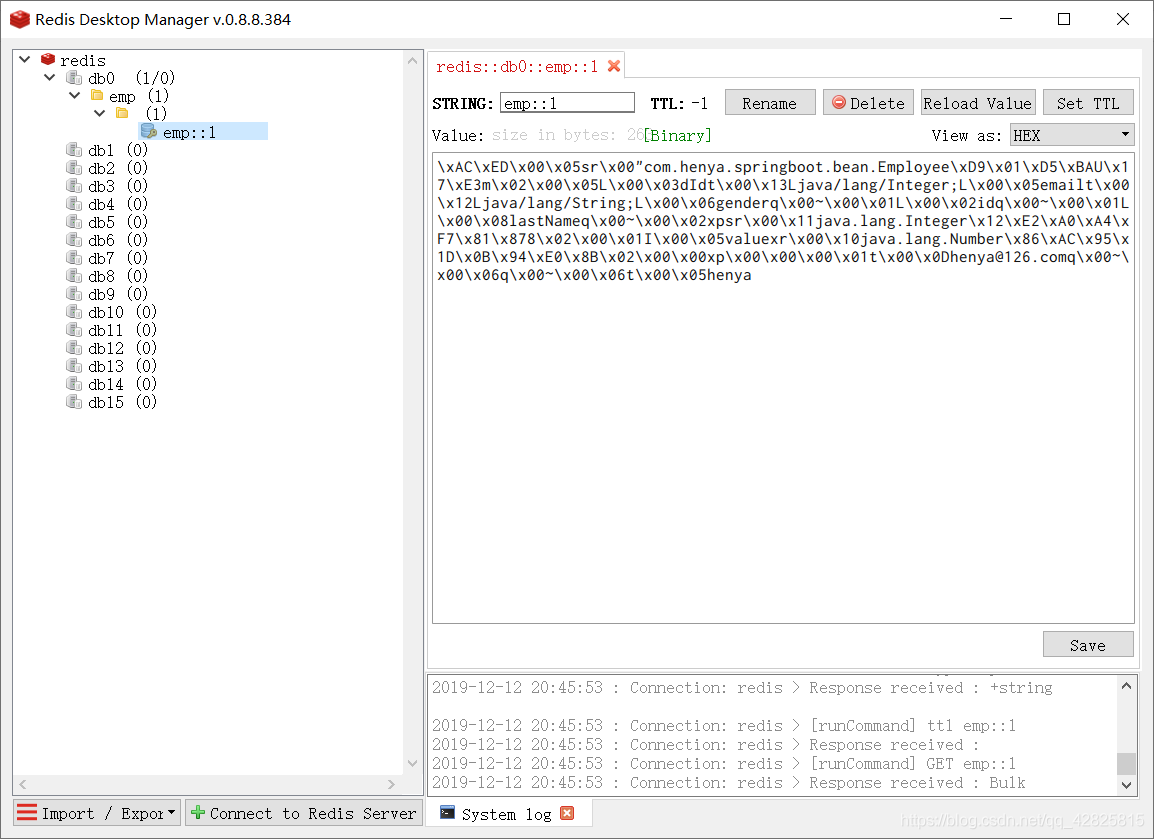
static RedisSerializer<Object> java(@Nullable ClassLoader classLoader) {
 return new JdkSerializationRedisSerializer(classLoader);
} RedisSerializer インターフェイスの次の実装を確認してください:
一般的に使用されるのは json 形式のシリアル化です。 。ただし、RedisCacheManager をカスタマイズする必要があります。 
package com.henya.springboot.config;
import org.springframework.context.annotation.Bean;
import org.springframework.context.annotation.Configuration;
import org.springframework.data.redis.cache.RedisCacheConfiguration;
import org.springframework.data.redis.cache.RedisCacheManager;
import org.springframework.data.redis.cache.RedisCacheWriter;
import org.springframework.data.redis.connection.RedisConnectionFactory;
import org.springframework.data.redis.serializer.GenericJackson2JsonRedisSerializer;
import org.springframework.data.redis.serializer.RedisSerializationContext;
import org.springframework.data.redis.serializer.RedisSerializer;

/**
 * @Description:
 * @Author:HenYa
 * @CreatTime:2019/12/6 20:50
 */
@Configuration
public class MyRedisConfig {
 @Bean
 public RedisCacheManager empCacheManager(RedisConnectionFactory redisConnectionFactory){
 //RedisCacheManager redisCacheManager = new RedisCacheManager(redisConnectionFactory);
 RedisCacheWriter redisCacheWriter = RedisCacheWriter.nonLockingRedisCacheWriter(redisConnectionFactory);

 RedisSerializer<Object> redisSerializer = new GenericJackson2JsonRedisSerializer();

 RedisSerializationContext.SerializationPair<Object> pair = RedisSerializationContext.SerializationPair.fromSerializer(redisSerializer);
 RedisCacheConfiguration redisCacheConfiguration = RedisCacheConfiguration.defaultCacheConfig().serializeValuesWith(pair);
 // 默认会将CacheName作为key的前缀
 return new RedisCacheManager(redisCacheWriter, redisCacheConfiguration);
 }
}このとき、Redis にキャッシュされたデータは図のように Json 形式でシリアル化されます。
以上がRedis フレームワークを統合して SpringBoot2.X を構築するための詳細なチュートリアルの詳細内容です。詳細については、PHP 中国語 Web サイトの他の関連記事を参照してください。

ホットAIツール

Undresser.AI Undress
リアルなヌード写真を作成する AI 搭載アプリ

AI Clothes Remover
写真から衣服を削除するオンライン AI ツール。

Undress AI Tool
脱衣画像を無料で

Clothoff.io
AI衣類リムーバー

AI Hentai Generator
AIヘンタイを無料で生成します。

人気の記事
ホットツール

メモ帳++7.3.1
使いやすく無料のコードエディター

SublimeText3 中国語版
中国語版、とても使いやすい

ゼンドスタジオ 13.0.1
強力な PHP 統合開発環境

ドリームウィーバー CS6
ビジュアル Web 開発ツール

SublimeText3 Mac版
神レベルのコード編集ソフト(SublimeText3)
ホットトピック
 7569
7569
 15
1386
52
87
11
28
107
15
1386
52
87
11
28
107

 Redisクラスターモードの構築方法
Apr 10, 2025 pm 10:15 PM
Redisクラスターモードの構築方法
Apr 10, 2025 pm 10:15 PM
Redisクラスターモードは、シャードを介してRedisインスタンスを複数のサーバーに展開し、スケーラビリティと可用性を向上させます。構造の手順は次のとおりです。異なるポートで奇妙なRedisインスタンスを作成します。 3つのセンチネルインスタンスを作成し、Redisインスタンスを監視し、フェールオーバーを監視します。 Sentinel構成ファイルを構成し、Redisインスタンス情報とフェールオーバー設定の監視を追加します。 Redisインスタンス構成ファイルを構成し、クラスターモードを有効にし、クラスター情報ファイルパスを指定します。各Redisインスタンスの情報を含むnodes.confファイルを作成します。クラスターを起動し、CREATEコマンドを実行してクラスターを作成し、レプリカの数を指定します。クラスターにログインしてクラスター情報コマンドを実行して、クラスターステータスを確認します。作る
 Redisデータをクリアする方法
Apr 10, 2025 pm 10:06 PM
Redisデータをクリアする方法
Apr 10, 2025 pm 10:06 PM
Redisデータをクリアする方法:Flushallコマンドを使用して、すべての重要な値をクリアします。 FlushDBコマンドを使用して、現在選択されているデータベースのキー値をクリアします。 [選択]を使用してデータベースを切り替え、FlushDBを使用して複数のデータベースをクリアします。 DELコマンドを使用して、特定のキーを削除します。 Redis-CLIツールを使用してデータをクリアします。
 Redisコマンドの使用方法
Apr 10, 2025 pm 08:45 PM
Redisコマンドの使用方法
Apr 10, 2025 pm 08:45 PM
Redis指令を使用するには、次の手順が必要です。Redisクライアントを開きます。コマンド(動詞キー値)を入力します。必要なパラメーターを提供します(指示ごとに異なります)。 Enterを押してコマンドを実行します。 Redisは、操作の結果を示す応答を返します(通常はOKまたは-ERR)。
 Redisキューの読み方
Apr 10, 2025 pm 10:12 PM
Redisキューの読み方
Apr 10, 2025 pm 10:12 PM
Redisのキューを読むには、キュー名を取得し、LPOPコマンドを使用して要素を読み、空のキューを処理する必要があります。特定の手順は次のとおりです。キュー名を取得します:「キュー:キュー」などの「キュー:」のプレフィックスで名前を付けます。 LPOPコマンドを使用します。キューのヘッドから要素を排出し、LPOP Queue:My-Queueなどの値を返します。空のキューの処理:キューが空の場合、LPOPはnilを返し、要素を読む前にキューが存在するかどうかを確認できます。
 単一のスレッドレディスの使用方法
Apr 10, 2025 pm 07:12 PM
単一のスレッドレディスの使用方法
Apr 10, 2025 pm 07:12 PM
Redisは、単一のスレッドアーキテクチャを使用して、高性能、シンプルさ、一貫性を提供します。 I/Oマルチプレックス、イベントループ、ノンブロッキングI/O、共有メモリを使用して同時性を向上させますが、並行性の制限、単一の障害、および書き込み集約型のワークロードには適していません。
 Redisロックの使用方法
Apr 10, 2025 pm 08:39 PM
Redisロックの使用方法
Apr 10, 2025 pm 08:39 PM
Redisを使用して操作をロックするには、setnxコマンドを介してロックを取得し、有効期限を設定するために有効期限コマンドを使用する必要があります。特定の手順は次のとおりです。(1)SETNXコマンドを使用して、キー価値ペアを設定しようとします。 (2)expireコマンドを使用して、ロックの有効期限を設定します。 (3)Delコマンドを使用して、ロックが不要になったときにロックを削除します。
 基礎となるRedisを実装する方法
Apr 10, 2025 pm 07:21 PM
基礎となるRedisを実装する方法
Apr 10, 2025 pm 07:21 PM
Redisはハッシュテーブルを使用してデータを保存し、文字列、リスト、ハッシュテーブル、コレクション、注文コレクションなどのデータ構造をサポートします。 Redisは、スナップショット(RDB)を介してデータを維持し、書き込み専用(AOF)メカニズムを追加します。 Redisは、マスタースレーブレプリケーションを使用して、データの可用性を向上させます。 Redisは、シングルスレッドイベントループを使用して接続とコマンドを処理して、データの原子性と一貫性を確保します。 Redisは、キーの有効期限を設定し、怠zyな削除メカニズムを使用して有効期限キーを削除します。
 Redisのソースコードを読み取る方法
Apr 10, 2025 pm 08:27 PM
Redisのソースコードを読み取る方法
Apr 10, 2025 pm 08:27 PM
Redisソースコードを理解する最良の方法は、段階的に進むことです。Redisの基本に精通してください。開始点として特定のモジュールまたは機能を選択します。モジュールまたは機能のエントリポイントから始めて、行ごとにコードを表示します。関数コールチェーンを介してコードを表示します。 Redisが使用する基礎となるデータ構造に精通してください。 Redisが使用するアルゴリズムを特定します。
