


たくさんの無料の学習に関する推奨事項、ありがとうございます。 #Python チュートリアル # (ビデオ)
#はじめに ## をご覧ください。
# 昨日の記事では、PyTorch で独自の画像を使用して画像分類器をトレーニングし、それを画像認識に使用する方法を紹介しました。この記事では、事前トレーニングされた分類子を使用して画像内の複数のオブジェクトを検出し、ビデオ内でそれらを追跡する方法を説明します。
ターゲット検出には多くのアルゴリズムがあり、現在最も人気のあるアルゴリズムは YOLO と SSD です。この記事では、YOLOv3 を使用します。 YOLO についてはここでは詳しく説明しません。詳しく知りたい場合は、以下のリンクを参照してください~ (https://pjreddie.com/darknet/yolo/)
始めましょう。引き続きインポート モジュールから開始します:
from models import *
from utils import *
import os, sys, time, datetime, random
import torch
from torch.utils.data import DataLoader
from torchvision import datasets, transforms
from torch.autograd import Variable
import matplotlib.pyplot as plt
import matplotlib.patches as patches
from PIL import Image
次に、事前トレーニングされた構成と重みのほか、画像サイズ、信頼性しきい値、非最大抑制しきい値などの事前定義された値を読み込みます。
config_path='config/yolov3.cfg'
weights_path='config/yolov3.weights'
class_path='config/coco.names'
img_size=416
conf_thres=0.8
nms_thres=0.4
# Load model and weights
model = Darknet(config_path, img_size=img_size)
model.load_weights(weights_path)
model.cuda()
model.eval()
classes = utils.load_classes(class_path)
Tensor = torch.cuda.FloatTensor
次の関数は、指定された画像の検出結果を返します。
def detect_image(img):
    # scale and pad image
    ratio = min(img_size/img.size[0], img_size/img.size[1])
    imw = round(img.size[0] * ratio)
    imh = round(img.size[1] * ratio)
    img_transforms=transforms.Compose([transforms.Resize((imh,imw)),
         transforms.Pad((max(int((imh-imw)/2),0),
              max(int((imw-imh)/2),0), max(int((imh-imw)/2),0),
              max(int((imw-imh)/2),0)), (128,128,128)),
         transforms.ToTensor(),
         ])
    # convert image to Tensor
    image_tensor = img_transforms(img).float()
    image_tensor = image_tensor.unsqueeze_(0)
    input_img = Variable(image_tensor.type(Tensor))
    # run inference on the model and get detections
    with torch.no_grad():
        detections = model(input_img)
        detections = utils.non_max_suppression(detections, 80,
                        conf_thres, nms_thres)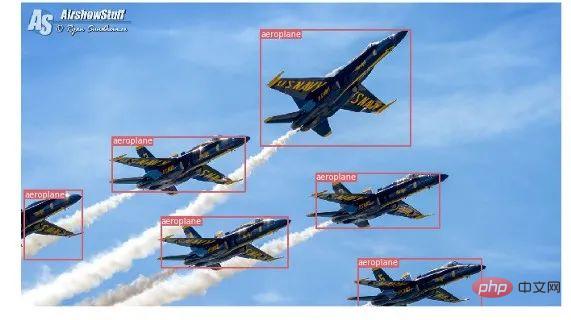
return detections[0]最後に、画像をロードして検出結果を取得し、検出されたオブジェクトの周囲に境界ボックスを付けて表示しましょう。また、クラスごとに異なる色を使用して区別します。
# load image and get detections
img_path = "images/blueangels.jpg"
prev_time = time.time()
img = Image.open(img_path)
detections = detect_image(img)
inference_time = datetime.timedelta(seconds=time.time() - prev_time)
print ('Inference Time: %s' % (inference_time))
# Get bounding-box colors
cmap = plt.get_cmap('tab20b')
colors = [cmap(i) for i in np.linspace(0, 1, 20)]
img = np.array(img)
plt.figure()
fig, ax = plt.subplots(1, figsize=(12,9))
ax.imshow(img)
pad_x = max(img.shape[0] - img.shape[1], 0) * (img_size / max(img.shape))
pad_y = max(img.shape[1] - img.shape[0], 0) * (img_size / max(img.shape))
unpad_h = img_size - pad_y
unpad_w = img_size - pad_x
if detections is not None:
    unique_labels = detections[:, -1].cpu().unique()
    n_cls_preds = len(unique_labels)
    bbox_colors = random.sample(colors, n_cls_preds)
    # browse detections and draw bounding boxes
    for x1, y1, x2, y2, conf, cls_conf, cls_pred in detections:
        box_h = ((y2 - y1) / unpad_h) * img.shape[0]
        box_w = ((x2 - x1) / unpad_w) * img.shape[1]
        y1 = ((y1 - pad_y // 2) / unpad_h) * img.shape[0]
        x1 = ((x1 - pad_x // 2) / unpad_w) * img.shape[1]
        color = bbox_colors[int(np.where(
             unique_labels == int(cls_pred))[0])]
        bbox = patches.Rectangle((x1, y1), box_w, box_h,
             linewidth=2, edgecolor=color, facecolor='none')
        ax.add_patch(bbox)
        plt.text(x1, y1, s=classes[int(cls_pred)],
                color='white', verticalalignment='top',
                bbox={'color': color, 'pad': 0})
plt.axis('off')
# save image
plt.savefig(img_path.replace(".jpg", "-det.jpg"),
                  bbox_inches='tight', pad_inches=0.0)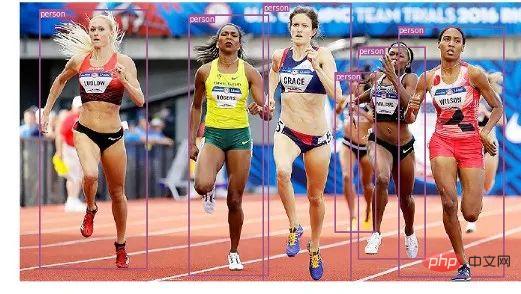
plt.show()テスト結果の一部を次に示します:

 # #ビデオ内のオブジェクト追跡
これで、画像内のさまざまなオブジェクトを検出する方法がわかりました。ビデオでフレームごとに見ると、トラッキング ボックスが動いているのがわかります。しかし、これらのビデオ フレーム内に複数のオブジェクトがある場合、あるフレーム内のオブジェクトが前のフレーム内のオブジェクトと同じかどうかをどのように判断すればよいでしょうか?これはオブジェクト追跡と呼ばれ、複数の検出を使用して特定のオブジェクトを識別します。
これを行うアルゴリズムは複数ありますが、この記事では SORT (Simple Online and Realtime Tracking) を使用することにしました。これは、カルマン フィルターを使用して、以前に特定されたターゲットの軌道を予測し、新しいターゲットと比較します。検出結果の照合は非常に便利で高速です。 次に、コードの作成を開始しましょう。最初の 3 つのコード スニペットは、単一フレームでの YOLO 検出の取得を処理するため、単一画像検出のコード スニペットと同じになります。違いは最後の部分にあり、検出ごとに Sort オブジェクトの Update 関数を呼び出して、画像内のオブジェクトへの参照を取得します。したがって、前の例の通常の検出 (境界ボックスの座標とクラス予測を含む) とは異なり、上記のパラメーターに加えてオブジェクト ID を含む追跡オブジェクトを取得します。また、OpenCV を使用してビデオを読み取り、ビデオ フレームを表示する必要があります。videopath = 'video/interp.mp4'
%pylab inline
import cv2
from IPython.display import clear_output
cmap = plt.get_cmap('tab20b')
colors = [cmap(i)[:3] for i in np.linspace(0, 1, 20)]
# initialize Sort object and video capture
from sort import *
vid = cv2.VideoCapture(videopath)
mot_tracker = Sort()
#while(True):
for ii in range(40):
ret, frame = vid.read()
frame = cv2.cvtColor(frame, cv2.COLOR_BGR2RGB)
pilimg = Image.fromarray(frame)
detections = detect_image(pilimg)
img = np.array(pilimg)
pad_x = max(img.shape[0] - img.shape[1], 0) *
(img_size / max(img.shape))
pad_y = max(img.shape[1] - img.shape[0], 0) *
(img_size / max(img.shape))
unpad_h = img_size - pad_y
unpad_w = img_size - pad_x
if detections is not None:
tracked_objects = mot_tracker.update(detections.cpu())
unique_labels = detections[:, -1].cpu().unique()
n_cls_preds = len(unique_labels)
for x1, y1, x2, y2, obj_id, cls_pred in tracked_objects:
box_h = int(((y2 - y1) / unpad_h) * img.shape[0])
box_w = int(((x2 - x1) / unpad_w) * img.shape[1])
y1 = int(((y1 - pad_y // 2) / unpad_h) * img.shape[0])
x1 = int(((x1 - pad_x // 2) / unpad_w) * img.shape[1])
color = colors[int(obj_id) % len(colors)]
color = [i * 255 for i in color]
cls = classes[int(cls_pred)]
cv2.rectangle(frame, (x1, y1), (x1+box_w, y1+box_h),
color, 4)
cv2.rectangle(frame, (x1, y1-35), (x1+len(cls)*19+60,
y1), color, -1)
cv2.putText(frame, cls + "-" + str(int(obj_id)),
(x1, y1 - 10), cv2.FONT_HERSHEY_SIMPLEX,
1, (255,255,255), 3)
fig=figure(figsize=(12, 8))
title("Video Stream")
imshow(frame)
show()
clear_output(wait=True)関連する無料学習の推奨事項:
php プログラミング(ビデオ)
以上がPyTorch を使用してターゲットの検出と追跡を実装する方法の詳細な説明の詳細内容です。詳細については、PHP 中国語 Web サイトの他の関連記事を参照してください。


![[Web フロントエンド] Node.js クイック スタート](https://img.php.cn/upload/course/000/000/067/662b5d34ba7c0227.png)


