

Angular の構造ディレクティブ、モジュール、スタイルの詳細な説明


angular チュートリアル 」
1、構造ディレクティブ
* は糖衣構文で、exit は、ng-template の作成を回避する<ng-template [ngIf]="user.login"> <a>退出</a> </ng-template>
<ng-template [ngIf]="item.reminder">
      <mat-icon >
        alarm
      </mat-icon>
    </ng-template>

    <!-- <mat-icon *ngIf="item.reminder">
      alarm
    </mat-icon> -->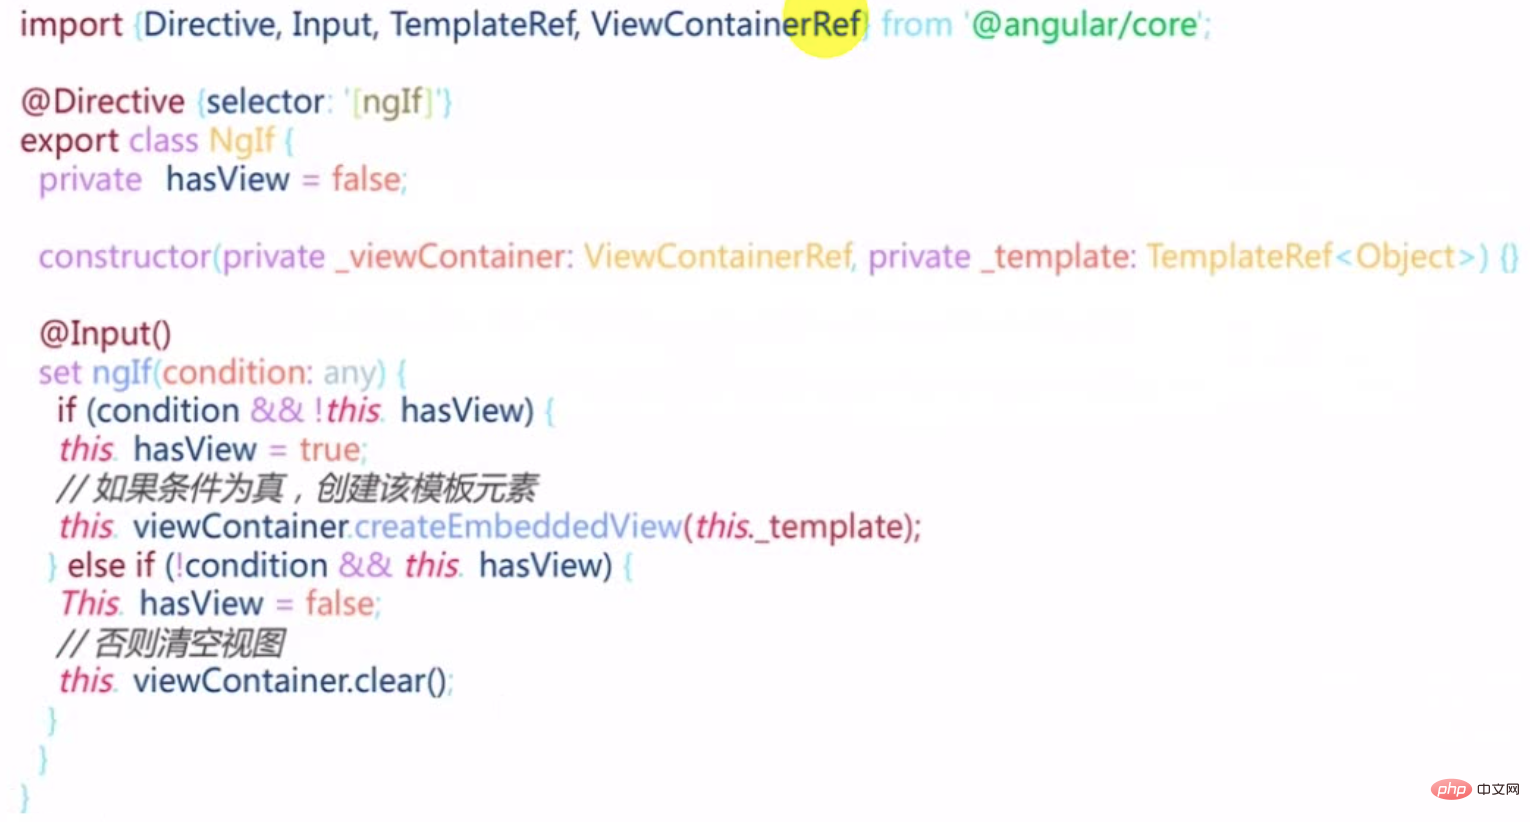
2、モジュール Module
とはモジュール?ファイルを整理するための独立した機能を持つファイルの集合。 モジュール メタデータentryComponents: 呼び出されたときではなく、モジュール (ダイアログ ボックスなど) に入るときにすぐにロードされます。 エクスポート: モジュール内のすべてを全員で共有したい場合は、エクスポートする必要があります。 forRoot() とは何ですか?imports: [RouterModule.forRoot(routes)],imports: [RouterModule.forChild(route)];実際、forRoot と forChild は 2 つの静的ファクトリ メソッドです。constructor(guard: any, router: Router);
/**
* Creates a module with all the router providers and directives. It also optionally sets up an
* application listener to perform an initial navigation.
*
* Options (see `ExtraOptions`):
* * `enableTracing` makes the router log all its internal events to the console.
* * `useHash` enables the location strategy that uses the URL fragment instead of the history
* API.
* * `initialNavigation` disables the initial navigation.
* * `errorHandler` provides a custom error handler.
* * `preloadingStrategy` configures a preloading strategy (see `PreloadAllModules`).
* * `onSameUrlNavigation` configures how the router handles navigation to the current URL. See
* `ExtraOptions` for more details.
* * `paramsInheritanceStrategy` defines how the router merges params, data and resolved data
* from parent to child routes.
*/
static forRoot(routes: Routes, config?: ExtraOptions): ModuleWithProviders<RouterModule>;
/**
* Creates a module with all the router directives and a provider registering routes.
*/
static forChild(routes: Routes): ModuleWithProviders<RouterModule>;
}import { NgModule } from '@angular/core';
import { CommonModule } from '@angular/common';
@NgModule({
declarations: [],
imports: [
CommonModule
]
})
export class ServicesModule { }import { NgModule, ModuleWithProviders } from '@angular/core';
import { CommonModule } from '@angular/common';
@NgModule()
export class ServicesModule {
static forRoot(): ModuleWithProviders{
return {
ngModule: ServicesModule,
providers:[]
}
}
}3、スタイル定義
ngClass、ngStyle および [class.yourclass]ngClass: スタイル クラスを条件付きで動的に指定するために使用され、スタイルに多数の変更が加えられる状況に適しています。事前にクラスを定義しておきます。<mat-list-item class="container" [@item]="widerPriority" [ngClass]="{
'priority-normal':item.priority===3,
'priority-important':item.priority===2,
'priority-emergency':item.priority===1
}"<div class="content" mat-line [ngClass]="{'completed':item.completed}">
<span [matTooltip]="item.desc">{{item.desc}}</span>
</div><div class="content" mat-line [class.completed]="item.completed">
<span [matTooltip]="item.desc">{{item.desc}}</span>
</div>1、ドラッグするときに ngStyle を使用して順序を調整します。
原則は、フレックス コンテナ スタイルの順序をリスト モデル オブジェクト内の順序として動的に指定することです。 1. taskHome の app-task-list に order を追加します。list-container はフレックス コンテナであり、その順序は order に従ってソートされます。<app-task-list *ngFor="let list of lists"
class="list-container"
app-droppable="true"
[dropTags]="['task-item','task-list']"
[dragEnterClass]=" 'drag-enter' "
[app-draggable]="true"
[dragTag]=" 'task-list' "
[draggedClass]=" 'drag-start' "
[dragData]="list"
(dropped)="handleMove($event,list)"
[ngStyle]="{'order': list.order}"
>lists = [
{
id: 1,
name: "待办",
order: 1,
tasks: [
{
id: 1,
desc: "任务一: 去星巴克买咖啡",
completed: true,
priority: 3,
owner: {
id: 1,
name: "张三",
avatar: "avatars:svg-11"
},
dueDate: new Date(),
reminder: new Date()
},
{
id: 2,
desc: "任务一: 完成老板布置的PPT作业",
completed: false,
priority: 2,
owner: {
id: 2,
name: "李四",
avatar: "avatars:svg-12"
},
dueDate: new Date()
}
]
},
{
id: 2,
name: "进行中",
order:2,
tasks: [
{
id: 1,
desc: "任务三: 项目代码评审",
completed: false,
priority: 1,
owner: {
id: 1,
name: "王五",
avatar: "avatars:svg-13"
},
dueDate: new Date()
},
{
id: 2,
desc: "任务一: 制定项目计划",
completed: false,
priority: 2,
owner: {
id: 2,
name: "李四",
avatar: "avatars:svg-12"
},
dueDate: new Date()
}
]
}
];ログイン後にコピー
3. リストをドラッグして順序を変更する場合は、順序を変更しますlists = [
{
id: 1,
name: "待办",
order: 1,
tasks: [
{
id: 1,
desc: "任务一: 去星巴克买咖啡",
completed: true,
priority: 3,
owner: {
id: 1,
name: "张三",
avatar: "avatars:svg-11"
},
dueDate: new Date(),
reminder: new Date()
},
{
id: 2,
desc: "任务一: 完成老板布置的PPT作业",
completed: false,
priority: 2,
owner: {
id: 2,
name: "李四",
avatar: "avatars:svg-12"
},
dueDate: new Date()
}
]
},
{
id: 2,
name: "进行中",
order:2,
tasks: [
{
id: 1,
desc: "任务三: 项目代码评审",
completed: false,
priority: 1,
owner: {
id: 1,
name: "王五",
avatar: "avatars:svg-13"
},
dueDate: new Date()
},
{
id: 2,
desc: "任务一: 制定项目计划",
completed: false,
priority: 2,
owner: {
id: 2,
name: "李四",
avatar: "avatars:svg-12"
},
dueDate: new Date()
}
]
}
];srcList と target list の順序を入れ替えます
handleMove(srcData,targetList){
    switch (srcData.tag) {
      case 'task-item':
        console.log('handling item');
        break;
      case 'task-list':
        console.log('handling list');
        const srcList = srcData.data;
        const tempOrder = srcList.order;
        srcList.order = targetList.order;
        targetList.order = tempOrder;
      default:
        break;
    }
}プログラミング ビデオをご覧ください。 !
以上がAngular の構造ディレクティブ、モジュール、スタイルの詳細な説明の詳細内容です。詳細については、PHP 中国語 Web サイトの他の関連記事を参照してください。

ホットAIツール

Undresser.AI Undress
リアルなヌード写真を作成する AI 搭載アプリ

AI Clothes Remover
写真から衣服を削除するオンライン AI ツール。

Undress AI Tool
脱衣画像を無料で

Clothoff.io
AI衣類リムーバー

AI Hentai Generator
AIヘンタイを無料で生成します。

人気の記事
ホットツール

メモ帳++7.3.1
使いやすく無料のコードエディター

SublimeText3 中国語版
中国語版、とても使いやすい

ゼンドスタジオ 13.0.1
強力な PHP 統合開発環境

ドリームウィーバー CS6
ビジュアル Web 開発ツール

SublimeText3 Mac版
神レベルのコード編集ソフト(SublimeText3)
ホットトピック
 7539
7539
 15
1380
52
83
11
21
86
15
1380
52
83
11
21
86

![WLAN拡張モジュールが停止しました[修正]](https://img.php.cn/upload/article/000/465/014/170832352052603.gif?x-oss-process=image/resize,m_fill,h_207,w_330) WLAN拡張モジュールが停止しました[修正]
Feb 19, 2024 pm 02:18 PM
WLAN拡張モジュールが停止しました[修正]
Feb 19, 2024 pm 02:18 PM
Windows コンピュータの WLAN 拡張モジュールに問題がある場合、インターネットから切断される可能性があります。この状況はイライラすることがよくありますが、幸いなことに、この記事では、この問題を解決し、ワイヤレス接続を再び正常に動作させるのに役立ついくつかの簡単な提案を提供します。 WLAN 拡張モジュールが停止しました。 WLAN 拡張モジュールが Windows コンピュータで動作を停止した場合は、次の提案に従って修正してください。 ネットワークとインターネットのトラブルシューティング ツールを実行して、ワイヤレス ネットワーク接続を無効にし、再度有効にします。 WLAN 自動構成サービスを再起動します。 電源オプションを変更します。 変更します。詳細な電源設定 ネットワーク アダプター ドライバーを再インストールする いくつかのネットワーク コマンドを実行する それでは、詳しく見てみましょう
 WLAN 拡張モジュールを開始できません
Feb 19, 2024 pm 05:09 PM
WLAN 拡張モジュールを開始できません
Feb 19, 2024 pm 05:09 PM
この記事では、無線 LAN 拡張モジュールが起動できないことを示すイベント ID10000 を解決する方法について詳しく説明します。このエラーは、Windows 11/10 PC のイベント ログに表示される場合があります。 WLAN 拡張モジュールは、独立系ハードウェア ベンダー (IHV) および独立系ソフトウェア ベンダー (ISV) がカスタマイズされたワイヤレス ネットワーク機能をユーザーに提供できるようにする Windows のコンポーネントです。 Windows のデフォルト機能を追加することで、ネイティブ Windows ネットワーク コンポーネントの機能を拡張します。 WLAN 拡張モジュールは、オペレーティング システムがネットワーク コンポーネントをロードするときに、初期化の一部として開始されます。無線 LAN 拡張モジュールに問題が発生して起動できない場合、イベント ビューアのログにエラー メッセージが表示されることがあります。
 macOS: デスクトップ ウィジェットの色を変更する方法
Oct 07, 2023 am 08:17 AM
macOS: デスクトップ ウィジェットの色を変更する方法
Oct 07, 2023 am 08:17 AM
macOS Sonoma では、Apple の macOS の以前のバージョンのように、ウィジェットを画面外に隠したり、通知センター パネルで忘れたりする必要はありません。代わりに、これらは Mac のデスクトップに直接配置でき、インタラクティブでもあります。使用していないときは、macOS デスクトップ ウィジェットがモノクロ スタイルで背景にフェードインするため、気が散ることが減り、アクティブなアプリケーションまたはウィンドウで目の前のタスクに集中できるようになります。ただし、デスクトップをクリックするとフルカラーに戻ります。単調な外観が好みで、その統一性をデスクトップ上に保持したい場合は、それを永続的にする方法があります。次の手順は、その方法を示しています。システム設定アプリを開きます
 Ubuntu 24.04 に Angular をインストールする方法
Mar 23, 2024 pm 12:20 PM
Ubuntu 24.04 に Angular をインストールする方法
Mar 23, 2024 pm 12:20 PM
Angular.js は、動的アプリケーションを作成するための無料でアクセスできる JavaScript プラットフォームです。 HTML の構文をテンプレート言語として拡張することで、アプリケーションのさまざまな側面を迅速かつ明確に表現できます。 Angular.js は、コードの作成、更新、テストに役立つさまざまなツールを提供します。さらに、ルーティングやフォーム管理などの多くの機能も提供します。このガイドでは、Ubuntu24 に Angular をインストールする方法について説明します。まず、Node.js をインストールする必要があります。 Node.js は、ChromeV8 エンジンに基づく JavaScript 実行環境で、サーバー側で JavaScript コードを実行できます。ウブにいるために
 Angular のサーバーサイド レンダリング (SSR) について説明する記事
Dec 27, 2022 pm 07:24 PM
Angular のサーバーサイド レンダリング (SSR) について説明する記事
Dec 27, 2022 pm 07:24 PM
Angular Universal をご存知ですか?これは、Web サイトがより優れた SEO サポートを提供するのに役立ちます。
 フロントエンド開発に PHP と Angular を使用する方法
May 11, 2023 pm 04:04 PM
フロントエンド開発に PHP と Angular を使用する方法
May 11, 2023 pm 04:04 PM
インターネットの急速な発展に伴い、フロントエンド開発テクノロジーも常に改善され、反復されています。 PHP と Angular は、フロントエンド開発で広く使用されている 2 つのテクノロジーです。 PHP は、フォームの処理、動的ページの生成、アクセス許可の管理などのタスクを処理できるサーバー側スクリプト言語です。 Angular は、単一ページ アプリケーションの開発やコンポーネント化された Web アプリケーションの構築に使用できる JavaScript フレームワークです。この記事では、PHPとAngularをフロントエンド開発に使用する方法と、それらを組み合わせる方法を紹介します。
 Python で一般的に使用される標準ライブラリとサードパーティ ライブラリ 2-sys モジュール
Apr 10, 2023 pm 02:56 PM
Python で一般的に使用される標準ライブラリとサードパーティ ライブラリ 2-sys モジュール
Apr 10, 2023 pm 02:56 PM
1. sys モジュールの紹介 前に紹介した os モジュールは主にオペレーティング システム用ですが、この記事の sys モジュールは主に Python インタプリタ用です。 sys モジュールは Python に付属するモジュールで、Python インタープリターと対話するためのインターフェイスです。 sys モジュールは、Python ランタイム環境のさまざまな部分を処理するための多くの関数と変数を提供します。 2. sys モジュールの一般的に使用されるメソッド: dir() メソッドを使用して、sys モジュールにどのメソッドが含まれているかを確認できます: import sys print(dir(sys))1.sys.argv - コマンド ライン パラメーター sys を取得します。 argv は、プログラムの外部からコマンドを実装するために使用されます。プログラムにはパラメータが渡され、コマンド ライン パラメータの列を取得できます。
 Pythonプログラミング:名前付きタプルの使い方のポイントを詳しく解説
Apr 11, 2023 pm 09:22 PM
Pythonプログラミング:名前付きタプルの使い方のポイントを詳しく解説
Apr 11, 2023 pm 09:22 PM
はじめに この記事では、Python コレクション モジュールの紹介に引き続き、今回はその中の名前付きタプル、つまり、namedtuple の使い方を主に紹介します。これ以上の苦労はせずに、始めましょう – いいね、フォロー、転送することを忘れないでください~ ^_^名前付きタプルの作成 Python コレクションの名前付きタプル クラスnamedTuples は、タプル内の各位置に意味を与え、コードの読みやすさを向上させます。これらは通常のタプルが使用される場所ならどこでも使用でき、位置インデックスではなく名前によってフィールドにアクセスする機能を追加します。これは、Python 組み込みモジュール コレクションから取得されます。使用される一般的な構文は次のとおりです。 import collections XxNamedT
