前書き:
クラスタリングとは、安定した効率的な状態を実現するために、サーバーの数を追加して同じサービスを提供することを指します。なぜ Redis クラスターを使用するのでしょうか? Redis クラスターは、Redis の読み取りおよび書き込み機能を強化できます。
ここで、redis クラスターについて正式に学びましょう。
準備作業:
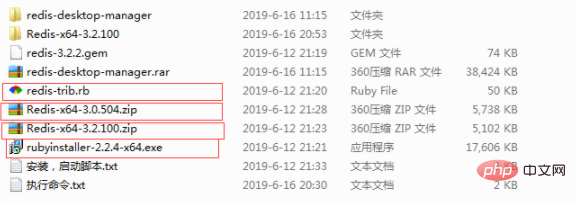
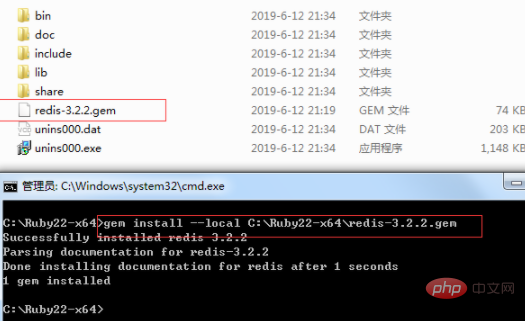
4 つのコンポーネントが必要です: Redis、Ruby 言語ランタイム環境、Redis Ruby ドライバー redis-xxxx.gem、および Redis クラスターを作成するツール redis-trib.rb。 redis-trib.rb ツールを使用して Redis クラスターを作成します。このファイルは Ruby 言語で書かれているため、Ruby 開発環境をインストールし、redis-xxxx.gem を実行する必要があります。

1) Redis インストール ファイルをダウンロードします: https://github.com/MSOpenTech/redis/releases/、Redis は msi 形式と zip 形式でダウンロード ファイルを提供します。zip をダウンロードします。ここで Redis-x64-3.2.100 バージョンをフォーマットします。
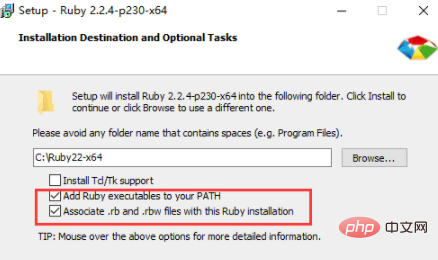
2) Ruby インストール ファイルをダウンロードします: http://dl.bintray.com/oneclick/rubyinstaller/rubyinstaller-2.2.4-x64.exe
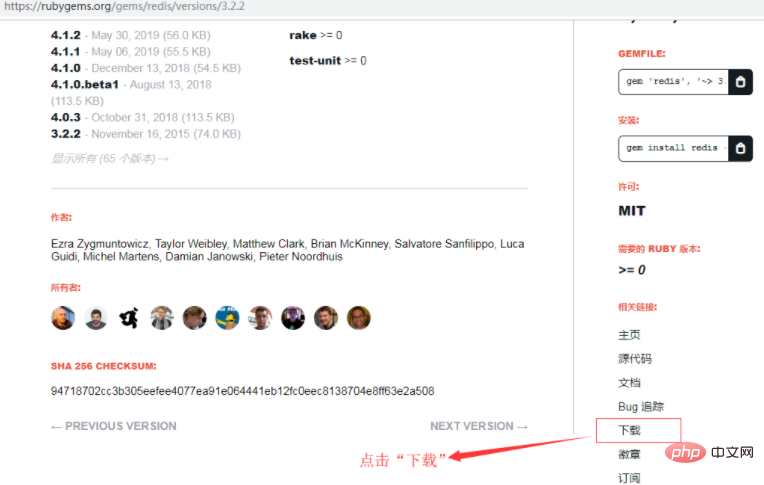
3) Ruby で Redis をダウンロードします。環境ドライバー: https://rubygems.org/gems/redis/versions/3.2.2. 互換性を考慮して、3.2.2 バージョンはここからダウンロードされます.
注: 右下隅にある関連リンクをダウンロードしてください中

4) Redis クラスターを作成するには、Redis が公式に提供する Ruby スクリプト ファイル redis-trib.rb をダウンロードします。パスは次のとおりです。 https://raw.githubusercontent.com/MSOpenTech /redis/3.0/src/redis-trib.rb
Redis のインストール
ダウンロードした Redis-x64-3.2.100.zip を解凍するだけです。使いやすいように、D:\Redis-Cluster\Redis-x64-3.2.100 のように、ドライブ文字のルート ディレクトリに配置することをお勧めします。
Redis をインストールし、3 つのインスタンスを実行します (Redis クラスターには少なくとも 3 つのノードが必要で、3 つ未満のノードは作成できません);
Redis のデフォルトのポートなので、構成ファイルを通じて 6 つの異なる Redis インスタンスを開始しますここでは 6379、6380、6381、6382、6383、6384、および 6385 が 6 つの Redis インスタンスを実行するために使用されます。
注:
(1) 不要なエラーを避けるために、構成ファイルを utf8 形式で保存し、コメントを含めないようにしてください。
(2) 以下ログの保存方法には、ファイルに保存する方法とシステムログに保存する方法がありますので、必要に応じて選択してください:
loglevel notice    #日志的记录级别,notice是适合生产环境的
logfile "D:/Redis-Cluster/Redis-x64-3.2.100/Logs/redis6380_log.txt" #指定log的保持路径,默认是创建在Redis安装目录下,如果有子目录需要手动创建,如此处的Logs目录
syslog-enabled yes    #是否使用系统日志
syslog-ident redis6380    #在系统日志的标识名
ここではファイルに保存する方法を使用しますので、最初に保存します。 Redis ディレクトリ内 D:\Redis-Cluster\Redis-x64-3.2.100 の下に新しい Logs フォルダーを作成します。
Redis インストールのルート ディレクトリで、エンコード形式 utf-8 の構成ファイルを作成します: redis.6380.conf、redis.6381.conf、redis.6382.conf、redis.6383.conf、redis .6384.conf、redis.6385.conf。
redis.6380.conf、
port 6380
loglevel notice
logfile "D:/Redis-Cluster/Redis-x64-3.2.100/Logs/redis6380_log.txt"
appendonly yes
appendfilename "appendonly.6380.aof"
cluster-enabled yes
cluster-config-file nodes.6380.conf
cluster-node-timeout 15000
cluster-slave-validity-factor 10
cluster-migration-barrier 1
cluster-require-full-coverage yes
redis.6381.conf、
port 6381
loglevel notice
logfile "D:/Redis-Cluster/Redis-x64-3.2.100/Logs/redis6381_log.txt"
appendonly yes
appendfilename "appendonly.6381.aof"
cluster-enabled yes
cluster-config-file nodes.6381.conf
cluster-node-timeout 15000
cluster-slave-validity-factor 10
cluster-migration-barrier 1
cluster-require-full-coverage yes
redis.6382.conf、
port 6382
loglevel notice
logfile "D:/Redis-Cluster/Redis-x64-3.2.100/Logs/redis6382_log.txt"
appendonly yes
appendfilename "appendonly.6382.aof"
cluster-enabled yes
cluster-config-file nodes.6382.conf
cluster-node-timeout 15000
cluster-slave-validity-factor 10
cluster-migration-barrier 1
cluster-require-full-coverage yes
redis.6383.conf、
port 6383
loglevel notice
logfile "D:/Redis-Cluster/Redis-x64-3.2.100/Logs/redis6383_log.txt"
appendonly yes
appendfilename "appendonly.6383.aof"
cluster-enabled yes
cluster-config-file nodes.6383.conf
cluster-node-timeout 15000
cluster-slave-validity-factor 10
cluster-migration-barrier 1
cluster-require-full-coverage yes
redis.6384.conf、
port 6384
loglevel notice
logfile "D:/Redis-Cluster/Redis-x64-3.2.100/Logs/redis6384_log.txt"
appendonly yes
appendfilename "appendonly.6384.aof"
cluster-enabled yes
cluster-config-file nodes.6384.conf
cluster-node-timeout 15000
cluster-slave-validity-factor 10
cluster-migration-barrier 1
cluster-require-full-coverage yes
redis.6385.conf
port 6385
loglevel notice
logfile "D:/Redis-Cluster/Redis-x64-3.2.100/Logs/redis6385_log.txt"
appendonly yes
appendfilename "appendonly.6385.aof"
cluster-enabled yes
cluster-config-file nodes.6385.conf
cluster-node-timeout 15000
cluster-slave-validity-factor 10
cluster-migration-barrier 1
cluster-require-full-coverage yes
(学習ビデオ共有: redis ビデオ チュートリアル)
構成は次のように説明されています:
port 6380                                 #端口号
loglevel notice                           #日志的记录级别,notice是适合生产环境的
logfile "Logs/redis6380_log.txt"          #指定log的保持路径,默认是创建在Redis安装目录下,如果有子目录需要手动创建,如此处的Logs目录
syslog-enabled yes                        #是否使用系统日志
syslog-ident redis6380                    #在系统日志的标识名
appendonly yes                            #数据的保存为aof格式
appendfilename "appendonly.6380.aof"      #数据保存文件
cluster-enabled yes                       #是否开启集群
cluster-config-file nodes.6380.conf
cluster-node-timeout 15000
cluster-slave-validity-factor 10
cluster-migration-barrier 1
cluster-require-full-coverage yes
上記の構成ファイルを Redis ディレクトリに保存し、これらの構成を使用しますインストールするファイル 6 Redis サービスの場合、コマンドは次のとおりです:
D:/Redis-Cluster/Redis-x64-3.2.100/redis-server.exe --service-install D:/Redis-Cluster/Redis-x64-3.2.100/redis.6380.conf --service-name redis6380
D:/Redis-Cluster/Redis-x64-3.2.100/redis-server.exe --service-install D:/Redis-Cluster/Redis-x64-3.2.100/redis.6381.conf --service-name redis6381
D:/Redis-Cluster/Redis-x64-3.2.100/redis-server.exe --service-install D:/Redis-Cluster/Redis-x64-3.2.100/redis.6382.conf --service-name redis6382
D:/Redis-Cluster/Redis-x64-3.2.100/redis-server.exe --service-install D:/Redis-Cluster/Redis-x64-3.2.100/redis.6383.conf --service-name redis6383
D:/Redis-Cluster/Redis-x64-3.2.100/redis-server.exe --service-install D:/Redis-Cluster/Redis-x64-3.2.100/redis.6384.conf --service-name redis6384
D:/Redis-Cluster/Redis-x64-3.2.100/redis-server.exe --service-install D:/Redis-Cluster/Redis-x64-3.2.100/redis.6385.conf --service-name redis6385
注:
1) redis.6380.conf などの構成ファイルのフル パスを使用して、 Redis クラスターの再起動時の問題を回避します
2) アンインストール コマンドは次のとおりです:
D:/Redis-Cluster/Redis-x64-3.2.100/redis-server.exe --service-uninstall D:/Redis-Cluster/Redis-x64-3.2.100/redis.6380.conf --service-name redis6380
D:/Redis-Cluster/Redis-x64-3.2.100/redis-server.exe --service-uninstall D:/Redis-Cluster/Redis-x64-3.2.100/redis.6381.conf --service-name redis6381
D:/Redis-Cluster/Redis-x64-3.2.100/redis-server.exe --service-uninstall D:/Redis-Cluster/Redis-x64-3.2.100/redis.6382.conf --service-name redis6382
D:/Redis-Cluster/Redis-x64-3.2.100/redis-server.exe --service-uninstall D:/Redis-Cluster/Redis-x64-3.2.100/redis.6383.conf --service-name redis6383
D:/Redis-Cluster/Redis-x64-3.2.100/redis-server.exe --service-uninstall D:/Redis-Cluster/Redis-x64-3.2.100/redis.6384.conf --service-name redis6384
D:/Redis-Cluster/Redis-x64-3.2.100/redis-server.exe --service-uninstall D:/Redis-Cluster/Redis-x64-3.2.100/redis.6385.conf --service-name redis6385
これら 6 つのサービスを開始します。コマンドは次のとおりです:
D:/Redis-Cluster/Redis-x64-3.2.100/redis-server.exe --service-start --service-name redis6380
D:/Redis-Cluster/Redis-x64-3.2.100/redis-server.exe --service-start --service-name redis6381
D:/Redis-Cluster/Redis-x64-3.2.100/redis-server.exe --service-start --service-name redis6382
D:/Redis-Cluster/Redis-x64-3.2.100/redis-server.exe --service-start --service-name redis6383
D:/Redis-Cluster/Redis-x64-3.2.100/redis-server.exe --service-start --service-name redis6384
D:/Redis-Cluster/Redis-x64-3.2.100/redis-server.exe --service-start --service-name redis6385
実行結果:


gem install --local path_to_gem/filename.gem

##D:/Redis-Cluster/Redis-x64-3.2.100/redis-trib.rb create --replicas 1 127.0.0.1:6380 127.0.0.1:6381 127.0.0.1:6382 127.0.0.1:6383 127.0. 0.1:6384 127.0.0.1:6385
D:\Redis-Cluster\Redis-x64-3.2.100>redis-trib.rb create --replicas 1 127.0.0.1:6380 127.0.0.1:6381 127.0.0.1:6382 127.0.0.1:6383 127.0.0.1:6384 127.0.0.1:6385
>>> Creating cluster
Connecting to node 127.0.0.1:6380: OK
Connecting to node 127.0.0.1:6381: OK
Connecting to node 127.0.0.1:6382: OK
Connecting to node 127.0.0.1:6383: OK
Connecting to node 127.0.0.1:6384: OK
Connecting to node 127.0.0.1:6385: OK
>>> Performing hash slots allocation on 6 nodes...
Using 3 masters:
127.0.0.1:6380
127.0.0.1:6381
127.0.0.1:6382
Adding replica 127.0.0.1:6383 to 127.0.0.1:6380
Adding replica 127.0.0.1:6384 to 127.0.0.1:6381
Adding replica 127.0.0.1:6385 to 127.0.0.1:6382
M: bb6ef615bb0ae13275943caec0db9d30b9f35c5e 127.0.0.1:6380   slots:0-5460      (5461 slots) master
M: b4d120f2983ad683f7b68992e1ba414722238db7 127.0.0.1:6381   slots:5461-10922  (5462 slots) master
M: 837779b3965e2c9d4dd4385750aaaaf9a9039fb0 127.0.0.1:6382   slots:10923-16383 (5461 slots) master
S: 5d154137180284d926ef51a91fc75f9438249ef8 127.0.0.1:6383   replicates bb6ef615bb0ae13275943caec0db9d30b9f35c5e
S: ad151680a3e36cf2083ef822be0bdb075a7d36de 127.0.0.1:6384   replicates b4d120f2983ad683f7b68992e1ba414722238db7
S: 9a2260a5a6a2add84b622a453a6a7b86a29d180d 127.0.0.1:6385   replicates 837779b3965e2c9d4dd4385750aaaaf9a9039fb0
Can I set the above configuration? (type 'yes' to accept): yes
>>> Nodes configuration updated
>>> Assign a different config epoch to each node
>>> Sending CLUSTER MEET messages to join the cluster
Waiting for the cluster to join...
>>> Performing Cluster Check (using node 127.0.0.1:6380)M: bb6ef615bb0ae13275943caec0db9d30b9f35c5e 127.0.0.1:6380   slots:0-5460      (5461 slots) master
M: b4d120f2983ad683f7b68992e1ba414722238db7 127.0.0.1:6381   slots:5461-10922  (5462 slots) master
M: 837779b3965e2c9d4dd4385750aaaaf9a9039fb0 127.0.0.1:6382   slots:10923-16383 (5461 slots) master
M: 5d154137180284d926ef51a91fc75f9438249ef8 127.0.0.1:6383   slots:            (0 slots)    master   replicates bb6ef615bb0ae13275943caec0db9d30b9f35c5e
M: ad151680a3e36cf2083ef822be0bdb075a7d36de 127.0.0.1:6384   slots:            (0 slots)    master   replicates b4d120f2983ad683f7b68992e1ba414722238db7
M: 9a2260a5a6a2add84b622a453a6a7b86a29d180d 127.0.0.1:6385   slots:            (0 slots)    master   replicates 837779b3965e2c9d4dd4385750aaaaf9a9039fb0
[OK] All nodes agree about slots configuration.
>>> Check for open slots...
>>> Check slots coverage...
[OK] All 16384 slots covered.
(1)--replicas #指定集群中每个主节点配备几个从节点,这里设置为1。
(2)redis-trib.rb工具的使用
、create:创建集群
、check:检查集群
、info:查看集群信息
、fix:修复集群
、reshard:在线迁移slot
、rebalance:平衡集群节点slot数量
、add-node:将新节点加入集群
、del-node:从集群中删除节点
、set-timeout:设置集群节点间心跳连接的超时时间
、call:在集群全部节点上执行命令
、import:将外部redis数据导入集群
(2)检验是否真的创建成功
输入以下命令:
redis-trib.rb check 127.0.0.1:6380
如果现实信息如下,则说明创建的Redis集群是没问题。
D:\Redis-Cluster\Redis-x64-3.2.100>redis-trib.rb check 127.0.0.1:6380
Connecting to node 127.0.0.1:6380: OK
Connecting to node 127.0.0.1:6383: OK
Connecting to node 127.0.0.1:6382: OK
Connecting to node 127.0.0.1:6384: OK
Connecting to node 127.0.0.1:6385: OK
Connecting to node 127.0.0.1:6381: OK
>>> Performing Cluster Check (using node 127.0.0.1:6380)
M: bb6ef615bb0ae13275943caec0db9d30b9f35c5e 127.0.0.1:6380   slots:0-5460      (5461 slots) master   1 additional replica(s)
S: 5d154137180284d926ef51a91fc75f9438249ef8 127.0.0.1:6383   slots:            (0 slots)    slave    replicates bb6ef615bb0ae13275943caec0db9d30b9f35c5e
M: 837779b3965e2c9d4dd4385750aaaaf9a9039fb0 127.0.0.1:6382   slots:10923-16383 (5461 slots) master   1 additional replica(s)
S: ad151680a3e36cf2083ef822be0bdb075a7d36de 127.0.0.1:6384   slots:            (0 slots)    slave    replicates b4d120f2983ad683f7b68992e1ba414722238db7
S: 9a2260a5a6a2add84b622a453a6a7b86a29d180d 127.0.0.1:6385   slots:            (0 slots)    slave    replicates 837779b3965e2c9d4dd4385750aaaaf9a9039fb0
M: b4d120f2983ad683f7b68992e1ba414722238db7 127.0.0.1:6381   slots:5461-10922  (5462 slots) master   1 additional replica(s)
[OK] All nodes agree about slots configuration.
>>> Check for open slots...
>>> Check slots coverage...
[OK] All 16384 slots covered.

D:\Redis-Cluster\Redis-x64-3.2.100>
(3)信息查询
使用Redis客户端Redis-cli.exe来查看数据记录数,以及集群相关信息

原文作者:cctext
原文链接:https://www.cnblogs.com/yy3b2007com/p/11033009.html
相关推荐:redis数据库教程
以上がWindows で Redis クラスターを構築する方法の詳細内容です。詳細については、PHP 中国語 Web サイトの他の関連記事を参照してください。