Nginx1.19 php8.0ソースコードのコンパイルとインストールの詳細説明
推奨学習: 「PHP8 チュートリアル 」
##centos7 以降のバージョンに備えてください
最初のステップ
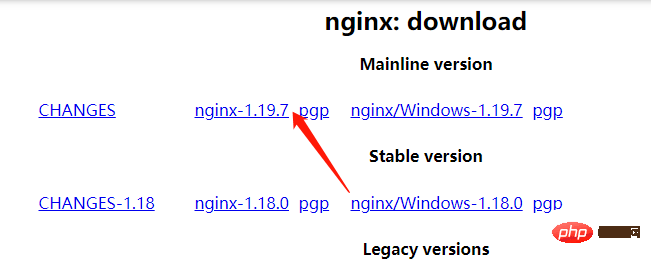
nginx パッケージをダウンロードし、指定されたディレクトリに置きます。通常は mnt ディレクトリに置きます: Downloadアドレス: nginx.org/ en/download.html
tar zxvf nginx-1.19.7.tar.gz
ログイン後にコピー
yum -y install zlib-devel pcre-devel openssl-devel
ログイン後にコピー
useradd -M -s /sbin/nologin nginx
ログイン後にコピー
./configure --prefix=/usr/local/nginx --with-http_stub_status_module --with-http_ssl_module --with-http_random_index_module --with-http_sub_module

make
make install
ログイン後にコピー
user nginx;
ログイン後にコピー
1. 構成構文の検出
/usr/local/nginx/sbin/nginx -t
ログイン後にコピー
/usr/local/nginx/sbin/nginx
ログイン後にコピー
/usr/local/nginx/sbin/nginx -s reload
pkill -HUP nginx
ログイン後にコピー
/usr/local/nginx/sbin/nginx -s stop
pkill nginx
ログイン後にコピー
vi /etc/rc.local/usr/local/nginx/sbin/nginx
ログイン後にコピー
pstree |grep nginx
ps -ef |grep nginx
ps aux |grep nginx
ログイン後にコピー
netstat -tunpl |grep nginx
ログイン後にコピー
http://192.168.2.1
ログイン後にコピー
[root@wml sbin]# pkill -HUP nginx
ログイン後にコピー
##php8.0 ソース コードのコンパイルとインストール1. php8 の依存関係をインストールします
yum -y install autoconf freetype gd libpng libpng-devel libjpeg libxml2 libxml2-devel zlib curl curl-devel net-snmp-devel libjpeg-devel php-ldap openldap-devel openldap-clients freetype-devel gmp-devel libzip libzip-devel sqlite-devel
ログイン後にコピー
2. php8 の依存関係パッケージをインストールします
1. ## を解凍します#
tar -zxvf oniguruma-6.9.4.tar.gz
ログイン後にコピー
cd oniguruma-6.9.4/
ログイン後にコピー
./autogen.sh
ログイン後にコピー
./configure --prefix=/usr
ログイン後にコピー
make && make install
ログイン後にコピー
ログイン後にコピー
1. 解凍
tar xzf php-8.0.0.tar.gz
ログイン後にコピー
2. ディレクトリの切り替え
cd php-8.0.0/
ログイン後にコピー
./configure --prefix=/usr/local/php --with-config-file-path=/usr/local/php/etc --enable-fpm --with-fpm-user=nginx --with-fpm-group=nginx --enable-mysqlnd --with-mysqli --with-pdo-mysql --enable-opcache --with-pcre-jit --enable-gd --with-jpeg --with-freetype --with-gettext --with-curl --with-openssl --enable-sockets --enable-mbstring --enable-xml --with-zip --with-zlib --with-snmp --with-mhash --enable-ftp --enable-bcmath --enable-soap --enable-shmop --enable-sysvsem --enable-pcntl --with-gmp
ログイン後にコピー
make && make install
ログイン後にコピー
ログイン後にコピー
error コンパイルおよびインストール中にエラーが発生しました
解决办法 yum install automake
ログイン後にコピー

解决办法 执行 yum install libtool
ログイン後にコピー

解决办法 参考 下图
ログイン後にコピー

以上がNginx1.19 php8.0ソースコードのコンパイルとインストールの詳細説明の詳細内容です。詳細については、PHP 中国語 Web サイトの他の関連記事を参照してください。
このウェブサイトの声明
この記事の内容はネチズンが自主的に寄稿したものであり、著作権は原著者に帰属します。このサイトは、それに相当する法的責任を負いません。盗作または侵害の疑いのあるコンテンツを見つけた場合は、admin@php.cn までご連絡ください。

ホットAIツール

Undresser.AI Undress
リアルなヌード写真を作成する AI 搭載アプリ

AI Clothes Remover
写真から衣服を削除するオンライン AI ツール。

Undress AI Tool
脱衣画像を無料で

Clothoff.io
AI衣類リムーバー

AI Hentai Generator
AIヘンタイを無料で生成します。

人気の記事
R.E.P.O.説明されたエネルギー結晶と彼らが何をするか(黄色のクリスタル)
1 か月前
By 尊渡假赌尊渡假赌尊渡假赌
R.E.P.O.最高のグラフィック設定
1 か月前
By 尊渡假赌尊渡假赌尊渡假赌
アサシンのクリードシャドウズ:シーシェルリドルソリューション
3週間前
By DDD
Windows11 KB5054979の新しいものと更新の問題を修正する方法
2週間前
By DDD
Will R.E.P.O.クロスプレイがありますか?
1 か月前
By 尊渡假赌尊渡假赌尊渡假赌

ホットツール

メモ帳++7.3.1
使いやすく無料のコードエディター

SublimeText3 中国語版
中国語版、とても使いやすい

ゼンドスタジオ 13.0.1
強力な PHP 統合開発環境

ドリームウィーバー CS6
ビジュアル Web 開発ツール

SublimeText3 Mac版
神レベルのコード編集ソフト(SublimeText3)

ホットトピック
Gmailメールのログイン入り口はどこですか?
 7549
7549
 15
15
 7549
7549
 15
15
CakePHP チュートリアル
 1382
1382
 52
52
 1382
1382
 52
52
Steamのアカウント名の形式は何ですか
 83
83
 11
11
 83
83
 11
11
NYTの接続はヒントと回答です
 22
22
 90
90
 22
22
 90
90


