Bootstrap のフォーム コントロールの詳細については、こちらをご覧ください。
この記事では、Bootstrap のフォーム コントロールについて詳しく説明します。一定の参考値があるので、困っている友達が参考になれば幸いです。

#基本的な例
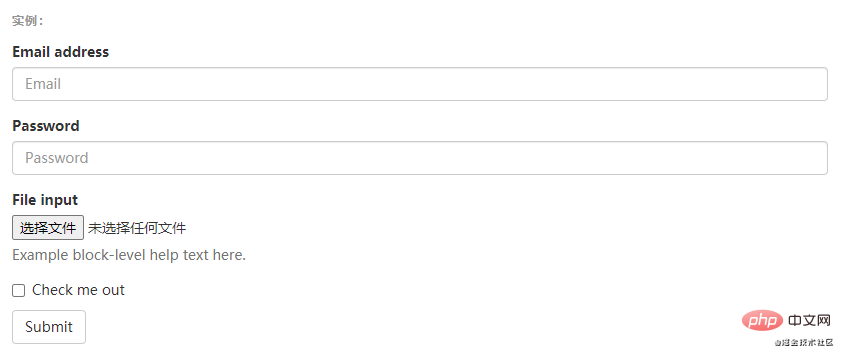
個々のフォーム コントロールには、いくつかのグローバル スタイルが自動的に割り当てられます。 .form-control クラス セットを持つすべての
、


関連する推奨事項: 「
ブートストラップ チュートリアル インライン フォームは
追加です
.form-inline クラスを 要素に追加すると、その内容が左揃えになり、inline-block レベル コントロールとして動作します。 ビューポートの幅が少なくとも 768 ピクセルの場合にのみ適用されます (ビューポートの幅がこれより小さい場合、フォームが折りたたまれます)。
必ずラベルを追加してくださいブートストラップでは、入力ボックスとラジオ/複数選択ボックスのコントロールは幅: 100% に設定されています。 ; デフォルトでは幅。インライン フォームでは、これらの
要素の幅を width: auto; に設定するため、複数のコントロールを同じ行に配置できます。レイアウトのニーズに応じて、
追加のカスタム コンポーネントが必要になる場合があります。
#各入力コントロールにラベルを設定しないと、スクリーン リーダーが正しく認識できません。これらのインライン フォームの場合、
ラベルに .sr 専用クラスを設定することで非表示にできます。 aria-label、aria-labelledby、title 属性など、label タグの代替を提供する支援技術もあります。これらのいずれも存在しない場合、スクリーン リーダーは、
placeholder 属性 (存在する場合) を使用して、他のマークアップの代わりにプレースホルダーを使用する可能性がありますが、このアプローチは不適切であることに注意してください。
<form class="form-inline">
  <div class="form-group">
    <label for="exampleInputName2">Name</label>
    <input type="text" class="form-control" id="exampleInputName2" placeholder="Jane Doe">
  </div>
  <div class="form-group">
    <label for="exampleInputEmail2">Email</label>
    <input type="email" class="form-control" id="exampleInputEmail2" placeholder="jane.doe@example.com">
  </div>
  <button type="submit" class="btn btn-default">Send invitation</button>
</form>
ログイン後にコピー
<form class="form-inline">
  <div class="form-group">
    <label class="sr-only" for="exampleInputEmail3">Email address</label>
    <input type="email" class="form-control" id="exampleInputEmail3" placeholder="Email">
  </div>
  <div class="form-group">
    <label class="sr-only" for="exampleInputPassword3">Password</label>
    <input type="password" class="form-control" id="exampleInputPassword3" placeholder="Password">
  </div>
  <div class="checkbox">
    <label>
      <input type="checkbox"> Remember me
    </label>
  </div>
  <button type="submit" class="btn btn-default">Sign in</button>
</form> #
#
<form class="form-inline">
  <div class="form-group">
    <label class="sr-only" for="exampleInputAmount">Amount (in dollars)</label>
    <div class="input-group">
      <div class="input-group-addon">$</div>
      <input type="text" class="form-control" id="exampleInputAmount" placeholder="Amount">
      <div class="input-group-addon">.00</div>
    </div>
  </div>
  <button type="submit" class="btn btn-primary">Transfer cash</button>
</form>
 #.form-horizontal
label ラベルとコントロールをグループとして配置できます。横に並んで。これにより、.form-group
の動作が変更され、グリッド システム内の行として動作するようになるため、追加の
.rowを追加する必要がなくなります。
#<div class="code" style="position:relative; padding:0px; margin:0px;"><pre class='brush:php;toolbar:false;'><form class="form-horizontal">
<div class="form-group">
<label for="inputEmail3" class="col-sm-2 control-label">Email</label>
<div class="col-sm-10">
<input type="email" class="form-control" id="inputEmail3" placeholder="Email">
</div>
</div>
<div class="form-group">
<label for="inputPassword3" class="col-sm-2 control-label">Password</label>
<div class="col-sm-10">
<input type="password" class="form-control" id="inputPassword3" placeholder="Password">
</div>
</div>
<div class="form-group">
<div class="col-sm-offset-2 col-sm-10">
<div class="checkbox">
<label>
<input type="checkbox"> Remember me
</label>
</div>
</div>
</div>
<div class="form-group">
<div class="col-sm-offset-2 col-sm-10">
<button type="submit" class="btn btn-default">Sign in</button>
</div>
</div>
</form></pre><div class="contentsignin">ログイン後にコピー</div></div>サポートされているコントロール

入力ボックス
ほとんどのフォーム コントロールとテキスト入力フィールド コントロールが含まれており、すべての HTML5 タイプの入力もサポートしていますコントロール: text
、
、datetime、datetime-local、
date、month、時間、週、番号、メール、url、検索、 tel と color。 型宣言を追加する必要があります型属性が正しく設定されている入力コントロールのみに、正しいスタイルを与えることができます。
入力コントロール グループテキスト入力フィールドの前後にテキスト コンテンツまたはボタン コントロールを追加する必要がある場合は、 , 入力制御グループを参照してください。
#テキスト フィールド
複数行テキストをサポートするフォーム コントロール。
rowsプロパティは必要に応じて変更できます。
多选和单选框 多选框(checkbox)用于选择列表中的一个或多个选项,而单选框(radio)用于从多个选项中只选择一个。 Disabled checkboxes and radios are supported, but to provide a "not-allowed" cursor on hover of the parent 内联单选和多选框 通过将 不带label文本的Checkbox 和 radio 如果需要 <label>, you'll need to add the .disabled class to the parent .radio, .radio-inline, .checkbox, or .checkbox-inline.
<div class="checkbox">
<label>
<input type="checkbox" value="">
Option one is this and that—be sure to include why it's great
</label>
</div>
<div class="checkbox disabled">
<label>
<input type="checkbox" value="" disabled>
Option two is disabled
</label>
</div>
<div class="radio">
<label>
<input type="radio" name="optionsRadios" id="optionsRadios1" value="option1" checked>
Option one is this and that—be sure to include why it's great
</label>
</div>
<div class="radio">
<label>
<input type="radio" name="optionsRadios" id="optionsRadios2" value="option2">
Option two can be something else and selecting it will deselect option one
</label>
</div>
<div class="radio disabled">
<label>
<input type="radio" name="optionsRadios" id="optionsRadios3" value="option3" disabled>
Option three is disabled
</label>
</div>.checkbox-inline 或 .radio-inline 类应用到一系列的多选框(checkbox)或单选框(radio)控件上,可以使这些控件排列在一行。
<label class="checkbox-inline">
  <input type="checkbox" id="inlineCheckbox1" value="option1"> 1
</label>
<label class="checkbox-inline">
  <input type="checkbox" id="inlineCheckbox2" value="option2"> 2
</label>
<label class="checkbox-inline">
  <input type="checkbox" id="inlineCheckbox3" value="option3"> 3
</label>

<label class="radio-inline">
  <input type="radio" name="inlineRadioOptions" id="inlineRadio1" value="option1"> 1
</label>
<label class="radio-inline">
  <input type="radio" name="inlineRadioOptions" id="inlineRadio2" value="option2"> 2
</label>
<label class="radio-inline">
  <input type="radio" name="inlineRadioOptions" id="inlineRadio3" value="option3"> 3
</label>
<label> 内没有文字,输入框(input)正是你所期望的。 目前只适用于非内联的 checkbox 和 radio。 请记住,仍然需要为使用辅助技术的用户提供某种形式的 label(例如,使用 aria-label)
<div class="checkbox">
  <label>
    <input type="checkbox" id="blankCheckbox" value="option1" aria-label="...">
  </label>
</div>
<div class="radio">
  <label>
    <input type="radio" name="blankRadio" id="blankRadio1" value="option1" aria-label="...">
  </label>
</div>
更多编程相关知识,请访问:编程视频!!
以上がBootstrap のフォーム コントロールの詳細については、こちらをご覧ください。の詳細内容です。詳細については、PHP 中国語 Web サイトの他の関連記事を参照してください。

ホットAIツール

Undresser.AI Undress
リアルなヌード写真を作成する AI 搭載アプリ

AI Clothes Remover
写真から衣服を削除するオンライン AI ツール。

Undress AI Tool
脱衣画像を無料で

Clothoff.io
AI衣類リムーバー

Video Face Swap
完全無料の AI 顔交換ツールを使用して、あらゆるビデオの顔を簡単に交換できます。

人気の記事

ホットツール

メモ帳++7.3.1
使いやすく無料のコードエディター

SublimeText3 中国語版
中国語版、とても使いやすい

ゼンドスタジオ 13.0.1
強力な PHP 統合開発環境

ドリームウィーバー CS6
ビジュアル Web 開発ツール

SublimeText3 Mac版
神レベルのコード編集ソフト(SublimeText3)

ホットトピック
 7742
7742
 15
15
 1643
1643
 14
14
 1397
1397
 52
52
 1291
1291
 25
25
 1233
1233
 29
29
 VueでBootstrapの使用方法
Apr 07, 2025 pm 11:33 PM
vue.jsでBootstrapを使用すると、5つのステップに分かれています。ブートストラップをインストールします。 main.jsにブートストラップをインポートしますブートストラップコンポーネントをテンプレートで直接使用します。オプション:カスタムスタイル。オプション:プラグインを使用します。
 ブートストラップ検索バーを取得する方法
Apr 07, 2025 pm 03:33 PM
ブートストラップを使用して検索バーの値を取得する方法:検索バーのIDまたは名前を決定します。 JavaScriptを使用してDOM要素を取得します。要素の値を取得します。必要なアクションを実行します。
 ブートストラップの垂直センタリングを行う方法
Apr 07, 2025 pm 03:21 PM
ブートストラップを使用して垂直センタリングを実装します。FlexBoxメソッド:D-Flex、Justify-Content-Center、Align-Items-Centerクラスを使用して、FlexBoxコンテナに要素を配置します。 ALIGN-ITEMS-CENTERクラス方法:FlexBoxをサポートしていないブラウザの場合、親要素の高さが定義されている場合、Align-Items-Centerクラスを使用します。
 ブートストラップにスプリットラインを書く方法
Apr 07, 2025 pm 03:12 PM
ブートストラップスプリットラインを作成するには2つの方法があります。タグを使用して、水平方向のスプリットラインを作成します。 CSS Borderプロパティを使用して、カスタムスタイルのスプリットラインを作成します。
 ブートストラップのフレームワークをセットアップする方法
Apr 07, 2025 pm 03:27 PM
Bootstrapフレームワークをセットアップするには、次の手順に従う必要があります。1。CDNを介してブートストラップファイルを参照してください。 2。独自のサーバーでファイルをダウンロードしてホストします。 3。HTMLにブートストラップファイルを含めます。 4.必要に応じてSASS/LESSをコンパイルします。 5。カスタムファイルをインポートします(オプション)。セットアップが完了したら、Bootstrapのグリッドシステム、コンポーネント、スタイルを使用して、レスポンシブWebサイトとアプリケーションを作成できます。
 ブートストラップに写真を挿入する方法
Apr 07, 2025 pm 03:30 PM
ブートストラップに画像を挿入する方法はいくつかあります。HTMLIMGタグを使用して、画像を直接挿入します。ブートストラップ画像コンポーネントを使用すると、レスポンシブ画像とより多くのスタイルを提供できます。画像サイズを設定し、IMG-Fluidクラスを使用して画像を適応可能にします。 IMGボーダークラスを使用して、境界線を設定します。丸い角を設定し、IMGラウンドクラスを使用します。影を設定し、影のクラスを使用します。 CSSスタイルを使用して、画像をサイズ変更して配置します。背景画像を使用して、背景イメージCSSプロパティを使用します。
 ブートストラップボタンの使用方法
Apr 07, 2025 pm 03:09 PM
ブートストラップボタンの使用方法は?ブートストラップCSSを導入してボタン要素を作成し、ブートストラップボタンクラスを追加してボタンテキストを追加します


