この記事では、Angular のコンポーネント間のさまざまな種類の通信について詳しく説明します。一定の参考値があるので、困っている友達が参考になれば幸いです。
#Angular コンポーネント間の通信
コンポーネント間の 3 つの典型的な関係:
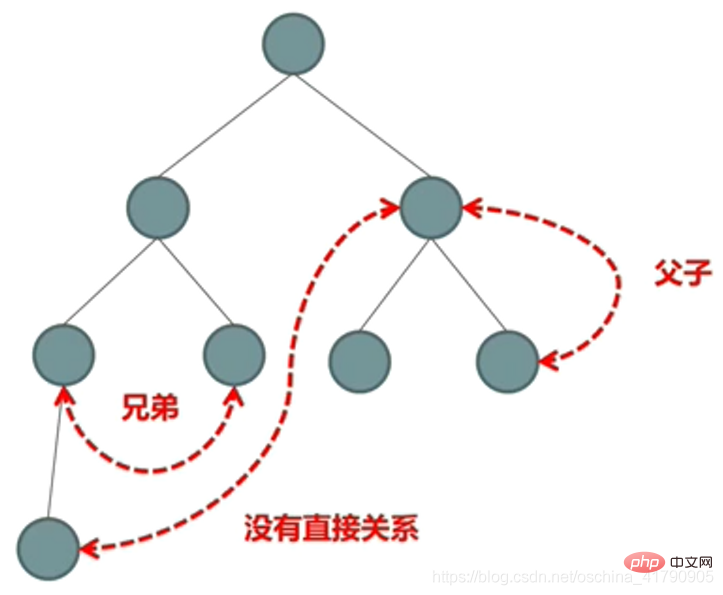
- 親コンポーネント間の対話 (@Input/@Output/テンプレート変数/@ViewChild)
- 親コンポーネントと子コンポーネント間の対話 (Service/localStorage)
- 通信などにセッション パラメーターとルーティング パラメーターを使用することもできます。
推奨される関連チュートリアル: 「
angular チュートリアル 」 》
##親コンポーネントと子コンポーネント間の相互作用##子コンポーネントの記述
# # child.component.ts
1 2 3 4 5 6 7 8 9 10 11 12 13 14 15 16 17 18 19 20 21 22 23 24 25 26 27 28 29 30 31 32 33 34 35 36 | @Component({
selector: 'app-child',
templateUrl: './child.component.html',
styleUrls: ['./child.component.css']
})
export class ChildComponent implements OnInit {
private _childTitle = '我是子组件';
@Input()
set childTitle(childTitle: string) {
this._childTitle = childTitle;
}
get childTitle(): string {
return this._childTitle;
}
@Output()
messageEvent: EventEmitter<string> = new EventEmitter<string>();
constructor() { }
ngOnInit(): void {
}
sendMessage(): void {
this.messageEvent.emit('我是子组件');
}
childFunction(): void {
console.log('子组件的名字是:' + this.childTitle);
}
}
|
ログイン後にコピー
child.component.html1 2 3 4 5 6 | <div class="panel panel-primary">
<div class="panel-heading">{{childTitle}}</div>
<div class="panel-body">
<button (click)="sendMessage()" class="btn btn-success">给父组件发消息</button>
</div>
</div>
|
ログイン後にコピー
## parent-and-child.component.ts
1 2 3 4 5 6 7 8 9 10 11 12 13 14 15 16 17 | <strong>@Component({
selector: 'app-parent-and-child',
templateUrl: './parent-and-child.component.html',
styleUrls: ['./parent-and-child.component.css']
})
export class ParentAndChildComponent implements OnInit {
constructor() { }
ngOnInit(): void {
}
doSomething(event: any): void {
alert(event);
}
}</strong>
|
ログイン後にコピー
parent-and-child.component.html
1 2 3 4 5 6 7 | <div class="panel panel-primary">
<div class="panel-heading">父组件</div>
<div class="panel-body">
<app-child #child (messageEvent) = "doSomething($event)"></app-child>
<button (click)="child.childFunction()" class="btn btn-success">调用子组件的方法</button>
</div>
</div>
|
ログイン後にコピー
ただし、@Input() と @Output() を使用して、プロパティの双方向バインディングを実現できます。 1 2 3 4 5 6 7 | @Input()
value: string;
@Output()
valueChange: EventEmitter<any> = new EventEmitter();
<input [(value)] = "newValue"></input>
|
ログイン後にコピー
注:
双方向バインディングに
[()]
を使用する場合、出力属性名は入力属性名と Change で構成される必要があります。フォーム: xxxChange。
親コンポーネントと子コンポーネント以外のコンポーネント間の対話
対話にサービスを使用する
event-bus.service .ts
1 2 3 4 5 6 7 8 9 10 | <strong>
@Injectable()
export class EventBusService {
evnetBus: Subject<string> = new Subject<string>();
constructor() { }
}</strong>
|
ログイン後にコピー
child1.component.ts
1 2 3 4 5 6 7 8 9 10 11 12 13 14 15 16 | @Component({
selector: 'app-child1',
templateUrl: './child1.component.html',
styleUrls: ['./child1.component.css']
})
export class Child1Component implements OnInit {
constructor(private eventBusService: EventBusService) { }
ngOnInit(): void {
}
triggerEventBus(): void {
this.eventBusService.evnetBus.next('child1 触发的事件');
}
}
|
ログイン後にコピー
child1.component.html
1 2 3 4 5 6 | <div class="panel panel-primary">
<div class="panel-heading">child1 组件</div>
<div class="panel-body">
<button (click)="triggerEventBus()" class="btn btn-success">触发事件</button>
</div>
</div>
|
ログイン後にコピー
child2 .component.ts
1 2 3 4 5 6 7 8 9 10 11 12 13 14 15 16 17 18 19 20 21 | @Component({
selector: 'app-child2',
templateUrl: './child2.component.html',
styleUrls: ['./child2.component.css']
})
export class Child2Component implements OnInit {
events: Array<string> = new Array<string>();
constructor(private eventBusService: EventBusService) { }
ngOnInit(): void {
this.listenerEvent();
}
listenerEvent(): void {
this.eventBusService.evnetBus.subscribe( value => {
this.events.push(value);
});
}
}
|
ログイン後にコピー
child2.component.html
1 2 3 4 5 6 | <div class="panel panel-primary">
<div class="panel-heading">child2 组件</div>
<div class="panel-body">
<p *ngFor="let event of events">{{event}}</p>
</div>
</div>
|
ログイン後にコピー
brother.component.ts
1 2 3 4 5 6 7 8 9 10 11 12 13 | @Component({
selector: 'app-brother',
templateUrl: './brother.component.html',
styleUrls: ['./brother.component.css']
})
export class BrotherComponent implements OnInit {
constructor() { }
ngOnInit(): void {
}
}
|
ログイン後にコピー
brother.component.html
1 2 3 4 5 6 7 | <div class="panel panel-primary">
<div class="panel-heading">第二种:没有父子关系的组件间通讯</div>
<div class="panel-body">
<app-child1></app-child1>
<app-child2></app-child2>
</div>
</div>
|
ログイン後にコピー
localStorage を使用して対話する
##local-child1.component.ts
1 2 3 4 5 6 7 8 9 10 11 12 13 14 15 16 17 | @Component({
selector: 'app-local-child1',
templateUrl: './local-child1.component.html',
styleUrls: ['./local-child1.component.css']
})
export class LocalChild1Component implements OnInit {
constructor() { }
ngOnInit(): void {
}
writeData(): void {
window.localStorage.setItem('message', JSON.stringify({name: 'star', age: 22}));
}
}
|
ログイン後にコピー
local-child1.component.html
1 2 3 4 5 6 | <div class="panel panel-primary">
<div class="panel-heading"> LocalChild1 组件</div>
<div class="panel-body">
<button class="btn btn-success" (click)="writeData()">写入数据</button>
</div>
</div>
|
ログイン後にコピー
1 2 3 4 5 6 7 8 9 10 11 12 13 14 15 16 17 18 19 | @Component({
selector: 'app-local-child2',
templateUrl: './local-child2.component.html',
styleUrls: ['./local-child2.component.css']
})
export class LocalChild2Component implements OnInit {
constructor() { }
ngOnInit(): void {
}
readData(): void {
const dataStr = window.localStorage.getItem('message');
const data = JSON.parse(dataStr);
console.log('name:' + data.name, 'age:' + data.age);
}
}
|
ログイン後にコピー
1 2 3 4 5 6 | <div class="panel panel-primary">
<div class="panel-heading">LocalChild2 组件</div>
<div class="panel-body">
<button class="btn btn-success" (click)="readData()">读取数据</button>
</div>
</div>
|
ログイン後にコピー


![[Web フロントエンド] Node.js クイック スタート](https://img.php.cn/upload/course/000/000/067/662b5d34ba7c0227.png)


