純CSSで血車目+転生目の特殊効果を実装する方法(詳細コード解説)
この記事では、純粋な CSS を使用してブラッドホイールの目と輪廻の目の特殊効果を実現する方法を紹介します。一定の参考値があるので、困っている友人は参考にしていただければ幸いです。

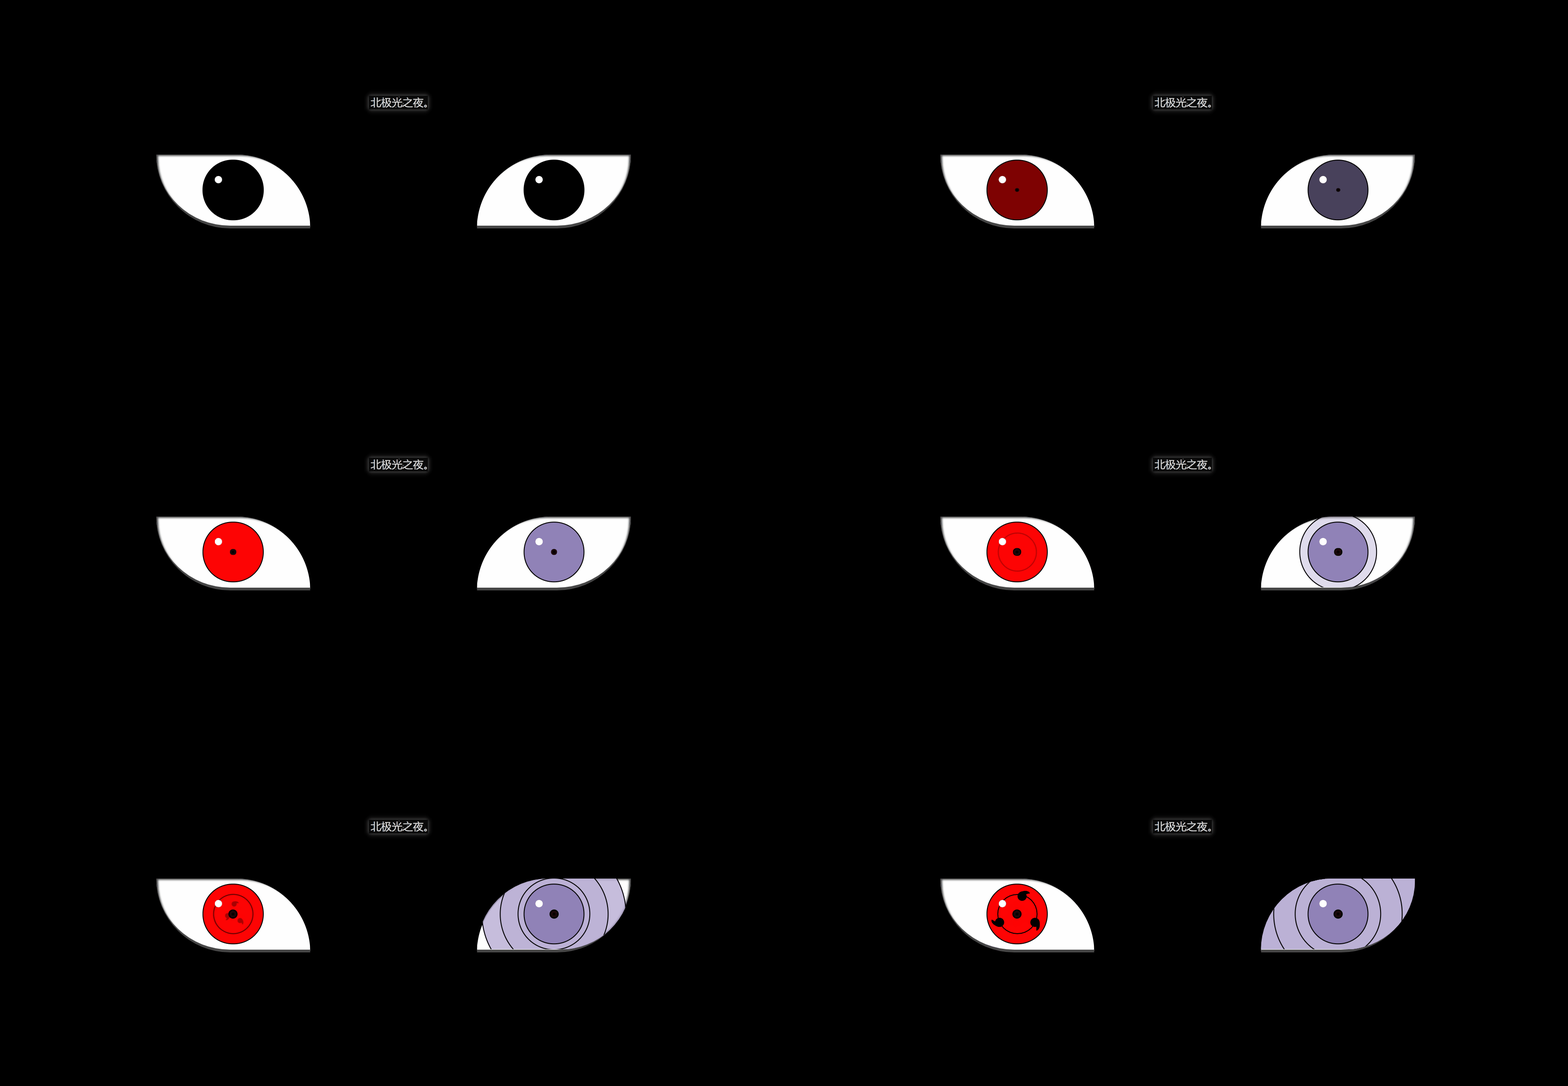
効果 (完全なコードは一番下にあります)
実際、実装は難しくありません。繰り返されるコードがたくさんあります。
実装 (段階的に記述できます):
1. まず基本的なタグを定義します:
<!-- 純CSSで血車目+転生目の特殊効果を実装する方法(詳細コード解説) -->
    <div class="zuo">
        <!-- 眼睛最中间那个黑点 -->
        <div class="zuoZong">
            <!-- 三勾玉所在的圈 -->
            <div class="zuoYu">
                <!-- 三个勾玉 -->
                <span class="yu"></span>
                <span class="yu"></span>
                <span class="yu"></span>
            </div>
        </div>
    </div>
    <!-- 轮回眼 -->
    <div class="you">
        <!-- 眼睛最中间那个黑点 -->
        <div class="dian"></div>
             <!-- 3个轮回圈 -->
            <div class="youYu">
                <span class="quan" style="--r:2;"></span>
                <span class="quan" style="--r:3;"></span>
                <span class="quan" style="--r:4;"></span>
            </div>
</div>2。左右の目を定義する 基本CSSスタイル:
.zuo , .you{
            width: 250px;
            height: 120px;
            background-color: rgb(255, 255, 255);
            border-bottom: 5px solid rgb(70, 70, 70);
            overflow: hidden;
            position: relative;
}border-bottom: 5px Solid rgb(70, 70, 70); まぶたをグレーにします。
オーバーフロー: オーバーフローが非表示になりました。
position: 相対; 相対的な位置決め。
3. まず、ブラッド ホイールの目の基本スタイルを定義します:
.zuo{
            transform: translateX(-135px);
            border-radius: 0 120px 0 120px;
            box-shadow: inset 3px 2px 3px  rgba(17, 17, 17, 0.8);
}transform: translationX(-135px); 左にオフセットして、二つの目は離れています。
border-radius: 目の形を形成する 2 つの角の円弧を設定します。
bos-shadowL 目尻に少し影を与えます。
4. 眼球の幅と高さを設定します:
.zuo::after{
            content: '';
            position: absolute;
            top: 50%;
            left: 50%;
            transform: translate(-50%,-50%);
            width: 95px;
            height: 95px;
            border-radius: 50%;
            border: 2px solid #000;
            animation: colour 2s linear forwards;
        }
        @keyframes colour{
            0%,30%{
                background-color: rgb(0, 0, 0);
            }
            100%{
                 background-color: rgb(255, 4, 4);
             }
}5. 眼球の中央に黒い点を設定します。重要なのは位置とサイズです。次に、アニメーションを設定して、ゆっくりと大きくします:
 .zuoZong{
            position: absolute;
            top: 50%;
            left: 50%;
            transform: translate(-50%,-50%);
            width: 0px;
            height: 0px;
            border-radius: 50%;
            background-color: rgb(0, 0, 0);
            z-index: 1;
            animation: da 3s linear forwards;
        }
        @keyframes da{
            100%{
                width: 15px;
            height: 15px;
            }
}6. 3 つの勾玉がある円を設定し、表示および回転するアニメーションを設定します。それ:
.zuoYu{
            position: absolute;
            top: -25px;
            left: -25px;
            bottom: -25px;
            right: -25px;
            border-radius: 50%;
            border: 2px solid rgb(0, 0, 0);
            animation: zhuan 2s linear 2s forwards;
            opacity: 0;
        }
        @keyframes zhuan{

            100%{
                opacity: 1;
                transform: rotate(720deg);
            }
}7. 3 つの勾玉を作成するには、まず円を作成し、次に二重疑似クラスを使用して円弧を作成します。この 2 つの組み合わせが勾玉です:
.zuoYu .yu{
             position: absolute;
             width: 15px;
             height: 15px;
             border-radius: 50%;
             background-color: rgb(0, 0, 0);

        }
        .zuoYu .yu::after{
            content: '';
            position: absolute;
            top: -6px;
            left: -1px;
            width: 6px;
            height: 20px;
            border-radius: 50%;
            border-left: 6px solid rgb(0, 0, 0);
}境界半径: 50% ;
境界左: 6px ソリッド rgb(0, 0, 0);
まず疑似クラスを円とし、次に円弧を形成する境界線のみを設定し、親要素上に配置して勾玉を形成します。
8. 勾玉が中央から大きくなり、勾玉がある円に向かって回転するように勾玉のアニメーションを設定します:
  .zuoYu .yu:nth-child(1){
            animation: yu1 2s ease-in 2s  forwards;
        }
        @keyframes yu1{
            0%{
                opacity: 0;
                left: 50%;
                top: 50%;
                transform:translate(-50%,-50%)  scale(0.1) ;
            }
            100%{
                left: 50%;
                top: -9%;
                transform: scale(1) rotate(80deg);
            }
}左: 50% ;
上: 50%; 真ん中。
不透明度: 透明。
スケール(0.1); 縮小します。
100%{…} を対応する位置に移動し、不透明になり通常のサイズに拡大します。
9. 同様に、他の 2 つの勾玉をアニメーション化します:
.zuoYu .yu:nth-child(2){
            animation: yu2 2s ease-in 2s forwards;
        }
        @keyframes yu2{
            0%{
                opacity: 0;
                left: 50%;
                top: 50%;

                transform: translate(-50%,-50%) scale(0.1) ;
            }
            100%{
                top: 60%;
                left: -9%;
                transform: scale(1) rotate(-60deg);
            }
        }
        .zuoYu .yu:nth-child(3){
            animation: yu3 2s ease-in 2s forwards;
        }
        @keyframes yu3{
            0%{
                opacity: 0;
                right: 50%;
                top: 50%;

                transform: translate(-50%,-50%) scale(0.1);
            }
            100%{
                top: 60%;
                right: -9%;
                transform: scale(1) rotate(180deg);
            }
}10. 両目に白色点を設定します。反射効果、ブラッド チャクラ アイは完成です:
.zuo::before,.you::before{
            content: '';
            position: absolute;
            left: 38%;
            top: 30%;
            width: 12px;
            height: 12px;
            border-radius: 50%;
            background-color: rgb(255, 255, 255);
            z-index: 10;
}position: 絶対;
left: 38%;
top: 30%; 対応する位置を配置します。
背景色: rgb(255, 255, 255); 白。
z-index: 10; 10 に設定すると、上部に表示されます。
11. Blood Wheel Eye と同じように、Samsara Eye の基本的な CSS スタイルを設定します:
 .you{
            transform: translateX(135px);
            border-radius:  120px 0 120px 0;
            box-shadow: inset -3px 2px 3px  rgba(17, 17, 17, 0.8);
}12. 幅を設定します。眼球の高さと:
.you::after{
            content: '';
            position: absolute;
            top: 50%;
            left: 50%;
            transform: translate(-50%,-50%);
            width: 95px;
            height: 95px;
            border-radius: 50%;
            border: 2px solid #000;
            animation: youcolor 2s linear forwards;
         }
         @keyframes youcolor{
            0%,30%{
                background-color: rgb(0, 0, 0);
            }
            100%{
                 background-color: rgb(144, 130, 183);

             }
}position: 絶対; 絶対位置
上: 50%;
左: 50%;
変換: 変換(-50 %,-50%); 中央揃え。
アニメーション: アニメーションを紫色になるように設定します。 forward: 最後のフレームのプロパティを継承します。
背景色: rgb(0, 0, 0); 黒
背景色: rgb(144, 130, 183); 紫。
13. 血車の目に似た、眼球の中央に黒い点を設定します:
.dian{
             position: absolute;
            top: 50%;
            left: 50%;
            background-color: #000;
            transform: translate(-50%,-50%);
            border-radius: 50%;
            z-index: 10;
            animation: youda 3s linear forwards;
         }
         @keyframes youda{
             0%{
                height: 0px;
            width: 0px;
             }
             100%{
                height: 15px;
            width: 15px;
             }
}14. 設定します。輪廻の目の各円を分割し、それが大きくなるようにアニメーションを設定します:
 .youYu{
            position: absolute;
          top: 50%;
          left: 50%;
          transform: translate(-50%,-50%);
       }
       .quan{
           position: absolute;
           border-radius: 50%;
           border: 2px solid #000;
           z-index: calc(1 - var(--r));
           animation: zhi 2s ease-out 2s forwards;
       }
       @keyframes zhi{
           0%{
            top: calc(var(--r) * 1px);
           left: calc(var(--r) * 1px);
           right: calc(var(--r) * 1px);
           bottom: calc(var(--r) * 1px);
           }
           100%{
            top: calc(var(--r) * -35px);
           left: calc(var(--r) * -35px);
           right: calc(var(--r) * -35px);
           bottom: calc(var(--r) * -35px);

               background-color: rgb(187, 177, 214);
           }
}z-index: calc(1 - var(–r)); 最初の円が になるように計算します。最上層に表示されます。
アニメーション: 輪廻転生の輪が徐々に大きくなり、同時に紫色になるアニメーションを設定します。
完全なコード:
Document
(学習ビデオ共有: css ビデオ チュートリアル)
以上が純CSSで血車目+転生目の特殊効果を実装する方法(詳細コード解説)の詳細内容です。詳細については、PHP 中国語 Web サイトの他の関連記事を参照してください。

ホットAIツール

Undresser.AI Undress
リアルなヌード写真を作成する AI 搭載アプリ

AI Clothes Remover
写真から衣服を削除するオンライン AI ツール。

Undress AI Tool
脱衣画像を無料で

Clothoff.io
AI衣類リムーバー

AI Hentai Generator
AIヘンタイを無料で生成します。

人気の記事

ホットツール

メモ帳++7.3.1
使いやすく無料のコードエディター

SublimeText3 中国語版
中国語版、とても使いやすい

ゼンドスタジオ 13.0.1
強力な PHP 統合開発環境

ドリームウィーバー CS6
ビジュアル Web 開発ツール

SublimeText3 Mac版
神レベルのコード編集ソフト(SublimeText3)

ホットトピック
 7519
7519
 15
15
 1378
1378
 52
52
 81
81
 11
11
 21
21
 68
68
 ブートストラップにスプリットラインを書く方法
Apr 07, 2025 pm 03:12 PM
ブートストラップスプリットラインを作成するには2つの方法があります。タグを使用して、水平方向のスプリットラインを作成します。 CSS Borderプロパティを使用して、カスタムスタイルのスプリットラインを作成します。
 ブートストラップに写真を挿入する方法
Apr 07, 2025 pm 03:30 PM
ブートストラップに画像を挿入する方法はいくつかあります。HTMLIMGタグを使用して、画像を直接挿入します。ブートストラップ画像コンポーネントを使用すると、レスポンシブ画像とより多くのスタイルを提供できます。画像サイズを設定し、IMG-Fluidクラスを使用して画像を適応可能にします。 IMGボーダークラスを使用して、境界線を設定します。丸い角を設定し、IMGラウンドクラスを使用します。影を設定し、影のクラスを使用します。 CSSスタイルを使用して、画像をサイズ変更して配置します。背景画像を使用して、背景イメージCSSプロパティを使用します。
 HTML、CSS、およびJavaScriptの役割:コアの責任
Apr 08, 2025 pm 07:05 PM
HTMLはWeb構造を定義し、CSSはスタイルとレイアウトを担当し、JavaScriptは動的な相互作用を提供します。 3人はWeb開発で職務を遂行し、共同でカラフルなWebサイトを構築します。
 ブートストラップのフレームワークをセットアップする方法
Apr 07, 2025 pm 03:27 PM
Bootstrapフレームワークをセットアップするには、次の手順に従う必要があります。1。CDNを介してブートストラップファイルを参照してください。 2。独自のサーバーでファイルをダウンロードしてホストします。 3。HTMLにブートストラップファイルを含めます。 4.必要に応じてSASS/LESSをコンパイルします。 5。カスタムファイルをインポートします(オプション)。セットアップが完了したら、Bootstrapのグリッドシステム、コンポーネント、スタイルを使用して、レスポンシブWebサイトとアプリケーションを作成できます。
 VueでBootstrapの使用方法
Apr 07, 2025 pm 11:33 PM
vue.jsでBootstrapを使用すると、5つのステップに分かれています。ブートストラップをインストールします。 main.jsにブートストラップをインポートしますブートストラップコンポーネントをテンプレートで直接使用します。オプション:カスタムスタイル。オプション:プラグインを使用します。
 ブートストラップボタンの使用方法
Apr 07, 2025 pm 03:09 PM
ブートストラップボタンの使用方法は?ブートストラップCSSを導入してボタン要素を作成し、ブートストラップボタンクラスを追加してボタンテキストを追加します
 ブートストラップの日付を表示する方法
Apr 07, 2025 pm 03:03 PM
回答:ブートストラップの日付ピッカーコンポーネントを使用して、ページで日付を表示できます。手順:ブートストラップフレームワークを紹介します。 HTMLで日付セレクター入力ボックスを作成します。ブートストラップは、セレクターにスタイルを自動的に追加します。 JavaScriptを使用して、選択した日付を取得します。


