この記事では、Nodejs のモジュール システムについて説明します。お役に立てば幸いです。

初期の JavaScript は、単純なページ インタラクション ロジックの実装に使用されていましたが、時代の発展により、ブラウザーはそうではなくなりました。シンプルなインタラクションのみを提供できるため、さまざまな Web サイトが輝き始めています。 Web サイトがより複雑になり始め、フロントエンド コードが増加するにつれて、他の静的言語と比較して、JavaScript のモジュール性の欠如 (名前の競合など) が明らかになり始めます。したがって、フロントエンド コードの保守と管理を容易にするために、コミュニティはモジュール仕様を定義し始めました。この過程で、CommonJS、AMD、CMD、ES modules などの多くのモジュール仕様が登場しました。モジュール化は CommonJS に基づいて Node に実装されています。
まず、Node の世界では、モジュール システムは CommonJS 仕様に準拠しています。 仕様 簡単に言えば、定義は次のとおりです。
オブジェクト#によって表されます。 ##Pass## を通じてモジュールを参照します##ノード モジュールの分類exports の違いについて話しましょう。 まず、新しいモジュールを使用して簡単な検証を実行します。
console.log(module.exports === exports); // true
module.exports と epxorts
が実際に同じ参照変数。demo1
// a模块
module.exports.text = 'xxx';
exports.value = 2;

// b模块代码
let a = require('./a');

console.log(a); // {text: 'xxx', value: 2}module.exports と が上記の
demo1 に渡される理由も検証されます。 属性を追加します。モジュールの導入時に両方とも存在します。最終的に同じ参照変数に属性を追加するためです。このデモに基づいて、次の結論を導き出すことができます: module.exports と exports 同じ参照変数を指します demo2
// a模块
module.exports = {
  text: 'xxx'
}
exports.value = 2;

// b模块代码
let a = require('./a');

console.log(a); // {text: 'xxx'}module.exports 値が再割り当てされました、exports
で属性が追加されましたが、モジュールの導入後、module.exports で定義された値が最終的にエクスポートされました。最終的に noed モジュールがエクスポートされたと結論付けることができます。 ##module.exports、および exports は、次のコードに似た module.exports への単なる参照です: <div class="code" style="position:relative; padding:0px; margin:0px;"><pre class='brush:php;toolbar:false;'>exports = module.exports = {};
(function (exports, module) {
// a模块里面的代码
module.exports = {
text: &#39;xxx&#39;
}
exports.value = 2;
console.log(module.exports === exports); // false
})(exports, module)</pre><div class="contentsignin">ログイン後にコピー</div></div>関数の実行により、エクスポートのみが参照されます。元の module.exports に対応する変数に値を代入します。module.exports に値を代入する場合、
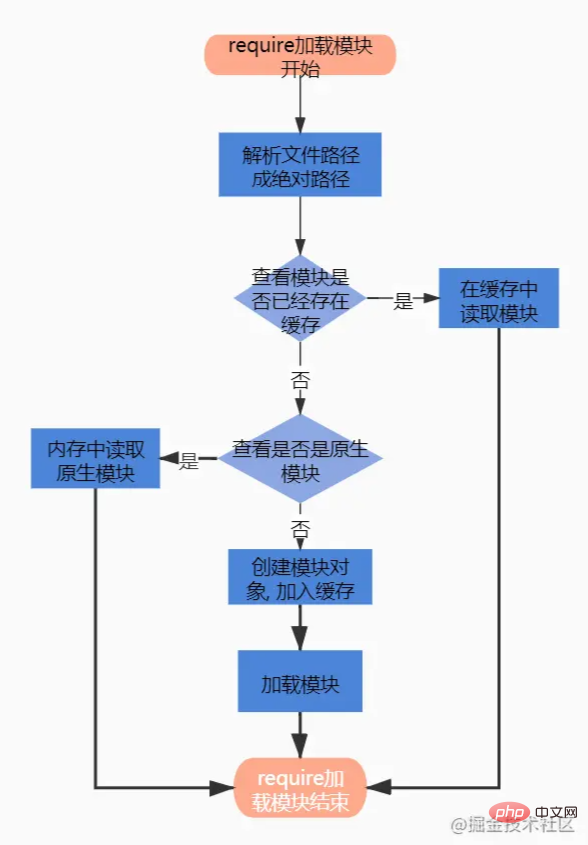
に対応する変数は最新の # と同じです。 ##module .exports は同じ変数ではありませんrequire メソッド##requireモジュールを導入するプロセスは主に次の 2 つに分かれています。次の手順:
.js,.json, .node后缀的文件)
Module.prototype.require = function(id) {
  // ...
  try {
    // 主要通过Module的静态方法_load加载模块
    return Module._load(id, this, /* isMain */ false);
  } finally {}
  // ...
};
// ...
Module._load = function(request, parent, isMain) {
  let relResolveCacheIdentifier;
  // ...
  // 解析文件路径成绝对路径
  const filename = Module._resolveFilename(request, parent, isMain);
  // 查看当前需要加载的模块是否已经有缓存
  const cachedModule = Module._cache[filename];
  // 如果有缓存, 则直接使用缓存的即可
  if (cachedModule !== undefined) {
    // ...
    return cachedModule.exports;
  }

  // 查看是否是node自带模块, 如http,fs等, 是就直接返回
  const mod = loadNativeModule(filename, request);
  if (mod && mod.canBeRequiredByUsers) return mod.exports;

  // 根据文件路径初始化一个模块
  const module = cachedModule || new Module(filename, parent);

  // ...
  // 将该模块加入模块缓存中
  Module._cache[filename] = module;
  if (parent !== undefined) {
    relativeResolveCache[relResolveCacheIdentifier] = filename;
  }

  // ...
  // 进行模块的加载
  module.load(filename);

  return module.exports;
};至此, node 的模块原理流程基本过完了。目前 node v13.2.0 版本起已经正式支持 ESM 特性。
在接触 node 中,你是否会困惑 __filename, __dirname是从哪里来的, 为什么会有这些变量呢? 仔细阅读该章节,你会对这些有系统性的了解。
Module.prototype._compile = function(content, filename) {
  // ...
  const compiledWrapper = wrapSafe(filename, content, this);
  //
  result = compiledWrapper.call(thisValue, exports, require, module,
                                    filename, dirname);

  // ...
  return result;
};function wrapSafe(filename, content, cjsModuleInstance) {
// ...
const wrapper = Module.wrap(content);
// ...
}
let wrap = function(script) {
return Module.wrapper[0] + script + Module.wrapper[1];
};
const wrapper = [
'(function (exports, require, module, __filename, __dirname) { ',
'\n});'
];
ObjectDefineProperty(Module, 'wrap', {
get() {
return wrap;
},
set(value) {
patched = true;
wrap = value;
}
});综上, 也就是之所以模块里面有__dirname,__filename, module, exports, require这些变量, 其实也就是 node 在执行过程传入的, 看完是否解决了多年困惑的问题^_^
package.json增加"type": "module"配置// test.mjs
export default {
a: 'xxx'
}
// import.js
import a from './test.mjs';
console.log(a); // {a: 'xxx'}较明显的区别是在于执行时机:
import导入的模块会先进行预解析处理, 先于模块内的其他模块执行// entry.js console.log('execute entry'); let a = require('./a.js') console.log(a); // a.js console.log('-----a--------'); module.exports = 'this is a'; // 最终输出顺序为: // execute entry // -----a-------- // this is a
// entry.js
console.log('execute entry');
import b from './b.mjs';

console.log(b);

// b.mjs
console.log('-----b--------');

export default 'this is b';
// 最终输出顺序为:
// -----b--------
// execute entry
// this is b
if代码块中),如果需要动态引入, 需要使用import()动态加载;ES 模块对比 CommonJS 模块, 还有以下的区别:
没有 require、exports 或 module.exports
在大多数情况下,可以使用 ES 模块 import 加载 CommonJS 模块。(CommonJS 模块文件后缀为 cjs)
如果需要引入.js后缀的 CommonJS 模块, 可以使用module.createRequire()在 ES 模块中构造require函数
// test.cjs
export default {
a: 'xxx'
}
// import.js
import a from './test.cjs';

console.log(a); // {a: 'xxx'}// test.cjs
export default {
a: 'xxx'
}
// import.js
import a from './test.cjs';
console.log(a); // {a: 'xxx'}// test.cjs
export default {
a: 'xxx'
}
// import.mjs
import { createRequire } from 'module';
const require = createRequire(import.meta.url);
// test.js 是 CommonJS 模块。
const siblingModule = require('./test');
console.log(siblingModule); // {a: 'xxx'}没有 __filename 或 __dirname
这些 CommonJS 变量在 ES 模块中不可用。
没有 JSON 模块加载
JSON 导入仍处于实验阶段,仅通过 --experimental-json-modules 标志支持。
没有 require.resolve
没有 NODE_PATH
没有 require.extensions
没有 require.cache
在 CommonJS 中引入 ES 模块
由于 ES Modules 的加载、解析和执行都是异步的,而 require() 的过程是同步的、所以不能通过 require() 来引用一个 ES6 模块。
ES6 提议的 import() 函数将会返回一个 Promise,它在 ES Modules 加载后标记完成。借助于此,我们可以在 CommonJS 中使用异步的方式导入 ES Modules:
// b.mjs
export default 'esm b'
// entry.js
(async () => {
	let { default: b } = await import('./b.mjs');
	console.log(b); // esm b
})()在 ES 模块中引入 CommonJS
在 ES6 模块里可以很方便地使用 import 来引用一个 CommonJS 模块,因为在 ES6 模块里异步加载并非是必须的:
// a.cjs
module.exports = 'commonjs a';
// entry.js
import a from './a.cjs';

console.log(a); // commonjs a
至此,提供 2 个 demo 给大家测试下上述知识点是否已经掌握,如果没有掌握可以回头再进行阅读。
demo module.exports&exports
// a模块
exports.value = 2;

// b模块代码
let a = require('./a');

console.log(a); // {value: 2}demo module.exports&exports
// a模块
exports = 2;

// b模块代码
let a = require('./a');

console.log(a); // {}require&_cache 模块缓存机制
// origin.js
let count = 0;

exports.addCount = function () {
	count++
}

exports.getCount = function () {
	return count;
}

// b.js
let { getCount } = require('./origin');
exports.getCount = getCount;

// a.js
let { addCount, getCount: getValue } = require('./origin');
addCount();
console.log(getValue()); // 1
let { getCount } = require('./b');
console.log(getCount()); // 1根据上述例子, 模块在 require 引入时会加入缓存对象require.cache中。 如果需要删除缓存, 可以考虑将该缓存内容清除,则下次require模块将会重新加载模块。
let count = 0;

exports.addCount = function () {
	count++
}

exports.getCount = function () {
	return count;
}

// b.js
let { getCount } = require('./origin');
exports.getCount = getCount;

// a.js
let { addCount, getCount: getValue } = require('./origin');
addCount();
console.log(getValue()); // 1
delete require.cache[require.resolve('./origin')];
let { getCount } = require('./b');
console.log(getCount()); // 0至此,本文主要介绍了 Node 中基于CommonJS实现的模块化机制,并且通过源码的方式对模块化的整个流程进行了分析,有关于模块的介绍可查看下面参考资料。有疑问的欢迎评论区留言,谢谢。
##元のアドレス: https://juejin.cn/post/7007233910681632781プログラミング関連の知識について詳しくは、著者:
プログラミング ビデオをご覧ください。 !
以上がNodejs のモジュール システムを 1 つの記事で素早く理解するの詳細内容です。詳細については、PHP 中国語 Web サイトの他の関連記事を参照してください。