Angular で DOM 要素を操作する方法について説明する記事
Angular で DOM 要素を操作するにはどうすればよいですか?次の記事では、angular で DOM 要素を操作する方法を紹介します。

DOM 要素を Angular で取得するには、
JavaScript のネイティブ APIを使用するか、jQuery を導入してjquery を通じて DOM を操作します。 objectですが、angular は DOM 要素を取得するための対応する API (ElementRef) を提供しているため、ネイティブ API や jQuery を使用する必要はありません。 [関連チュートリアルの推奨事項: "angular チュートリアル"]
ElementRef DOM 要素を取得します
1. TestComponent# を作成します# #コンポーネント、テンプレートは次のとおりです: test.component.html
<div>
	<p>你好</p>
</div>
<div>
    <span>世界</span>
</div>
<h1 id="标题">标题</h1>
<pass-badge id="component" textColor="red">组件</pass-badge>test.component.ts ファイルを記述します
import { Component, OnInit } from '@angular/core';
// 1、导入 ElementRef 类
import { ElementRef} from '@angular/core';
import { PassBadge } from './compoment/pass-badge/pass-badge.component'

@Component({
  selector: 'app-test',
  templateUrl: './test.component.html',
  styleUrls: ['./test.component.css'],
  declarations: [ PassBadge ]
})
export class TestComponent implements OnInit {
	// 2、将 ElementRef 类注入 test 组件中
    constructor(private el:ElementRef) {}

    ngOnInit() {
    	// 3、获取 DOM 元素
        console.log(this.el.nativeElement)
        console.log(this.el.nativeElement.querySelector('#component'))
    }
}this.el.nativeElement が何であるかを見てみましょう
 したがって、
this.el.nativeElement.querySelector( '#component' ) を使用して、対応する DOM 要素を操作します。たとえば、テキストの色
this.el.nativeElement.querySelector('#component').style.color = 'lightblue'
テンプレート変数を変更してDOM要素を取得できます
コンポーネントを変更します。ViewChild##を通じてコンポーネントを取得できます。 #、##ContentChild
TestComponent、ViewChildren、およびContentChildren# も同様です。
<div>
    <p>你好</p>
</div>
<!-- 1、给元素加入模板变量 div -->
<div #div>
    <span>世界</span>
</div>
<h1 id="标题">标题</h1>
<!-- 给组件加入模板变量 component -->
<pass-badge #component textColor="red">组件</pass-badge>2 のように、対応する要素にテンプレート変数を追加します。test.component.ts を次のように変更します: import { Component, OnInit } from '@angular/core';
import { ElementRef} from '@angular/core';
// 2、引入ViewChild
import { ViewChild } from '@angular/core'
@Component({
selector: 'app-test',
templateUrl: './test.component.html',
styleUrls: ['./test.component.css']
})
export class TestComponent implements OnInit {
constructor(private el:ElementRef) {}
// 3、获取元素
@ViewChild('component') dom: any;
@ViewChild('div') div: any;
ngOnInit() {
console.log(this.dom) // PassBadgeComponent
this.dom.fn() // 调用 passbadge 组件的 fn 方法
console.log(this.div) // ElementRef
this.div.nativeElement.style.color = 'lightblue' // 文字颜色修改为淡蓝色
}
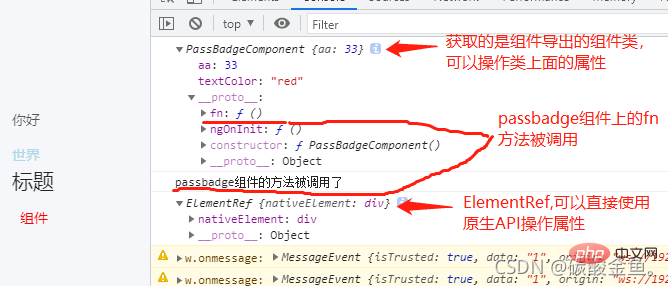
}最終結果は次のとおりです
 結果から、
結果から、
テンプレート変数を使用してコンポーネント要素を取得すると、取得されるのはエクスポートされたコンポーネント クラスであることがわかります。 (上記の例はをご覧ください。 !PassBadgeComponent
テンプレート変数を使用して html 要素を取得する場合、取得されるクラスは) 現時点では、コンポーネントに含まれるプロパティのみを操作できます。ViewChildElementRef
プログラミング ビデオ型になりますが、このときthis を渡すことができます。 div.nativeElement.querySelector('span')および要素を操作するためのその他のネイティブ APIプログラミング関連の知識の詳細については、
以上がAngular で DOM 要素を操作する方法について説明する記事の詳細内容です。詳細については、PHP 中国語 Web サイトの他の関連記事を参照してください。

ホットAIツール

Undresser.AI Undress
リアルなヌード写真を作成する AI 搭載アプリ

AI Clothes Remover
写真から衣服を削除するオンライン AI ツール。

Undress AI Tool
脱衣画像を無料で

Clothoff.io
AI衣類リムーバー

AI Hentai Generator
AIヘンタイを無料で生成します。

人気の記事

ホットツール

メモ帳++7.3.1
使いやすく無料のコードエディター

SublimeText3 中国語版
中国語版、とても使いやすい

ゼンドスタジオ 13.0.1
強力な PHP 統合開発環境

ドリームウィーバー CS6
ビジュアル Web 開発ツール

SublimeText3 Mac版
神レベルのコード編集ソフト(SublimeText3)

ホットトピック
 7530
7530
 15
15
 1378
1378
 52
52
 82
82
 11
11
 21
21
 76
76
 Angular のメタデータとデコレータについて話しましょう
Feb 28, 2022 am 11:10 AM
この記事では、Angular の学習を継続し、Angular のメタデータとデコレータを理解し、それらの使用法を簡単に理解します。
 Ubuntu 24.04 に Angular をインストールする方法
Mar 23, 2024 pm 12:20 PM
Angular.js は、動的アプリケーションを作成するための無料でアクセスできる JavaScript プラットフォームです。 HTML の構文をテンプレート言語として拡張することで、アプリケーションのさまざまな側面を迅速かつ明確に表現できます。 Angular.js は、コードの作成、更新、テストに役立つさまざまなツールを提供します。さらに、ルーティングやフォーム管理などの多くの機能も提供します。このガイドでは、Ubuntu24 に Angular をインストールする方法について説明します。まず、Node.js をインストールする必要があります。 Node.js は、ChromeV8 エンジンに基づく JavaScript 実行環境で、サーバー側で JavaScript コードを実行できます。ウブにいるために
 Angular Learning State Manager NgRx の詳細な説明
May 25, 2022 am 11:01 AM
この記事では、Angular のステートマネージャー NgRx について深く理解し、NgRx の使用方法を紹介します。
 Angular のサーバーサイド レンダリング (SSR) について説明する記事
Dec 27, 2022 pm 07:24 PM
Angular Universal をご存知ですか?これは、Web サイトがより優れた SEO サポートを提供するのに役立ちます。
 Angular で Monaco エディターを使用する方法の簡単な分析
Oct 17, 2022 pm 08:04 PM
Angularでモナコエディタを使用するにはどうすればよいですか?以下の記事は、最近業務で使用したangularでのmonaco-editorの使い方を記録したものですので、皆様のお役に立てれば幸いです。
 Angular + NG-ZORRO でバックエンド システムを迅速に開発
Apr 21, 2022 am 10:45 AM
この記事では、Angular の実践的な経験を共有し、angualr と ng-zorro を組み合わせてバックエンド システムを迅速に開発する方法を学びます。
 フロントエンド開発に PHP と Angular を使用する方法
May 11, 2023 pm 04:04 PM
インターネットの急速な発展に伴い、フロントエンド開発テクノロジーも常に改善され、反復されています。 PHP と Angular は、フロントエンド開発で広く使用されている 2 つのテクノロジーです。 PHP は、フォームの処理、動的ページの生成、アクセス許可の管理などのタスクを処理できるサーバー側スクリプト言語です。 Angular は、単一ページ アプリケーションの開発やコンポーネント化された Web アプリケーションの構築に使用できる JavaScript フレームワークです。この記事では、PHPとAngularをフロントエンド開発に使用する方法と、それらを組み合わせる方法を紹介します。
 Angular の独立したコンポーネントの簡単な分析とその使用方法を説明します。
Jun 23, 2022 pm 03:49 PM
この記事では、Angular の独立コンポーネント、Angular で独立コンポーネントを作成する方法、および既存のモジュールを独立コンポーネントにインポートする方法について説明します。


